Creating a bootable Linux flash drive from iso. Creating a Bootable USB Flash Drive for Linux Mint
Probably most of you might have thought about the problem of preparing a bootloader. flash drives with operating system Linux on board and subsequently install the Ubuntu system from a flash drive. In this article we will be able to look in detail at how to do this in an already installed Linux. Read about how to create a bootable USB flash drive in Windows here:. Well, let's go :)
All we may need is an empty flash drive with a volume of information entered of at least 2 Gigabytes, an image ISO some kind of disk with a Linux system, an Internet connection and some free time.
Well, of course, the first thing we do is (in no case insert a flash drive) we install special software, namely a software application under a somewhat unusual name UNetBootin. This is an excellent software application designed to create bootable flash drives from ISO images. There is nothing superfluous in it, it is easy to manage and it is also available in the repository storage Ubuntu.
Let's install it now:
sudoapt–getinstall unet-bootin
And after waiting for a few minutes, you can already launch this program:
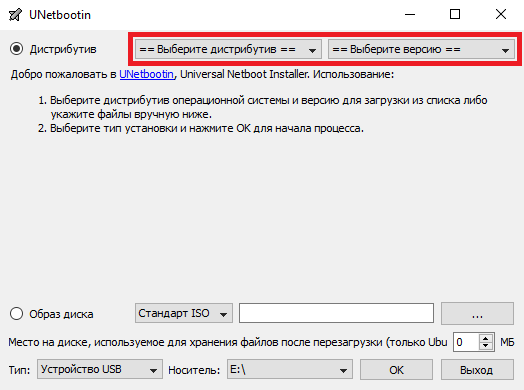
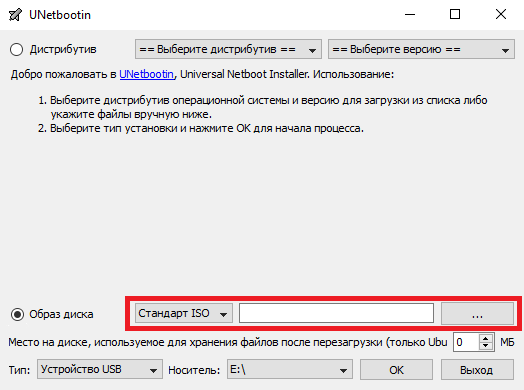
This software application also has the ability to create bootable flash drives, even if you do not have an ISO image with the Linux operating system at hand. It will simply be copied from the Internet and then copied to a flash drive. In order to do this in the above software application, it will be necessary to select the top “distribution” checkbox, then select the required Linux distribution and select the version of this distribution. True, we already have our own ISO image. For this reason, we select the second “image” checkbox, select our image format - ISO from the list of formats (in case it suddenly isn’t the default), then press the “...” button and look for it on the hard drive our personal computer.
There is also the possibility of creating an image manually (by specifying your initrd, kernel and the use of additional options), but all this goes very far beyond the scope of our article today, and we don’t need it.
That’s it, we have already selected the image, then we must make our choice on the “Type” item – USB drive to indicate our flash drive on which we will record our image “Disk: /nodiv/sdb2” and click on Ok button. That's it, the process has begun! If you made your choice on the top checkbox, the image recording process may take much longer, since the image must first be downloaded to the hard drive, and then it will be recorded. This concludes our article. Good luck.
Linux Mint is one of the popular distributions of this operating system, which is developed by the community. It is based on Ubuntu, which makes it friendly even to users with no Linux experience and at the same time quite flexible and easy to configure.
From this article you will learn how to create a bootable USB flash drive with Linux Mint in various operating systems using the software available for them and how to mark up a permanent storage partition on this flash drive to save user files, OS options and installed programs. In the final part of the article, we will briefly talk about customizing Linux Mint on a flash drive.
Creating a Bootable USB Flash Drive for Linux Mint
First we need to download the distribution we need. This can be done from the official website at https://linuxmint.com/download.php. You can choose from 32-bit and 64-bit images with various graphical environments: Cinnamon, MATE, Xfce and KDE. For this article we use the distribution with the first of them. Now let's look at creating a flash drive in two operating systems.
How to burn Linux Mint to a USB flash drive in Windows
Rufus is the most convenient program for recording Live images to USB devices, running on any version of Windows. Even the Ubuntu developers on the distribution's official website recommend using it. Rufus is easy to use and supports Russian language.
First of all, download the program itself from its website https://rufus.akeo.ie, a portable version is suitable for our purposes. Launch the downloaded file.
The USB flash drive was automatically detected, but if you have several USB storage devices connected at the same time, select the one you need from the list.
Click the optical drive icon and select the Linux Mint image file.

We see that the volume label was added automatically after this. You don’t need to change anything else in the settings, just click "Start".

A warning appears that the file is an ISOHybrid image. Leave the recommended mode and just click “OK”.
Check to see if there are any files on the flash drive that need to be transferred to your hard drive. If there is no important information there, then when further pop-up warnings appear, click "OK".
We are waiting for the process to complete. That's it - the creation of a bootable Linux Mint flash drive is complete.
How to make a bootable Linux Mint USB flash drive in Linux
A very simple way is to use a GUI utility called Etcher. First, download the utility archive from etcher.io. Linux builds of this program are distributed in the AppImage format, which contains executable files and does not require installation. In any distribution, it is enough to unpack this file from the archive and run it by double-clicking.

Click "Select Image" and select the image file.

If more than one flash drive is connected to your computer, you can select the one you need by clicking "Change" under the external hard drive icon. Next click "Flash!", enter the administrator password and wait for the end of recording and verification of files. Ready!
Another option for recording an image. First, we need to find out what device ID is assigned to the flash drive we need. Open a terminal and write:

The required flash drive can be found by size in gigabytes. In this example it is /dev/sdb.
sudo dd bs=4M if=path_to_image_file of=/dev/sdb(device identifier) status=progress
In this example, this line would look like
sudo dd bs=4M if=~/Downloads/linuxmint-18.3-cinnamon-32bit.iso of=/dev/sdb status=progress

Once the copying is complete, the Linux Mint bootable USB flash drive will be ready.
Setting up persistent storage
The portable system on USB-Flash is quite useful. You can boot from it to work on any computer, and, if necessary, install Linux on it. But there is one drawback: any changes made to the system, created files and installed programs will not be saved when restarted. One way to solve this problem is to simply install Linux on a flash drive, like a regular hard drive. But this solution has many disadvantages:
- Pocket USB drives are not optimized for handling many small files.
- The installation will take a very long time.
- The main feature of LiveUSB is lost - installing an operating system from it.
In order to combine the advantages of the two solutions, you can create a separate partition on a flash drive in which user data will be saved. We will do this from Linux using the Gparted and MultiSystem programs. First you need to install them.
Gparted is installed on the system by typing the command in the terminal
sudo apt-get install gparted

MultiSystem is installed with the following lines:
sudo apt-add-repository "deb http://liveusb.info/multisystem/depot all main"
wget -q -O - http://liveusb.info/multisystem/depot/multisystem.asc | sudo apt-key add -
sudo apt update

sudo apt install multisystem

Launch Gparted. In the upper right corner, select our flash drive (here - dev/sdb/).

If there is some section or several, right-click on each of them and click first "Unmount", and then "Delete".

This will be the partition for the OS image. We specify the size as 2500, select fat32 as the file system. Confirm the dialogue with the button "Add".

Further also through the command "New" We create a permanent storage partition on the remaining unallocated space. It can be expanded to cover all free space on a flash drive; it is best to use it as a file system ext2. But the most important thing here is to be sure to set the disk label casper-rw.

Next, select the menu item "Edit" -> "Apply All Operations", click “Apply” to agree to delete data from the flash drive, wait for the procedures to complete and close Gparted. After this, you need to pull out the flash drive and insert it back so that the new partitions are mounted. Now we launch Multisystem, select our device there and click "Confirm".

The program will write that the main partition label is not assigned and ask after clicking "OK" Pull out and insert the flash drive again. Let's do it.

Launch Multisystem again and press again "OK", agreeing to install the Grub boot loader.

The program has started. Click on the CD icon at the bottom left, select the image file, enter the administrator password and wait for the copying to complete.

Again, select the name of the image, write in the empty input field persistent and click “Backup”. Enter the administrator password again and wait for the process to complete.

That's it, now you know how to make a bootable Linux Mint flash drive with the ability to save user data.
Setting up Linux Mint on a flash drive
Next, you can start setting up the resulting LiveUSB. To do this, reboot the computer and boot from it. The first step is to translate the environment into Russian. Open the start menu -> "Preferences" -> "Languages".

A window like this appears.

In it, select “Install / Remove Languages...”, in the next window click "Add...", looking in the list "Russian, Russia UTF-8" and confirm the installation with the button "Install".
The initial window opens again, but now in the lists of languages and regions we change the American flag to Russian and click "Apply System-Wide".

Reboot the computer. We are greeted with a proposal to translate the names of folders with personal files into Russian. You can agree ( "Update Names"), or you can leave them in English ( "Keep Old Names").

The system is Russified. Next, you need to install the software you need. For example, let's install the popular Chromium browser (the open source version of Chrome). Go to the start menu -> "Administration" -> "Program Manager".

A convenient application opens, which is not difficult to understand.


In the same way, you can select from the catalog and install any other software you need.
conclusions
It turned out to be not at all difficult to burn Linux Mint to a flash drive, just follow the instructions. And if you mark up a persistent partition when creating a LiveUSB, then when booting from such a flash drive you can save OS settings and user files, and install additional programs. To Russify the OS, a few clicks are also enough, because Mint is a friendly and easy-to-use system that natively supports the Russian language.
Bootable flash drives are always useful. The computer is broken, the OS is running slowly, you need to install Linux... There are thousands of such situations, but there is only one solution. In this article we will look at how to make a bootable Linux USB flash drive.
Rufus is the most common and secure recording option. The second one behind it is UltraISO - if any problems arise, you should use it. Well, if he didn’t help, then UNetBootIn will come to the rescue.
Making a bootable USB flash drive using Rufus
Rufus is a program for Windows that allows you to create a boot disk, including Linux. In order to create a bootable USB flash drive, first download Rufus. Now you need to download the desired Linux distribution as an ISO image. After the download is complete, launch the program.
We leave all the parameters as default, just select the disk we need and instead of FreeDOS, select the ISO image and indicate the path to it with the button to the right of the list. For example, an Ubuntu 16.04 installation would look like this:

Click “Start”. All! Now you have your own bootable USB flash drive. Read below for information on how to launch it.
Making a bootable USB flash drive via UNetBootIn
UNetBootIn is a cross-platform application designed to create boot disks for Linux distributions. You can download it.
In order to create a bootable USB flash drive, there are two ways. The first is to select a distribution from the list above:
The second way is to download the image and select it in the field below:
After selection, click “OK”. The bootable flash drive will be installed.
Important! It’s better to download the ISO image of the system yourself, otherwise the program does not guarantee its newness and relevance!
Creating a bootable USB flash drive using UltraISO
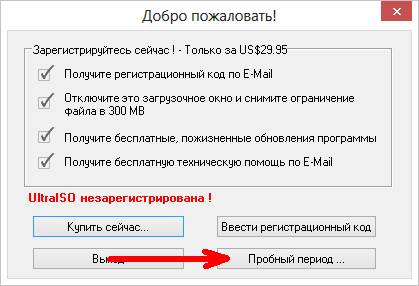
UltraISO is a paid program for working with ISO images. To create a bootable USB flash drive, you can use the trial version of the program.
Download the program from the official website. After installation, we will choose to use the 30-day trial period.
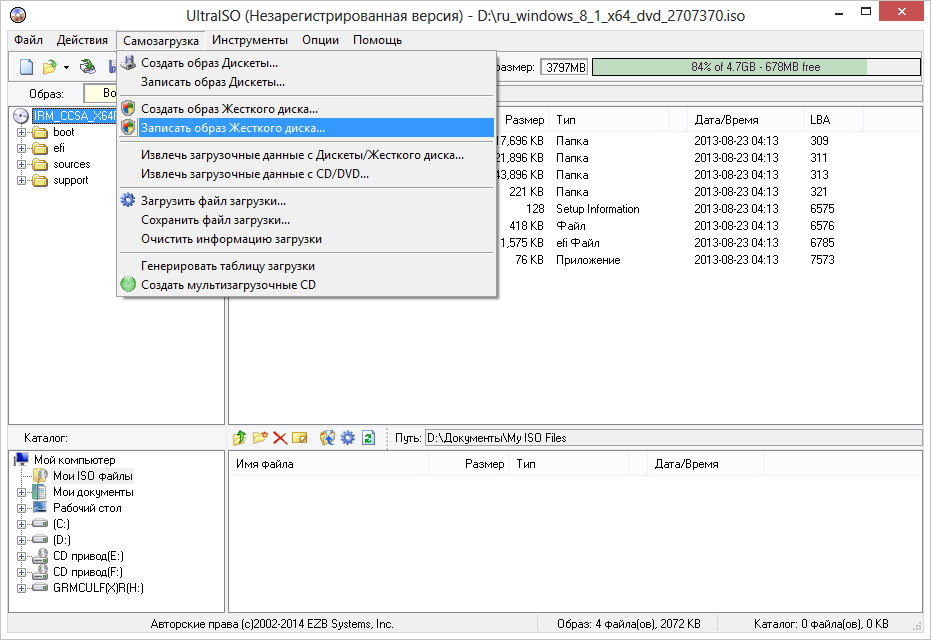
Now let’s open the pre-downloaded ISO image:

To create a bootable USB flash drive, you need to find the “Boot” menu and select “Burn hard disk image” in it:
Here we select the desired disk, and also select the USB-HDD+ v2 recording method - it guarantees the flash drive will work in almost any BIOS:

Click “Record”. A warning about formatting the flash drive will appear. Click "OK".

That's it, the process has begun. We are waiting for the recording to finish.
How to boot from a flash drive via BIOS
To launch the BIOS, use one of the following keys (listed in order of decreasing probability of operation).
- DELETE
Important! If you have a Lenovo laptop, then try using the Fn + F12 combination!
First, you need to understand the very concept of what is a bootable Linux flash drive? This topic is very popular; almost everything can be found on the Internet.
Option #1. Creating a bootable USB flash drive in UNetbootin
UNetbootin is a program for installing Linux without CD/DVD.
This utility allows you to install it on your computer or, otherwise, create a bootable Flash disk with special Linux/BSD distributions previously downloaded from the Internet.
Installation can be done either through Windows or Linux.
The program is installed on most Linux distributions, namely: Ubuntu, Fedora, openSUSE, CentOS, Debian, Linux Mint, Arch Linux, Mandriva, Slackware, FreeDOS, FreeBSD, NetBSD and their varieties).
- Before you start working with this utility, you need to format (clean) the USB drive; it is best to select the FAT32 file system. How to do this is shown in the illustration below:

- After cleaning the Flash media, you need to run the UNetbootin program. As already mentioned, this program allows you to burn a Live CD/DVD from the Internet, showing only the distribution and its version:

- To write a disk image of the operating system (in the example, the downloaded distribution is Debian Wheezy, you can find any other) onto a USB drive, select the “Disk Image” item, then activate the “ISO Standard”, also do not forget to indicate the path to the distribution with the extension .ISO, and also indicate the type of device and the media itself (as shown in the figure).
The characteristics have been selected, now you need to click the “OK” button, the procedure for extracting and duplicating files occurs automatically. This process will take 5-10 minutes.

- After unpacking the necessary files, the program will automatically install the bootloader and notify you when the bootable USB flash drive is ready.
If you wish, you can immediately install the Linux OS; to do this, you need to restart the computer and select in the BIOS to boot the system via a USB drive.

If installation is not required, then there is no point in restarting the computer; you should click on the “Exit” button. All! As you can see, it's not difficult at all.
Your bootable Linux flash drive is ready to go.
Option #2. Creating a bootable USB flash drive in Universal USB Installer
Unlike the first one, this program formats removable media spontaneously.
Let's look at this program in more detail.
- You need to install and run the Universal USB Installer program.
- The first step shows a list of Linux operating systems. Select the Linux that you want to use on the flash drive; if the one you need is not there, then indicate “Try Unlisted Linux ISO”.
- The second step is to go to the pre-downloaded Linux distribution on your computer; if you did not select the folder yourself, then look for it in the Downloads folder.
- The third step is to indicate our flash drive, usually an H drive, followed by the name of your device.
We check everything again and click the “Create” button.

- Next, a warning will appear telling you to close all unnecessary windows, close everything and click next.
The program will automatically format the USB drive, create the MBR boot area, change the volume label to the UUI name and install the Linux operating system image. We only need to confirm the action by clicking on the “Yes” button.

- Afterwards, the procedure for installing data on removable media is observed, as shown in the figure; literally in 5 minutes everything will be ready.

- The program completes the installation process on its own, see the figure below.

That's it, another bootable Linux flash drive has been created!
Option #3. Creating a bootable USB flash drive using the Xboot utility
In this case, the option of creating it using the Xboot utility is considered.
This program does not require installation on a computer; it can be launched immediately by first downloading it from the Internet.

The interface of this utility is quite simple.
To add images, you need to transfer the iso files (Linux OS distributions) of each image to the main part of the program window, or click on File-open, as shown in the figure.

After the path to the image has been indicated, a window will open with the question: how to perceive this image?
Since we are making a bootable flash drive for Linux, we choose Utilitu - Ubuntu, but if you are making a flash drive for Windows!! select Add using Grub4dos ISO image Emulation.
Please note that the option to add Windows is selected by default.

A huge plus of this program is that, along with the system, you can install various antiviruses on a bootable USB flash drive, such as: Dr.Web, Live CD, Kaspersky Rescue Disc.
In the future, they will help protect your computer from Trojans, viruses and other nasty things.

Utilities that come with the program
As shown in the figure above, the program offers various utilities for both Linux OS and Windows.
Xboot is not installed on your computer, so all the utilities you select will be downloaded automatically from the Internet, you will only need to confirm all actions, all steps are shown in the pictures.


To make it convenient for you to work with images, write a name for each. For example: Linux 1 WT, Linux 2 Mouse, Linux 3 Android.

Check all the steps again when everything is ready and if you are sure that you have not missed anything, then select the option to write to a USB drive (do not confuse making a bootable DVD), before use you need to clear the flash in FAT32.
If you don’t know English well, then find two buttons at the bottom of the window, when you click the Create ISO button you will make a bootable DVD, but we need to click – Create USB.
Users of the Windows operating system can very easily create a bootable USB flash drive with an Ubuntu image on it. To do this, you can use special software.
To burn Ubuntu, you need to have an ISO image of the operating system, which will be stored on removable media, as well as the drive itself. It is important to understand that all data on the USB drive used will be erased.
Before creating a bootable USB flash drive, download the distribution of the operating system itself. We recommend doing this exclusively on the official Ubuntu website. There are many advantages to this approach. The main one is that the downloaded operating system will not be damaged or unfinished. The fact is that when downloading an OS from third-party sources, it is likely that you will download an image of a system modified by someone else.
If you have a flash drive from which you can erase all data and a downloaded image, use one of the methods listed below.
Method 1: UNetbootin
This program is considered the most basic in matters of recording Ubuntu to removable media. It is used most often. You can read how to use it in the lesson on creating a bootable drive (method 5).
We skip point 3 in LinuxLive USB Creator and do not touch it.
As you can see, the program has a rather interesting and non-standard interface. This, of course, is attractive. A very good move was adding a traffic light near each block. A green light on it means that you did everything correctly and vice versa.
Method 3: Xboot
There is another very unpopular, “unpromoted” program that does an excellent job of writing an Ubuntu image to a flash drive. Its huge advantage is that Xboot is capable of adding not only the operating system itself, but also additional programs to the bootable media. These can be antiviruses, all kinds of startup utilities, and the like. Initially, the user does not need to download the ISO file and this is also a big plus.
To use Xboot, follow these steps:

So, creating a bootable USB flash drive with an Ubuntu image is very easy for Windows users. This can be done in just a few minutes and even a novice user can cope with this task.


