Creating advanced animation in Photoshop: Learning new techniques. Motion Animation
In this article, we'll combine everything we've learned so far to learn several new animation techniques in Photoshop. Let's look at how to use different combinations of adjustment layers and filters for animation, how to create complex movement of animation layers and natural-looking effects.
Using a template layer with smart object animation
Since smart objects can contain multiple layers, we can create temporary layers, which helps us create more complex animations. For example, in the animation effect below, I created a red dot that moves in a circle. This effect is usually not easy to create and requires a lot of keyframes. With the help of smart objects we can use template layers and simplify the whole process.
Let's look at how this is done:
In the scene below I have created two layers: one with a red dot ( "Dot"), and the second with a large gray circle ( "Template Shape"). I've added separator marks to the large gray circle to better demonstrate the effect of the movement:
Step 1: A scene consisting of two layers: a red dot and a large gray circle. ( Larger version)
First, I select both layers and convert them into a smart object by right-clicking on one of the selected layers and selecting " Convert to Smart Object»:

Step 2: Convert the layers into a smart object. ( Larger version)
Now we can animate both layers as one. Since this is a Smart Object, I have access to the Transforms property in the Timeline panel, which allows me to set a keyframe for the rotation. I added a frame for each half rotation to create one full rotation. As a result, I got a circle rotating around its axis:
Step 3: Both Layers Rotate As One
Now that our animation is working, we need to delete the template shape. To do this, double-click on the smart object thumbnail in the layers palette. With the smart object open, we can hide the “Template Shape” layer:

Step 4: Hide the "Template Shape" layer. ( Larger version)
Before making a completely animated banner in Photoshop, all we have to do is save the smart object document and return to the original document. We will see that the red dot moves in a circle without the gray shape:
The red dot moves in a circle
Nesting Animation in Smart Objects
Smart objects can consist of layers of any type ( or several types). Including layers that already contain animation keyframes. Let's look at how this is implemented:
Bouncing dot animation created using multiple sets of keyframes
In the scene below, I've already created a simple animation of a yellow dot spinning on a blue background:
Step 1: Yellow Dot Spinning on Canvas

Step 2: Convert the yellow dot layer into a smart object. ( Larger version)
We have a new smart object layer and we can add a new set of frames to it. In the scene below, I've added a set to animate the smart object moving up and down. Here we can see both sets of keyframes in action, which create the bouncing effect:
Step 3: New Keyframes Create a Bouncing Effect
Convert this smart object layer into another smart object that we can edit. Next we will add a Transformation property to this smart object. Go to Editing > Free Transformation, and use anchor points to reshape the smart object so that it appears in perspective.

Step 4: Convert Animation. ( Larger version)
The smart object's transformation will now be displayed when the animation plays. This is one of the main ways to make an animated picture in Photoshop:
Playing an animation with transformation
Filter Animation
If we add a filter to a smart object that contains an animated layer, we get an animation that plays through the filter. Let's look at how this works.
In the below scene I have already created a simple point animation ( inside a smart object), moving on a red background:
Step 1: Animate a Smart Object, a Yellow Dot Moving on a Red Background
Since our animation is already inside the smart object, I can add the filter directly to it. I'm moving to Filter > Distort > Twist:

Step 2: Apply the Twist filter to the smart object animation. ( Larger version)
When you watch this animation, you'll see some interesting things happening. The filter was applied to the smart object itself, not to the pixels of its content. This gives animated pixels moving through the filter a unique effect:
Animating the Twist filter
Adding Layer Styles to a Smart Object Animation
In the scene below, I already have a smart object that contains a simple animation of a dot moving on a white background:
Step 1: Simple Smart Object Animation
I want to apply an Emboss layer style to this point. But if I now try to apply a layer style to a smart object, it will affect all of its contents:
Step 2: Layer Styles Applied to the Image as a Whole
To fix this I need to remove the white background. Earlier I told you that we can modify the smart object to hide additional layers. In this example I want to demonstrate a different method.
As long as there is a strong tonal contrast between the layers, we can use the Blend If option to remove the background. Double-click the smart object layer to open the Layer Styles panel, and move the Overlay If slider until the background disappears:

Step 3: Set up the Overlay If slider. ( Larger version)
After that, right-click on the layer in the Layers palette and select “Convert to Smart Object”. We will get a new smart object that will save the changes we made:

Step 4: Convert to Smart Object. ( Larger version)
When we add a layer style set to the animation, the effect will only apply to that object:
Layer styles added to smart object animation
Changing Animation Using Adjustment Layers
Adjustment layers affect animated layers in the same way as regular ones. If an adjustment layer is placed on top of a layer containing keyframes, the animation inherits the adjustments. With this in mind, we can use adjustment layers to create unique effects.
In the scene below, I created a simple animation with two points, one moving past the other:
Step 1: Two Point Animations
Since the entire scene is in grayscale, I use a Gradient Map adjustment layer to introduce the colors. You can then use the Properties panel to make the following adjustments:

Step 2: Settings for the Gradient Map Adjustment Layer ( Larger version)
As a result, we got an animation effect, which was colored using the properties of the adjustment layer:
The animation was colored using an adjustment layer
Create natural effects using adjustment layers
Now that we've learned several techniques for creating animation in Photoshop, I want to combine some of them to create the natural effect below:
Natural animation effect
First I created another simple animation with two layers, one of which moves relative to the other. The only difference is that both layers were blurred.
Important note. If you need to quickly create simplest animation from several frames in Photoshop, go to the lesson - .
I have been interested in stop-motion animation for quite a long time, although I have studied little material. All the books that I started reading were quite long, difficult and “dry”.
Therefore, after I began to understand a little about the technology of creating animations, I began to look for ways to bring them to life using Photoshop.
Many people advised me to switch to other programs (for example, TVP Animation Pro), but I, not wanting to adapt to the new interfaces of other programs, decided to do everything in Photoshop.
And I wrote this lesson specifically for those who did not understand the technology of creating frame-by-frame animations specifically in Photoshop. Who didn’t want to dig a little and understand what’s what?
I will touch on two topics: short animations and long ones. You should not scroll through the type of animations that are not interesting to you: there may be information there that will be useful to you for animations of the type you need.
Short animations– these are animated avatars, emoticons, etc.
Long animations– these are cartoons, videos, etc.
First I will tell you the theory and then we will create animation in practice.
Important addition
Many people ask: “Why is my animation so jerky, why is my character/object moving fast/slow?”
The answer is: your character/object moves fast because you drew few frames.
Your character/object is moving slowly because you drew a lot of frames.
Your character/object is jerking because you didn't follow the previous movement and drew the next one, which is not consistent with the previous one.
Remember: in one second 24 frame!
So when you get ready to create your animation, remember: 24 frame = 1 second, 24 frame = 1 second. Never forget this very important detail.
Short animations
I think you have often come across animations on avatars, animated emoticons.
Some emoticons are made in Flash, but I draw mine in Photoshop. Don't think that such short animations are easy to make. On the one hand, yes, they are small in size, but on the other hand, while you draw these 15
-30
frames, you'll get busy (imagine, if you want to create a three-minute clip, then you'll have to do 4320
frames!).
What should you remember and know?
Let's say you wanted to draw a girl with wind-blown hair for your avatar. Means:
Firstly, hair is not cardboard - under the influence of a moderate wind, it will form transverse waves.
This is roughly how it is shown in the diagram:

Under the influence of a strong wind, the hair will be almost straight, but your character will have to close his eyes tightly and grab onto something to avoid being blown away, since in reality few people can withstand such wind. although this type of animation can be used when your character is riding a bike, for example.
And finally, a gentle breeze gently lifts and lowers your hair.
Light wind:
Medium wind:
Strong wind:
The same applies to fabric and clothing - they will behave in much the same way as hair.
And now, for example, you wanted to draw an animation with the movement of your character and object. Means:
Secondly, any action begins somewhere. Have you ever noticed that, for example, to get up from a chair, you first move it a little and lean forward a little, and only then get up? or that when you want to make a hit with the racket, you first move it away and turn your body with it, and only then make a hit?
There are a huge bunch of such examples, but it’s better to look:

To avoid getting into trouble with these movements before actions(DPD), analyze and observe the movements of people or animals more often.
Small addition
In general, never forget about physics. The weight of objects, the materials from which they are made (elasticity, softness, hardness, etc.), all this is needed.
Realize that without this, your animation will be dead, terrible and ugly!
Better work on it and never rush.
Long animations
Oooh, this is where the fun begins!
Have you often, while watching cartoons or anime, admired animation and envied those who know how to make them? All these wonderful scenes, plastic movements and much more. etc.? I honestly admit - yes. Every time I watch something, I try to understand how the animators worked with it? How did they create all this?
But, due to the fact that I don’t know what programs they work in, I’m trying to understand the whole process using Photoshop mechanisms.
And you know, I find answers to all my questions!
But let's look at everything in order.
The process of creating a long animation
1. Initially we need an IDEA
For example, you decided to make a short video in which several girls will dance.
If you are a seasoned animator, you can “make someone dance” in your video from 3 and more girls.
But at the beginning of your animator’s journey, it’s better to limit yourself to one or two.
2. Now you need to create a scene-by-scene storyboard (RPS)
What is it and what is it eaten with?
Imagine a movie. Now imagine the number of different views from different cameras. Close-up, landscape, camera following the character...

It's okay when there aren't so many of them. But when we make a whole clip there can be more of them 30
things!
That's why smart animators use such a wonderful thing that looks like a lined book.
In it they depict scenes.
Only some draw one scene in each section of the table, then another, a third, etc., while others draw images in each section of the table after a few seconds (I apologize if I didn’t explain it clearly).


It’s also very convenient that you can do it on the side of the description, otherwise, sometimes you draw it, then after a while you look at it and don’t understand - what did I depict here?
So we take note of this storyboard for the scenes and use these books.
You don’t even have to make a book, but simply create a large file in Photoshop and draw all the scenes there.
3. Now you need to come up with a background, character concept and movement
We draw the movements in the RPS book.
If you have more than one scene in a video, you will have to draw several different backgrounds. Draw them in separate files.
And remember one thing - the background does not appear out of thin air. So if you want the camera to kind of move to the side, then the background should be there too. those. you will have to draw the background in length (or width, or maybe both) more.
Then you design the look of your character and start creating the animation.
Moving from theory to practice
Let's think a little about the IDEA from now on and, in general, about the point “The process of creating animation”. What am I talking about? Moreover, now you will need a guinea pig whom you will force to move. We won't make a video in which 4320 frames. The best and easiest way to understand is how to create a frame-by-frame animation using 24 -72 - frame animation.
Well, let's begin!
1. Let's create a new document. For my animation I took a small size - 400 x 500 px.
2. Now, if you don't have a window at the bottom left " Animation", look up, open the tab " Window» - « Animation».*
* - The examples use the Russified version Photoshop CS2.

In the screenshot above we see the animation window in which there is the first frame, below it is a small panel on which the buttons are located:
Always/once- by selecting “Always” you will loop the animation. If you select Once, the animation will only play once. (In my lesson there are both versions of animations: looped - where the principle of DPD is shown, reproduced once - where the scene change is shown).
Select first frame- takes us back to the very beginning.
Selects the previous frame- Let's not call Cap. (=
Plays animation/Stops animation- Play/Stop.
Selects next frames- next frame. Your Cap!
Tweens animation frames- using this button we can add smooth transitions between two frames by adding new ones.
Duplicates selected frames- not quite the correct name... It would be better to say “Adding a new frame”.
Deletes selected frames- basket.
3. Now we can start drawing. To do this, place the background you created earlier on Background(Background/Background).

4. Then create a new layer (Ctrl+Shift+Alt+N) and draw your character on it.

4. Now comes the hard part: we need to draw the same character many times in a row in different poses.
We create a new frame, and... There are two options:
A) Either you start drawing your character anew each time, or...
B) Copy the previous layer and change it (you finish drawing and erasing, rather than using transformation! You will rarely need such a tool, I’ll write later when).
Once you get some training in animation, you can use both options painlessly. (You can try each of them in a separate document).
Option A:
1. We drew our first frame.
2. To see how to change the next one, we reduce the layer's opacity to about 30% and create a new layer on which we draw the rabbit for the second frame.
3. We finish drawing the second frame and turn off the visibility of the previous, first layer.

Option B:
1. Create a frame with the character and make this layer invisible.
2. Then duplicate it (Ctrl+J) by dragging the layer onto the “Create a new layer” button to the left of the trash can.
3. Now we make the second layer visible and begin to change it.

Thus, by duplicating the previous layer, you create new frames and change them, and not the same one.
5. We sit and draw frames 10 -15 ...
6. And let's see what happened.

It turned out to be a running rabbit.
Moreover, not a single part of it is copied: each frame is drawn anew.
See for yourself:


When creating an animation, remember that it's quite difficult to switch between hundreds of layers, so you shouldn't put off painting or changing anything until later. Do it right away.
Almost the end
Above I made a reservation about the tool ().
It is worth using it when, for example, you want to zoom the camera away, bring it closer, rotate it, etc. (If you only need to move the background, use video editors, it will be easier for you). Don't use distortion, tilt, or other transformation tools unnecessarily.
And, after we have saved our gif-animation as video file format .avi, for example, you can safely go to Windows Live Film Studio.
From there, do whatever your heart desires with your clip.
And then you can upload your clip to youtube.com and enjoy the work you've done.
THANK YOU VERY MUCH for your attention, Lero-art was with you. Excuse me for the tongue-tiedness, strange presentation and other flaws in the lesson, if any. All of them are due to the fact that thoughts are confused, and words do not form into sentences...
But I hope you learned something new and interesting for yourself!
GIFs are everywhere. The once humble animated images are now the unofficial language of the internet. GIF animation is the fastest way to express emotions on Twitter, and we can also spend hours watching it while scrolling through the news feed on VK, Facebook or Odnoklassniki.
There are quite a large number of sites where you can find ready-made GIFs on a variety of topics. But nothing beats GIF animation that you made yourself. Do you think this is a difficult process? You're wrong, it's quite simple. You can quickly create a GIF animation in the Photoshop graphics editor, converting an existing video, or using a series of static images. Let's take a closer look at how this is done.
Note: In all of the examples in this article, I'm using Photoshop CC 2017.
How to create GIF animation from video
First, you need to launch Photoshop, go to “File” > “Import” > “Video Frames to Layers” and select the desired video recording.

In the dialog box that opens, you can import the entire video recording, or select only a certain part of it. If you choose the second option, drag the handles below the preview window to set the start and end points. The portion of the video between these handles will be imported.

Note: Keep in mind that the more video you import, the larger your GIF will be. Also, if you're importing a video that's too long, choosing Keep Every 2 Frames (or more) is an easy way to reduce the size without affecting the quality too much.
Make sure the Create frame-by-frame animation checkbox is checked, then click OK. The video import process will begin. This may take some time, depending on the size of the clip. Once the import is complete, a work area will open in which each frame of the video will be placed on its own layer.
At the bottom of the screen there is a time scale palette. It shows all the frames that will make up your GIF animation.

You can add and remove frames as you see fit, or edit any of the existing layers the same way you edit layers in any other image. To preview your GIF animation, simply click the Play button at the bottom of the timeline.
The end result should be something like this:

Creating GIF animation from a series of static images
If you don't have video footage to use as the basis for your GIF animation, you can create one manually from a series of static images. It's a little more complicated, especially if you want to make something cool, but the basic process is simple.

You create your GIF from a single image file containing multiple layers. Each layer is a separate frame of your future animation. There are two ways to get started:
- If you've already created images for your animation, import them by choosing File > Scripts > Load Files into Stack.... Click Browse and select your images, then click OK. Each image will be placed on a separate layer within the same file.
- If you haven't created images yet, do so now. Remember that every single image is part of a future animation.
Now you are ready to start creating animation.
Animating static images
Here's how it works. When you manually create an animation frame, every visible layer is included in it. Layers that are disabled will not be included in the generated frame.
To create the first frame, make the very first layer visible and turn off all the others. Then, when creating the second frame, make the second layer visible, and then the third layer on the third frame, and so on. Once you start, everything will become clearer.

To start creating an animation, open the timeline if it does not open automatically for you. To do this, click “Window” in the top panel and select “Timeline” in the menu that opens. In the center of the panel that opens, click “Create frame animation.” This action will create the first frame of your animation. In the Layers palette, hide layers that you don't want to be part of the frame.
Now click the "New Frame" button, which will duplicate the previous frame. Once again, hide the extra layers, and make those that should be included in the frame visible.
Repeat this process until you have added all the frames needed for the animation.
Completion
Finally, set the display time for each frame. Select the first frame, and then Shift-click on the last one to select them all. Now click the down arrow below one of the frames and select a delay. No delay means the animation will run quickly, while the set number of seconds will cause the frames to remain on screen for a set period of time.

Finally, set the loop options, which you'll find at the bottom of the Timeline panel. This parameter controls how many times your animation will play. In most cases, you will select the "Always" option.
Now click the Play button at the bottom of the screen to view the resulting animation. You should see something like this:

You can edit frames by simply selecting them and changing the visibility of the layers (you can also change the opacity or make other more complex settings). Add additional layers if you need them, or click the trash can icon to delete them.
When you're happy with the result, you can move on to the "Saving Animation" section, or read on to improve the resulting animation.
Enhancing animation by adding intermediate frames
Photoshop supports a powerful animation tween feature. This allows you to create smoother animations by automatically generating transition frames between two existing frames. In this example, I'm going to go through all the frames to give the starry sky a twinkling effect.
To begin, select the first frame and click the Create Tweaks button in the toolbar at the bottom of the timeline.
In the dialog box that opens, set the “Intermediate frames” item to the “Next frame” value, and for the “Add frames” item, specify the value at your discretion. A higher value means a smoother but slower transition. Click "OK" to create the intermediate frames.

Now repeat this process for the other source frames you added. When you get to the last one, set "Inbetween Frames" to "First Frame". This will help create a smooth transition to the start of your animation loop.

Click the play button to preview the effect.
Saving Animation
When you're done, first save the file in ".PSD" format. This will save all the layer and animation information so you can edit your animation later if needed. After this, you can proceed directly to saving.

To save the created animation, go to "File" > "Export" > "Save for Web (old version)...". In the window that opens, select the GIF format, and enter 256 in the “Colors” field. To reduce the overall file size, reduce the size in the “Image Size” field.

You can see the size of the animation in the lower left corner of the preview window. If it's too big, drag the Waste slider to the right. This will affect the quality, but will significantly reduce the file size.
Earlier on the site we looked at third-party ones, but most of them can easily replace regular Photoshop. Animated GIF files can be created quite easily and quickly with its help. They usually consist of several images (frames), which, when changed step by step, form the final result. Today we will try to consider this issue from A to Z in as much detail as possible:
The screenshots below are from Photoshop CC, but working with GIF animation in CS6 and other versions of the program is similar, plus or minus. Perhaps the visual tools will be slightly different, but in general, the principle and algorithm of actions are similar. As an example, consider the trivial task of how to create a GIF animation in Photoshop from photographs replacing each other. Recently, using this guide, I made a gif about my adventures for the final post for 2016 on my personal blog.
The process took literally 5-10 minutes. The important thing here is to just follow all the steps carefully. At the end of the post you will find an English video tutorial on this topic.
Adding GIF Animation Images in Photoshop
The first thing you need to do is load all the pictures/photos that will participate in the animation into the graphics editor. Add them to one project in different layers - this will be the frames for the resulting GIF file. Check the size of the pictures and their display so that everything is as you need. Layers can be hidden (using the eye icon to the left of the layer) in order to view all objects.
In the center of this panel there is a drop-down list where you need to select the “Create Frame Animation” option and click on the button. As a result of this action, the Timeline will change a little, and you should see the image from the topmost layer as the first frame.
In the next step, select all layers in the project (click on them while holding the Ctrl key). After that, open the context menu in the upper right corner of the Timeline window and select “Make Frames From Layers”.
From all visible and selected layers, Adobe Photoshop will create animated GIF frames. As a result, you will see them in the Timeline panel.
GIF animation settings in Photoshop
Here you will need to specify 2 things: the duration of display of different frames + the number of repetitions of the gif. Let's start with the first one. Under each picture object in the Timeline you will find the display time and a down arrow. Click on them and select the card duration in the pop-up menu.
You can specify different times for elements or set the parameter for several of them simultaneously (joint selection as in layers - using Ctrl).
To “loop” a GIF in Photoshop when creating an animation, select the Forever value in the appropriate setting as shown in the screenshot below.
There you can also specify any number of repetitions you need. Nearby is the Play button, which allows you to play an animated GIF and see what the final result will look like.
Saving GIF animation in Photoshop
In the final part of our guide, we’ll look at how to properly save GIF animation in Photoshop. For this purpose, the familiar Save for Web tool is used, but in the latest versions of Adobe Photoshop CC it is located in a new menu location (File - Export). Luckily Alt + Shift + Ctrl + S still works.
In the settings window that opens, you need to select the GIF format, and also make sure that the Looping Options setting is set to Forever. In the lower right corner of the window, there is an option to run the animated GIF you created in Photoshop for a preview.
If everything works as expected, click Save and save the file to your local computer. To check the functionality of a GIF, you need to open it in a browser, because... The built-in Windows viewer does not play animation.
By the way, you can also easily export your project to video format. The procedure is the same as when saving GIF animation, but in the Photoshop menu, select File - Export - Render Video.
In the window that opens there will be different video settings, but you don’t need to change anything additional, just click on the Render button. As a result, you will receive an mp4 file with a slideshow of photos/images.
Finally, we suggest watching an English-language video tutorial about creating animated GIFs in Photoshop. The algorithm for working there is the same as in the article, but perhaps it will be easier for you to perceive the information from the video.
If you still have any questions about how to make GIF animation in Photoshop or have any additions, write in the comments.


02.08.2016 27.01.2018
In this lesson we will learn how to create animation. Animation is an image that is given movement; unlike static images (for example, photographs), it can change frames or parts of the frame.
Anima is translated from Latin as “soul”. We can say that by creating animation, we “animate” the picture, giving it life.
Animation Panel appeared in Adobe Photoshop CS3; before that, in the CS version, the ability to create animation was carried out through a separate program, Image Ready CS2, which was supplied with Adobe Photoshop. Now, in new versions of Adobe Photoshop, a tool for creating animation is included in the program and has the name Time scale. Lesson completed V Adobe Photoshop 2015.5, if you have an earlier version of the program, some settings may differ, but the basic concepts are the same.
Let's get started learning how to create animation. Open the picture you want to “revive” File-Open (File-Open). I have this cute picture with a girl and a cat admiring the starry sky.
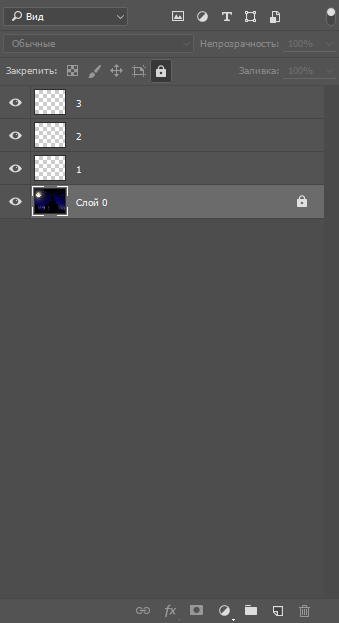
Create three new empty layers, Layers-New-Layer (Layer-New-Layer) or click on the thumbnail for creating a new layer in layers panel.

Name them, respectively, “1”, “2”, “3”. This will help you avoid confusion in the future.
Choose Brush tool (Brush):
First click on the triangle next to the brush size, then on the gear on the left:

The brush loading menu will open:

Load the star brushes (https://cloud.mail.ru/public/G2co/RTne1N3f9):

Select single brushes and, changing the size, paint on the three layers that we created earlier. The color of the brush is white or close to white. The main thing is not to place them in the same area on all layers; try to randomly scatter the stars throughout the sky.
Well, now the most important thing: let’s move on to the magic of bringing the picture to life. Let's go to the menu Window-Timeline), the following window will appear:

Animation panel has two types: timeline And stop motion animation. The first type is rarely used because it is intended mainly for working with video, let's switch to frame by frame, to do this, click on the button “ Create timeline for video", and then to this icon:

The following window will open:
To create a new frame, click on this icon:
Our animation is simple, three frames is enough. We add two more frames to the existing one by default, then go to the layer with the girl and the cat and make it and the first layer with stars visible (to do this, just click on the eye of the layer on layers panel):

We do the same for the second and third frames, only including the visibility of the second and third layers with stars, respectively. The layer with the girl and the cat is always visible. For clarity, screenshots for the second and third frames:


With a clamped keyShift select all layers in the animation panel, right-click and change the frame duration, with 5 second, set by default, up to, for example, 0.2 seconds. Click on the button "Selecting cycle parameters" and change the value to "Constantly":

If the parameter is set "One time", then the animation will play once and stop, with the parameter "Constantly" it will “blink” continuously.
To see what the animation looks like, click on this button:
For a smoother transition between frames, you can add intermediate frames - make the active frame in animation panels and click this icon:
A window will appear in which you can select the number, location, and style of intermediate frames. I added 3 intermediate frames to the first two frames with the following settings:

And the last, third, frame is also 3, but with different settings to loop the animation and so that the stars appear and disappear smoothly, without jerks and sharp transitions:

Well, we made the animation in Photoshop, all that remains is to save it. Let's go to File-Export-Save for web (old version) (File— Export— Save for Web (old version)):

Choosing a format Gif, you can also select the number of colors (the more colors, the more the file will weigh, but the fewer colors, the worse the quality), size. The remaining parameters can be left as default.
That's all! We learned how to make animation in Photoshop!


