Creating a free online radio with an auto DJ on the Radionomy service. How to create an online radio station
Many people would like to create their own radio station or television studio, but not everyone’s dream turns into reality. Potential owners of a new media are afraid of possible obstacles. This includes paperwork, purchasing equipment, and relations with supervisory authorities. But are the barriers really insurmountable? Let's discuss how to make your own radio station.
Broadcast or Internet?
Before you create your own radio station, it is very useful to decide which broadcasting method suits you best. The word “broadcast”, of course, sounds tempting, and such a radio has undoubted advantages:
- Anyone with the simplest radio can listen to your programs;
- your signal will be received in any conditions - on the road, at work, while cooking.
However, this method of broadcasting also has its disadvantages:
- paperwork takes a lot of time;
- some documents are very expensive;
- you need special equipment.
Important! Some bands are now completely open to amateur non-commercial broadcasting, so setting up a long and medium wave station requires much less effort and money than FM.
Advantages and disadvantages of Internet radio stations
Internet radio is simply a page on the World Wide Web. Accordingly, such a pleasure will cost much less than creating a real broadcast station.
The tangible advantages of this type of broadcasting are not only greater accessibility, there are a number of other points:
- such a station is not necessarily registered as a mass media outlet;
- special equipment, of course, is needed, but not in such quantities as for broadcasting - it’s just a server and a set of programs;
- You can create such a station much faster than an on-air station.
Important! The disadvantages include the fact that such a station must be specially “promoted” using purely network methods, that is, give links, attract friends, while the owners of any receivers quite often catch the broadcast by accident.

Creating an FM radio station
So, having wondered how to make a radio station, you decided to try what ether is. Well, nothing is impossible, but you have to start with the concept. If you do not have a solid start-up capital, you will have to look for people who are ready to sponsor your project - of course, they must understand what they are giving the money for.
The procedure will be as follows:
- Formulate how your radio station will differ from existing ones - determine its focus, goals, approximate target audience, format of future radio broadcasts.
- Make a cost estimate, including the costs of purchasing equipment, completing documentation, obtaining frequencies, and attracting potential employees.
- Determine how your station will make money.
- Indicate how long it will take for your brainchild to reach self-sufficiency and even begin to make a profit.
In short, you need to draw up a full-fledged business plan. Otherwise, you simply won’t get the money.

What documents are needed?
A radio station in the Russian Federation can only be opened by a legal entity, so you will have to create your own small company to obtain a broadcasting license. Without such a license, the station will be considered a pirate station. You need to indicate the types of activities:
- creation of television and radio projects;
- advertising of a commercial and political nature;
- television and radio broadcasting;
- activities related to the media;
- the possibility of purchasing studio space for radio stations and various facilities used for radio broadcasting.
You will have to select a radio transmitter in advance - you must know exactly its parameters:
- power;
- broadcast radius;
- coordinates of the place where it will be located.
All this data must be reported to the Main Radio Frequency Center. After this, you can begin completing the documentation to create your own radio station. This is a very serious process that should be treated with the utmost care. It can be done:
- on one's own;
- through a subsidiary of the Radio Frequency Center.
Important! If the circumstances are successful, registration on your own will be cheaper, however, you need to know all the intricacies of the legislation very well and have a fair amount of time. By contacting the “subsidiary” of the GRChTs, you will immediately relieve yourself of a lot of problems, including coordination with military units and the Research Institute of the Ministry of Defense.

Determining the broadcast frequency
FM range – from 87.5 to 108.0 MHz. Beginner radio amateurs sometimes think that it is better to choose a higher frequency. This is not entirely true. The range of action under the same initial conditions for a station broadcasting at a lower frequency is almost always greater. It is possible that you will get lucky and there is a free frequency in this range. You can get it to create your own radio station. But it happens that someone else wants to open a radio station at the same time as you and lays claim to the same frequency. In this case, you will have to participate in the competition.
When is the competition held?
Competitions for obtaining frequencies are held twice a year, but not everywhere, but only in regions where the population is at least 200 thousand people. Information about this can be found on the official website of the Independent Radio Broadcasting Foundation and there you can also find samples of filling out documents.
Important! Legal entities that are planning to create their own radio station do not always participate in such competitions. Your rival may be a company that has no plans to create media at all. For some entrepreneurs, this is a very profitable business - they win the tender and then rent out the frequency.
Registering a new media outlet
Having decided on the frequencies and concept of the station, register a new media outlet. This is done in Roskomnadzor - more precisely, in its territorial, regional or federal branches, depending on the broadcast radius.
Important! The check lasts about a month - the supervisory authority determines the uniqueness of the name, you are given a certificate, after which you will have to start broadcasting within a year. If you do not do this, the certificate will be revoked.

Obtaining a license
Your relationship with Roskomnadzor does not end with receiving the certificate. You need two more licenses to make your own radio station:
- for radio broadcasting;
- for communication services.
Important! You already have a software concept; you need to attach a package of documents to it (which ones exactly are best found out in Roskomnadzor itself or on its official website). If everything is completed properly, you will receive a license.
Permission to use radio frequencies
And even after receiving licenses, you will have to contact Roskomnadzor more than once. You need:
- permission to use frequencies;
- registration of the radio transmitter.
To obtain permission to create your own radio station, you write an application (the form can be obtained there, at Roskomnadzor), and you can use the selected frequency for 10 years. After this, you can receive the last document - register the transmitter and receive the corresponding certificate.

Opening a station
Once you receive all the documents, the rest will seem easy. So, to create your own radio station:
- Find a premises and sign a lease agreement.
- Install the transmitter and on-air equipment.
- Test.
- Obtain the right to commercial activity.
- Start your radio project.
How to make an Internet radio station?
Making your own radio station on the Internet is somewhat easier than starting broadcasting. But first, try to decide what exactly you want to do, that is, decide what the focus of your channel will be:
- news;
- political;
- musical;
- historical and local history;
- tourist;
- something else – perhaps completely unexpected.
Important! Of course, it is impossible for a channel to broadcast just one thing - music programs are interspersed with short news, on political ones there is music, and on a historical, local history or tourist channel, everything is possible. Music of a particular country or era is played there, news is read, there are conversations about problems - and so on.

The face of the Internet channel
Based on the focus, an Internet page is created. This is the calling card of your radio station. To create it, do the following:
- Find a simple, effective and memorable address.
- Order hosting.
- Create an engine - you also need a PHP and SQL database.
Important! It is better to create a channel not on your own server, but to order hosting. This will provide good throughput. The number of your listeners, in turn, depends on it. To determine how many people can listen to you at the same time, divide the bandwidth by the quality of the broadcast.
The best option to make your own radio station is a virtual server. It has a lot of advantages:
- static IP address;
- high speed connection;
- You don’t need a state-of-the-art computer with a powerful processor and large RAM.

Deciding on the operating system
The radioserver can run both Windows and Linux. It doesn't really matter. Each operating system has its advantages. For example, Windows has more programs, including sound ones. But Linux is cheaper and provides better protection against viruses or hacker attacks.
Broadcaster
This is the main part of the radio station. It provides merging of audio streams. There are two programs that most owners use when planning to make their own radio station on the Internet:
- IceCast2;
- ShoutCast.
Important! Their capabilities are approximately the same, so in this matter you need to focus solely on your own taste. Both come with documentation – albeit in English.
To make your radio station active, the broadcaster will need to be configured:
- indicate the names of the streams;
- specify parameters;
- define switching rules;
- set the security level (usually FireWall);
- check the box that an exception is made for the port on which broadcasting is taking place.

Putting sound on air
So, the server has been found, the software has been installed, the interface has been created. Now you have to do the most important thing, for which you, in fact, tried, that is, put the sound on the air.
You can submit it in three ways:
- rayleigh;
- auto broadcaster;
- direct, aka live, broadcast.
Rayleigh
Rayleigh is actually a “transfer point”. This point receives the ready link of your radio station and sends it to users, that is, to those who have joined the channel.
Important! Using such a point, you can organize broadcasting, for example, on a local network, intercepting ready-made broadcasts. This is a very convenient thing if you host some of your own programs, but cannot fill all the airtime with them. When “windows” arise, you can jam your airwaves by relaying other radio stations.
Rayleigh is good for making your own radio station, and in other cases:
- if you have a weak server;
- if the leaders change frequently.

Autobroadcaster and Live broadcast
There are quite a few programs that can perform a similar task. The choice depends on the operating system.
Option 1
If you have Windows, the following programs are suitable for you:
- Winamp with plugin for ShoutCast;
- RadioBoss;
- SamBroadcaster.
Option 2
For Linux, the best car broadcasters to make your own radio station are:
- phpCast
- PulseAudio.
The idea of making your own radio station is relevant and interesting. If you really have set yourself such a goal and have a clear idea of the development of such a business, then why not try yourself in this direction. And with the help of our useful tips from this article, some issues will be resolved for you much faster than, in fact, we are trying to help you. Good luck in your endeavors!
The advantages of the web as a channel for delivering content are obvious - electronic libraries, social networks, information portals, video hosting and other Internet services are replacing “classical” media before our eyes for an increasingly wider audience. And radio is no exception.
The distribution of audio and video content in the form of digital streams, that is, streaming, is becoming increasingly important. It is with him that many experts associate the main prospects for the development of radio broadcasting. There is noticeable interest in this area on the part of equipment and software manufacturers: in recent years, solutions focused specifically on organizing virtual broadcasting have been demonstrated at professional exhibitions and conferences.
The main advantage of Internet broadcasting over FM is the ability to create a radio station in the shortest possible time and without major investments. There are a number of other advantageous technical differences:
- Globality. Internet radio can be listened to wherever there is Internet access. FM broadcasting is severely limited by the coverage area and the power of radio transmitters.
- Interactivity. Communication with the audience on an FM radio station is limited to telephone calls, surveys, communication on social networks and instant messengers. In the case of an online radio station, the feedback is more detailed: the listener connects and immediately has the opportunity to “like” a program or track, write a comment - that is, he can really influence the broadcast and choose the content that he likes.
- Personalization. No matter what research is conducted by sociologists - focus groups, surveys or polls, in the case of FM, the creators of radio stations can only roughly understand who listens to them. The audience is somewhat blurry. With Internet broadcasting the situation is exactly the opposite. To connect to a stream, you need to send a request to the server. Thus, by IP address you can determine your geographic location, and by logging in from social networks during registration, you can determine all the information from your profile. This is where the fun begins, because you can not only “tailor” the content to your listeners, but also attract relevant advertisers - this opens up additional opportunities for targeted advertising. The advertiser is offered not an abstract audience, but a specific personalized listener.
Your own Internet radio station - step by step
1. Create a beautiful website with a simple domain close to the name of the radio station.
2. Agree on services with your Internet provider.
3. Develop an online player or broadcasting program.
4. Install a server in your office/home or purchase/rent a server in a data center.
5. Install and configure the software.
6. Organize remote access to the server.
7. Solve the problem of audio processing.
8. Connect and configure statistics collection tools.
9. Then think about content.
Players and streams
Maintenance costs
An FM radio station spends huge amounts of money on the operation, purchase and maintenance of equipment, transmitters, maintenance of staff, rental of offices and pays this amount regardless of the number of listeners and the size of the audience. At the initial stage of the existence of an online radio station, the number of expenses usually increases with the number of listeners - this can be predicted and calculated in advance when drawing up a business plan. The Internet radio station delivers streams of different quality for each listener and collects information about what players the audience uses and from what device. Technical capabilities make it possible to determine the requirements for outgoing traffic, calculate its percentage, and determine costs. From the listeners’ side, everything is much simpler - the costs are equal to the monthly payment for the Internet.
Transmitters
In the case of online broadcasting, this is a server on which special programs are installed, most often free. The free Icecast program is very common in Russia, as well as Shoutcast and the paid multifunctional cross-platform Wowza. Theoretically, the distribution server can be physical - located in the office or at home, but now they are increasingly turning to the services of data centers. You can also rent a virtual server from a data center. This method has certain advantages: you do not need to purchase a server, install software on it, configure equipment and change it over a period of time.
Audio processing: is a processor needed when creating an online radio station?

Needed. Without processing, the sound will “sag” and there will be no sound depth. The hardware processor is the most expensive link in this chain. But considering that Internet radio stations usually have modest budgets, the solution can be considered the use of software analogues of processors. There are a number of software solutions for audio processing, such as Digispot II, Z/IP Prostream, Omnia A/XE, Z/IP Stream 9X/2.
It is also worth deciding on the sound supply to the channel:
- Live broadcast - broadcast from the studio, live conversation between people
- Autobroadcaster – broadcasting according to a prepared sheet or robot broadcaster
- Relay is a forwarding node through which a ready-made link is distributed to everyone who connects to it. That is, using relay, you can relay radio stations to local networks and increase the capacity of an online radio station.
Internet radio organization schemes
The simplest option: The broadcast server is installed on a virtual server - streams are distributed from the cloud directly to listeners. A radio station employee has the ability to connect to the interface via the web to edit the schedule, content, playlists and other elements.

There are a couple more schemes for the operation of an online radio station.
Classic option: from the studio the stream goes through the distribution server, and then to the listeners.
 The classic version of organizing Internet radio / Slide from the report of Oksana Beketova, technical support engineer at Trakt company
Combined option: The radio station broadcasts from the “cloud”, that is, from an on-air station that is installed on a virtual server. In this case, switching to live broadcasts from the studio occurs according to a schedule or by command. The editor also has the ability to connect via a web interface.
 Combined option for organizing Internet radio / Slide from the report of Oksana Beketova, technical support engineer at Trakt company
Ready-made service packages
Radio service (Radio as service) is a ready-made service package for an Internet radio broadcaster, which already includes operating costs, technical support, updates, and so on. For example, Radiobox is a platform for broadcasting, the Russian Digispot II can also be used as software, and there are also many foreign analogues.
These services can be managed via a web interface. Its use in technical and functional terms is much simpler than connecting via remote access. A journalist/DJ can edit the schedule, make cuts, monitor the broadcast, add new materials, voice tracks to the database and carry out administration.
To answer this question, you first need to ask yourself why you need to make this radio station and what it will be like. But if you have already drawn this little “business plan” in your head for a long time, then “welcome to the cut” to studying the mathematical part.
Facing the people
The face of any Internet project is its Internet page. Armed with the WHOIS service, we are looking for a beautiful and simple address for the site. It would not be amiss to remind you that the closer the address is to the name, the simpler its spelling and the fewer possible incorrect spellings, the better.Have you chosen an address? Great! We order hosting.
For the website to work successfully, we need 3 simple things:
- SQL database
- Engine
Here everyone has the right to choose what suits them best, but I’ll immediately note that the best way to implement the site will be Joomla (no matter how many options I have tried on Wordpress and Drupal, it’s very difficult to come up with an implementation on these engines). I will tell you more about ways to fill it with content and tricks for implementation in the following articles.
Combat server
Yes, it was not by chance that I wrote earlier that a site needs hosting, because on a combat broadcast server we will have every kilobit of speed on our account, and “eating away” by displaying content of this most important resource for us is an unaffordable luxury.And now a simple formula that will become an eyesore for us in the future:
Channel capacity/broadcast quality=number of simultaneous listeners.
In other words, if our Internet channel is 100Mb/s, and we plan to broadcast at a quality of 128Kb/s, then a total of 800 people will fit in (believe me, this is a very large audience for a start-up project).
Which server to choose?
I spent hours scouring the Internet for a solution to this question, and the solution was not long in coming. A virtual server is the best choice in this situation.First: By default it has a static IP address.
Secondly: It has a fairly high-speed connection, although with one small amendment - the speed is divided by all the inhabitants of this physical machine, which means our 800 people can be safely divided by 5 (although it is possible that this figure will be very different, because the load on other servers can also be quite high).
Our research does not require a powerful processor or a lot of RAM. The radioserver configuration allows you to successfully use negligible resources; our main selection criterion is the connection speed.
Windows or Linux
As such, when choosing a server, what operating system will be installed does not matter. Solutions for deploying a radio server are available for both Win 32/64 and *nix. I’ll just note that when implemented on Windows you will have more options, and on Linux it will be cheaper to maintain.IceCast2 or ShoutCast
The heart of our server is the broadcaster. It is to this that all audio streams, both incoming and outgoing, are connected. And here you need to make an informed choice, because the entire future broadcasting system and its support will be built on this. Both products have all the amenities that are needed to organize the broadcast. Both products are cross-platform and require certain skills in communicating with configuration files, fortunately, they are accompanied by impressive documentation (in English).Setting up the broadcaster
Each radio requires very specialized settings. The configurations indicate names, flow parameters, switching rules, security, etc. After configuration, do not forget to set an exception in the firewall for the port on which the broadcast is performed.Sound on air
There are 3 ways to send sound to a channel:- Rayleigh
- Autobroadcaster
- Live broadcast
But with Rayleigh everything is more interesting. Let's look at all the methods:
Rayleigh is a forwarding point. She takes a ready-made radio station link and distributes it to everyone who connects to it. Thus, having such a relay, you can rebroadcast radio stations to local networks, fill up empty time on your broadcasts and expand the capacity of your own radio station. (I’ll tell you more about how to gracefully increase the capacity of one channel by 2 or more times in the following articles). Also, this point is extremely important if you do not have very powerful server resources, and hosts change very often.
Autobroadcaster and Live Broadcast - quite a few programs are suitable for this role, but I will highlight the most common:
Windows
- Radio Boss
- SamBroadcaster
- Winamp+plugin for ShoutCast
- phpCast
- PulseAudio*
Results:
In this article I described the key points in creating Internet radioThe installation and configuration of the radio server itself takes no more than 15 minutes. Much more time is spent on debugging certain functions, because... It is impossible to manually monitor the status of the project 24 hours a day.
The Internet is developing rapidly, the channel width of users is becoming wider, which means that they go online not only for text information and pictures, but also to listen to music and watch videos. Therefore, online radio stations are becoming more and more popular.
Many people believe that creating Internet radio is very difficult, since creating it will require a powerful server and expensive software. This is partly true - if you want to create commercial online radio for a wide audience. However, if your goal is a “chamber” radio station for a narrow circle of listeners, you can avoid serious expenses.
To create an Internet radio, you will need a fairly powerful computer (you can do without a “sophisticated” server, but a “typewriter” will not be enough), a wide Internet channel and special software. There are various programs that allow you to create Internet radio, we will tell you about creating an online radio station using the example of free software Shoutcast.
The basis of your radio station will be the popular Winamp, and you also need to download two programs from shoutcast.com - SHOUTcast Server and SHOUTcast Plug-in. First, install and configure the server. After running the installer, install the server, then go to the directory where the program was installed and open the sc_serv.ini file with any text editor.
A complete list of server settings can be found on shoutcast.com, let's talk about the basic settings. You should enter three main parameters:
- PortBase: port on which the server will operate (by default, port 8000 is assigned, it is better not to change it if you have it free);
- MaxUser: the maximum number of users who can simultaneously listen to the radio station;
- Password: password for remote server administration, we recommend choosing a more complex combination.
Now install SHOUTcast Plug-in and launch Winamp. Go to the player options, find the DSP/Effect item, then Nullsoft SHOUTcast Source DSP. Click the Configure active plug-in button. In the settings window that opens, go to the Output tab and activate the Connect at Startup and Automatic Reconnection on Connection Failure options.
- Address – the computer on which the server is installed (if the server is located on the same computer, enter 127.0.0.1 or Localhost);
- Port – port (taken from the server settings);
- Password – password (taken from the server settings).
Leave all other settings at default for now and go to the Encoder tab. Here you can configure the audio codec type, audio bitrate and broadcast mode (mono or stereo). You can save up to five groups of settings and switch between groups depending on the channel bandwidth and the number of listeners.
In Input tab you configure what will be broadcast: music or music and voice. To transfer only music, you need to select the Winamp option in the drop-down list; to transfer music and voice - Soundcard Input. The following options are available for Soundcard Input:
- Open Mixer – opens the system mixer window;
- Push to Talk – activates the ability to simultaneously broadcast music and voice from a microphone, “sticking” this option is activated by the Lock button;
- Music Level – music volume;
- BG Music Level – volume of background music when the microphone is working;
- Mic Level – microphone volume;
- Fade Time – fade time (volume change when Push to Talk mode is activated and deactivated).
After setting up the plugin, start the server, in Winamp go to the Output tab and click Connect. To check if you were able to create an Internet radio, enter the following address in the address bar:
If the SHOUTcast server page opens with track histories and the current server status, everything worked out for you. To listen to the radio, click on the Listen link or add the address to the player .
Please note that if you want to give your friends a link to listen to your radio, as the server address you need to use the IP address of your computer on the Internet(or on a local network, if your listeners are on the same network as you), they will not go to the radio station’s page using the IP address Localhost/127.0.0.1!
If you want to, so that the radio station you create is available not only to selected users, but also to everyone on the Internet, you need to click the Yellowpages button on the Output tab. If you enable the Make this server public option, information about your station appears on the shoutcast.com home page. But to do this, in the Yellowpages settings you need to enter a description of the station, genre of music, and contact information of the DJ.
It is also possible create an Internet radio using online radio station management systems, for example, radio-tochka.com, radiocms.ru, radiostyle.ru. You create an account on the site, and you are allocated a certain amount of disk space on the server and a channel of a certain width. You can download and stream your favorite music and broadcast live from your computer.
As you can see, creating an internet radio is not that difficult. A little patience - and you can try yourself as a radio DJ.

The simplest radio receivers are not suitable for catching the FM range, frequency modulation. Common people say: this is where the name comes from. In English we interpret the letter FM as frequency modulation. A clearly expressed meaning is important for readers to understand: the simplest radio receiver, assembled with your own hands from rubbish, will not accept FM. The question of necessity arises: the cell phone picks up the broadcast. Electronic equipment has a similar capability built into it. Far from civilization, people still want to catch broadcasts the old-fashioned way - they almost said with dental crowns - by constructing efficient devices for listening to their favorite programs. For free…
Detector simplest radio receiver: basics
The story touched on dental fillings for a reason. Steel (metal) is capable of converting ethereal waves into current, copying the simplest radio receiver, the jaw begins to vibrate, the bones of the ear detect the signal encrypted on the carrier. With amplitude modulation, the high frequency repeats the speaker's voice, music, and sound in scope. The useful signal contains a certain spectrum, which is difficult for a layman to understand; it is important that when adding the components, a certain law of time is obtained, following which the speaker of a simple radio receiver reproduces the broadcast. At the dips, the jaw bone freezes, silence reigns, and the ear hears the peaks. God forbid, of course, you should have a simple radio receiver.
The reverse piezoelectric effect changes the geometric dimensions of the bones according to the law of electromagnetic waves. A promising direction: a human radio receiver.
The Soviet Union was famous for launching a space rocket, ahead of the rest, for scientific research. Union times encouraged degrees. The luminaries have brought a lot of benefit here - designing radios - and earn decent money over the hill. The films promoted the smart, not the wealthy; it is not surprising that the magazines are full of various developments. A series of modern lessons on creating simple radios, available on YouTube, is based on magazines published in 1970. Let’s be careful not to deviate from traditions; we will describe our own vision of the situation in the amateur radio industry.
The concept of a personal electronic computer was developed by Soviet engineers. The party leadership recognized the idea as unpromising. Efforts are devoted to building giant computer centers. It is too much for a worker to master a personal computer at home. Funny? Today you will encounter more amusing situations. Then they complain - America is shrouded in glory, printing dollars. AMD, Intel - have you heard? Made in USA.
Everyone can make a simple radio receiver with their own hands. An antenna is not needed, there is a good stable broadcast signal. The diode is soldered to the terminals of high-impedance headphones (discard computer ones), all that remains is to ground one end. To be fair, let’s say the trick will work with the good old Soviet-made D2, the taps are so massive that they will serve as an antenna. We get the earth in the simplest radio receiver by leaning one leg of the radio element against a heating radiator that has been stripped of paint. Otherwise, the decorative layer, being the dielectric of the capacitor formed by the leg and metal of the battery, will change the nature of the operation. Try it.
The authors of the video noticed: there seems to be a signal, represented by an unimaginable jumble of rustles and meaningful sounds. The simplest radio receiver lacks selectivity. Anyone can understand and understand the term. When we set up the receiver, we catch the desired wave. Remember, we discussed the spectrum. The ether contains a bunch of waves at the same time, you will catch the one you need by narrowing the search range. There is selectivity in the simplest radio receiver. In practice, it is implemented by an oscillatory circuit. Known from physics lessons, it is formed by two elements:
- Capacitor (capacitance).
- Inductor.
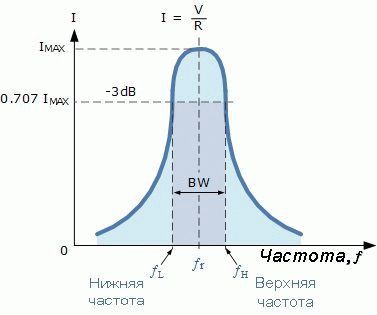
Let's take a moment to study the details; the elements are equipped with reactance. Due to this, waves of different frequencies have unequal attenuation as they pass by. However, there is some resonance. For a capacitor, the reactance in the diagram is directed in one direction, for an inductance - in the other, and the frequency dependence is displayed. Both impedances are subtracted. At a certain frequency, the components equalize, and the reactance of the circuit drops to zero. Resonance sets in. The selected frequency and adjacent harmonics pass through.
The physics course shows the process of choosing the bandwidth of a resonant circuit. Determined by the attenuation level (3 dB below maximum). Let us present the theoretical calculations, guided by which a person can assemble a simple radio receiver with his own hands. In parallel with the first diode, a second one is added, connected oppositely. It is soldered in series to the headphones. The antenna is separated from the structure by a 100 pF capacitor. Let us note here: the diodes are endowed with pn-junction capacitance, minds apparently calculated the reception conditions, which capacitor is included in the simplest radio receiver endowed with selectivity.
We believe we will slightly deviate from the truth when we say: the range will affect the HF or SV regions. Multiple channels will be received. The simplest radio receiver is a purely passive design, devoid of an energy source; one should not expect great achievements.
A few words about why we discussed remote nooks where radio amateurs crave experiments. In nature, physicists have noticed the phenomena of refraction and diffraction, both of which allow radio waves to deviate from their direct course. Let's call the first rounding obstacles, the horizon moves away, giving way to broadcasting, the second - refraction by the atmosphere.
DV, SV and HF are caught at a considerable distance, the signal will be weak. Therefore, the simplest radio receiver discussed above is a touchstone.
The simplest radio receiver with amplification
In the considered design of the simplest radio receiver, low-impedance headphones cannot be used; the load resistance directly determines the level of transmitted power. Let's first improve the performance using a resonant circuit, then add a battery to a simple radio receiver, creating a low-frequency amplifier:

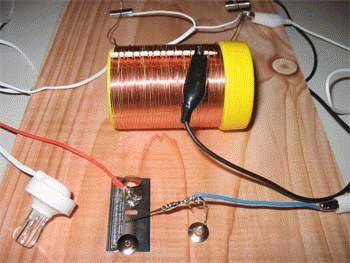
- The selective circuit consists of a capacitor and inductor. The magazine recommends that the simplest radio receiver include a variable capacitor with an adjustment range of 25 - 150 pF; the inductance must be made according to the instructions. A ferromagnetic rod with a diameter of 8 mm is wound evenly with 120 turns, covering 5 cm of the core. A copper wire coated with varnish insulation with a diameter of 0.25 - 0.3 mm is suitable. We provided readers with the address of the resource where you can calculate the inductance by entering numbers. The audience can independently find, using Yandex, and calculate the number of mH of inductance. The formulas for calculating the resonant frequency are also well known, therefore, while remaining at the screen, you can imagine the tuning channel of a simple radio receiver. The instructional video suggests making a variable coil. It is necessary to push out and push in the core inside the frame with wound turns of wire. The position of the ferrite determines the inductance. Calculate the range using the program; YouTube craftsmen suggest drawing conclusions every 50 turns when winding a coil. Since there are about 8 taps, we conclude: the total number of revolutions exceeds 400. You change the inductance in steps, and fine-tune the core. Let's add to this: the antenna for the radio receiver is decoupled from the rest of the circuit by a capacitor with a capacity of 51 pF.
- The second point you need to know is that a bipolar transistor also has p-n junctions, and even two. It’s appropriate to use a collector instead of a diode. As for the emitter junction, it is grounded. DC power is then applied to the collector directly through the headphones. The operating point is not selected, so the result is somewhat unexpected; patience will be required until the radio receiver is perfected. The battery also greatly influences the choice. We consider the headphone resistance to be collector resistance, which determines the slope of the transistor's output characteristic. But these are subtleties, for example, the resonant circuit will also have to be rebuilt. Even with a simple diode replacement, let alone the introduction of a transistor. That is why it is recommended to conduct experiments gradually. And the simplest radio receiver without amplification will not work at all for many.
How to make a radio receiver that would allow the use of simple headphones. Connect via a transformer, similar to the one at the subscriber point. A tube radio differs from a semiconductor radio in that in any case it requires power to operate (filament filaments).
Vacuum devices take a long time to reach operating mode. Semiconductors are ready to accept immediately. Don't forget: germanium does not tolerate temperatures above 80 degrees Celsius. If necessary, provide cooling for the structure. At first, this is necessary until you select the size of the radiators. Use fans from a personal computer, processor coolers.


