Repair of LED lamps using examples. Save on replacement: do-it-yourself LED lamp repair
Hello, dear readers and guests of the Electrician's Notes website.
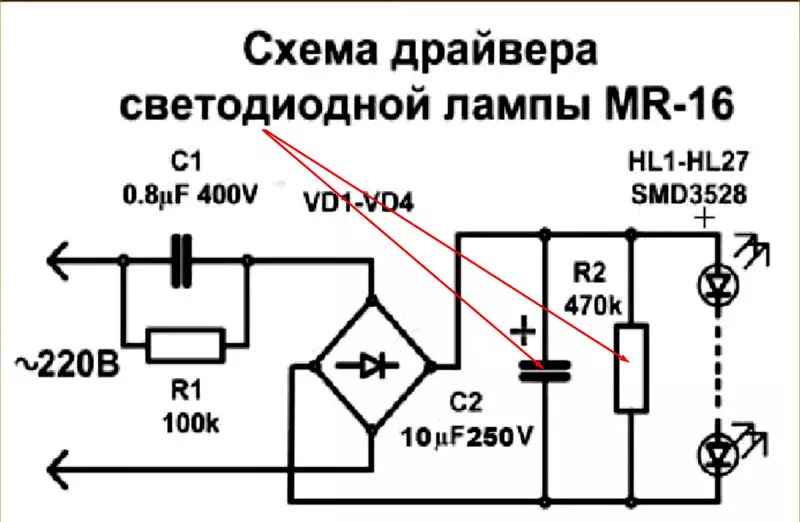
Today I decided to tell you about the design of the EKF LED lamp of the FLL-A series with a power of 9 (W).
I compared this lamp in my experiments (,) with an incandescent lamp and a compact fluorescent lamp (CFL), and in many respects it had clear advantages.
Now let's take it apart and see what's inside. I think that you will be no less interested than me.
So, the design of modern LED lamps consists of the following components:
- diffuser
- board with LEDs (cluster)
- radiator (depending on the model and lamp power)
- LED power supply (driver)
- plinth

Now let's look at each component individually as we disassemble the EKF lamp.
The lamp in question uses a standard E27 socket. It is attached to the lamp body using point recesses (cores) around the circumference. To remove the base, you need to drill out the core points or make a cut with a hacksaw.

The red wire is connected to the central contact of the base, and the black wire is soldered to the thread.

The power wires (black and red) are very short, and if you are disassembling an LED lamp for repair, then you need to take this into account and stock up on wires for further extension.
Through the opened hole you can see the driver, which is attached with silicone to the lamp body. But it can only be removed from the diffuser side.

The driver is the power source for the LED board (cluster). It converts 220 (V) alternating voltage into a direct current source. Drivers are characterized by power and output current parameters.
There are several types of power supply circuits for LEDs.
The simplest circuits are made using a resistor that limits the LED current. In this case, you just need to choose the right resistor value. Such power circuits are most often found in switches with LED backlighting. I took this photo from an article in which I talked about.


Slightly more complex circuits are made on a diode bridge (bridge rectification circuit), from the output of which the rectified voltage is supplied to series-connected LEDs. An electrolytic capacitor is also installed at the output of the diode bridge to smooth out the ripples of the rectified voltage.


In the above circuits there is no galvanic isolation from the primary network voltage; they have low efficiency and a high ripple factor. Their main advantage is ease of repair, low cost and small dimensions.
Modern LED lamps most often use drivers based on a pulse converter. Their main advantages are high efficiency and minimum pulsation. But they are several times more expensive than the previous ones.
By the way, soon I plan to measure the pulsation coefficients of LED and fluorescent lamps from various manufacturers. In order not to miss the release of new articles, subscribe to the newsletter.
The EKF LED lamp in question has a driver installed on the BP2832A chip.

The driver is attached to the case using silicone paste.

To get to the driver, I had to saw off the diffuser and remove the board with the LEDs.
The red and black wires are the 220 (V) power supply from the lamp base, and the colorless ones are the power supply to the LED board.

Here is a typical driver circuit on the BP2832A chip, taken from the data sheet. There you can familiarize yourself with its parameters and technical characteristics.


The driver operating mode ranges from 85 (V) to 265 (V) mains voltage, it has short circuit protection, and uses electrolytic capacitors designed for long-term operation at high temperatures (up to 105°C).

The housing of the EKF LED lamp is made of aluminum and heat-dissipating plastic, which provides good heat dissipation, which means it increases the service life of the LEDs and driver (according to the passport, up to 40,000 hours are stated).

The maximum heating temperature of this LED lamp is 65°C. Read about this in the experiments (I provided the links at the very beginning of the article).

More powerful LED lamps, for better heat dissipation, have a heatsink that is attached to the aluminum LED board through a layer of thermal paste.
The diffuser is made of plastic (polycarbonate) and with its help a uniform dispersion of the light flux is achieved.


But the glow without a diffuser.

Well, we got to the LED board or, in other words, the cluster.
There are 28 SMD LEDs placed on a round aluminum plate (for better heat dissipation) through an insulation layer.

The LEDs are connected in two parallel branches with 14 LEDs in each branch. The LEDs in each branch are connected to each other in series. If at least one LED burns out, the entire branch will not light up, but the second branch will remain in operation.

And here is a video filmed based on this article:
P.S. At the end of the article, I would like to note that the design of the EKF LED lamp is not very successful from a repair point of view; the lamp cannot be disassembled without sawing off the diffuser and drilling out the base.
Before our eyes, a real revolution in lighting is taking place: the world is rapidly switching to LEDs. Just five years ago, LED lamps were still a technical novelty, but now LED lighting is used in all spheres of life: LED lights can be found even in villages, many offices, hotels and public buildings are illuminated with LED lamps, the vast majority of concert and theater lighting has become LED. Lamps of this type appear in many apartments, because they can be bought even in grocery stores, and in household goods their range is wider than other types of lamps.
An LED lamp is a rather complex electronic device with several dozen parts on which the quality of light, its safety for health and the durability of the lamp depend.
⇡ Pros and cons
LED lamps have many advantages compared to conventional incandescent lamps:
- Economical - with the same amount of light, a modern LED lamp consumes 7-10 times less electricity.
- Durability - an LED lamp lasts 15-50 times longer than a conventional one.
- A little heating - the child will not get burned on the LED lamp in the table lamp.
- Same brightness at different mains voltages - unlike incandescent lamps, LED lamps shine just as brightly at lower mains voltages.
- The ability to install an LED lamp, much brighter than an incandescent lamp, in a lamp that has a power limitation.
- The light of good lamps is visually indistinguishable from the light of incandescent lamps.
There are also advantages when compared with compact fluorescent (energy-saving) lamps (CFL):
- Environmental friendliness - absence of hazardous substances (the bulb of any CFL contains mercury).
- Economical - the lamp consumes less energy with the same luminous flux.
- The LED lamp instantly lights up to full brightness, and the CFL smoothly increases brightness from 20% to 100% in a minute at room temperature and much more slowly at low temperatures.
- CFLs have a poor spectrum consisting of peaks of several colors. The spectrum of an LED lamp is much closer to natural light and incandescent light.
But, of course, there are also disadvantages:
- High price.
- The presence on the market of lamps with poor light quality (pulsation, poor color characteristics, uncomfortable color temperature, discrepancy between the luminous flux and the incandescent lamp equivalent declared).
- Some lamps have problems with switches that have an indicator.
- Only some expensive models support brightness adjustment (dimming).
Let's figure out the savings
The main advantage of LED lamps is energy savings. For the same amount of light emitted by the lamp, an LED lamp consumes 7-10 times less electricity than a conventional incandescent lamp. You can now buy 6-watt LED bulbs and 4-watt LED bulbs, which provide the same amount of light as a 60- and 40-watt incandescent bulb, respectively.
I calculated what the electricity costs would be when lighting a two-room apartment with conventional and LED lamps. Of course, this is an approximate calculation, but it allows you to get an idea of the order of the numbers of possible savings.

The packaging of any incandescent lamp indicates a service life of 1,000 hours. If the lamps actually work for 1,000 hours (unfortunately, they often burn out much earlier), the lamps in the hallway and room will have to be changed twice a year, and in the kitchen and bedroom once. If a lamp costs 30 rubles, it will cost 690 rubles to buy new lamps. LED lamps do not have to be changed every six months, because their service life is 15-50 thousand hours. This is from 7 to 22 years when used 6 hours a day.
The purchase of lamps for this apartment will cost 4,045 rubles (7 E27 6 W lamps for 240 rubles, 11 “candles” 4 W for 215 rubles), and they will pay off in less than a year.
LED and energy saving lamps
LED bulbs are undoubtedly energy efficient, but the word "energy efficient" is attached to compact fluorescent lamps (CFLs), and CFLs and LED bulbs are very different things.

CFLs became widely available about ten years ago and were expected to replace incandescent lamps. However, CFLs turned out to be a dead-end branch of evolution. These lamps have many disadvantages: the lamp tube contains mercury, the lamp lights up slowly and does not shine at all in the cold, CFLs have a poor spectrum, consisting of peaks of several colors.
From July 1, 2016, in accordance with Decree of the Government of the Russian Federation No. 898 of August 28, 2015, all state and municipal enterprises and institutions will be prohibited from purchasing any lamps containing mercury (including CFLs) through the public procurement system. Already, the number of CFLs in stores is constantly decreasing, and soon they will disappear completely.
Let's compare the light spectrum of an incandescent lamp, a fluorescent lamp and an LED lamp.

The spectrum of an LED lamp is much closer to natural light and incandescent light.
A little history
The glow of a semiconductor transition was first discovered in 1923 by the Soviet physicist Oleg Losev. The first LEDs were called "Losev Light" (Losev's light). First the red LED appeared, then yellow and green LEDs appeared in the early 70s. The blue LED was created in 1971 by Yakov Panchechnikov, but it was very expensive. In 1990, the Japanese Suji Nakamura created a cheap and bright blue LED.

After the advent of the blue LED, it became possible to make white light sources with three crystals (RGB). Such sources are still used in concert and decorative lighting.

In 1996, the first white LEDs using a phosphor appeared. In them, blue or ultraviolet LED light is converted to white using a special chemical applied on top of light-emitting crystals.

Phosphor LED
In 2005, the efficiency of such LEDs reached 100 lm/W, which made it possible to begin using phosphor LEDs for lighting. Now the most efficient white LEDs already produce 200 lm/W, commercial lamps with standard sockets - up to 125 lm/W.
Types of LED lamps
LED lamps replicate all possible types of incandescent, halogen and fluorescent lamps. We produce regular lamps - "pears", "candles" and "balls" with E27 and E14 sockets, "mirror" lamps R39, R50 with E14 sockets, and R63 with E27 sockets, spots with GU10 and GU5.3 sockets, capsule microlamps with bases G4 and G9, lamps for ceilings with base GX53.

Despite the diversity on the country's shelves, they remain unrivaled due to their cost-effectiveness and durability. However, a quality product is not always purchased, because in a store you cannot take the product apart for inspection. And even in this case, it is not a fact that everyone will determine from what parts it is assembled. burn out, and buying new ones becomes expensive. The solution is to repair LED lamps yourself. Even a novice home craftsman can do this work, and the parts are inexpensive. Today we will figure out how to check in what cases the product is repaired and how to do it.
It is known that LEDs cannot operate directly from a 220 V network. To do this, they need additional equipment, which, most often, fails. We'll talk about it today. Let's consider the circuit, without which the operation of the lighting device is impossible. At the same time, we will conduct an educational program for those who do not understand anything about radio electronics.

The 220 V LED lamp driver circuit consists of:
- diode bridge;
- resistance;
- resistors.
The diode bridge serves to rectify the current (converts it from alternating to direct). On the graph it looks like cutting off a half-wave of a sine wave. Resistors limit the current, and capacitors store energy, increasing the frequency. Let's look at the operating principle of a 220 V LED lamp.
The principle of operation of the driver in an LED lamp
| View on the diagram | Operating procedure |
 | A voltage of 220 V is supplied to the driver and passes through a smoothing capacitor and a current-limiting resistor. This is necessary in order to protect the diode bridge. |
 | Voltage is supplied to a diode bridge, consisting of four differently directed diodes, which cut off the half-wave of the sine wave. The output current is constant. |
 | Now, by means of a resistance and a capacitor, the current is again limited and the desired frequency is set. |
 | Voltage with the necessary parameters is supplied to unidirectional light diodes, which also serve as a current limiter. Those. when one of them burns out, the voltage increases, which leads to failure of the capacitor if it is not powerful enough. This happens in Chinese products. High-quality devices are protected from this. |
Having understood the principle of operation and the driver circuit, the decision on how to repair a 220V LED lamp will no longer seem difficult. If we talk about quality products, then you shouldn’t expect any troubles from them. They work for the entire prescribed period and do not fade, although there are “diseases” to which they are also susceptible. Let's talk about how to deal with them now.
Reasons for failure of LED lighting devices
To make it easier to understand the reasons, let’s summarize all the data in one common table.
| Cause of failure | Description | Solution |
| Voltage drops | Such lamps are less susceptible to breakdowns due to voltage surges, however, sensitive surges can “break through” the diode bridge. As a result, the LED elements burn out. | If surges are sensitive, you need to install one, which will significantly extend the life of the lighting equipment, but also other household appliances. |
| Incorrectly selected lamp | Lack of proper ventilation affects the driver. The heat it generates is not removed. The result is overheating. | Choose one with good ventilation that will provide the necessary heat exchange. |
| Installation errors | Incorrectly selected lighting system and its connection. Incorrectly calculated electrical wiring cross-section. | The solution here would be to unload the lighting line or replace lighting fixtures with devices that consume less power. |
| External factor | Increased humidity, vibration, shock or dust if the IP is incorrectly selected. | Correct selection or elimination of negative factors. |
Good to know! Repair of LED lamps cannot be carried out indefinitely. It is much easier to eliminate negative factors that affect durability and not purchase cheap products. Savings today will result in costs tomorrow. As economist Adam Smith said, “I am not rich enough to buy cheap things.”

Repairing a 220 V LED lamp with your own hands: nuances of the work
Before you repair an LED lamp with your own hands, pay attention to some details that require less labor. Checking the cartridge and the voltage in it is the first thing to do.
Important! Repairing LED lamps requires a multimeter - without it you will not be able to ring the driver elements. You will also need a soldering station.
A soldering station is necessary for repairing LED chandeliers and lamps. After all, overheating of their elements leads to failure. The heating temperature when soldering should be no higher than 2600, while the soldering iron heats up more. But there is a way out. We use a piece of copper wire with a cross-section of 4 mm, which is wound onto the soldering iron tip in a tight spiral. The more you lengthen the tip, the lower its temperature. It is convenient if the multimeter has a thermometer function. In this case, it can be adjusted more accurately.

But before you repair LED spotlights, chandeliers or lamps, you need to determine the cause of the failure.
How to disassemble an LED light bulb
One of the problems that a novice home DIYer faces is how to disassemble an LED light bulb. To do this you will need an awl, solvent and a syringe with a needle. The LED lamp diffuser is glued to the body with sealant, which needs to be removed. Carefully running an awl along the edge of the diffuser, inject the solvent with a syringe. After 2-3 minutes, easily twisting, the diffuser is removed.

Some lighting fixtures are made without sealant. In this case, it is enough to rotate the diffuser and remove it from the body.
Determining the cause of failure of an LED light bulb
After disassembling the lighting fixture, pay attention to the LED elements. Burnt is often identified visually: it has scorch marks or black dots. Then we replace the faulty part and check its functionality. We will tell you in detail about the replacement in step-by-step instructions.
If the LED elements are in order, move on to the driver. To check the functionality of its parts, you need to remove them from the printed circuit board. The value of resistors (resistances) is indicated on the board, and the parameters of the capacitor are indicated on the case. When testing with a multimeter in the appropriate modes, there should be no deviations. However, often failed capacitors are identified visually - they swell or burst. The solution is to replace it with suitable technical parameters.

Replacing capacitors and resistances, unlike LEDs, is often done with a regular soldering iron. In this case, care should be taken not to overheat nearby contacts and elements.
Replacing light bulb LEDs: how difficult is it?
If you have a soldering station or hair dryer, this work is simple. It is more difficult to work with a soldering iron, but it is also possible.
Good to know! If you don’t have working LED elements at hand, you can install a jumper instead of the burnt one. Such a lamp will not work for a long time, but it will be possible to gain some time. However, such repairs are carried out only if the number of elements is more than six. Otherwise, a day is the maximum work of the repair product.
Modern lamps operate on SMD LED elements, which can be desoldered from the LED strip. But it is worth choosing the ones that are suitable according to technical characteristics. If there are none, it is better to change everything.

Related article:
To choose the right LED devices, you need to know not only the general ones. Information about modern models and electrical diagrams of working devices will be useful. In this article you will find answers to these and other practical questions.
Repairing an LED lamp driver if you have an electrical diagram of the device
If the driver consists of SMD components that are smaller in size, we will use a soldering iron with copper wire on the tip. A visual inspection revealed a burnt element - unsolder it and select the appropriate one according to the markings. There are no visible damages - this is more difficult. You will have to solder all the parts and ring them separately. Having found a burnt one, we replace it with a functional one. It is convenient to use tweezers for this.
Helpful advice! You should not remove all elements from the printed circuit board at the same time. They are similar in appearance, you can later confuse the location. It is better to unsolder the elements one by one and, after checking, mount them in place.

How to check and replace the power supply of LED lamps
When installing lighting in rooms with high humidity (or), stabilizing ones are used, which reduce the voltage to a safe one (12 or 24 volts). The stabilizer can fail for several reasons. The main ones are excessive load (power consumption of luminaires) or incorrect selection of the unit’s degree of protection. Such devices are repaired in specialized services. At home, this is unrealistic without equipment and knowledge in the field of radio electronics. In this case, the power supply will have to be replaced.

Very important! All work to replace the stabilizing LED power supply is carried out with the voltage removed. Don't rely on the switch - it may not be connected correctly. The voltage is turned off in the apartment's distribution panel. Remember that touching live parts with your hand is dangerous.
You need to pay attention to the technical characteristics of the device - the power must exceed the parameters of the lamps that are powered from it. Having disconnected the failed unit, we connect a new one according to the diagram. It is located in the technical documentation of the device. This does not present any difficulties - all wires are color-coded, and the contacts are labeled with letters.

The degree of protection of the device (IP) also plays a role. For a bathroom, the device must be marked at least IP45.
Article
LED lamps have moved from luxury items to household appliances. Currently, many companies produce such light sources, since their manufacture does not require complex equipment, and the assembly scheme is simple. Now everyone can buy a miracle lighting source, but what to do if it suddenly stops working. It’s good if there is a warranty, but what if it ended or didn’t exist at all? Is it possible to repair LED lamps with your own hands? Let’s try to figure it out in today’s review.
LED lighting sources differ in power parameters and variety of configurations
Before deciding how to disassemble an LED lamp, you need to understand its structure. The design of this lighting source is not complicated: a light filter, a power board and a housing with a base.

Cheap products often use capacitors to limit voltage and current. The light bulb contains 50-60 LEDs, which form a series circuit. They form a light-emitting element.
The operating principle of the products is similar to the functioning of semiconductor diodes. In this case, the current moves only directly from the anode to the cathode. What contributes to the emergence of light flows in LEDs. The parts have little power, so the lamps are produced with many LEDs. To remove the unpleasant sensations from the produced rays, a phosphor is used, which eliminates this drawback. The device eliminates heating from spotlights, since luminous fluxes decrease with heat loss.

The driver in the design is used to supply voltage to the diode groups. They are used as a converter. Diode parts are small-sized semiconductors. The voltage is transferred to a special transformer, where the operating parameters are slightly slowed down. The output produces a direct current, which allows you to turn on the diodes. Installing an additional capacitor helps prevent voltage ripple.

LED lamps come in different types. They differ in the features of the device, as well as in the number of semiconductor parts.
Related article:
We’ll talk about this in more detail in the article to help you reduce costs when purchasing and during operation, and solve other practical problems.
Reasons for repairing LED lamps: device, electrical circuits
Before you start repairing LED lamps with your own hands, it is important to find out the reasons for their failure. The declared service life of lamps may not coincide with the actual lifespan. This is due to poor quality crystals.
There are the following reasons for malfunctions of lighting devices:
- Voltage drops do not greatly affect the operation of electrical parts; noticeable fluctuations in voltage readings can cause a malfunction;
- unsuitable lamp. If the wrong lamp is selected, the light source may overheat.
- light-emitting elements of poor quality contribute to the rapid failure of products;
- improper installation of the lighting system has a negative impact on electrical wiring;
- Strong vibrations and shocks can cause damage to such equipment.

To avoid having to repair the LED light bulb yourself, you need to minimize the impact of the listed factors on the lamp.
Note! If there are no visually detectable deformations, then you need to look for the cause of the breakdown using special devices: a multimeter and a tester.
Frequent problems arising with ice devices
It is often necessary to repair LED lamps yourself if there are problems with the capacitor. To carry out the test, it will have to be removed from the board. You can measure the element voltage with a multimeter. The same device checks the operating condition of the diodes.

In some cases, LED elements blink. This happens if the current-limiting capacitor is faulty. The cause of the breakdown may be a burnt-out emitter. The malfunction cannot be seen in all LEDs, so you will have to check every detail. A tester is used to find the problematic diode.
When making renovations, you can experiment with LED elements. For example, choose warm or cold light temperatures. Some devices do not have a smoothing capacitor and a rectifier. They can be installed using a soldering iron.

Advice! If only one LED burns out, you can close its contacts.
Related article:
High-tech lighting equipment allows you to create a comfortable indoor environment. Let's find out what information you need to know to choose such products.
How to repair an LED lamp with your own hands
If you are wondering how to repair a 220v LED lamp, then get acquainted with the standard repair schemes. The most common cause of failure is capacitor failure. A multimeter is used to check this part. If the capacitor burns out, it is replaced with a new one. Another common lamp malfunction is driver problems. When replacing this part, it is important to choose the appropriate option.

Current limiting resistors don't break often, but it does happen. You can check the malfunction using a multimeter in dial mode. If the deviation of the indicator is more than 20%, then the device is faulty.
LEDs often need to be replaced. They should be checked only after it is clear that everything is in order with the power source. To replace these parts you will need a soldering iron. All faulty elements are soldered off.
The cause of flickering of LED lighting sources is a poor-quality capacitor. To eliminate such a malfunction, it is worth purchasing a more powerful mechanism.
You can try to repair ice lamps LL-corn (corn lamps) with your own hands.
| Image | Stages of work |
|---|---|
 | If it is impossible to find the burnt-out LEDs on the case, then it is dismantled. |
 | Since the wires are short, the base is removed. |
 | To remove the base, the mounting points are drilled with a drill with a diameter of 1.5. Then the base is removed using a knife. |
 | Inside are drivers that power 43 LEDs. The heat shrink tube on the driver is cut off. |
 | After repair, the tube is put back on and pressed with a plastic tie. |
 | The breakdown occurred as a result of high voltage. The driver is connected to the socket. |
Before any repair, be sure to check for voltage. This turns on the required switch. If there is no voltage, the electrical wiring is checked and the fault is eliminated.

It is important to check the functionality of the light bulb, as well as the integrity of the fuses. You can ring not only integrity, but also the possible presence of a short circuit. The power supply and LEDs are also checked. LEDs can be tested using a battery. To do this, voltage is applied to each LED through a resistor.

If a larger number of LED elements in the lamp have burned out, then you need to unsolder all the old ones, and then solder the working elements to the back side.

LED lamp repair (video)
You might also be interested in:
 Scheme for connecting a 220V LED strip to the network - done correctly
 How to hang a chandelier on a suspended ceiling: video and main steps
The lamps use LEDs as a light source. LED lamps are used for street lighting, in industry and in everyday life. These are the cleanest lighting sources from an environmental point of view.
Their safety is based on the use of non-hazardous components in the manufacture. No mercury is used, so LED bulbs are not dangerous if they burn out or break.
Device, principle of operation
The main components of an LED lamp are:
- Frame.
- Base.
- Driver.
- LEDs.
A light-emitting diode is designated by the letter abbreviation LED or SD. In English its designation is LED. It is part of the LED lamp as a light source.
The scheme of its operating principle coincides with the process of any semiconductor diode made of germanium or silicon with a p-n junction. When a positive potential difference is applied to the anode and a negative potential difference to the cathode, electrons move towards the anode and holes move towards the cathode. The current flows straight through the diode in one direction.
But, in the composition of other materials from semiconductors, when bombarded in the forward direction by holes and electrons, they carry out recombination, transferring them to the next energy level. As a result, photons are released, which are elementary particles of light wave radiation.
In electrical circuits, LEDs are designated as ordinary diodes, and arrows are added to them (light emission).
Semiconductors have different photon-emitting properties. Straight-gap conductors—the substances gallium nitride and gallium arsenide—are transparent to light waves in the visible spectrum. The release of light occurs as a result of the replacement of p-n junction layers.
In an LED, the layers are located:

1 - Anode
2 - Cathode
3 - Active layer based on In-GaN
4 - GaN-based buffer layer
5 - Sapphire substrate
6 - Conducting n-GaN layer
7 - Current-conducting p-GaN layer
There are contact pads in the layers for the cathode and anode.
When electrons transform into photons, energy is lost for the following reasons:
- Light waves are refracted at the exit from the semiconductor at the crystal-air location, the wavelength is distorted.
- Inside the layer, some light particles are lost, although the layer is very thin.
The luminous flux can be increased if a sapphire substrate is used. Such designs have found application in lamps. In conventional LEDs, a substrate is not used for indicators.
Such diodes have a lens made of a reflector that directs the light and epoxy resin. According to the purpose of the lamp, the angle of light propagation has a wide range from 5 to 160 degrees.
Expensive diodes for lamps are produced with a Lambertian diagram, that is, the brightness of the LED in space is constant, regardless of the angle or direction of the light.
The crystal dimensions are small; there will be little light from one crystal. The lamps contain a group of LEDs. It is difficult to make lighting uniform, since each diode is a point light source.

1 - Pin 1
2 - Housing
3 - CHIP
4 - Phosphor layer
5 - Explorer
6 - Reflector
7 - Conclusion 2
8 - Heat sink
9 - Insulator
10 - Printed circuit board
The narrow spectrum of light waves from semiconductor diodes leads to eye fatigue and discomfort, unlike the sun or incandescent lamps. To somehow correct this drawback, a phosphor layer was introduced into the design of the LEDs.
The amount of light emitted by a semiconductor diode depends on the current strength of the pn junction. With a higher current, the radiation is higher, up to a certain threshold.
The dimensions of LEDs are small, so it is not possible to use large currents. The current for indicator diodes does not exceed 20 mA. For more powerful lighting lamps, heat removal and protective measures are taken, which have limitations.
The light flux in the lamp increases as the current increases, then decreases due to heat loss. No heat is generated when an LED lamp is illuminated; they are considered cold light.

But this does not mean that the lamp does not heat up. The current passing through the LED passes through the resistance sections at various contacts, which causes the lamp to heat up. Energy is lost due to heat, and when the current increases, the heat can damage the design of the LED lamp.
LED crystals in lamps can reach a large number (more than 100). To supply the optimal current value, boards are made of fiberglass with tracks that conduct current and have different configurations.

LED crystals are soldered to contact pads in groups, power is supplied sequentially, and the same current is passed through each chain. This scheme is technically simple, but has a serious drawback. If any contact is broken, then all the links in the chain stop shining and the lamp fails.
Each group of diodes is supplied with a constant voltage from the driver device. Previously, it was called a power source. The driver converts the network input voltage into the supply voltage of the LEDs. The input voltage can be either 220 V (in an apartment) or 12 V (in a car).
It is difficult to connect a stabilized direct current to each LED in parallel and is rarely used. Drivers have different circuits: transformer, etc. Common circuit options depend on the configuration.

Drivers have a low cost provided that they are connected to a constant voltage that is protected from surges, surges and pulses, and do not have a current-limiting resistor in the power output circuit. This is used in battery-powered flashlights, in which the LEDs are connected to batteries.
They are powered by high current, shine brightly, and burn out quite often. If the drivers do not have protection against voltage surges, then cheap lamps will quickly burn out without reaching their service life under warranty.
High-quality power supplies do not heat up, overloaded drivers heat up, and energy is wasted on heat loss. These losses are quite significant; they can exceed the energy of the emitted photons (light).
LED apartment lamps have an E27 base. It makes it possible to use lamps in conventional sockets. Imported lamps are equipped with different sockets, which require appropriate sockets, with differences in thread pitch and diameter. The supply voltage can be 110 V. Lamps for cars also come in different socket designs.
To protect LEDs, you do not need sealed bulbs, you do not need to pump air out of them or create a gas environment. The LEDs are covered with plastic materials that transmit light.
The placement of parts on LEDs differs among manufacturers for different purposes. The installation sequence is the same: from the driver to the LED board, covered with protective glass. Heat protection screens, etc. can be installed.
The design and design features of different manufacturers may differ significantly in similar lamps, but their design principles are common.
Types and applications of LED lamps
Based on their application, LED lamps are divided into:
- For home and office.
- Street.
- Spotlights.
- Automotive.
- LED lamps for plants (ultraviolet).
- Lamps for buildings.
Based on their design and luminous flux, LED lamps are divided into:
- General purpose, for offices and residential premises, similar to incandescent lamps, candles, “corn” lamps.
- Directional light – for illuminating shop windows and areas.
- Linear, tube-shaped, similar to fluorescent lamps. Suitable for sales areas and offices.
By types of LEDs used:
- Indicator diodes. These include lamps with 3 mm diodes and Piranhas. The quality of light from such lamps is low.
- SMD diodes are common, small in size, do not heat up, and are widely used.
- Diodes 1, 3, 5 W, heating is significant.
- SOV diodes, using new technology, have an advantage over others: they are more reliable due to the installation of diodes directly on the board, uniform luminous flux, different lamp shapes.
- Filament diodes, 360 degree lighting, low price, heat sink.
Separation by type of base

Edison sockets with threads and the designation beech E with a number are widespread. The number is the diameter of the base in mm (E27, E14, E40). Base G – pin connection. The number indicates the distance between the pins (terminals). Such lamps are connected only through a power supply. The T socket is used to replace fluorescent lamps, measured in inches.
Advantages, disadvantages, features
The advantages include:
- Energy saving, energy efficiency, consume 5 times less energy.
- The service life is 30-50 thousand hours of operation for different types.
- Mechanical strength.
- Safety, do not contain harmful substances, no strong heating, used in any lamps, for suspended ceilings.
- Wide temperature range of use, work down to -60 degrees below zero.
- Quick start, shine brightly immediately.
- Reliability with frequent switching off and on.
- Environmentally friendly, can be disposed of with regular waste.
Disadvantages include:
- Large sizes due to the technical side of the device.
- They are afraid of overheating, efficiency decreases, and they become dull.
- They may not fit into any chandelier due to the increased size.
- The luminous flux is directional; it shines worse on the sides and behind.
- The cost is higher than other types of lamps, the price decreases every year.
Peculiarities
LED lamps consist of a board with LEDs, a base, a housing, a power supply, and a matte bulb. The current is immediately converted into light, bypassing the heating stage, as in incandescent lamps. Heating losses are minimal, LEDs are economical and safe.
LEDs were invented back in the 70s, but were used only in devices, indicators, and screens. High-brightness blue LEDs were manufactured in 1993, white ones in 1996. Modern LEDs have a light output of up to 170 lm/W.


