Adjusting the cooler rotation speed. How to reduce fan speed or "quiet cooler"
Good day, computer users. The topic of our conversation today worries many: how to make the cooler much quieter.
Often the main reason for the loud operation of the cooler is the presence of a layer of dust on it. This is easy to check without even removing the cover from the system unit. It is enough to give the PC a small load, and the cooler starts spinning at maximum speed (and no drop in temperature is observed).
You should clean the dust in the entire system yourself or order subscription service for your computers. If cleaning does not help, you should find out if there is any mechanical damage to the cooler.
These simple steps often help reduce noise, but in some situations they are not enough. If you are completely sure that the noise is not due to dust, then you are faced with a problem that needs to be solved by other methods. Most likely, the matter is in the rotation parameters, namely, in the given torque. It turns out that even with normal PC loading, a lot of noise appears, which means that the speed is high. In this article you will learn how to correctly set the optimal fan speed.
So, let's begin.
Correct cooler speed: how to achieve it? Speed fan
Fan adjustment is done using the motherboard. The required speed is calculated based on the temperature data and the settings specified in the Bios. The motherboard independently regulates the rotation speed by changing the voltage/resistance, which allows it to control the speed based on user-specified settings. In addition, the temperature of the PC inside the case is taken into account.

But these actions do not always lead to setting the correct cooler rotation speed, despite “smart” technologies. In most cases, there is a choice of either the maximum rotation speed or the minimum. The first option causes excessive noise, the second ─ the cooler is much quieter, but the speed is not enough for normal cooling. There are at least 3 options for solving the problem:
- trying to enter the required values using Bios;
- physical impact on the operation of the cooler with the subsequent connection of various physical. devices capable of changing the rotation speed;
- installation of specialized software for speed control.
The first option may seem the simplest, but it is not suitable in all cases. No one can guarantee that all coolers are powered by motherboards. boards , which means Bios may not even be aware of their presence. This often applies to case fans. In reality, everything looks like this: they work at full capacity, which is unnecessary, and produce unnecessary noise.

Physical intervention can help, but for this the owner must have the necessary knowledge of physics and electronics, and understand how the rotation speed can be changed. And besides, there is no guarantee that your intervention will not lead to damage to the fan, and cutting the wires itself is not an easy task. Ultimately, you can end up with a cooler whose rotation speed is forced to change, and it will not be possible to increase it if necessary.

The solution may be to buy a reobass. You need to connect everything through it and easily change the rotation speed. However, this is quite expensive, and many people do not like this method because they have to change the set speed each time, which can only be done manually.
Having analyzed the two methods, we smoothly moved on to the most important thing - installing special programs for adjusting the speed. If you try, you can even find free programs, among which the highest quality is Speed fan. This utility completely copes with the adjustments and will be your salvation. The only problem is that this program is in English, but the interface is quite simple and you will quickly figure it out. Installing a program is several times easier than installing a game.
When you launch the utility for the first time, the following window may appear:

Click on the “Do not show again” checkbox, then “Close”:

So, let's figure it out. Regardless of whether it is a new version of the program (picture above) or an old one (picture below), the principle of operation is the same. The only difference is the different value signatures.

“Cpu Usage” ─ this field with indicators shows how much the processor and its cores are currently loaded. “Configure” opens the program settings, “Minimize” minimizes it.
“Automatic fan speed” ─ it makes no sense to enable this checkbox, because then the cooler will rotate at the original speed, which will reduce the benefit of the utility to zero. It makes no sense to install a program and not change the speed. If you don’t want to waste your own time, order computer repairs in Butovo at a time convenient for you.
IMPORTANT! There is a 100% guarantee that the coolers in your PC are installed in the right places, so when choosing CPU or Fan1 for the first time, you need to remove the cover of the system unit and observe which cooler will work slower (faster) when changing parameters in the program. This is worth dealing with from the very beginning, since the program may incorrectly read information about coolers, and they may be connected to the motherboard sockets incorrectly.
Next is a set of indicators of the rotation speeds of certain fans (on the left) and the temperatures of components (on the right) at the current moment. So which is which? Let's look at the example of rotation speed, which is measured in RPM (rpm):
- SysFan (Fan1) ─ shows the rotation speed of the fan plugged into the SysFan socket on the motherboard. A chipset cooler or any other cooler connected here by mistake can be connected here (each motherboard connector has a specific signature);
- CPU0 Fan (Fan2) ─ parameter showing the speed of the fan on the processor, provided that it is plugged into the CPU_Fan slot;
- Aux0 Fan (Fan3) ─ provides information about the current rotation speed of the cooler plugged into the AUX0 connector;
- CPU1 Fan (Fan4) ─ similar to CPU0, works if there is a second processor or a connector for a cooler labeled CPU1_Fan;
- Aux1 Fan (Fan5) ─ similar to Aux0, shows the rotation speed of the knob connected to the AUX1_Fan connector;
- PWR Fan (Fan6) ─ indicates the speed of the cooler located in the power supply? or the speed of any fan connected to the PWR_Fan connector on the motherboard.
Particular attention should be paid to the fact that these parameters completely coincide with the motherboard connectors, into which you can connect absolutely any cooler from the listed ones, and the indicator will be in the corresponding column of the utility. This is only possible if the cooler is connected via a small 3-pin connector on the motherboard. For clarity, take a look at the photo. The first photo is with the correct connector (4-pin) and socket (3-pin). Speed adjustment is allowed:


The wrong connector (power supply to the power supply) does not allow monitoring and changing the speed even using the program:

If you find this method of powering coolers from the power supply in your computer, it is better to re-plug the plugs into the connectors on the motherboard. This will allow you to change operating parameters using the utility.
As mentioned above, the temperature of the components is indicated on the right, but the indicators of this program are not always adequate and accurate, and this parameter is better controlled using analogues HWMonitor or AIDA64, which give the most accurate values. Taking into account their readings, set the settings:


Now we have reached the most important thing - speed adjustment. This can be done in one way: opposite the inscriptions Speed (01-06) or Pwm1-3 Pwm1-3 (for newer versions) there are arrows that set the fan rotation speed. They are exactly what we need. If you press them, you can hear how the rotation speed of the coolers changes. Here you can understand what the minimum volume of your PC is.

To understand in which column the speed of each cooler is located, click on the arrows and see where the RPM will change. You cannot turn off the fans completely, as there is a risk of burning something. When adjusting, you should also monitor the temperature.
Disable/enable fan speed control in BIOS
Some motherboards and their BIOS types may block the program. This occurs because automatic or pattern-based throttling is enabled or disabled in the BIOS.
You may encounter incorrect operation of the program and problems that arise, or you decide to connect speed control using the motherboard. Then you will need to go into the BIOS and activate or disable the adjustment system. You can do it like this:


If Q-Fan is in the Enable position, then automatic control is enabled, if Disable control is performed manually using the utility. Depending on what type of BIOS is in your PC, this parameter is located. It may be in other tabs and have a different appearance. Sometimes it is necessary to switch the CPU Fan Profile from Auto to Manual (or vice versa).
There may be many options for the location of this tab, but its presence is required on every computer, and you can find it. Perhaps it will be called CPU Fan Contol, Fan Monitor, etc.
Afterword
The program has other tabs that are responsible for completely different components. This program may be exactly the utility you have been looking for for a very long time. Keep your PC productive and quiet.
The main problem with active use of laptops, especially in the warm season, is overheating. This leads to their slowdown and periodic self-switching off. Standard settings for laptop computers require coolers to operate at only half their maximum power. Therefore, if necessary, the fan speed of the PC cooling system can be increased.
Ways to overclock a cooler on a laptop
If a modern desktop computer has three fans installed (for the processor, video card and built-in storage), then laptops usually use only one. Although a high-power video card can also be equipped with a cooler. In this case, it is possible to overclock both one or both cooling devices.
You can control the fan speed in two ways:
- through the basic input/output environment (BIOS);
- by installing additional software.
Before increasing the speed of the cooler on a laptop in one way or another, it is necessary to disassemble the PC and clean the fan blades and all elements of the motherboard from dust, because dust impairs heat transfer, thereby increasing the temperature of the system.
Overclocking a cooler via BIOS
All modern motherboards allow you to monitor and control the operation of the cooling system. This is done using special drivers that come with the laptop. If the motherboard installed on your PC is equipped with this function, you can overclock the fan through the BIOS. This is done as follows:
The appearance of the Hardware Monitor subsection may differ slightly in different BIOS versions. However, if you know what to look for, you will have no problem completing the required settings:

Programs for overclocking the cooler in a laptop
If you do not like working with the BIOS environment, then to increase the rotation speed of the fan blades, you can use special software designed to control the cooling system.
The most effective programs in this area are:
- SpeedFan;
- AMD OverDrive;
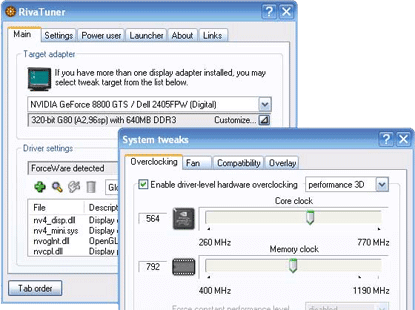
- Riva Tunes.
Using the SpeedFan utility
SpeedFan is a completely free application with a simple and intuitive interface. To overclock a laptop cooler using SpeedFan, you will need:

Changing fan mode using AMD OverDrive and Riva Tunes
To control the operation of a laptop running an AMD processor, Advanced Micro Devices has developed a unique program that allows you to increase the performance of the chipset by changing its settings.
To increase fan speed using AMD OverDrive, you must:

If your laptop is based on an Intel processor, then instead of AMD OverDrive you need to install the Riva Tunes utility. The settings of this program are carried out according to the same principle as in the first case, so there is no point in emphasizing this again. 
Overclocking a fan on a laptop computer is quite simple. However, it must be remembered that As the speed of rotation of the cooler blades increases, the noise level also increases, which may cause some inconvenience when listening to music or watching movies. Another problem that you will encounter when the fan rotates faster is increased power consumption. If the laptop is powered from the network, this will not affect its operation in any way. With local power, the battery will drain faster and its service life will be slightly reduced.
The operation of a personal computer depends on the state of all elements of the system and the load they experience. Some of them are used less intensively, while the processor or video card is constantly loaded and, as a result, overheats. To cool such system elements, a cooler and a radiator grille are used, which lower the operating temperature of the devices, creating comfortable conditions. There are situations when the computer does not work stably and its elements heat up above normal. In such a situation, increasing the cooler speed will help. We will look at how to increase the rotation speed of the processor cooler below.
Before understanding the options for increasing cooler speed, you need to understand the reason why the processor or video card is heating up. There may be many of them, and not all of them will be helped by simply increasing the rotation speed of the processor cooler. Let's look at them in more detail:
- The processor was purchased a long time ago and its working life is gradually coming to an end. In this case, increasing the speed of the cooler blade will help, but not for long and you may soon need to replace the old processor with a new model;
- The thermal paste, which transfers excess heat from the processor to the cooler, has become unusable. Here, simply increasing the cooler speed is not enough. A regular cooler will still not cope with excess heat energy, even if you increase the speed. A comprehensive solution will help here. The rotation speed of the cooler is temporarily increased, which is necessary to purchase thermal paste, after which the protective layer on the processor is renewed and the speed returns to normal. This is not difficult to do, and any user will update the protective layer independently, without the help of specialists. To do this, just read the instructions on the Internet and do everything carefully, without rushing;
- The computer is used to solve complex problems and the software used during the work overloads the system. In this case, a speed boost is ideal since the PC is functioning normally, it's just a little lacking in power;
Note! By limiting yourself to simply increasing the cooler rotation speed without understanding the essence of the problem, you increase the chances of burning your computer. This will lead to large financial expenses, which we absolutely do not need.
After you are convinced that the system is working properly, you can move on to the options for overclocking the cooler. The most proven of them are the following possibilities:
- Increase the fan speed by setting the appropriate commands through the BIOS;
- Installing special applications on your computer that will help you increase the number of cooler revolutions to the desired value;
- The speed is regulated not only by software. There is special equipment with which the cooler is accelerated to the required values;
Each option has its own advantages and disadvantages, which we will discuss separately.
Users asking questions about how to increase the speed of a cooler through the BIOS should be aware of the following:
- To implement the method, you need to have a general understanding of the BIOS system and how to work with it. This is due to the wide variety of BIOS graphical interfaces, which have significant differences in terms of data location;
- The option will not allow you to set any number of revolutions you want. The range of available values is small;
The basic algorithm of actions, suitable for most BIOS interfaces, looks like this:
- We launch the BIOS by pressing the Del button or one of the function keys F1 - F12. The activator button is different for different versions;
- After starting the BIOS, go to the Power section;
- In the window that appears, look for the phrase Hardware Monitor. If it could not be found, go to any tab containing the word Hardware;
- Now you need to decide which option for overclocking the cooler is preferable for you - overclock it to maximum on a constant basis, or increase the rotation power only depending on the current processor temperature;
- To implement the first option, click on the CPU min Fan Speed item and select the number of revolutions from the available values. This method is energy-consuming, but allows for maximum processor cooling;
- Another option is realized by clicking on the line CPU Smart Fan Target. With its help, the owner of a personal computer sets a certain temperature value, the achievement of which by the processor will trigger the accelerated operation of the cooler. This mode allows you to reduce power consumption, but this protection against overheating is worse, since the activation does not work immediately. Constant jumps in the number of revolutions can also cause discomfort for some users;
- To exit the BIOS and save the settings as specified, click the Save button
Setting the maximum cooler rotation mode is recommended only in extreme cases, since changing the fan speed reduces the operating life. If this method is not for you, pay attention to another solution to the problem - installing software to adjust the fan speed.

Cooler speed programs
There are many programs available on the Internet, the installation of which helps to accelerate the rotation of the cooler to the required values. Not all of them are safe for your computer and some can harm the system, causing it to fail. To prevent this from happening, use time-tested software products.
Citizens using AMD processors will benefit from the AMD One Drive application. Advantages of the software product:
- You don't have to pay money to access. The adjustment program is freely available;
- Designed to interact with system components from AMD, allowing you to customize work taking into account all the nuances;
The cooler is configured this way:
- Download and launch the application;
- In the window that appears, select Performance Control;
- Go to the FAN Control subsection;
- We adjust the rotation speed of the blades to the desired value;
If you have an Intel processor, it is better to configure cooling using the Speed Fan program. Pros of the application:
- The product is completely Russified, which allows you to understand all the settings without much effort;
- No money is charged for using the software product;
- Not limited to working with one manufacturer and, if necessary, suitable for customizing any cooling system;
In addition to overclocking processor coolers, there are applications that allow you to work with video card cooling systems. An example is MSI Afterburner, by installing which you will have access to setting up your video card cooler. When installing any third-party software, keep in mind that all settings are performed at your own peril and risk. By setting the wrong value, you will quickly disable the entire system. If you are not confident in your own abilities, seek advice from specialists.
Adjusting the cooler speed using additional devices
You can control the processor cooling system using third-party equipment, which allows you to set the required speed through a control panel installed in the system unit case. Such equipment is used when assembling powerful personal computers and is installed instead of a DVD drive, or in the free space under it.
Such devices are called reobass, and their installation allows you to achieve the following effect:
- Cooling is quieter than other methods;
- Coolers work without interruption;
- You can control the speed either manually, through a panel on the system unit case, or using programs, in automatic mode;
Some risky owners who want to save money assemble homemade versions of devices according to diagrams provided on the Internet. This approach is extremely risky and threatens the failure of all elements of the system unit. In this case, you will have to spend much more money than in the case of purchasing normal, licensed equipment.
- Clean the inside of your PC regularly, paying special attention to the cooler blades;
- Do not adjust the speed down unless necessary;
- You should not rely on the programs to work 100%. Some of them do not work correctly with sensors inside the computer, which is why the displayed processor temperature differs from the current one. Monitor this by periodically checking the temperature by other means;
The cooler is an important component of the cooling system of any computer. It performs the function of removing warm air. Fan speed control is performed directly from the motherboard and depends on the readings of the processor chip temperature sensor. The higher it is, the higher the fan rotation speed. Self-adjustment of the speed is most often done due to the high noise that the fan creates.
Note: when adjusting the speed yourself, you MUST monitor the processor temperature, since as the speed decreases, it increases, which can ultimately damage the chip.
How can I independently adjust the fan speed through the BIOS?
You can adjust the fan speed in the standard way - through the BIOS.To enter the BIOS, you must press the “Delete” key at the beginning of boot (in some computers it may be “F2”, “F12”, “Esc”). Depending on the BIOS type, fan speed control is located either in the “Power” or “Hardware Monitor” tab.

In this menu you can independently adjust the fan speed.
How to adjust fan speed in Windows?
On some motherboards, changing cooler settings in the BIOS may be blocked, or the adjustment may be superficial. In this case, you can use special utilities provided by the manufacturer along with the drivers (MSI Afterburner, PCProbe). If these are not available, you can use third-party programs, for example, SpeedFan. It is very popular among users, is absolutely free and has an intuitive interface.
When you first start the program, it reads the current system parameters and fan speed.
Note: at boot time, the computer fan should be running at maximum speed, since the utility reads the current fan speed and takes it as 100%.
The first block displays information from detected cooler sensors. The second contains information from device temperature sensors. The third is for adjusting the fan speed. In the “Speed01” item you can set the desired speed level (in percentage).
When is it impossible to independently adjust the fan speed on a computer?
It is impossible to adjust the cooler rotation speed if the motherboard does not have such support. Typically these are coolers with a 3-pin connector. To make it possible to control the fan speed on your computer, you need to purchase a cooler with only a 4-pin power connector or buy a speed controller to which the fan is connected directly. In this case, the adjustment is performed directly on the removable block, which is called a reobass.Also, in most laptops, the speed control function is also not available (again due to the 3-pin connector). Only a few models that require the use of manufacturer's programs have such support. This was done to avoid overheating, since the compactness of the components limits heat transfer. Therefore, it is not recommended to change the fan speed manually.
All active laptop users are aware of the problem of overheating, especially in the hot season, and it entails not only freezing and a long response of the system to user action, but also failure of components.
Based on this, the question arises, how to increase the rotation speed of the cooler on a laptop?
Since the fan is responsible for cooling, the only correct solution is to overclock it. There are several ways to do this, but let's look at the most common ones.
Speedfan
A very popular free overclocking program. First of all, it is designed to monitor the temperature of all components, and one of its functions is the ability to monitor the fan. With its help, you can control the speed, depending on the needs and load of the processor.
So what to do:

But this is only one of the methods that allow you to overclock the cooler on a laptop.
BIOS
You can also increase the fan speed using the BIOS. This is also done according to a certain scheme.
If you do not have experience working with BIOS, then it is better to entrust the work to an experienced technician, otherwise the integrity of the system may be compromised and the computer will simply stop booting.
You need to do the following:

The appearance of the settings may differ depending on both the manufacturer of your laptop (Lenovo, Samsung, Packard Bell, etc.) and the BIOS version.
AMD OverDrive
For owners of laptops with an AMD processor, a special utility has been developed that allows not only to control the rotation speed of the cooler, but also allows you to change the settings of the entire chipset, thereby increasing the performance of the PC.
To overclock the fan, do the following:

After all the manipulations, the rotation of the fan will be completely under the control of the utility, and you will no longer have to worry about anything.
Riva Tuner
Another utility that allows you to increase or decrease the fan speed on laptops running an Intel processor. The whole point is that the necessary settings are installed here according to the algorithm described in the method where AMD OverDrive technology was used, so we won’t go into more detail; even a beginner can handle it.

When installing any software, you should understand that it is preferable to download programs exclusively from official sites, otherwise there is a risk of introducing malware onto your computer.
In what cases can a cooler not be overclocked?
Fan connectors come in two types: 3-pin and 4-pin (PWM). And only the last of them can be controlled.


I learned this from my own experience when, in the process of updating the hardware, I replaced the old 4-Pin cooler with a newer 3-Pin and encountered the problem that it could not be accelerated in any way. Therefore, when choosing, always take this into account.
Programs from the manufacturer
There are cases when third-party software does not detect laptop fans or there is no way to change the speed. And then original programs from laptop manufacturers come to the rescue.
A small list of such programs:
- In some HP models, you can only speed up work using the Notebook Fan Control utility.
- Acer provides its users with the “Smart Fan”, “Fan Controller” and “ACFanControl” utilities.
- Lenovo has a "Fan Control" utility.
You can find and download them on the official website. However, not all laptop models may have such software.
If none of the methods brought the desired result, and it was not possible to increase the speed of the cooler, then we recommend using special cooling pads. They will help you achieve the optimal temperature of your laptop, and it will last a long time.


