Checking the hard drive for bad sectors. Checking the hard drive for functionality
Hello.
Forewarned is forearmed! This rule comes in handy when working with hard drives. If you know in advance that such and such a hard drive will most likely fail, then the risk of data loss will be minimal.
Of course, no one will give a 100% guarantee, but with a high degree of probability, some programs can analyze S.M.A.R.T. readings. (a set of software and hardware that monitors the condition of the hard drive) and draw conclusions on how long it will last.
In general, there are dozens of programs to perform such a hard drive check, but in this article I wanted to focus on some of the most visual and easy to use. So…
How to find out the status of your hard drive
HDDlife
(By the way, in addition to HDD, it also supports SSD drives)
One of the best programs for constantly monitoring the condition of your hard drive. It will help you recognize the threat in time and replace the hard drive. Most of all, it captivates with its clarity: after launching and analysis, HDDlife presents the report in a very convenient form: you are shown the percentage of the “health” of the disk and its performance (the best indicator, of course, is 100%).
If your performance is above 70%, this indicates the good condition of your disks. For example, after a couple of years of work (quite active by the way), the program analyzed and concluded: that this hard drive is about 92% healthy (which means that it should last, unless force majeure occurs, at least the same amount) .

After launch, the program minimizes to the tray next to the clock and you can always monitor the status of your hard drive. If any problem is detected (for example, the disk temperature is high, or there is too little space left on the hard drive), the program will notify you with a pop-up window. Example below.

HDDLIFE alerts you when your hard drive is running out of space. Windows 8.1.
If the program analyzes and gives you a window like the one in the screenshot below, I advise you not to delay making a backup copy (and replacing the HDD).

HDDLIFE - the data on your hard drive is in danger, the faster you copy it to other media, the better!
Hard Disk Sentinel
This utility can compete with HDDlife - it monitors the disk status just as well. What captivates us most about this program is how informative it is and how easy it is to work with. Those. it will be useful for both a novice user and an already experienced one.
After launching Hard Disk Sentinel and analyzing the system, you will see the main program window: hard drives (including external HDDs) will be presented on the left, and their status will be displayed in the right window.
By the way, there is a rather interesting function for predicting the performance of the disk, according to how long it will serve you: for example, in the screenshot below the forecast is more than 1000 days (that’s about 3 years!).
The condition of the hard drive is EXCELLENT. No problematic or weak sectors were found. No speed or data transmission errors were detected.
No action needs to be taken.
By the way, the program has a rather useful function: you can set the threshold for the critical temperature of the hard drive, upon reaching which Hard Disk Sentinel will notify you that it has been exceeded!

Hard Disk Sentinel: disk temperature (including the maximum for the entire time the disk was used).
Ashampoo HDD Control

An excellent utility for monitoring the status of hard drives. The monitor built into the program allows you to find out in advance about the first problems with the disk (by the way, the program can even notify you about this by e-mail).
Also, in addition to the main functions, a number of auxiliary ones are built into the program:
Disk Defragmenter;
Testing;
Cleaning the disk from garbage and temporary files (always relevant);
Deleting the history of visiting sites on the Internet (useful if you are not alone at the computer and do not want anyone to know what you are doing);
There are also built-in utilities for reducing disk noise, adjusting power, etc.
Screenshot of the Ashampoo HDD Control 2 window: everything is fine with the hard drive, condition 99%, performance 100%, temperature 41 degrees. (it is desirable that the temperature be less than 40 degrees, but the program believes that for this disk model everything is in order).
By the way, the program is completely in Russian, intuitively thought out - even a novice PC user can figure it out. Pay special attention to the temperature and status indicators in the main program window. If the program produces errors or the condition is assessed as extremely low (+ in addition there is a grinding or noise coming from the HDD), I recommend that you first copy all the data to other media, and then start dealing with the disk.
Hard Drive Inspector
A distinctive feature of this program is:
1. Minimalism and simplicity: there is nothing superfluous in the program. It gives three indicators in percentage terms: reliability, performance and absence of errors;
Hard Drive Inspector - monitoring the condition of the hard drive.
СrystalDiskInfo
A simple but reliable utility for monitoring the status of hard drives. Moreover, it works even in cases where many other utilities refuse, crashing with errors.
The program supports several languages, is not full of settings, and is designed in a minimalist style. At the same time, it has quite rare functions, for example, reducing the disk noise level, temperature control, etc.
What is also very convenient is a graphical display of the situation:
Blue color (as in the screenshot below): everything is ok;
Yellow color: alarm, measures need to be taken;
Red: you need to take immediate action (if you still have time);
Gray: the program was unable to determine the readings.

CrystalDiskInfo 2.7.0 - screenshot of the main program window.
HD Tune
This program will be useful to more experienced users: who, in addition to a graphical display of the “health” of the disk, also need high-quality disk tests, in which they can familiarize themselves in detail with all the characteristics and parameters. It should also be noted that the program, in addition to HDD, also supports new-fangled SSD drives.
HD Tune offers a rather interesting feature to quickly check a disk for errors: a 500 GB disk is checked in about 2-3 minutes!
HD TUNE: quickly find errors on the disk. Red squares are not allowed on a new disk.
Also very necessary information is checking the disk read and write speed.
HD Tune - checking disk speed.
Well, we can’t help but note the tab with detailed information about the HDD. This is useful when you need to know, for example, supported functions, buffer/cluster size or disk rotation speed, etc.
HD Tune - detailed information about the hard drive.
In general, there are at least as many similar utilities that can be cited. I think that these will be more than enough for most...
And lastly: do not forget to make backup copies, even if the disk condition is rated as 100% excellent (at least the most important and valuable data)!
Good luck...
aass, didn't use it. But I note that Victoria and MHDD are proven tools for serious diagnostics.
And Windows 7 can track SMART information. It will warn you if anything happens.
aass
Vadim Sterkin, Thanks for the answer and for the topic!
I agree with the assessment of the Victoria and MHDD programs, I myself use Victoria for serious diagnostics, but I try to test other programs, everything is learned by comparison.)
Dmitriy
When checking the hard drive with a standard program on Windows 7, it says that bad clusters were detected in null.sys... what kind of driver is this?
Dmitriy
Vadim Sterkin,
thanks...can the system slow down because of it?
Sanyok
Hello.
I ran (hypothetically) checking the C: drive from the graphical interface with parameters similar to your screenshot. Clicked the "Schedule disk check" button. Changed my mind. How can I cancel this one-time system disk check before rebooting the system?
I myself assume that it may be entered into the Task Scheduler.” But I want to know for sure. I see no point in experimenting. Since, after such a check was completed successfully once (in practical reality), it would be entered into the “Scheduler” even as a one-time check, and should, in theory, be saved. After all, tasks from the “Scheduler” do not have the ability to self-delete (I think so). But I didn’t find any traces in the “Planner”. As you probably know, I didn’t receive an answer on the Internet or on the forum.
Simply put, I want to know where this mythical “Check Schedule” is located and what methods and methods Windows 7 offers for adjusting it. And then it turns out like this - click, and ala-ulu...
Sanyok
Yeah…
There were graphics, but they all came out. This is some kind of graffiti, black and white, with a register. Just like Battleship Potemkin.
(Yes, I Googled, but really for a slightly different request). Thank you.
You can plan this by checking two boxes in the chart, and canceling by going to the register. They got smart here. Well, okay, there’s nothing to do - I’ll post in the forum.
Yes, by the way, does it make sense to check the second (bottom) checkbox if the system is on an SSD? After all, as far as my knowledge is sufficient, the SSD controller itself periodically (when idle) scans the memory for faulty cells.
And this second checkbox, by definition, is intended to check for broken cells on the surface of the HDD.
Sanyok
Sanyok,
You turn on your TV with the remote control and set the wake-up timer. The next morning you wake up to the music of your favorite music channel. And life flows smoothly and measuredly. But at one fine moment it dawns on you - after all, tomorrow is Sunday. No problem, you tell yourself. With a slight movement of your hand and a screwdriver, without unplugging the TV from the mains, you remove the back cover, quickly replace a couple of resistors on the board and you’re done. Tomorrow you can sleep peacefully until lunchtime.
Do you feel what I mean?
Vadim Sterkin: Sanya, what do you mean, smart? You don’t have to split hairs by pressing all sorts of strange buttons, and everything will be fine :)
It's really funny, but also of course, of course Truth.
Yes, but it’s not entirely appropriate. I don’t see anything unpredictable or completely incomprehensible in checking the disk. And the conversation was about the fact that if you have already provided a graphical opportunity to schedule such a task, then be kind enough to provide the same opportunity to disable it, and not through one place (the registry). Either remove graphics when planning (do planning only through CMD), or provide the ability to disable this task using the graphical interface. As an engineer, in my technical practice and in the practice of interfaces of various industrial programs and IT, this is the first time I have come across something like this. Yes, and in Windows OS too.
That’s what I wanted to convey when I said, “We’ve been clever.”
When faced with a question, I noticed that this function causes complaints from the user in terms of frequent independent launches. But let's not talk about that. As unrelated to the topic.
And of course, thanks for the comments. Everything is clear to me here.
Regarding the bottom daw:
To perform a thorough disk scan, select the Scan and repair bad sectors option. In this mode, the scanning program attempts to find and correct physical errors on the hard drive itself, which may take much longer.
Nothing is said about the file system. More about physical disabilities. Some of us are wrong. Or I didn't understand something.
And further in the text:
To check for both file and physical errors, select both options: Automatically fix system errors and Scan for and repair bad sectors.
Please comment. I would like clarity on the issue.
So as not to press “all sorts of strange buttons”, and everything was fine. :-)
Vyacheslav
I am very surprised by the capabilities of checking and restoring a disk under Windows 8. Changing the partition size upward using Acronis Disk Director 11 ended with errors. I wanted to increase the size of the system disk using the empty space on the adjacent partition by 200 GB. As a result, this program reports that everything is OK, and the disk size in Explorer has not changed. I checked the disk using the OS - it said that there were errors and needed to be rebooted. After the reboot, nothing changed and a request appeared to reboot to fix it. As you can already guess, this also did not help. As a result, we have lost 200 GB, despite the fact that Acronis says everything is ok, but the system is not able to correct the errors found. Sadness. Do I need to format it?
Vyacheslav
Vadim Sterkin,
In fact, under Windows 7, a similar operation was always performed without problems. I always perform the task of expanding/narrowing a partition in 2 stages: first, we cut off a piece of space from the partition being compressed and transfer it to the “unallocated space” status from the required end of the partition, and then we expand another partition using this space (I do everything manually in 2 reboots in case of “jambs”, because Acronis performs a group of operations very strangely. There is a sad experience under Windows XP). So, if under Windows 7, after checking the disk, everything returned to normal and the free space did not disappear so easily, then under Windows 8 Acronis completed the first stage successfully, and when performing the second it broke down with errors, although then it reports that “everything is fine.” The problem was eventually resolved by booting from a Live CD from Acronis. It's a pity that this cannot be done under Windows 8. And I was counting so much on the “improved checking and correction of file system errors” promoted in the media. Of course, it is very difficult to trust that checking and background diagnostics of FS problems is working correctly. It is very confusing that the time to scan one partition under Windows 7 and under Windows 8 differs by orders of magnitude, for the better for the latter. Are all problems really so easily and quickly fixed? Maybe Windows 8 simply doesn’t notice most of them, or even worse, ignores them?
Vyacheslav
Vadim Sterkin,
Well, what option is there in Windows 8 to expand the partition size? I saw the Disk Management snap-in. Well, I didn’t see how it’s possible to cut the size of a logical volume from the desired end using “standard means”. There's also no way to move a partition within the unallocated space. If there is an analogue that I missed, tell me. Along the way, you did not quite correctly understand what I meant by the phrase “I had a bad experience under Windows XP.” And it was like this: after a reboot, this operation was performed and at that moment the electricity went out. Thus, I lost 2 partitions, although, in theory, there could have been 3 options: the second partition would have been lost, from which space was taken due to the incompleteness of the operation of moving NTFS service zones, or only the system partition would have been lost (although this is unlikely), or both partitions would be fine, and between them there would be some area of unmarked space. But I was very “lucky”. Let’s skip the topic of uninterruptible power supplies and it turns out that Acronis is a reputable company, and their products are sometimes dangerous to use in any way in the absence of alternatives from the OS. And then another “surprise” emerged. And even here everything is fine with the power supply. But as I already noted, the last problem was solved by booting from a Live CD from Acronis and a classic disk check, and not the over-optimized one from Windows 8, the benefits of which I have not yet felt. It seems to be there, but there seems to be no point. Or maybe I was using the disk check tool wrong. Unfortunately, such “optimization” still raises more questions and mistrust in me than answers.
Vyacheslav
Vadim Sterkin,
Irina
Conducted Windows hard drive diagnostics (chkdsk). There were no messages, but later it turned out that there was no free space. Although before the check, less than 50% of the disk was full. And now it shows 931 GB occupied. Was all the free space wasted? The disk is six months old.
I forgot to say, after that I checked with Victoria and reported that there weren’t even any errors.
Irina
This is not the case for me. We are not talking about the system disk. And about the external drive. I’ve already found out that the system marked all the free space as bad blocks. Now I’m trying to figure out whether it’s a failure or whether the screw has died.
Sergey
Vadim, I have the following problem: After running the chkdsk disk check utility, if both “daws” are checked, it asks to reboot and the check is performed, I don’t know what to call it, but it looks like MS-DOS - lines run quickly on a black background. After the next reboot, I look at the information in the Windows Logs - Application, text in English, “there are many letters,” but the meaning can be understood from a single sentence: “Windows has checked the file system and found no problems.” At the same time, a few lines above I was kindly informed that, they say, “Cleaning up 31 unused security descriptors.” Sometimes it is not “31 unused security descriptors” that are cleared, but more or, conversely, less. That is, something is still not quite right, and the program corrects it a little. Like, overall everything is fine, but the Bug died. So, no matter how many times I run this chkdsk, it requires a reboot to correct these errors, nothing else is detected. Previously, on another machine in Windows XP this happened rarely, but now it happens time after time.
The SSD drive is about a quarter occupied. The system is legal Windows 7 x64 Professional and is automatically updated. If you do not run a disk check, then there is no reason to worry, everything works fine, does not glitch, does not crash. So, in connection with this, the question is - maybe there is no need to spoil your mood. I didn’t find a solution to the problem of these file system errors on the Microsoft website, and are they really errors?
 far_town2 Kulyasov
Are there any methods to check if the power supply is sufficient? And due to its insufficient power, can freezes/errors occur in games?
Despite the fact that recently solid-state drives have increasingly conquered the niche of the main memory module of computers and laptops, their market share is not so large. Good old mechanical hard drives have a much lower cost, which is why they are still popular. However, they have the ability to fail, like any other equipment. This article is devoted to the question of how to check a hard drive for serviceability at home, without resorting to the help of service centers. Moreover, here we will provide options that will help you restore the functionality of a partially damaged hard drive.
A little about the hard drive itself
The classic hard drive of a laptop or computer consists of several so-called “pancakes” with a ferrimagnetic coating, onto which information is written using heads, and with their help it is read. These discs rotate at high speeds, ranging from 5400 to 10,000 rpm. For comparison, the same rotation speed is found in an industrial cutting tool, commonly referred to as a “grinder.” Impressive?
It is during rotation that reading or writing occurs. But if you hit or push the hard drive during operation, the heads can make an almost imperceptible scratch on the surface. And although it is small, the clusters in this area become unreadable, and the computer tries to access them again and again. As a result, after unsuccessful attempts to read information, it freezes. How can I check my disk for such areas?

Testing software Victoria
One of the popular utilities for testing hard drives is Victoria. Although it can also be run from under the operating system, today we will learn how to check the hard drive for serviceability through the BIOS. The website of the manufacturer of this utility contains information on how to make a boot disk or flash drive with it. In the BIOS of a laptop or computer, you need to set it to boot from removable media, after which, when you turn on your device with the bootable media connected, you will see the interface of this program. Select your hard drive by pressing the "P" key on your keyboard and start scanning it using the "F5" key.
Now you can go and do your business. Depending on the disk size, scanning will take from 1 to 3 hours. As a result, on the right side you will see a legend of the disk map, which will indicate the number of sectors of each type. If there are sectors that take more than 1.5 seconds to read, or bad sectors in the frame below, it means that the hard drive is faulty and needs to be restored or replaced. So, you already have one way in your arsenal on how to check the health of the hard drive on a laptop or computer.

Testing via HDD Regenerator
You will have to prepare bootable media in the same way by downloading the utility from the developers’ website. This utility is easier to use, but takes a little longer to work. It is believed that this is the best method, since it is easier to check the hard drive for serviceability; moreover, it provides more information.
To start checking, select your disk by entering its number from the list. After this, you will need a menu item called Normal Scan. In the next submenu, select Scan, but do not repair. Then everything follows the standard pattern: you can go about your business. After a period of time, you will receive a hard drive map on which you can see exactly which areas are damaged. If the drive is good, the entire card should be white, with no "D" or "B" letters. What other test can you use to check if your hard drive is working properly?

One of the difficult options is MHDD
Working with this utility is very similar to the previous option. As in other cases, you should first prepare bootable media to launch it without starting the operating system.
After starting, you will need to select the desired hard drive, if you have more than one. The selection is made by entering the desired number from the list. After this, initialize the disk using the “F2” key and enter the SCAN command. It starts scanning the surface of the hard drive. If necessary, you can scan not the entire surface, but a specific area of clusters.
The program interface is reminiscent of the Victoria we already know. As is the case with it, the result should not be any sectors that could not be considered a program or take too long to read.
Now you know all the common ways to check the health of your hard drive. There is no point in installing these programs on your computer; a bootable USB flash drive is enough.

Recovering a hard drive using Victoria
Of course, knowledge about the malfunction alone is not enough; you need to fix it. But it is physically impossible to cure problem sectors. The programs simply block the hard drive's access to problem areas, so they are completely erased from the map, and it does not access them.
In the case of the Victoria program, before starting the scan after pressing the “F5” key, you simply need to specify one of the recovery options in the fourth line of the window. As a result, not only scanning will occur, but also problem sectors will be re-partitioned, and you will put your disk in order if it has not completely failed. Now you know not only how to check if your hard drive is working properly, but also how to restore it.

Recovery using HDD Regenerator
The very name of this program says that it is designed to treat problematic disks, and this is actually true. In order for sectors to be re-partitioned during scanning. When starting, in the last menu, instead of Scan, but do not repair, select Scan and repair. This operation will take a little longer, but all problem areas of the surface will be erased.
It is worth noting that if the recovery lasts more than 5-6 hours, then most likely the disk has completely failed and cannot be restored. This applies to all recovery programs.

Scanning using BIOS without utilities
Some laptops and computers can check the hard drive and RAM without additional utilities. Therefore, in the question of how to check a hard drive for serviceability through BIOS, you can not complicate your life by preparing bootable media, but use standard tools.
However, they may not always be intended for recovery. To be fair, it is worth noting that they will still allow you to make an initial diagnosis without unnecessary problems, which means you definitely shouldn’t neglect them.
What about removable hard drives?
Drives of this type are also mostly mechanical devices packaged in a special pocket. So how can you check if your external hard drive is working properly? All the same methods apply to them, except for the Victoria program, since it will not be able to detect it. The main thing is to connect it to the USB connector of your computer or laptop before turning it on, so that it can correctly recognize it. After this, the procedure does not change, you can simply check it. Or run a script to restore damaged clusters.
Now you know all the ways to check your hard drive for serviceability without the help of professionals. This information will help you save a lot of money on trips to service centers, because hard drive failures are one of the most common in computer technology.
Good day!
How many things could be corrected if we knew in advance what awaits us...
And if in life it is almost impossible to predict some events, then in the case of a hard drive, some of the problems can still be predicted and foreseen!
For this, there are special utilities that can find out and analyze the SMART* readings of a disk (show them to you, if necessary), and based on this data, assess the health of your disk, simultaneously calculating how many years it can still serve.
The information is extremely useful, in addition, such utilities can monitor your disk online, and as soon as the first signs of unstable operation appear, they will immediately notify you. Accordingly, you will have time to make a backup in time and take action (although backups should always be done, even when everything is fine ☺).
And so, in this article I will consider several methods (and several utilities) for analyzing the status of HDDs and SSDs.
*Note:
S.M.A.R.T. (Self-Monitoring, Analysis and Reporting Technology) - a special technology for assessing the condition of a hard drive with an integrated hardware self-diagnosis/self-monitoring system. The main task is to determine the likelihood of device failure, preventing data loss.
Perhaps this is one of the most popular questions asked by all users who are encountering problems with their hard drive for the first time (or who are thinking about the safety of storing their data). Everyone is interested in the time it takes for the disk to work until it completely stops. Let's try to predict...
Therefore, in the first part of the article, I decided to show a couple of utilities that can receive all the readings from the disk and analyze them independently, and give you only the finished result (in the second part of the article, I will provide utilities for viewing SMART readings for independent analysis).
Method No. 1 - using Hard Disk Sentinel
One of the best utilities for monitoring the status of computer disks (both hard drives (HDD) and “newfangled” SSDs). What is most captivating about the program is that it will independently analyze all the data received about the state of the disk and show you the finished result (very convenient for novice users).
In order not to be unfounded, I will immediately show the main window of the program, which appears after the first launch (the disk analysis will be done immediately automatically). The health and performance of the disk are assessed as 100% (ideally, this is how it should be), the time that the disk will still work in normal mode is estimated by the program at approximately 1000 days (~3 years).

What's wrong with the disk according to Hard Disk Sentinel
In addition, the program allows you to monitor the temperature: both current, average and maximum during the day, week, month. If the temperature goes beyond the “normal” limits, the program will warn you about this (which is also very convenient).

Hard Disk Sentinel also allows you to view SMART readings (though to evaluate them, you need to have a good understanding of disks), get complete information about the hard drive (model, serial number, manufacturer, etc.), see what the hard drive is loaded with (i.e. .get performance information).
In general, in my humble opinion, Hard Disk Sentinel is one of the best utilities for monitoring the status of disks in the system. It is worth adding that there are several versions of the programs: professional and standard (for the professional version with extended functionality, there is a portable version of the program that does not require installation (for example, it can even be run from a flash drive)).
Hard Disk Sentinel works in all popular Windows (7, 8, 10 - 32|64 bits), supports the Russian language in full.
Method number 2 - using HDDlife
This program is similar to the first one; it also clearly shows the current state of the disk: its health and performance (in percentage terms), its temperature, the amount of time worked (in months). At the top of the window, based on all this data, HDDlife shows a summary of your disk, for example, in my case, “ALL RIGHT” (which means that everything is fine with the disk).
By the way, the program can work online, monitoring the state of your disk, and if something goes wrong (when the first signs of problems appear) it will immediately notify you about it.

As an example, the screenshot below shows an SSD disk has received a warning: its condition is still within acceptable limits, but reliability and performance are below average. In this case, you should not trust the disk with any important data, and if possible, you should prepare to replace it.

By the way, in the main window of the program, next to the amount of disk time worked, there is a link "Disk settings" (allows you to change some necessary parameters). By opening it, you can control the balance between noise/performance (very useful with drives that make a lot of noise), and adjust power consumption settings (relevant for laptops that quickly run out of battery).

Addition: HDDlife works on both PCs and laptops. Supports HDD and SSD drives. Portable versions of the program are available that do not require installation. You can configure the program to run alongside your Windows. HDDlife works on Windows: XP, 7, 8, 10 (32|64 bits).
How to view SMART readings
If previous utilities independently assessed the condition of the disk based on SMART data, then the utilities below will give you more freedom and data for independent analysis. In the reports you will be able to find a fairly large set of parameters, on the basis of which it will be possible to roughly assess the condition of the disk and make a forecast for its further operation.
Method No. 1 - using CrystalDiskInfo
СrystalDiskInfo
An excellent free utility for viewing the status and SMART readings of a hard drive (SSD drives are also supported). What’s so attractive about the utility is that it provides you with complete information about the temperature, technical condition of the disk, its characteristics, etc., and some of the data comes with notes (i.e., the utility is relevant for experienced users who themselves know “what-is- what" and for beginners who need a hint).
For example, if there is something wrong with the temperature, you will see a red indicator on it, i.e. СrystalDiskInfo will inform you about this.

The main window of the program can be roughly divided into 4 zones (see screenshot above):
- "1" - all your physical disks installed in your computer (laptop) are listed here. Next to each one is shown its temperature, technical condition, and the number of sections on it (for example, “C: D: E: F:”);
- "2" - the current temperature of the disk and its technical condition are shown here (the program performs an analysis based on all data received from the disk);
- "3" - disk data: serial number, manufacturer, interface, rotation speed, etc.;
- "4" - SMART readings. By the way, what’s so attractive about the program is that you don’t have to know what this or that parameter means - if something is wrong with any item, the program will mark it in yellow or red and notify you about it.
As an example to the above, I will give a screenshot that shows two disks: on the left - with which everything is fine, on the right - with which there are problems with reassigned sectors (technical condition - alarm!).

As a reference (about reassigned sectors):
when the hard drive detects, for example, a write error, it transfers the data to a specially designated spare area (and this sector will be considered “reassigned”). Therefore, on modern hard drives you cannot see bad blocks - they are hidden in reassigned sectors. This process is called remapping, and the reassigned sector is remap.
The higher the value of reassigned sectors, the worse the condition of the disk surface. Field "raw value" contains the total number of remapped sectors.
By the way, for many disk manufacturers, even one reassigned sector is already a warranty case!
To utility CrystalDiskInfo monitored the status of your hard drive online - in the "Service" menu, check two boxes: "Agent launch" and "Autostart"(see screenshot below).

Then you will see the temperature program icon next to the clock in the tray. In general, you can now be more confident about the condition of the disk ☺...
Method number 2 - using Victoria
Victoria- one of the most famous programs for working with hard drives. The main purpose of the program is to assess the technical condition of the drive and replace damaged sectors with spare working ones.
The utility is free and allows you to work both under Windows and under DOS (which in many cases shows much more accurate data about the state of the disk).
Of the minuses: working with Victoria is quite difficult; at least, I highly do not recommend pressing buttons on it at random (you can easily destroy all the data on the disk). I have one fairly large article on my blog that explains in detail how to check a disk using Victoria (including finding out the SMART readings - an example in the screenshot below (in which Victoria pointed out a possible problem with the temperature)).
Instructions for working with Victoria:
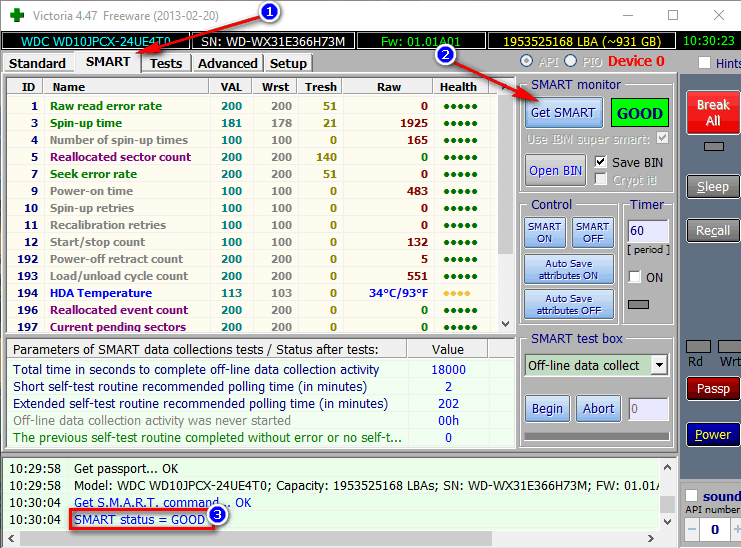
SMART Tab || Victoria utility
I'll call it a day, good luck to everyone!
Additions on the topic are welcome ☺
Hello admin! I read several articles on your website about the Victoria program and a question arose. What, the latest operating system from Microsoft - Windows 10 - is so flawed and does not have a built-in hard drive diagnostic tool? Is it really not possible for it to determine the state of the hard drive on which it is installed and is it necessary to download third-party programs? I have a new laptop with Windows 10 and if there is such a tool, then please tell me about it in your articles. I also wanted to ask. In one of your comments, you said that it is useless to run the hard drive status check utility built into Windows 10 - CHKDSK to find and fix bad sectors (bad blocks). Why? After all, on all sites like yours it is written that chkdsk, launched with the /R parameter, can fix bad blocks!
How to find out the status of your hard drive using built-in tools in Windows 10
Hello friends! There are about a dozen articles on this topic on our website, but what’s interesting is that I didn’t tell you about this method, but it nevertheless exists.
In fact, you can find out the status of the hard drive in Windows 10 using built-in tools, but these tools will simply tell you: “Yes, the condition of the disk is good” or “The condition of the disk is bad,” but how bad is it and is it worth urgently copying data from HDD and replace it, or you can wait at least until tomorrow, that’s what they won’t tell you. Why?
In simple words, the operating system simply reads the self-diagnosis readings of the hard drive (S.M.A.R.T.) and if it is GOOD (good), then the system tells us so - “The disk is working fine.” If the S.M.A.R.T status of the hard drive is BAD (bad), then the system will indicate that the disk is faulty. But in life everything is relative and very often the HDD is on the verge of failure, and Windows still shows us that the disk is working fine.
In short, if you want to accurately diagnose a hard drive, then you can’t do without special programs and even chkdsk won't help you. I will try to prove this to you in today's article.
To find out the status of your hard drive in Windows 10 using built-in tools, you need to go to« Control Panel»
"Security and Service Center"

"Service"

As you can see, Windows 10 evaluates the condition of the hard drive as normal: All drives are working fine. OK.

But in fact, if you now run a special program for diagnosing hard drives, you will see that the condition of the hard drive is C (Alarm!) and it is full of unstable sectors that the built-in firmware of the hard drive could not fix.

The Victoria program will say the same thing.

How else can you find out the status of your hard drive using the built-in tools of Windows 10 or how to use the disk check utility (chkdsk). Running disk check from the GUI
Windows 10 has a disk checking utility, chkdsk, and you can run it directly in the graphical interface or using the command line. After checking, the utility will issue a full report on the state of the file system of your operating system installed.
Note: On many sites you may read that the chkdsk utility, run with the /R parameter, can fix bad sectors (bad blocks), but in fact this is not the case. Bad sectors can be reassigned to good sectors from backup tracks only by the technical control firmware built into the hard drive. disk status. What the chkdsk utility does is fix errors in the NTFS or FAT32 file system and it is best to use the utilitychkdsk to fix file system errors, not to diagnose the condition of the hard drive. Let me explain a little.
You all know that the minimum unit of information on a hard disk is a sector, the volume available to the user is 512 bytes. When formatting a hard drive into a file system, all sectors are combined into clusters (one cluster is placed on several sectors); accordingly, a cluster is the minimum area of the file system. So here it is, utility chkdsk does not work with hard disk sectors, but at a higher level - with clusters. In turn, the Victoria and MHDD programs are used to check hard disk sectors, not clusters; therefore, they do not treat the file system.
Go to the Computer window and right-click on the drive (C:), select “Properties”

Go to the “Service” tab and click on the “Check” button

"Check disk"

The disk is being checked for errors.

The disk has been successfully verified. No errors found.


