VirtualBox program: installing a virtual Windows OS. The best virtual machines for Windows: install if you really want to look at other operating systems
One operating system - virtual - inside another operating system, but a real one - this is an ideal find for those who like to test third-party software as well as different versions and builds of operating systems.
It's safe, it's interesting, moreover, it's even useful for development. The VirtualBox program is perhaps the only widely known representative of software that provides the mentioned capabilities.
It is free, simple and easy to use even for novice users. How to install a virtual Windows operating system using VirtualBox? We will consider this question below.
Step 1. Create a virtual computer
There are unlikely to be any problems with downloading and installing VirtualBox; it can be freely downloaded from developer's official website, and it is installed as standard.
The launched program will open with a welcome window, where you need to click the command - “Create”.
The window that appears will give you a choice of operating systems supported by the program. We select the required version, set a name for the virtual computer. Click "Forward". 
We indicate what system we are creating: 
Correct operation of Windows XP will be ensured by 512 MB of RAM, but for Windows 7 it is better to allocate 800-900 MB.
You cannot enter the red section of the scale, thereby giving the virtual computer more than half the hardware potential of the physical computer. Click "Forward".

In the next hard drive selection window, select the option to create a new hard drive.


In the next window, it is better for beginners to choose a storage format - fixed disk, since it works a little faster than dynamic. Click "Forward".

This figure will also be taken from the memory of the physical hard drive, so it is necessary to select the optimal amount, which will be enough for the purposes of operating a virtual computer, and this will not be to the detriment of physical memory.
For Windows XP you can allocate 5 GB, and for Windows 7 – about 15 GB. Here, using the browse button visible at the end of the first line, select the directory of the physical computer where the virtual hard drive will be placed.
It is better to choose a location on a non-system drive. The “Create” command will start the process of creating a virtual computer hard disk, after which you can admire the parameters of the newly created virtual computer.

Step 2. Install the operating system on the virtual computer
The virtual computer has been created and the operating system can be installed on it. Click the “Run” command.

We select either the operating system boot disk located in the physical drive or the disk image. You can set the path to the disk image using the browse button at the end of the line. Click “Continue”.

The familiar Windows installation menu will open in a separate VirtualBox window. The further steps are no different from the process of installing Windows on a physical computer.

Description of how to install and run the full version Windows XP from under Windows Vista or Windows 7 using the program Oracle VirtualBox. In this case, Windows XP is installed on a virtual machine and runs as a separate application in Windows Vista, Windows 7 or any other operating system, including various Linux distributions. In this way, you can solve problems with the compatibility of various programs and drivers with Windows Vista, Windows 7 or another operating system.
A short introduction
Probably, many of you, my dear readers, have already installed and tried Windows Vista and Windows 7. Everyone seems to have a good system, but some programs and old games do not run on the new operating system, and the drivers for some devices do not work. What to do in this case? Give up the delights of the new version of Windows?
There are actually several ways to solve this problem. The most obvious is to install Windows XP as a second system with the ability to choose which one to include at boot. This method is described in this article: . But this is where inconvenience arises. For the sake of some program, you need to restart the laptop, turn on Windows XP, work with the program, restart the laptop and turn on Windows 7, For example. It's inconvenient, isn't it? What should you do if your favorite USB modem only works fine in Windows XP? Reboot the system and turn on Windows XP in order to surf the Internet?
Fortunately, there is a solution. Windows XP can be installed on a virtual machine and run from any operating system as a separate program. It works on this principle Microsoft Windows 7 XP Mode. It’s a good technology, but it requires the laptop to support virtualization for it to work, and it only works in Windows 7 Professional, Windows 7 Ultimate and Windows 7 Enterprise. What to do if your laptop has Windows Vista?
And this is where a great program comes to the rescue. VirtualBox from Sun. It is completely free and allows you to create virtual machines on a laptop on which you can install many operating systems. The advantage of this utility compared to Microsoft Windows 7 XP Mode is support for 3D graphics for virtual machines, it is not required for its operation hardware virtualization, and also the fact that it can be run on any version of Windows, Linux, etc.. The downside is that formally you need a licensed Windows XP, although taking into account our realities... :)
This article will discuss the process of installing Windows XP on a virtual machine. The whole process can be divided into the following stages:
If you have any problems or questions about working with the Virtual Box virtual machine, then you should seek help in this forum topic: .
1. Create a virtual machine
First of all, you need to install the utility VirtualBox( / ). During installation, it is important to note the following options:

System devices will also be installed. Appropriate installation requests must be allowed.
When the installation is complete, launch the utility and click on the button Create:

Should start:


Let's move on to the next window. Since we don’t have a virtual hard disk, we need to create a new one:


Select the type of virtual hard disk. I recommend :


That's all. The virtual machine has been created. Now you can proceed to setting it up.
2. Setting up a virtual machine
Before setting up, prepare a disk with Windows XP or an iso image with it, and then select the created virtual machine in the VirtualBox window and click on the button Properties:

Let's start with the tab Basic. If desired, you can place the virtual machine menu at the top. This is more convenient:

Go to the tab System:

Here you can change the amount of RAM that is allocated to the virtual machine, change the boot order of virtual devices, enable or disable the IO-APIC option (needed if you plan to use several processor cores for the virtual machine), and also enable or disable EFI (needed for some OSes, for example MacOS). Go to the tab CPU:

Here you can specify how many processor cores the virtual machine can use, and also enable or disable PAE/NX (some operating systems support PAE. This mode allows a 32-bit virtual system to use up to 64 GB of RAM). Go to the tab Acceleration:

On this tab you can enable or disable hardware virtualization. If you are going to install a 64-bit operating system, you need to enable it, and you also need support for virtualization on the laptop. If your laptop does not support this function, then it does not matter. To run 32-bit operating systems on a virtual machine hardware virtualization is not needed.

VirtualBox supports 2D and 3D acceleration (OpenGL / DirectX8 / DirectX9). It's worth turning it on. Go to the tab Net:

When installing VirtualBox, another network card appeared in the system, which is virtually connected to the network card of our virtual machine. We configure the virtual network adapter as shown in the figure above and go to the tab USB:

At the beginning of the article it was said that using virtualization you can get around the problem of incompatibility of drivers for USB devices with new operating systems. So here it is VirtualBox allows redirection to make any USB device that connects to your computer or laptop connect not to the main operating system, but to the system that runs in the virtual machine. Then on Windows XP, in a virtual machine, drivers are installed on the new USB device and it fully works under Windows XP. The main system is the device will not be seen. Since there are many USB devices in the system, so that when the virtual machine is turned on, they all do not disconnect from the main one and do not connect to the virtual one, a filter system was invented. Filters indicate which USB devices should be disconnected from the main operating system and connected to Windows XP on the virtual one when it is turned on.
To add a new filter, click on the plus sign icon and select the desired USB device from the list. After that it appears in the list. Let's go to the tab:

Since there is no point in using Windows XP on a virtual machine without the ability to work with files on the main one, you need to organize shared access to certain folders on the hard drive. To do this, click on the plus sign and select the folder on the hard drive of your computer or laptop with which Windows XP will work in a virtual machine:

Enter its name and click OK. Here she is on the list:

Now there is still one last very small touch left. We need to somehow install Windows XP :) Go to the tab Carriers:

We have two options: install Windows XP from an .iso image or from a regular disk. In the first case, click on the arrow icon and click on the button Add:

We indicate where the Windows XP image is located and add it to the list:

Click on the image with Windows XP and press the button Choose.
If you just have a disk with Windows XP, then put it in the drive and select your drive from the list:

Click OK. Now you can proceed to installation Windows XP.
3. Installing and configuring Windows

A normal Windows XP installation should start:


I won’t describe it in detail. The installation is described in detail in this material: . In this case, drivers are not needed. Everything you need is already included in Windows XP.
After installation, we will get a working Windows XP in a virtual machine. Now you need to install Guest OS Additions. To do this, select the appropriate menu item Devices:

Important Note: Since there is often only one keyboard and mouse in a laptop or computer, the main operating system and the operating system running in the virtual machine are forced to share it somehow. A gripping mechanism is used for this. In other words, if there is a virtual machine in the foreground, then everything entered from the keyboard will be addressed to it. You can also switch manually. For this purpose, by default it is used right Ctrl. When the virtual machine works with a keyboard and mouse, the green arrow in the lower right corner of the window with the virtual machine lights up.
The installation of additions for the guest OS should begin:

Possible questions: if the installation has not started for you, then manually add the image VBoxGuestAdditions.iso in the folder with VirtualBox into a virtual drive as was done when installing Windows XP, and then run the disk in the virtual machine.


Put a tick next to Direct3D Support:

During installation, the following warnings will appear several times:

Click Continue anyway. After installation, it is advisable to reboot the virtual machine:

To maximize the virtual machine window, in the menu Car select the item:

Now the frame has been removed and it has become much more convenient to work:

Now all that remains is to deal with shared folders. IN Windows XP launch Command line:

We connect the previously created shared folder as a network drive. To do this, enter the command net use x:\\vboxsvr\Documents(Documents here is the name of the shared folder):

IN My computer disk appeared x:\, which we just connected:

The contents of this disk correspond to the contents of the shared folder that we created earlier.
That's all.
If you have any questions about working with the VirtualBox utility, we present them in this forum topic: . Please post all questions related to installing Windows XP in this forum thread:
Detailed Installation Guide Windows XP from a flash drive or memory card to any laptop, netbook or computer.
A detailed description of how to solve the problem with the blue screen of death or BSOD for newbies.
A guide on how to find and remove all viruses and other malware from your laptop or computer.
Full and detailed description of several installation methods Windows Vista or Windows 7 from a flash drive or memory card to any laptop, netbook or computer.
A detailed guide on how to install Windows Vista on a laptop or computer.
After creating a virtual machine in VirtualBox, you can begin installing the Windows operating system (or any other) on the VirtualBox virtual machine. By installing an operating system on a virtual machine, you can use several operating systems on your computer at the same time: the main (host) and guest (virtual) operating systems.
The guest operating system installed on the virtual machine will operate in isolation from the main system installed on your computer. You can learn to work in a new OS, test applications, run outdated programs, use a virtual system for security purposes, etc. In this case, nothing will threaten the main system, and you can make any changes in the guest system.
In previous articles on my website, we discussed in detail the process of installing the VirtualBox virtualization program and the VirtualBox Extension Pack on a computer, creating and configuring a virtual machine in VirtualBox (you will find links to the articles mentioned here under this article). Now the final stage has come: installing the operating system in VirtualBox, installing the VirtualBox Guest Additions, final settings of the virtual machine.
Once the virtual machine has been created and configured, you can begin installing the operating system.
In this example, I install Windows 7 in a virtual machine; Windows 10 is installed on my computer (by the way, you can additionally install another Windows 10 on the virtual machine).
Installing Windows on VirtualBox
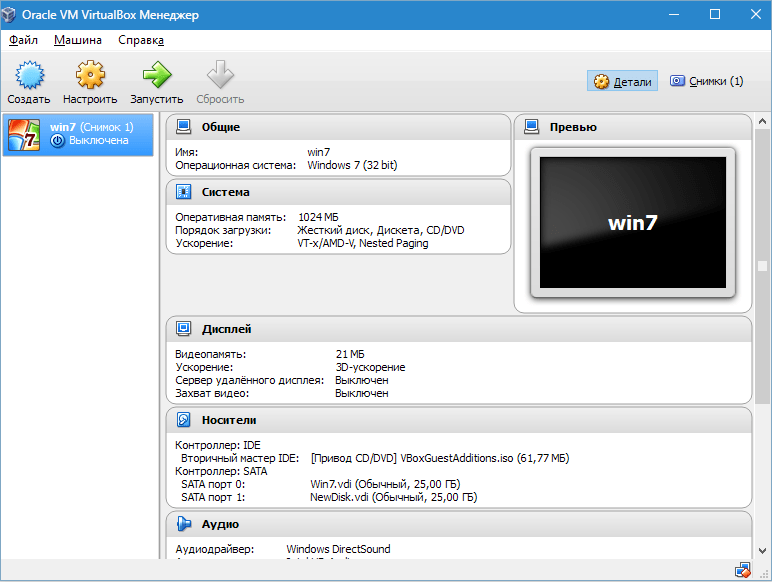
In the main window of the Oracle VM VirtualBox program, select the desired virtual machine if you have several virtual machines installed, and then click on the “Launch” button.
In the Virtual Box program window, the process of installing the operating system into the virtual machine will begin. The system installation process itself is no different from installing the system on a regular computer. Go through all the steps of installing the OS on a virtual computer.

After installing the operating system on the virtual machine, you will see Windows (or another operating system) in the VirtualBox program window.
A virtual OS requires customization to suit your needs, just like a regular system on your computer.

Immediately after installing the operating system on the virtual machine, you will need to install Additions for the guest operating system - VirtualBox Guest Additions, which consists of a set of drivers and utilities. After installing the add-on package, the functionality of the guest OS is noticeably improved.
Installing VirtualBox Guest Additions
In the window of the running virtual machine, go to the “Devices” menu item. Next, in the context menu, select “Mount guest OS Add-ons disk image...”.

After this, in the guest operating system you will need to open Explorer. In Explorer, you will see that the VirtualBox Guest Additions disk image is located in the place of the CD-DVD drive.

Now you will need to install VirtualBox Guest Additions.

Go through the stages of installing add-ons for the guest system by consistently clicking on the “Next” button. Agree to install software for devices.

After the installation of the guest OS package is complete, reboot the virtual operating system.

Creating a shared folder in VirtualBox
A shared folder is needed for data exchange between the main (host) and guest operating systems. First, you will need to create a shared folder on the main operating system installed on your computer. I have a “Data Sharing” folder on one of the drives on my computer, which is intended for data exchange.
In the “Folder Path” field, enter the path to the folder on the main system. Select "Other...", and then in the Explorer window, select or create the desired folder.
In the “Add a shared folder” window, check the “Auto-connect” and “Create a permanent folder” checkboxes, and then click the “OK” button.

In the Explorer window, go to “Network”, in the VBXSVR folder you will see a shared folder. In Virtual Box you can create several shared folders.

After installing additions for the guest OS, remove the ISO image of the operating system from the virtual machine's disk drive, since the system image is no longer needed.
For faster access, the shared folder can be added to the “Network location” of Explorer as a network drive. To do this, press the “Windows” + “R” buttons on your keyboard. In the Run window, in the Open field, enter the following command:
Net use x: \\vboxsvr\folder_name
Then click on the "OK" button.

After executing the command, the shared folder will appear in Explorer under “Network Location”.

Taking a System Snapshot in VirtualBox
VirtualBox has a very useful feature: Snapshots. An operating system snapshot is the current state of the operating system at the time the snapshot was taken. Essentially, it is a system backup for recovery. You can take one or more snapshots and then restore the system to the state it was in when the snapshot was taken.
Typical situation: an operating system was installed on a virtual machine, after configuring it and installing the necessary applications, a snapshot of the guest operating system was taken. After this, the user “killed” Windows (or another system), changed the configuration, etc. As a result of these actions, the operating system malfunctions or does not work at all.
Since this is a virtual OS, you can easily remove it from VirtualBox and then install a new system on the virtual machine. If a system snapshot was previously taken, then nothing will need to be done. In this case, it will be possible to restore the system to working condition using the previously taken “Snapshot”.
To create a system snapshot, click on the “Snapshots” button in the main VirtualBox window.

In the “Pictures” tab, click on the camera button. In the “Take a snapshot of a virtual machine” window, you will need to give a name to the snapshot being created, and in the description you can add additional information (I added the date the snapshot was created). Next, click on the “OK” button.

After this, the process of creating a snapshot of the system in Virtual Box occurs.

A system snapshot has been created and can be accessed from the main VirtualBox window. Just keep in mind that system snapshots take up some space on the guest operating system's disk.
Recovering using a system snapshot
If necessary, for example, in case of serious problems with the guest system, you can restore the state of the virtual machine using a previously taken system snapshot. Restoring using a system snapshot occurs when the virtual machine is turned off.
Click on the "Snapshots" button in the main VirtualBox window. In the “Snapshots” tab, right-click on the system snapshot, and in the context menu select “Restore snapshot”.

In the question window, agree to restore the image. If the guest system is not working, you can uncheck the “Create a snapshot of the current system state” checkbox so as not to create an unnecessary snapshot since the system is not working normally.
Click on the "Restore" button.

If you create a snapshot of the current state, give it a name and description.
In the next window, click on the “Restore” button.

The guest operating system will be restored to the virtual machine in the state at the time the system snapshot was taken.
VirtualBox update
To update VirtualBox, you will need to download the installation file of the new version of the program, as well as the Extension Pack of the new version. After installing the program, all previously made settings will be saved.
After starting the guest operating system in the virtual machine, you will need to install the VirtualBox Guest Additions again. If several operating systems were installed in VirtualBox, then in this case, Add-ons for Guest OS will need to be installed on each operating system.
Conclusions of the article
You can install a guest operating system on a VirtualBox virtual machine, install the VirtualBox Guest Additions, create shared folders, take a snapshot of the system, and then restore the virtual OS using the snapshot.
If you want to install one or more operating systems on your computer, and completely different ones, it would be a very mistaken attempt to install these operating systems on hard drive partitions. We encounter this error quite often. This approach promises nothing but loading problems and wasting hard disk space. How to get out of the situation? There is a great solution - a virtual machine! How to install and configure a virtual machine using Oracle VM VirtualBox as an example? Read in this article...
One of the reasons why we need this was named and it sounded like the need to get anonymous access to the Internet. What else might motivate you to create a VirlualBox virtual machine? For example, you have never seen the Linux operating system in use, but you want to try it, but you don’t want to “demolish” a working Windows system. Or you need to try a new software package, the stable operation of which you are not sure of or you doubt that you even need it. All this can be done without harm to the main operating system using a virtual machine.
A few terms for a proper understanding of the topic. The operating system (OS) on which the virtual machine (VM) runs is called the host operating system or simply the Host. The operating system we run is called a guest operating system. The Guest OS can be the same type as the Host. For example, we can run Windows 7 on top of Windows 7, this is the simplest option for virtualization systems. It is much more interesting to experiment with different types of OS, for example, running Linux on top of Windows, which is what we will do today as an example.
First, we need a VM distribution kit, or in common parlance an installation file. Finding it couldn't be easier, but so as not to bog you down with unnecessary training, I'll just provide a link to the download page:
All you have to do is select the link that corresponds to your OS, for the case of Windows; at the time of writing, it looks like this: VirtualBox 4.1.18 for Windows hosts x86/amd64. This means that the same distribution will be used for both 64-bit and 32-bit OS. Download the file from the link corresponding to your OS and start the installation. In the case of Windows 7, you will be asked to confirm the launch and allow changes to be made.

After the installation begins, click Next, which means “next” in Russian, without changing the set of components offered by the installer.

For successful installation we will need approximately 140 MB of free space on the system disk. Yes, and to install the Guest OS we will also need from 5 to 25 GB of free space on any partition of the hard drive to accommodate the Guest OS virtual disk.
We receive a warning about a possible short-term loss of network connection. This occurs due to the installation of additional VM network drivers.

Click Yes and wait a few minutes for the installation to complete.


Hooray! The first stage is almost finished. All that remains is to click Finish, leave the launch mark after installation selected, which after installation is complete should lead to the launch of the VirtualBox VM.
If no failures occurred during the installation phase, the following window will open as a result. There will be only one active button in it in the form of a blue sun with the caption – Create. To create a VM and further install the guest OS, we need it.

Now let's move on to creating a VM. Click Create, enter the name of our future system (it can, in principle, be arbitrary), select Linux as the OS type, and leave Ubuntu as the version.

After clicking Next, you will be prompted to install the required amount of memory available to the Guest OS. Make sure that the slider does not go beyond the green zone, but is sufficient. If your computer has 1GB of RAM installed, no more than 512MB will be available for the Guest OS. In general, you can allocate no more than half the amount of memory installed in your computer for the Guest OS.

Now it's time to allocate space for the Guest OS virtual disk. The proposed 8GB of space should be enough to install the system unless you plan to save all your data on the VM disk in the future.

We leave the disk type as VDI - this is the native format for VirtualBox. Next again, now we see the choice between dynamic and fixed disk type. Each type has its own advantages; dynamic will take up less space and grow as it fills, while fixed will immediately take up the full amount allocated to it, but will work faster. Personally, I prefer dynamic.

By default, the VM disk will be located in the c:\Users\Username\VirtualBox VM\ folder, where “Username” is the name of your account in Windows 7. In other OSes, everything will be a little different. We leave the proposed VM disk size unchanged or change it if it is necessary to shrink it or allocate additional space. Click Next again.

We read what we got in the end, if everything is as you planned, we confirm by clicking the Create button.
The machine is already ready; to start the VM, all that remains is to connect the boot disk image to the VM drive or specify that we will use a physical optical drive if you already have the installation disk on a separate optical media. To do this, click the Properties button that has become available and select the Media section on the left. In the Storage media form there is an IDE controller to which the virtual drive is attached, but now it is empty. On the right, under Attributes, you must either check the Live CD/DVD option if an optical disc is inserted into your CD/DVD drive, or by clicking the disk icon on the right, select the location of the Guest OS installation image.

Once selected, everything should look like this:

Now about where to get the image. It is available from this page: http://xubuntu.org/getxubuntu/.
To download the image, we need a program that can download torrent links. This could be the Opera browser, which can do this, or, for example, utorrent for Windows. You can download it from here: http://www.utorrent.com/intl/ru/downloads/complete?os=win. One can argue for a long time about the dangers and benefits of downloading through torrent links, but in this case it is the simplest, most reliable and fastest way to get the necessary disk image.
Now you can start launching the created VM, and at the same time see what one of the varieties of Linux OS looks like. In the future, it will be possible to delve into the properties of the VM, change various parameters and see how this affects the operation of the VM, but we will leave all this for the curious to work on independently.
After starting the VM, you need to wait for the graphic screen to appear with the choice of installation language, select Russian and click the “Install Xubuntu” button. The system will check the parameters of your VM, and if everything is in order, it will allow the installation to continue. You can also select the Install updates and Install third-party software items, this will eliminate the need to manually configure Flash and codecs for listening to MP3. Next, the installer will offer to erase the disk and install Xubuntu. We boldly agree, because... nothing except the virtual partition is accessible in the Guest OS, and nothing will be lost or erased on the real OS. The installer will plan and format the disk independently, so choose to continue. All that remains is to choose a time zone, it is different for everyone, and I can’t even guess where you are reading this article. We select our location on the map with the mouse, and the system itself knows what zone it is. For my computer, the system returned the location of Zaporozhje. Next, select the keyboard layout, most likely it will be Russian, unless you prefer something else. All you have to do is enter your name and come up with a password; the system will check if the password matches the two input fields and evaluate its complexity. Choose a password that you can remember, but do not enter something like: 123, qwerty, password, test, user, god, etc. - such passwords can be calculated in a couple of minutes by a hardworking “breaker”. You shouldn’t be too clever; a password like G%4v$$q12&hB will be considered reliable, but it will probably get lost both in your head and on paper.
Now the system will install the necessary packages and upon completion will ask you to reboot the VM. During installation, it is advisable that the computer be connected to the Internet, this will allow you to immediately install some system updates. During the installation process, a slide show introduces the user to the main applications and interface features, so don’t be lazy, look and read everything on the slides. In the future, this will save time and effort for performing practical tasks in the system. After the reboot, the final step was to install guest OS additions. To do this, from the VM menu, select the Devices section and in it the item Install guest OS additions. A disk with additional drivers for the guest OS will be mounted in the virtual drive of the guest OS. In our case, we will need to run an application named VBoxLinuxAdditions.run, moreover, this must be done with administrator rights. Right-click on an empty space in the window with the contents of the virtual drive. Select the context menu item Open terminal. In the window that opens, type the command:
sudo ./VBoxLinuxAdditions.run
Press Enter, then you will need to enter the password, the one we entered at the beginning of the installation, I hope you have not forgotten it yet, press Enter again and wait for the installation to complete. Upon completion, reboot the guest OS system. In the upper right corner of the screen there is an inscription with the user name, left-click on it and select Restart.
This is the result that should await us in the finale, if everything went without errors. If something goes wrong, write to us and we’ll try to figure it out.

Once you've installed a virtual machine and realized how easy it is, you'll probably want to try installing something yourself. All you need is an ISO image of the installation disk and select the correct OS type. Explore first those systems that are in the list of VirtualBox, do not immediately jump to setting up Mac OS X 10.8 Lion. Over time, you will learn to do this, but only when you understand in detail all the intricacies of the VM’s operation. In the meantime, you can experiment with the installed Xubuntu system, as it seems to me, it deserves your attention.
We have successfully taken one of the steps that brings us closer to anonymity on the Internet. To complete the journey, we still have to install a package that allows us to hide the real IP address of our computer - Tor Project, but more on that next time. Good luck and thanks for reading our blog!
GD Star Rating
a WordPress rating system
Installing VirtualBox usually does not take much time and does not require any skills. Everything happens as usual.
Today we will install VirtualBox and go through the global settings of the program.
1.
Run the downloaded file VirtualBox-4.3.12-93733-Win.exe.
When launched, the installation manager displays the name and version of the application being installed. The installation program simplifies the installation process by giving the user hints. Click "Next".

2. In the window that opens, you can remove unnecessary application components and select the desired installation directory. You should pay attention to the installer's reminder about the required amount of free space - at least 161 MB must be free on the disk.

Leave all settings as default and proceed to the next step by clicking "Next".
3. The installer will offer to place an application shortcut on the desktop and Quick Launch panel, as well as to associate files and virtual hard drives with it. You can select the desired options from the proposed ones, and uncheck the unnecessary ones. Let's move on.

4. The installer will warn you that during installation the Internet connection (or connection to the local network) will be disconnected. We agree by clicking "Yes".

5. By pressing a button "Install" We start the installation process. Now you just need to wait for it to complete.

During this process, the installer will prompt you to install USB controller drivers. This should be done, so click on the appropriate button.
6. This completes all stages of installing VirtualBox. The process, apparently, is not difficult and does not take much time. All that remains is to complete it by clicking "Finish".

Settings
So, we have installed the application, now let's look at setting it up. Usually, after installation, it starts automatically, unless the user disabled this function during installation. If the launch does not happen, open the application yourself.
When launched for the first time, the user sees the application's welcome message. As virtual machines are created, they will appear on the start screen along with their settings.
Before you create your first virtual machine, you must configure the application. You can open the settings window by following the path “File” – “Settings”. A faster way is to press a combination Ctrl+G.

Tab "Are common" allows you to specify a folder for storing virtual machine images. They are quite voluminous, which should be taken into account when determining their location. The folder must be located on a disk with enough free space. In any case, the specified folder can be changed when creating the VM, so if you have not yet decided on a location, you can leave the default directory at this stage.

Paragraph "VDRP Authentication Library" remains the default.
On the tab "Enter" You can set key combinations to control the application and the virtual machine. The settings will be displayed in the lower right corner of the VM window. It is recommended to remember the key Host(this is Ctrl on the right), but there is no urgent need for this.

The user is given the opportunity to set the desired application interface language. He can also enable or disable the option to check for updates.


You can configure the display and network separately for each virtual machine. Therefore, in this case, you can leave the default value in the settings window.


Installation of application add-ons is performed on the tab "Plugins". If you remember, add-ons were downloaded when installing the program. To install them, press the button "Add plugin" and select the desired add-on. Please note that the versions of the plugin and application must match.

And the last setup step - if you plan to use a proxy, then its address is indicated on the tab of the same name.

That's all. Installation and configuration of VirtualBox is complete. Now you can create virtual machines, install the OS and get to work.


