Wake-on-LAN - what is it and how to enable it
Wake-on-LAN (WoL) is an underrated and underutilized part of the Windows 10 operating system. If you are not an avid Windows user, then the phrase Wake-on-LAN will probably not be of interest to you. This function is associated with a local network connection, which in turn will be of interest to gamers and technical support. In the past, this setting was weak, but today, setting up the Wake-on-LAN feature in Windows 10 does more than it used to. So what is Wake-on-LAN? How can this be useful for ordinary users? And most importantly, how to set it up?
What is Wake-On-LAN?
Wake-on-LAN is a network standard that allows a computer to wake up remotely. It has an additional standard called Wake-on-Wireless-LAN (WoWLAN).
For WoL to work, you need three things:
- Your computer must be connected to a power source.
- The computer's motherboard must be ATX compatible. Don't worry, most modern motherboards meet the requirements.
- The computer's network card (Ethernet or wireless) must be enabled in WoL. WoL support is almost universal.
Wake-on-LAN is widespread in the computer world. Since support is required at the hardware level, WoL runs on Windows, Mac and Linux computers without any problems. From a Windows perspective, your computer can turn on from any of the default power states, such as hibernation and sleep, as well as from a complete power outage.
How does Wake-On-LAN work?
Wake-on-LAN uses "magic packets"; when the network card detects a packet, it tells the computer to wake itself up. This is why your computer must be connected to a power source, even if it is turned off. WoL-enabled NICs will continue to receive a small charge 24/7 while they scan for "magic packets".
But what is happening?
The "magic packet" is sent from the server. There can be many things on the server, for example, specialized software, routers, websites, computers, mobile devices, smart TVs. The server sends the packet throughout your network. The package itself contains important information, including subnet information, network address, and most importantly, the MAC address of the computer you want to enable. All this information combined into one packet is called a wakeup frame. Your network card is constantly scanning for them.
Why is Wake-On-LAN useful?
Now you know what Wake-on-LAN is and how it works. But why is this useful? Why should the average user care about this technology?
Turn on your computer from anywhere
It's hard to imagine being on a business trip without forgotten files at home that you can't access remotely. To use your desktop remotely, you will need a remote desktop application that supports Wake-On-LAN. The popular Google Chrome Remote Desktop does not work, but it provides this opportunity.
Note: The BIOS must support Wakeup-on-PME (power management event). And then you can wake up the computer from the off state.
How to enable Wake-On-LAN
Enabling WoL is a two-step process. You need to configure Windows and your computer's BIOS.
Enabling Wake-On-LAN in Windows
- To enable Wake-on-LAN in Windows, you need to open the Device Manager application. Click Win+R and write devmgmt.msc.
- Scroll through the list of devices until you find network adapters. Click " > ", to expand the menu. Now you need to find your network card.

- If you don't know which one is your network card, search for windows " System Information".

- Go to " Components" > "Net" > "Adapter" and on the right, find the product name or type. Remember these values and go back to the device manager.

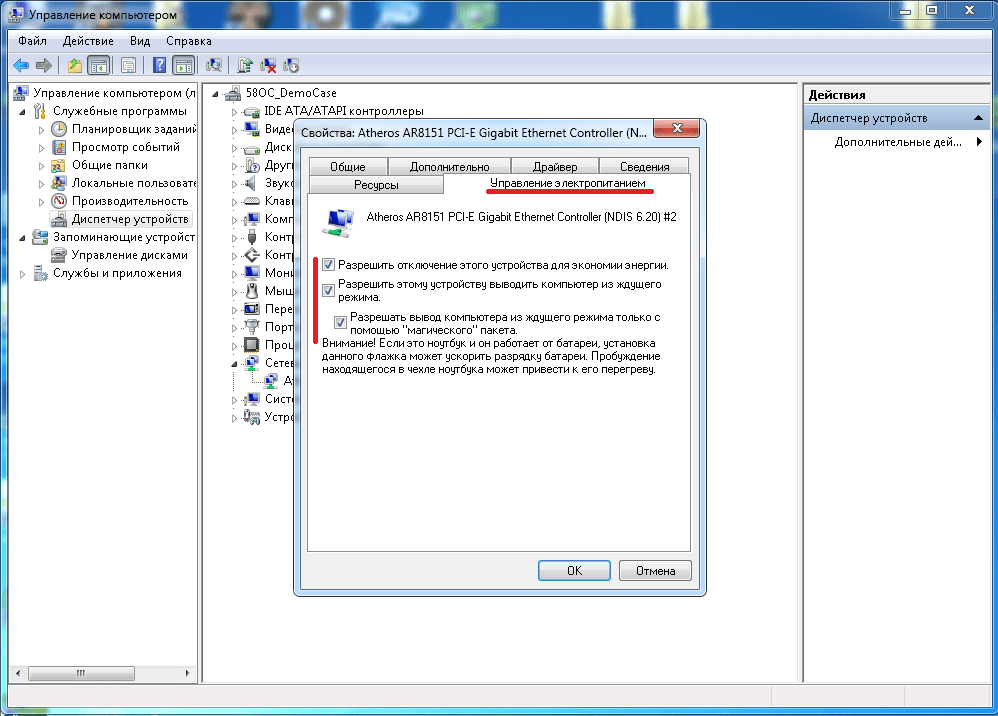
- In Device Manager, right-click on your network adapter and select properties. Next, in the new window that appears, go to the tab " Additionally", scroll down the list and find Wake-On-LAN, select value Enabled(included). The name may vary between devices and some will have Wake on magic packet.

- Next, go to the " Power management" and you should have two items checked there: Allow this device to wake the computer from standby mode And Allow the computer to wake up from standby mode only using a "magic packet". Click OK.

Enabling Wake-On-LAN in BIOS
Unfortunately, the BIOS menu differs between computers and laptops, making it impossible to provide precise instructions. Basically, you need to press a specific key while your computer is booting up. Typically, the buttons are Escape, Delete or F1. See detailed guide.
- In the BIOS menu you need to find the " "Power" and find the entry Wake-on-LAN and enable (Enabled). Don't forget to save the BIOS settings.
- The tab may also be named Power Management or you can find this function even in Advanced Settings.
Security implications of Wake on LAN
Magic packets are sent using the OSI-2 layer. In practice, this means that anyone on the same network as WoL can use your computer to download. In a home environment this is not a significant problem. In a public network this is more problematic. In theory, WoL only allows you to turn on computers. It will not bypass security checks, password screens, or other forms of security. This will also prevent you from turning off your computer again.
However, there have been cases where attackers used a combination of DHCP and PXE servers to boot a machine with their own boot image. This gives them access to any unprotected drives on the local network.
Wake on LAN (WOL) is a technology that allows you to remotely turn on a computer via a local network or the Internet. (Wikipedia link:https://ru.wikipedia.org/wiki/Wake-on-LAN )
Program to enable Wake on LAN: http://www.syslab.ru/wakeon
To use the "Wake On Lan" technology ("Magic packet" technology), you must have:
1. The equipment must comply with the ACPI specification and support for the "Wake On Lan" mode must be enabled in the BIOS settings.
2. Have an ATX power supply.
3. Have a network card that supports Wake On Lan (WOL) technology.
4. Configure Wake on LAN via Router. (setting examples)
Settings
1. Enable WOL in BIOS
You can determine whether your computer's motherboard supports Wake On Lan. by going to the CMOS Setup settings in the power management settings section. Find the option there "Wake On Lan" and make sure it is enabled.
Example: "Power - APM Configuration" AMI BIOS v2.61:
To enable Wake On Lan mode, you must set the "Power On By PCI Devices" item to "Enabled"
2. Settings linux For Wake On Lan
- We putplastic bagethtool (apt-get install ethtool)
- Checking whether the card supports “Supports Wake-On”
ethtool eth0 | grep –i wake-on
In line Supports Wake-On The mechanisms supported by the network card are listed. In my example, I use the so-called sending method. Magic Packet, and if you need the same, then make sure that in Supports Wake On there is a letter "g". Letter "d" in line Wake-on indicates that Wake On Lan is disabled for this network interface. To enable it in Magic Packet recognition mode, you must:
ethtool - s eth 0 wol g
-
approx. ifconfig eth0 | grep –i hwaddr
Settings Windows ForWake On Lan
- Click the Start key and search for “Computer Management.” Find your network adapter from the list of devices. Right-click on it, select “Properties” from the menu, and then find the “Advanced” tab. Scroll down the list and find the next item “Wake on Magic Packet” or something like that, and set the value to “Enabled”. Click on the OK button when finished.
- You will also need to know the MAC address of the network card ipconfig – all
- The practice of using Wake On Lan has revealed another point - some computers, when enabling the network switching mode in the BIOS settings, turn on the power supply on their own, without even receiving a frame with the Magic Packet. The reason for this phenomenon is that some network cards (noted at Intel, 3COM) to turn on the power supply over the local network, they use not only WOL, but also other events (Wake on ARP, Wake on Link Change, etc.), and by default several inclusion criteria are involved. It is necessary to remove them from. adapter settings (usually using a special utility) add unnecessary conditions, and everything will work correctly.
Settings MACOS For Wake On Lan
Open the System Settings window and select Energy Saver. In the Options tab you should see the phrase “Wake on Ethernet” or something similar. This option enables the Wake-on-LAN feature.
Settings FreeBSD ForWake On Lan
With each release of FreeBSD, more and more network card drivers gain support for Wake-on-LAN.
http://forums.freebsd.org/threads/wake-on-lan.28730/ (here we discuss how to insert a driver)
3.Routers:
a.ZyXEL:WakeonLAN via Internet Center seriesKeenetic(http://zyxel.ru/kb/2122)
b.Router configuration exampleTP-Link:
1. come in V chapter Forwarding->Virtual Servers
2. will add “virtual server” indicate its IP address and port that will be used to enable it. Typically ports 7 and 9 are used for Wake-On-LAN, but you can also specify any other port (from 1 to 65535). Set the protocol type to UDP or ALL.
3. Come in IP & MAC Binding->Binding Settings Turn on option Arp Binding .
4. Add a new entry for the computer that you will turn on remotely by specifying its IP and MAC addresses. Don't forget to also enable the option for it Bind.
c.Router configuration examplemikrotik:
Note: Bmikrotik has a built-in utilitytoolwol which allows you to turn on your computer directly from the router. (http://wiki.mikrotik.com/wiki/%D0%A0%D1%83%D0%BA%D0%BE%D0%B2%D0%BE%D0%B4%D1%81%D1%82%D0 %B2%D0%B0:%D0%98%D0%BD%D1%81%D1%82%D1%80%D1%83%D0%BC%D0%B5%D0%BD%D1%82%D1% 8B_(Tools)/Wake-on-LAN )
An example of setting up Mikrotik to turn on the computer viasyslab:
1. Create a static entry in the ARP table for broadcast
> /ip arp add address=192.168.1.254 disabled=no interface=bridge-local mac-address=FF:FF:FF:FF:FF:FF
2. Create a static entry in the ARP table for the user’s computer
- Tutorial
... and also without port forwarding, SSH/telnet and installation of third-party applications. From any computer connected to the Internet and even from your phone!
From time to time I need to turn on my home computer when I am not at home. Usually I didn’t bother and called or sent a message with such a request to my wife, who was sitting at home on maternity leave. A very convenient remote control tool with a voice interface. However, this method has a number of disadvantages - she went for a walk, put the child to bed, or was busy with something else. I wanted a simple solution from what was at hand.
First of all, we enable Wake on LAN in the BIOS of the motherboard, everyone does it in their own way, for many it is enabled by default. On one of my PCs there is not even such an option - it is always enabled.
Next, go to WinBox and connect to your router (if you want, you can via SSH or via HTTP(S), I do everything in WinBox). If you open the RouterOS text console and rummage around there in the /tool section (or in the wiki manuals ), then you can find the wol utility with the following syntax:
/tool wol mac=XX:XX:XX:XX:XX:XX interface=ifname
Where ifname is the name of the interface from which the magic packet will be sent, XX:XX:XX:XX:XX:XX is the mac address of your computer.
Everything seems simple, but Winbox doesn’t really launch from your phone and you’ll have a hard time entering the mac address from memory. You can launch SSH and send one single command to it, but this is also long and tedious. Let's use a firewall!
It is impossible to launch command execution directly from the filter rules; of all the actions, adding an address to the address-list is most suitable for us, because it allows you to create a new object in the router operating system, accessible from scripts.
Let's add a new rule for the input chain and place it among the other allowing rules in this chain. Let's specify the tcp protocol and dst-port - any of the upper ports.
Select the action add src (dst is also possible) to address list, specify the name of the sheet.

We use a scheduler to track the appearance of entries. Go to System -> Sheduler, create a scheduler task, set a name. We indicate Start time: startup, and the desired interval, for example every 15 seconds.
In the on event field we will write a simple script:
:local WAKEPC :if ($WAKEPC!="") do=( /tool wol mac=00:11:22:33:44:55 interface=bridge_lan /ip firewall address-list remove )
Don't forget to specify the correct mac, interface name and address list. This script, when it detects elements in the address list, will execute a command that sends magic packets to your computer, after which it will delete the entry from the address list.
To turn on your computer, just open your browser and go to the IP of your Mikrotik, indicating the port that we set in the firewall rule: http://your.router.net:port, after which the firewall creates an entry in the address list, the scheduler task will detect this entry, will launch the wol utility and delete the entry from the address list. Simpler than a steamed turnip, we can add the address to favorites so as not to enter it every time.
Just don’t forget about security, this method is not protected in any way and anyone can turn on your computer by knowing or selecting the right port. For protection, you can use VPN, port knocking, whitelist or the Elusive Joe method - it’s up to you. If you need to turn on several computers separately in this way, create an appropriate number of rules on different ports, each of which will throw addresses into its own address list, we can also reproduce the script in the scheduler task using Ctrl+C, Ctrl+V, or create separate tasks for everyone - as you want.
13 Mar 2015
Wake-on-Lan. Remotely turn on your computer
With TeamViewer you can turn on your computer via Wake-on-LAN.
This way, you can remotely control a computer that is disconnected from the network by waking it up before establishing a connection.
I will talk about a method to wake up a computer using another computer on the same network.
To do this we need to configure BIOS, Network Card, Firewall and TeamViewer.
First you need to configure the BIOS. This procedure may vary depending on the type of computer.
To enable Wake-On-LAN in BIOS, follow these steps::
- Start your computer.
- To access BIOS settings immediately after turning on, press the Del key (sometimes another one, for example F2 or F1, F12). The BIOS settings window will open.
- Open the Power tab (“Power Management Setup”, or “ACPI Configuration”, etc.)
- Activate the option Wake-Up by PCI devices (or “Wake-on-LAN”, “Power on by Ethernet Card”, “Power by PCI”, etc.) for the network card built into the motherboard. If the network card is external, activate the Wake-Up by PCIE devices option.
- Select Save and Exit (F10).
All other settings must be done in Windows. Log in with an administrator account.
Firstly Let's configure the network card.
Your computer's network card now supports Wake-On-LAN.
Secondly setting up Firewall
- Open Control Panel
- Open Windows Firewall
- In the left pane, select Extra options
- In the Windows Firewall with Advanced Security dialog box, in the left pane, click Inbound Rules, and then in the right pane, click New Rule.
- The New Inbound Connection Rule Wizard opens.
- Select “For port”
- Click the “Next” button
- Select “UDP protocol”
- Check “Specific local ports” and write “7,9” (this means that you want to open port 7 and 9 for incoming connections)
- Click the “Next” button
- Leave the checkbox next to “Allow connection”
- Click the “Next” button
- Uncheck the box next to “Public”
- Click the “Next” button
- Give your rule a name, for example “WoL”
- Click the “Done” button
The firewall is configured.
Third you need to configure TeamViewer itself.
First, let's associate the computer with the account.
To ensure that only you can turn on the computer, you need to make sure that the computer really belongs to you. Therefore, you need to link your computer to your TeamViewer account. It is possible to wake up this computer only through the TeamViewer account associated with it.
- Launch TeamViewer on your computer.
- From the main menu, select Advanced | Options.
→ The TeamViewer Options dialog opens.
- Select the General section.
- In the Link to account section, click on the Link to account... button.
- The Link to Account dialog box opens. Enter the E-Mail address of your TeamViewer account in the E-Mail field.
- Enter your TeamViewer account password in the Password field.
- Click the Link button.
- Your computer is now assigned your TeamViewer account.
- Do not close the settings, we will need them later.
Now let's set up Wake-on-Lan via TeamViewer ID on the network.
If the computer does not have a public address, you can also wake it from another
computer via a local network. The other computer must be turned on and TeamViewer installed and configured to start when Windows starts.
In this case, you can activate Wake-On-LAN capabilities over the local network. To do this, you will need to enter the TeamViewer ID of the computer on the network with which yours will be awakened. Thus, the wake-up signal will be sent through a specific turned on computer to the one that needs to be woken up/turned on.
- Find “Incoming connections (LAN)” under “Network settings” in the main TeamViewer settings, and change from “deactivated” to “accept”
- Now click on the “Configuration” button in the “Network Settings” section of the TeamViewer main settings.
- The Wake-on-LAN Feature dialog box opens. Select “Other TeamViewer applications on your network”
- In the TeamViewer ID field, enter the TeamViewer ID on your network with which the wakeup signal should be sent, and then click the “Add” button
- Click OK
- The computer can now be woken up using the saved TeamViewer ID.
All that remains is to check if everything works. Open “computers and contacts”, right-click on the desired computer, the “Wake up” button should appear, click (you can do it several times) and the computer will turn on!
The instructions for you were compiled by Evgeniy Troshev.
For more information and ordering services, you can call us from 9.00 to 19.00 (Mon-Fri) or leave a request for a call back!
+7 495 215-52-77 Mon-Fri 9.00-19.00
© 2019 | KMK-SERVICE | Outsourcing and IT support
INN/KPP 7728869840/772801001 OGRN 1147746122556
Privacy Policy (as amended on 11/01/2013)
We strive to respect the personal information regarding visitors to our website http://kmk.bz. This Privacy Policy explains some of the measures we take to protect your privacy.
Confidentiality of personal information
Obtaining private information. We receive private information about you, including information you provide when you register as a user, send us email, or sign up to receive email newsletters from our site. “Personally identifiable information” means any information that can be used to identify an individual, such as name or email address.
Use of private information
Personally identifiable information collected in electronic registration forms is used by us, among other things, for the purposes of registering users, maintaining and improving our site, tracking policies and site usage statistics, and for purposes authorized by you. We also use personal information to communicate with you in other ways. For example, if you send us a message through this site, we may use your personal information to respond to it. We also use personal information to notify you about significant changes to this Privacy Policy.
From time to time, we may invite users to provide information in the form of surveys or questionnaires. Participation in such surveys or opt-in lists is entirely voluntary, therefore the site user can decide whether to disclose the requested information. In addition to the other purposes set forth in this Privacy Policy, contact information collected in connection with surveys or questionnaires is used to communicate survey or questionnaire results to you and to monitor or improve your use of and satisfaction with this site.
Disclosure of Private Information
We employ other companies or are affiliated with companies that provide services on our behalf, such as processing and delivering information, posting information on this site, delivering content and services provided by this site, and performing statistical analysis. To enable these companies to provide these services, we may share personal information with them, but they will only be permitted to receive the personal information they need to provide the services. They are required to keep this information confidential and are prohibited from using it for other purposes.
We may use or disclose your personal information for other reasons, including if we believe it is necessary to comply with the law or court orders, to protect our rights or property, or to protect the personal safety of users of our site or members of the general public. , to investigate or take action regarding illegal or suspected illegal activity, in connection with a corporate transaction such as a divestiture, merger, consolidation, sale of assets or in the unlikely event of bankruptcy, or for other purposes consistent with your consent.
We may disclose the content of messages or requests, but we will not post or publish personally identifiable information and, except as provided in this Privacy Policy, such information will not be provided to third party service providers without your consent. We will not sell, rent or lease our user lists with email addresses to third parties.
Access to personal information
If, after providing information to this site, you decide that you do not want your Personal Information to be used for any purpose, you may remove yourself from the list of users of our site by contacting us at the following address: [email protected].
Our Practices Regarding Non-Personal Information
We may collect non-personal information about your visit to the site, including the pages you view, the links you click, and other activities in connection with your use of our site. In addition, we may collect certain standard information that your browser sends to any site you visit, such as your IP address, browser type and language, time spent on the site, and the address of the website in question.
Using bookmarks (cookies)
A cookie is a small text file placed on your hard drive by our server. Cookies contain information that can later be read by us. No data collected by us in this way can be used to identify a visitor to the site. Cookies cannot be used to run programs or infect your computer with viruses. We use cookies to monitor the use of our site, collect non-personal information about our users, store your preferences and other information on your computer in order to save you time by eliminating the need to repeatedly enter the same information, and to displaying your personalized content on your subsequent visits to our site. This information is also used for statistical studies aimed at adjusting content according to user preferences.
Aggregated Information
We may combine in a non-identifiable format the personal information you provide and the personal information provided by other users, thereby creating aggregate data. We plan to analyze aggregated data primarily for the purpose of tracking group trends. We do not link aggregated user data to personally identifiable information, so aggregated data cannot be used to contact or identify you. Instead of using actual names, we will use usernames during aggregate data creation and analysis. For statistical purposes and to track group trends, anonymous, aggregated data may be provided to other companies with whom we interact.
This Privacy Policy applies only to information collected by this site. This site may contain links to other sites that are not owned or controlled by us. We are not responsible for the privacy policies of such sites. When you leave our site, you should read the privacy statement of each site that collects personal information.
Changes to this Privacy Statement
We reserve the right to make changes or additions to this Privacy Policy, in part or in whole, from time to time. We encourage you to periodically review our Privacy Policy to stay informed about how we protect your personal information. The most current version of the Privacy Policy can be viewed by clicking on the “Privacy Policy” hypertext link located at the bottom of the home page of this site. In many cases, when we make changes to the Privacy Policy, we will also change the date at the beginning of the Privacy Policy, but we may not provide you with any other notice of changes. However, if there are material changes, we will notify you either by prominently posting such changes in advance or by directly sending you an email notification. Your continued use of this site constitutes your acceptance of such changes.
Contact us
If you have any questions or concerns about our privacy statement, please contact us at the following address: [email protected]
The forum often receives various questions. Whenever possible, they are answered promptly. And sometimes, the number of questions with the same content begins to go off scale. And this phenomenon did not bypass the Wake-On-Lan technology, which was implemented on a lot of motherboards manufactured by GIGABYTE.
Today's example with pictures will be an attempt to bring some clarity to the specifics of setting up and working with WOL. What Wake-On-Lan is and why it is needed can be found on the all-knowing Wikipedia website:
I'll start with the configuration. The following equipment was used:
GIGABYTE GA-Z77X-D3H motherboard
Processor Intel Core i5 -2300
Intel BOX Cooler
RAM Kingston KHX11000D3LL/2G connected to DDR3_1 slot
Drive wd1002faex
Power supply CFT-1000G-DF
Operating system Windows 7 Professional x64
So, it is considered that the system is assembled, tested, works properly and is included in the local network. However, to guarantee correct settings in the UEFI environment, it is still necessary to bring it to uniformity and harmony. To do this, you need to perform a CMOS clearing procedure. This is done by shorting the two CLR_CMOS pins using a metal jumper WITH AN ABSOLUTELY DE-ENERGED SYSTEM. But we used the proven, old-fashioned method and closed the contacts with a screwdriver☺
Refer to the official motherboard manual for details on the CMOS reset procedure.
Afterwards, the system turns on, and subsequently a message indicating that the BIOS reboot has been completed is displayed on the screen, and you are prompted to select the desired action option. The third one is selected - entering the BIOS settings menu.

After resetting the CMOS, all parameters are returned to the factory settings and, therefore, the possibility that some settings affected the WOL functions necessary for correct operation is excluded.
In a UEFI environment, you need to switch to Advanced mode (where there are no beautiful views of the board). This is done by pressing the F1 key. Next, you need to go to the Power Management menu and make sure that the ErP parameter (it is responsible for the WOL functionality) is set to Disabled. If not installed, you need to install it.

So, in the operating system environment, it is necessary to prepare the Ethernet adapter to “listen” to the airwaves in order to receive the “magic packet”. This package is specifically designed to transfer a computer from S5 mode to S0 mode at the right time, without physical user intervention. To do this, you need to perform the following adapter settings. Let’s go to the computer’s management menu by right-clicking on the “Computer” icon on the desktop and selecting “manage”:


Go to the “advanced” tab. There we select the “WOL Magic Package” option. It must be turned on. If it is turned off, turn it on.

In fact, after this the computer is ready to wake up at the “Magic packet” command. And all that remains to be done is to find out how to “wake it up”. But before that, you need to find out what physical and IP address the computer currently has. You can do this as follows:
Go to the Network and Sharing Center (either using Device Manager or using the tray icon), select the current local network connection and click the “details” button there. Afterwards, you can see extensive information regarding the network connection. We are interested in the columns “Physical Address” (aka MAC) and IPv4 Address. We write them down on paper. In our case, these are 50E549EDFCA3 and 192.168.100.55, respectively.

Afterwards, we turn off the computer in the only correct way, through “shutdown”. This is necessary so that the network adapter continues to function correctly and receive “magic packets” after the computer is turned off.

After the computer quiets down, you can make sure that the network adapter continues to work by blinking the LED:

Please note that further loss of power is strictly unacceptable. If you unplug the power cable or turn off the pilot surge protector, the computer will not be able to turn on remotely.
So, now you can proceed directly to the procedure for remotely turning on the computer. This is done using special software capable of generating and sending a “Magic packet” to the desired address. There is a huge amount of such software available, and everyone can find something personally to their liking. We settled on the free utility WOL 2.0.3. It is installed on a third-party computer, from which, in fact, the computer waiting for the “Magic Packet” will be remotely turned on.
The installation is carried out in the most basic way:


After that, the program starts, and in it you need to make settings to add a computer that will be turned on remotely. To do this, in the main window, click the “add new item” icon, in the window that appears, enter the IP and MAC addresses previously written down on a piece of paper. Next, click OK.

Afterwards, in the list rows of the main window, an entry about the computer with the previously entered parameters should appear. Select the entry below the “Host” column, the interaction icons become active, and click on the one called “Wake-up”. After this action, the treasured “Magic packet” will be sent to the remote computer, and the computer will react as if the Power button had been pressed, or, more simply put, it will turn on.
This is, in brief, the procedure for remotely turning on a computer based on a GIGABYTE motherboard using Wake-On-Lan technology. But what to do next with the computer, how to connect, how to work and how to turn it off - it’s up to you to decide, because this is a completely different story☺


