Install a theme on Windows 7. How to return the standard theme to Windows? Detailed instructions. Solution for Starter and Home Basic users
Despite a lot of text and pictures included below, installing third-party themes for Windows 7 is actually a very simple operation that will take you no more than 10 minutes the first time. And after that, if you follow the instructions correctly, it will take you about 2 minutes to install a new theme.
Keep in mind that all your further actions you do at one's own risk, no one except you is responsible for the possible crash of the OS. Before installing patches and replacing system files, we recommend making a restore point or backup of the OS.
Preparing the system to support third-party themes
1.
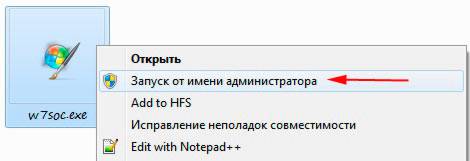
Download and install the patch (run the program as administrator and follow further prompts).
2.
Download and run the second patch as administrator, press 3 buttons in the window that opens Patch(see screenshot).
After completing the above operations, reboot your computer, your system is ready to install third-party themes.
Setting the visual style (theme)
Replacing system files
In our case, we will change the file ExplorerFrame.dll, which comes in the archive with the theme (if there is none, read the notes at the end of the article).
Automatically changing background images alone may not be enough to improve performance and efficiency. We will need to change the entire style of displaying information on the screen. How to update the desktop theme in Windows 7 using special programs or manually, we will figure it out further.
Is it possible to change the subject?
In most cases, when talking about Windows 7, we mean “Windows 7 Ultimate”. You can change the theme on this version. However, not everyone has the opportunity to use this particular version, and the options for home - “Windows 7 Home Basic” or “Windows 7 Home Starter” - are generally devoid of customization options: the “Personalization” item is simply missing from the Desktop context menu. So in the future, when talking about installing themes, we will focus specifically on “Windows 7 Ultimate”.Also, before you start changing the theme, you should make sure that your account has sufficient rights to perform such actions in the operating system. It's best if you are an Administrator on your PC. If this is not the case, most likely you will not be able to replace the topic that has set your teeth on edge. Try contacting your system administrator or computer expert with a request to expand your powers.
Program for installing themes for Windows 7
The global brand in the field of application programs, StarDock, has been producing the WindowBlinds program for many years, which is the most popular program for manipulating themes in Windows.The program is offered for download on the official resource, which is located at https://www.stardock.com/products/windowblinds/

The following window will open:

After downloading and launching the installer, the program will offer to use a paid version or a free version for trial, which is active for 30 days.
To start the program, you will need to enter your email address, after which you will receive an email with an activation link:

After clicking on the button indicated in the letter, activation will automatically occur in the “WindowBlinds” application and the trial period will begin counting from that moment:

During the installation, you will be asked to install another useful program from the same developer, which changes the desktop theme - “Fences”. It will allow you to organize your desktop icons by organizing them into unique folders. However, the folders themselves on the table will have the shape of rectangles of arbitrary sizes, which you can determine yourself. In addition, you can “swipe” additional screens to the right and left of the main one, just like in a smartphone.
The installed WindowBlinds program looks like this:

The application allows you to choose from 15 styles. Each of them is both similar and different from the others. Among such a variety, you will surely find something suitable for yourself. In addition to the style, you can immediately change the desktop wallpaper, as well as create your own unique and inimitable style in the “Modify style” tab.
How to install the official theme?
The operating system offers its users several themes to choose from, which are installed according to the following instructions:

If you don’t like the above options, you can download other official themes. To do this, we continue our actions:

How to install a third party theme?
Microsoft does not allow its users to arbitrarily install and change themes in the operating system. This is done to generally improve the stability of the OS and the security of the users themselves. However, if the workplace is not very responsible, you can easily allow yourself to experiment, choosing a topic that suits you individually. But for this you will have to do a little magic.The principle of installing a theme that is not signed by Microsoft is to download any program that allows you to patch system files, and then download and install the new theme itself.
The most recognized programs for our purposes are as follows:
- Universal Theme Patcher. It replaces some system files, and after that you can install any themes from any creators without restrictions. However, replacing system files may be perceived negatively by your antivirus. After replacing the files, you need to restart the PC.
- UxStyle Core. Its difference from the previous one is that no system files are affected, but an additional background service, Unsigned Themes, is launched. However, the application has a significant drawback: when you try to change the theme, sometimes the theme “flips” to the usual classic one. In this case, uninstalling and reinstalling UxStyle Core helps, after which the desired theme can still be installed. Perhaps until the next replacement.
- VistaGlazz (VG). This application also affects system files, but also has important additional features: automatic creation of initial copies of working files with the ability to automatically restore if necessary; adding a “transparency” effect to windows (maximized folders, etc.).


Next, we proceed directly to downloading and installing a third-party theme.
One of the most popular and trusted sites with a huge number of themes for every taste is located at https://winzoro.net/themes/windows7_themes/
The themes themselves are downloaded to any folder on the PC, even to the Desktop itself. Most often, a downloaded theme is an archive in *.zip format, which can contain not only files for the theme (Theme), but also thematic ones:
- wallpapers – background options for the theme;
- preview – screenshots to get an idea of the theme’s appearance;
- me – a file that describes the theme’s capabilities, installation nuances and a little self-promotion of the creator;
- System Files is a subfolder whose contents need to be replaced with system files, but this is at your own peril and risk.


To fully comply with the creator’s intentions, you may need to install fonts, wallpapers and replace the “explorer.exe” file. It must be remembered that when changing the theme, the results of these manipulations will have to be canceled or restored. Therefore, it is better to copy the replaced files to a backup folder on your PC or flash drive in advance.
Advice: I would like to warn fans of everything free from downloading themes and styles for Windows 7 in the “*.exe” file format. Any of these files may contain a virus, and instead of updating the appearance of your desktop, you may have to reinstall the entire Windows 7 (see). In this case, you can lose all your documents, settings for Word, Excel, and other office or accounting programs. If you still download executable files from the Internet, be sure to use an antivirus.
Video instruction
This short video describes step-by-step and clearly the simple process of replacing a theme in Windows 7:Well, now, after reading our article, you can independently change the themes and styles in your Windows 7. You can make your workplace less official, more friendly and individual, in some ways even surprising you. Special programs and a huge number of themes for Windows 7 available on the Internet will help you with this. Good luck in your design search!
It is best to download Windows 7 themes from the official website. Why here? Yes, because on the Microsoft website you are guaranteed not to pick up any infection on your computer. Moreover, all themes are adapted for Windows, and some also replace standard system sounds with more interesting ones.
How to install a Windows 7 theme
Go to the folder with the downloaded themes and double-click to start the installation. That's it, the theme is installed, and for Windows 7 starter and home users additional instructions: We need to install the personalization panel, since this function is blocked by default in the initial versions of Windows 7. You can download it or. After installing Personalization Panel, you will take full advantage of all desktop customization options.
How to customize the Windows 7 theme
Right-click on the screen and select Personalization. We poke at the bottom of the window Desktop background, check and uncheck the required images, now step by step:
Image Position - Tile
Change images every time - select the right time
In random order - for variety, put a tick 🙂 and save the changes.
How to create your own Windows 7 theme
Now let's go back a little, where we selected Desktop Background and click on the Sounds button to the right. Here you can choose a sound scheme for your PC from those offered by Microsoft.
But that's not all. Now we will need several large images (by the way, beautiful abstract packs of pictures can easily be found on the Internet) or photographs. Now, in any graphics editor (I like the picture manager - Microsoft Office Picture Manager, which is part of the Microsoft Office package), crop and resize the pictures to the resolution of your monitor.
To find out the monitor resolution, right-click on the screen and select Screen Resolution. This is the size (in pixels) that your images should be. This condition, of course, is not mandatory, but desirable. This way you will make life a little easier for your video card; it will not need to stretch and adjust images to fit your screen, which means you save computer resources.
Now we repeat the procedure: right button on the screen, desktop background, image location: here with the browse button, select the prepared images one by one, tick them, set them up as described above and save the changes.
Now you know how to create your own Windows 7 theme from your favorite images with the sound design you like best.
http://site/wp-content/uploads/tema_windows7.pnghttp://site/wp-content/uploads/tema_windows7-150x150.png 2018-04-17T15:20:57+00:00 Lessons Where to download a theme for Windows 7 It is best to download Windows 7 themes from the official Microsoft website. Why here? Yes, because on the Microsoft website you are guaranteed not to pick up any infection on your computer. Moreover, all themes are adapted for Windows, and some also replace standard system sounds with more interesting ones. I recommend...Probably every computer user wants to make it something special. Currently, it is possible to significantly modify the interface of not only the desktop, but the entire system. It will be difficult for an inexperienced person to do this, but with the right information, you can achieve success.
Microsoft actively warns that the use of pirated software products can lead to system failures. There is not a drop of lies in this judgment. However, some people want to create an individual style for their interface. The reason for this is the fact that the official products are quite monotonous.
What it is
The theme is a complex of images, colors and computer sounds. As a rule, it includes a screensaver, a desktop screensaver and sound design (on/off, information signals, etc.). Folder icons and cursor can also be changed.
You can install a theme on your Windows 7 computer from those suggested by the developer. Thus, the Aero extension is very popular, which allows you to make your own customization. They are built into the operating system. If they were not enough, you can download additional options on the official Microsoft website.
There is also the possibility of installing non-certified products. You can find countless of them on the Internet. They are able to highlight the individuality of each user. However, there are certain risks, as various malicious utilities are often embedded in downloads.
How to install
You don't have to use themes offered by Microsoft. It is possible to use products from third party sources. It is very important to install them correctly, otherwise critical errors may occur.
In order to do this, the first step is to find a topic you like. They are presented in huge numbers on the Internet. At the same time, do not forget about the bit size of your system (32 or 64 bits). You can view this parameter by clicking on the “my computer” icon and calling up the context menu.
Important! Do not download archives from unverified resources. There is a high probability of getting a Trojan or virus software.
Before starting the installation, create a restore point. If something goes wrong, you can return everything back.
Video: new design for Windows
Let's patch system files

Tip: By default, Windows hides access to system folders. Therefore, you will have to open it for a while by clicking on the corresponding tab (most likely, it will appear when you open the system directive).
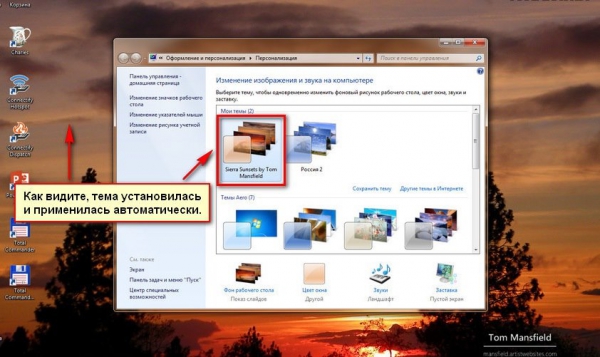
- Now you will need to go to the personalization tab (it can be found in the toolbar). In it, select the theme you just installed from the archive. If you did everything correctly, the appearance of the interface will change.
Changing explorer elements
This is not all that can be done. It is possible to modify the elements of the conductor.
We do it this way:

Changing the Start button
Installing most themes does not change the START button. Many would like to modify this element in the form of a ball with colored squares. To do this you will need to use special software. Let's look at the example of Start Orb Changer.
This utility is distributed free of charge. You can download it on the resource of the same name. It works with all bit depths.
Important! When installing, uncheck unnecessary boxes so as not to acquire unnecessary toolbars.
So, we do the following:

There may be cases when, after such an operation, the entire desktop and taskbar disappear. This occurs due to incompatibility of files with a specific system.
To get everything back, do the following:

How to install a standard theme on Windows 7
Sometimes users get too carried away with modifying their operating system. This can lead to many problems: performance degradation, virus infection, loss of control over certain elements, etc. As a result, there is a need to return everything to standard settings. There may be several solutions.
In the simplest case, we do the following:

The method described above only helps if the system files have not been edited. In other situations, the fix will be a little more difficult.
If you once created a backup system restore point (it was discussed at the beginning of the article), then everything will be as simple as possible.

If you did not show foresight, you will have to use another method. To do this, you will need a disk (or flash drive) with Windows. Paste it in and select “System Restore”. Next we follow the instructions.

As a rule, the described methods help in these situations. If they also turn out to be powerless (which happens extremely rarely), then there is only one way out - reinstalling the operating system. In Windows seventh generation, this operation does not cause difficulties, even for inexperienced users.
Well, that's all, as you can see, editing the interface in Windows OS is not such a difficult task. However, you shouldn't get too carried away with it. Many extensions can slow down your computer's performance. Therefore, it is best to use verified files (built into the OS, or downloaded from the official website).
>


