Connecting Wi-Fi to an Asus laptop. Error “Windows could not connect to...”. Turn on Wi-Fi using a switch or a combination of buttons on the keyboard
Connecting to a wireless network is the most convenient way to access the Internet at good speed without unnecessary wires. However, to enjoy all the benefits of a wireless connection, you must first understand how to set up Wi-Fi on a laptop.
Enabling the adapter
Before you start creating a new connection, you need to check if the Wi-FI adapter is turned on.
Each laptop model has its own function key to turn the adapter on/off. For example, ASUS laptops use the combination Fn+F2, and Acer laptops use Fn+F3. On some Lenovo models, adapter status is controlled using a hardware switch located on the front panel. 
To determine which key you have installed, look at the F1-F12 row. One of the buttons should have an icon - an antenna that distributes a signal. Press this button in combination with the Fn key and check that the Wi-Fi adapter indicator light changes from red to blue or green.
What to do if the Wi-Fi adapter does not turn on?
There are situations when, after pressing a function key, the adapter does not turn on. Typically this problem occurs due to one of the following reasons:
- Incorrectly installed drivers.
- Incorrect operation of the system.
- Virus infection of laptop.
Until you eliminate the cause, the question of how to set up Wi-Fi in a laptop will not receive a positive resolution. Most often, the problem lies in incorrectly installed drivers, but it would also be a good idea to check the system for viruses. If no malicious applications are found, reinstall the Wi-Fi module drivers and try turning it on again.
How to set up Wi-Fi on a laptop
Setting up on Windows XP
To configure, you just need to correctly specify some parameters of the wireless connection:

If you have set a password for your wireless connection, you will be required to provide a security key, after which the connection will be established.
Setting up on Windows 7
We've sorted out XP, now let's see how to set up a wireless network on a laptop with Windows 7 installed. There are practically no fundamental differences:

This completes the wifi setup on a Windows 7 laptop. When connected, you enter the security key and gain access to the Internet.
For Windows 8.1 or Windows 10 there are no differences in settings from the seventh version. The list of networks available for connection can be called up directly from the notification panel - there is a special Wi-Fi icon in the tray.
Video of Wi-Fi settings on a laptop
Wi-Fi technology is very widely used in the life of a modern person, as it allows you to easily and quickly solve the problem of connecting to the Internet without using conventional wires. This is especially true when using laptops, which can be used to access the Internet in any convenient place thanks to the presence of a built-in Wi-Fi adapter.
That is why the situation when Wi-Fi does not work on a laptop leads to significant inconvenience and even some problems. There are many reasons why Wi-Fi may not work on a laptop computer. It is simply unrealistic to solve the most serious of them on your own without the help of specialists, but there are quite a lot of them that can be eliminated on your own. Let's look at them.
Is the problem with your laptop or router?
A fairly common problem that a laptop has stopped connecting to the WiFi network is not a problem with the laptop itself, but with the settings of the router that distributes the network. Thus, the laptop can be configured correctly, but Wi-Fi still does not turn on precisely because it has nothing to connect to.

To rule out the possibility that the problem is related to this, you should try to connect to the network from any other device that is equipped with a Wi-Fi adapter - from another laptop, smartphone, tablet, etc.

If Wi-Fi does not work from another gadget, then the problem lies in the Wi-Fi router distributing the Internet. If the connection is successful, the problem is in the laptop and before solving it, you first need to determine why Wi-Fi stopped working.
Hardware enable adapter
Based on such diagnostics, you can accurately determine that this problem arose precisely because of the laptop. When Wi-Fi does not work on it, you can try using several methods.
The first one is to check if the wireless adapter on your laptop is enabled. Almost all modern models have light indicators for the operation of the WiFi module and there are special key combinations to enable it in hardware.

Typically, a lit indicator indicates that the module is turned on. If the indicator does not light up at all or lights up in red, then Wi-Fi is not working precisely because of the wireless network adapter. It must be turned on.
Most often, such indicators are located directly on the keyboard, side or front panel of the device case. Sometimes they are located on the monitor body or near the touchpad.

To enable the module of such a network, press the key combination Fn and one of the system keys F1-F12. The specific combination depends on the laptop manufacturer. Usually, the corresponding antenna icon is located on the desired key. If it is not there, then to turn on Wi-Fi you should try pressing the standard combination for a particular model:
Fn+F3 for Acer;
Fn+F2 for Asus, Dell or Gigabyte;
Fn+F5 on Fujitsu devices;
Fn+F12 on HP laptops.

After pressing the appropriate keys, we check whether the wireless connection module operation indicator lights up or whether it stops glowing red. After this, you should try to connect to the network again. If this does not help, move on to the next step.
Software enablement
When Wi-Fi stops working and turning it on in hardware does not give positive results, you also need to turn it on in software, which is done directly from the operating system the laptop is running.
To programmatically enable WiFi that has stopped working on Windows 7, 8 or 10, you need to perform the following sequence of actions:
1. On the notification panel, which is located near the clock, select the network connection status icon;
2. From the list that opens, select “Network and Sharing Center” or “Network Settings” depending on the version of the operating system;

3. The next step is “Changing adapter parameters.”
 Among the list of all existing connections, you need to pay attention to the color of the “Wireless Network Connection” icon. If your WiFi does not work and the wireless adapter is disabled, the connection icon will not be highlighted. In this case, right-click on its icon and select “Enable” from the context menu that opens. The color of the connection icon should change.

In this case, the wireless network adapter turns on, all you have to do is find the one you need in the list of available wireless networks and connect to it.
If, after such actions, Wi-Fi, which has stopped working, continues to be inactive, you need to move on to the next method of solving the problem.
Driver installation and update
Quite often, the wireless Wi-Fi connection does not turn on due to the lack of a driver or when it is very outdated. To determine whether the driver is installed, you need to select “Properties” from the context menu of the “My Computer” icon, which is located on the desktop or in the “Start” menu. Next, in the window that opens, select the “Device Manager” command from the menu on the left.
In the new window that opens with a list of connected devices, you need to find the name of the laptop’s wireless network adapter. Usually its name is “Wireless Network Adapter” or “Wireless Network Adapter”, along with which the device manufacturer should be indicated: Realtek, Atheros, Qualcomm or something else.

Having found the desired item and right-clicking on it, select “Properties” from the context menu. In the window that opens, there should be an item “Device is working normally.” But even if there is a mark indicating the normal operation of the device, this is far from a guarantee that the correct driver version is installed and Wi-Fi is turned on correctly. To check it, in the window with the properties of the wireless device, go to the “Driver” tab and pay attention to the items “Date of development” and “Vendor”.

If the supplier is Microsoft or the program development date is several years behind the current one, go to the official website of the laptop manufacturer and download the latest official version of the driver.
The same should be done if there is no wireless adapter among the list of installed devices.
If the wireless communication module is present in the list of devices, but is marked with a yellow exclamation mark, this means that the device is disabled, as a result of which the network has stopped working. In this case, opening the device properties window, you need to click the “Engage” button.

Another reason why Wi-Fi stopped working on a laptop may be that the energy-saving mode is enabled, which prevents the wireless connection from working. To disable it, you need to do the following:
1. Open Control Panel;
2. Select the “Power Options” icon;

3. In the window that opens, select the “High Performance” or “Balanced” mode.

External obstacles to the signal
It's also worth noting that a broken wireless network can also be the result of more than just laptop problems. The wireless signal is affected by some external factors that may weaken it. Ceilings, walls, floors and similar obstacles significantly degrade the signal quality of the access point and laptop.

As you know, the signal quality on a personal computer is displayed in the form of several marks - the more of them, the higher the quality of the signal. If the wireless connection level is displayed as 1 or 2 marks, then you don’t have to try to use WiFi - in this case it will not work properly.
In this case, you need to move the router closer to your workplace, move the workplace closer to the Wi-Fi router, or buy a new, more powerful router.
Other causes of Wi-Fi problems
The causes of problems with the functioning of the wireless network adapter described above are the most common and you can fix them on your own.
It is worth noting that all of these are software solutions to the problem, which can be solved by installing, reinstalling or updating the device driver, as well as performing some operations with the OS.
But often the problem with the operation of the wireless connection module lies in hardware errors. What are these errors? These are problems that are directly related to the board itself, most often due to its physical damage.
To fix such problems, you will need to disassemble the laptop. It is worth noting that such actions can only be performed if you have certain skills in this area. If such skills are missing, it is better to entrust the work to professionals.

One of the most common physical damages is an unconnected antenna wire to the proximity module. This problem occurs with laptops that have been repaired or if their owner independently cleaned the cooling system from dust. In such cases, the antenna is sometimes simply forgotten, as a result of which the adapter will not be able to establish a connection even near the signal source. To fix this problem, you just need to connect its antenna to the Wi-Fi module.
Sometimes the reason that Wi-Fi stops working is simply overheating of the network card. Most often this is the result of the laptop being placed on some kind of soft surface. The thing is that at the bottom of the device there are holes through which cold air enters, cooling all the computer boards. By blocking these holes, the system will overheat, which can lead to failure of certain components.
Another common cause of device overheating is dust, which can prevent cold air from entering the cooling system.

That is why, in order to avoid such problems, it is recommended to clean the laptop from dust at least once every year: in this case, it will be possible to avoid repairing the laptop as a result of overheating of its components.
In the most extreme cases, the wireless adapter may even burn out. In this case, only replacing it with a new one will help. You can determine this problem using the device manager, in which the module will simply no longer be displayed. When you try to install a driver for a wireless network, a message appears stating that the corresponding device is not installed on the system.
If all else fails
If none of the tips above help, you can use a simple, but often effective solution: restart both your computer and your wireless router. Please note that after a reboot, the router turns on for up to 5-10 minutes before it starts distributing the network. Be patient. Also, despite the opinion of many skeptics, sometimes the troubleshooting function found in the Windows operating system helps solve problems with a wireless network.
Thus, most of the existing solutions to problems related to the fact that Wi-Fi has stopped working on a laptop have been listed above. Almost all such methods and recommendations can be used by anyone who is faced with a similar problem, since this does not require any special skills.
If nothing helps, and the wireless network does not start working, there is only one option left - go for help to a quality service center, where they can solve any problems with the laptop.
If the article did not help solve your problem and Wi-Fi still does not work, write in the comments, I will try to help.
This article describes step by step how to enable WiFi on an ASUS laptop for a novice user. Experience shows that this is not as difficult as it seems at first glance. You just need to carefully follow the instructions given within this material - and everything should definitely work out for you. The connection procedure is as follows:
- Configuring the router.
- Installation of hardware switches.
- BIOS parameterization.
- Checking drivers.
- Connect to a wireless access point.
- Network testing.
It is in this order that the presentation of the material will be constructed to simplify the setup.
General information
So, how to enable WiFi on an ASUS laptop of any model? First, let's figure out what it is and why it is needed. Today it can be done in two ways: using twisted pair and wirelessly. The standard we are interested in relates to the last of them. Nowadays, most electronic devices are equipped with such an adapter. Not only laptops and netbooks, but also smartphones, phones and tablets. This list can be continued indefinitely. This is implemented as follows. Its connecting link is the router, to which the incoming wire from the provider is connected. It contains an adapter - a source that allows other devices, including a laptop, to connect to the wireless network. In turn, the mobile PC has a network card that receives data from the router. This statement is true before obtaining a network address. Once it is received, information is transferred in two directions at once.

Setting up the router
If you don’t know how to enable WiFi on an ASUS laptop, you need to understand the rules. If you have a network router configured and already working, you can skip this section. So, first you need to connect the router. To do this, it is installed near the laptop. Another important condition is the presence of a free outlet for organizing its power supply. We immediately connect the twisted pair cable that comes with it to the laptop. We install the power supply into the socket, and its wire and pin into the router. We turn on the laptop and router. After the mobile PC has finished loading, launch any browser and enter “192.168.x.1” in its address bar. Instead of “x” on some models you need to enter “1”, and on others - “0”. We carefully look at the documentation and find the information we need. Then press Enter. In response to this action, a request will appear in which you need to enter your login and password. They should also be found in the documentation for the router. Next, set the parameters for the “incoming” connection. This information is in the contract concluded with the provider, and we find the place to enter it in the operating manual for the router. We also use it to find items related to the network name, password and encryption method. We set the first two of them at our discretion, but the last one must be set to WPA2 (provides the greatest degree of protection). Then everything is turned off, the circuit is disassembled. The router is installed at its permanent location. The input wire from the provider and the power supply are connected to it. At the next stage it turns on.

Hardware switches
Now let's figure out how to enable it in hardware. Some ASUS models are equipped with a special switch that allows you to completely turn off this adapter. Its location on the laptop body may vary, so you need to look at the documentation for it. This toggle switch must be set to the On position. The second important point is the key combination that also allows you to turn it off. It consists of a keyboard layout switch Fn and one of them (it shows the Wi-Fi logo). By pressing them simultaneously, you can turn off or turn on the wireless network card. The status indicator of this device is the corresponding LED. If it is on or blinking, the adapter is active. Otherwise, to activate it, you need to press the key combination again. Another important nuance that needs to be taken into account is the availability of drivers. This will be described a little later in this article.
"BIOS"
In some cases, it is necessary to enable WiFi on an ASUS laptop using the BIOS. Since such an option can be located in completely different sections of the menu, you simply cannot do without an instruction manual. We find this item there. Then, when you boot or reboot the laptop, go to the basic settings. Next, we find the item we are interested in. It must be set to Enabled. If this is not the case, then change it using the appropriate keys.

Drivers
Enabling WiFi on an ASUS laptop requires drivers to control this adapter. To do this, go to the “Start” menu, then “Control Panel”. In it we find “Device Manager”. In it, we check for the presence of an exclamation or question mark next to its name. If they are not there, then everything is fine, so you can skip this step. Otherwise, you need to download the drivers from the manufacturer’s official website and install them so that all these icons disappear. In some cases, an additional PC restart may be necessary. Let’s not forget about this, we do it without fail.
Connection
The next step is to configure WiFi on your ASUS laptop properly. To do this, click on the network connections logo on the taskbar in the lower right corner (most often this is a monitor with a red screen). A list of available wireless connections will open. In the upper right corner of this screen there is an “Update” button (it shows 2 blue arrows). It is on this that you need to click with the right mouse button. After this, scanning of available wireless networks begins. At the end of this operation, the list must be updated. Our network appeared in it, the name of which was set earlier at the stage of setting up the router. We click on it. In response, a window should appear in which we enter the password. Then we wait to receive the network address. This will be indicated by a change in the wireless networks icon. Right away it will look like a brown and transparent ladder, and then it will become white and opaque. After this, you can proceed to the next stage.

Functionality check
After the manipulations have been carried out, you need to make sure that everything is done correctly and the Internet connection is working. To do this, launch any of the browsers installed on the PC. In its address bar, enter rambler.ru and press Enter. After this, the Internet page should begin loading. If this does not happen on the ASUS laptop, then check the account balance status. In most cases, in the absence of funds, providers block access to the global web. If this is not the problem, then we check the settings made at each stage, and only then contact the operator and consult with him about the causes of possible malfunctions.

Results
This article described how to enable WiFi on an ASUS laptop of various models for a novice user. If you follow the previously stated instructions, you can easily and simply solve the problem. There is nothing complicated about this; anyone can cope with this task, regardless of their level of training.
The modern world can no longer be imagined without wireless technologies such as cellular communications and Wi-Fi. Wi-Fi is no longer only available in offices, entertainment and shopping centers, but is also rapidly spreading throughout apartments and private houses. Unfortunately, when it comes to setting up and connecting Wi-Fi, not every Internet user will be able to immediately perform the necessary steps and turn on Wi-Fi on a laptop. Therefore, we will try to tell in simple language and make our instructions step-by-step and understandable to every reader of this article.
It is worth noting that today there are quite a few laptop manufacturers: ASUS, Acer, Sony, Alienware, Compaq, DELL, HP, Lenovo, MSI, Packard Bell, Samsung, Panasonic. And in all Wi-Fi connections are different. More precisely, there are two types of WiFi enablement: hardware and software. We will begin our instructions with a description of hardware methods for turning on Wi-Fi and will describe how to connect Wi-Fi on a laptop if it has the ability to turn on a wireless network using buttons or a special toggle switch.
How to enable Wi-Fi on a laptop using hardware
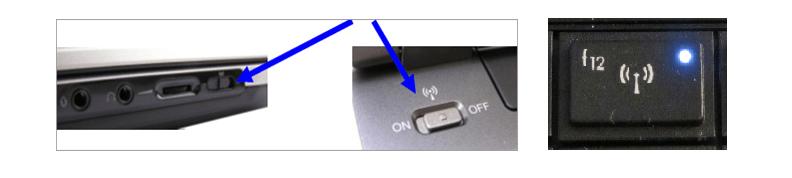
As mentioned above, some laptop models are equipped with a special button that turns on the Wi-Fi network. Therefore, carefully inspect the laptop for the following sliders:


Or a separate button that allows you to configure Wi-Fi on a laptop:


If you don’t find a special slider or button that turns on Wi-Fi, then look at the F1-F12 keys, which may have an antenna on them. That is, the Wi-Fi network symbol:

We will try to list the necessary key combinations for popular laptop manufacturers:
- To enable Wi-Fi on laptops Asus (Asus) you need to use a combination of buttons Fn+F2.
- To enable wifi on a laptop HP (Hewlett Packard) must be pressed Fn+F12. Or use a special key with a Wi-Fi image - an antenna.
- On manufacturers' laptops Packard Bel And Acer (Acer) Wi-Fi is turned on using a combination of buttons Fn+F3.
- Laptops from famous brands MSI use a combination of buttons to turn on Wi-Fi Fn+F10.
- To connect a laptop to wifi from Samsung (Samsung) need to be clamped Fn+F12 or Fn+F9.
- On laptops from a renowned manufacturer Lenovo (Lenovo) a special mechanical slider can be installed. Or you can turn on Wi-Fi using a combination of buttons Fn+F5.
- Laptops from Toshiba (Toshiba) usually use a combination of buttons Fn+F8.
- On laptops Sony Vayo (Sony Vaio) a mechanical switch can be installed.
If there is no Fn key on your laptop, this means that either a special slider or a special button is responsible for turning on Wi-Fi. If both are missing, you need to connect the laptop to Wi-Fi at the software level, checking the drivers and software. The next chapter of our instructions is about this.
How to programmatically connect Wi-Fi on a laptop
Some laptop models come with manufacturer's software through which you can enable your laptop's Wi-Fi adapter. For example, on laptops equipped with adapters from Intel, the “Intel PROSet” software is installed, and on many Samsung laptops there is the “Easy Settings” program. Therefore, if your laptop does not have a special switch or button, you need to look for such software in the Windows operating system tray.
Now let’s look at how to connect a laptop to the Internet via wifi, that is, the procedure for turning on Wi-Fi in the Windows operating system. Our instructions are universal and suitable for users of operating systems such as Windows 7, Windows 8 and Windows 10. First, make sure that the driver is installed on your laptop’s wireless adapter and is visible in the device manager. To do this, go directly to Device Manager by going to “Start”, then to “Control Panel”, then to “System” and open “Device Manager”.

In Device Manager, find the “Network Adapters” menu item and expand it. After this, all available network adapters should appear there, including the wireless one, which contains the word “Wireless”. This is our wireless adapter. Make sure that it is enabled and there are no icons with a yellow exclamation point (indicates a problem with the drivers) and a red cross (indicates a breakdown)

As mentioned above, you need to make sure that the wireless adapter is enabled. And if necessary, use it.

If there are no drivers, you need to download them from the manufacturer’s website or try to update them using the system:


Your wireless network connection must be turned on. If for some reason it turns out to be turned off, as in the picture above, then turn it on by right-clicking on it and selecting the “Enable” menu item. Next, just find the ladder icon in the Windows tray, click on it and find your wireless network.

After that, click the “Connect” button. If there is no password set for the wireless connection, Wi-Fi will turn on automatically. Otherwise, you will need to specify a network password, which in Windows is called a security key.

That's all, we hope that the instructions were useful. You can ask all questions in the comments. Finally, watch the video on how to enable and configure wifi on a laptop with Windows 7:
Thanks to their mobility and stylish design, as well as good functionality, laptops and netbooks have become very popular. Nowadays, every modern person uses the Internet. Thanks to Wi-Fi technology, taking a book with you to a bar or cafe you can communicate with friends and work colleagues, check your email, read news on the Internet and much more.
Many laptop users are interested in the question: how to turn on WiFi on a laptop. As a rule, in order to turn on Wi-Fi you need to perform a couple of simple operations.
Quickly turn on wifi on a laptop
The combination of keys pressed depends on the specific laptop model. Here are several options for launching a wifi network on popular models.
- On Samsung laptops, to turn on wifi, you need to press the Fn and F12 or F9 buttons for a couple of seconds, depending on the model.
- On Aser laptops, turn on by holding the Fn + F3 buttons
- To enable on Asus, you need to press Fn + F2
- On Lenovo, turn on wi-fi by pressing Fn + F5. But there are also models where there is a separate switch with a wireless network design for this.
Different laptop models from different manufacturers use their own keyboard shortcut to enable Wi-Fi. For more detailed information about the startup scheme, please refer to the user manual for the laptop. All modern laptops have an Fn key. If there is no such button, then there is a separate switch or button to start wifi. And it looks like this:
Did you turn on Wi-Fi using the required key combination or a separate button, but it doesn’t work? This means you need to configure wifi on your laptop.
Checking Wi-Fi Drivers
Let's start with the basics, check the version and the presence of installed drivers. This is necessary to make sure whether the necessary drivers are available and whether they are enabled. On the desktop, select the icon<<компьютер>> and select the item<<свойства>>. Then in the left column select<<диспетчер устройств>>.
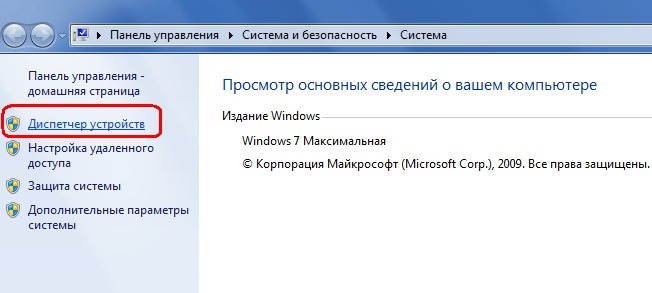
In the window that opens, find the line network adapters. This line should contain our wifi adapter and be signed as a wireless network adapter.

If there is no such line or there is an icon with an exclamation mark on a yellow background, then the driver is either not installed or is not working correctly. We solve the problem by installing them from the disk that came with the laptop. If there is no such disk, then you will have to look for them on the laptop manufacturer’s website.
Turn on the Wi-Fi adapter
We sorted out the drivers by installing the ones necessary for our laptop model. Now you need to start wifi. To do this we do the following: Control Panel > Network and Internet > Network and Sharing Center > Change adapter settings. Choose Wireless network connection Right-click on it and select Enable from the menu.

If everything was done correctly and wi-fi was turned on, then you will see this icon on your desktop.

Click on the icon, a menu will appear with available wireless networks, which should include yours.

After you click on the name of your network and click Connect, a window like this will appear in which you need to enter the security key - the password for your network. If it is not password protected, the connection will occur automatically.


