Why is system protection disabled in Windows 10? Using a USB drive. Recovery methods without logging in
Windows Defender- a standard Windows operating system program that protects computer data from malicious software. The developers created a built-in antivirus in version 7 of the operating system and continue to do so in subsequent ones. This is exactly the same antivirus, the cost of which is included in the price of the operating system.
When choosing to use a regular antivirus or Windows Defender, the choice will, of course, fall on other antiviruses. Defender gets the job done, but it's designed to withstand basic virus programs. To fully ensure the protection of their personal computer, many users install other antiviruses. Therefore, the question arises of how to completely disable Windows Defender. After all, the built-in anti-virus protection of the operating system simply does not allow installing other anti-viruses.
Users who use a pirated version of the operating system also wonder how to completely disable the built-in antivirus.
How to remove Windows 10 Defender
Don't look for ways to remove it Windows Defender. Since this utility is standard in the operating system, it cannot be removed. This is the same as uninstalling Windows by uninstalling the files in the folder. Perhaps the operating system will work, but not fully. But you can turn it off at any time.
The most standard way to disable Windows Defender is to remove it from startup. To do this, you need to go to, find the desired application and disable it.
In Windows 8 and Windows 10 operating systems, disabling Defender is performed using different methods, so we will consider this action separately using the eighth and tenth versions of the operating system as an example.
How to disable Windows Defender 8
In order to disable it, you need to find the Windows Defender Service and stop this process. Let's take a step-by-step look at what needs to be done for this:
Users of the tenth version of the OS will not be able to use this method, since in this operating system the methods are much more complicated, but there are several of them.
How to disable Windows Defender 10
First, let's look at the simplest method, which is primarily used by all users if Defender prevents software installation. It is not effective for those who want to disconnect permanently Defender, since it will only turn off for 15 minutes.
When entering the menu Start you need to go to Options", select section " Update and Security", find " Windows Defender» and disable real-time protection.

There is another way to disable protection for 15 minutes - through Command line.
But such methods are not suitable for everyone, since most users would like to see the built-in Windows antivirus turned off not for 15 minutes, but forever. Therefore, let's move on to consider the question: how to disable Defender Windows 10 forever.
How to permanently disable built-in antivirus protection on Windows 10
In order to turn off protection in Windows 10, there are 2 ways, using the editor’s group policy and the registry capabilities.
To turn off Defender Windows 10 via Group Policy Editor required:

Of course you can turn it off Defender Windows 10 via registry:

Other methods
You can use various special utilities to remove Windows components. One such program is WinUpdatesDisabler. It allows you to disable operating system components that are not required by the user.
When you disable the standard antivirus, a notification periodically appears in the lower right corner stating that it is disabled. In the Security and Maintenance Center there is a tab about disabling pop-up messages on the topic of antivirus protection.

How to enable Windows Defender 10
It happens that the service Defender turns off on its own. Do not forget that installing other antivirus programs may disable the built-in antivirus.
To enable Defender There is no need to configure it again, the system will automatically configure it on its own. If the user knows how to turn it off, then he knows how to turn it on. But it happens that Defender has been disabled by other users or malicious software. You can enable it by returning the default settings to Group Policy Editor and in Registry Editor. Also in the support center there is a button to enable the built-in antivirus; just click it and it will work again.
Windows Defender Error 577
Sometimes users encounter error 577, which almost immediately closes the running program. Whenever errors 577 The computer begins to freeze, keyboard input becomes slow, and the mouse cursor slows down.

Why does the error occur?
Maybe, Windows Defender was installed incorrectly, that is, the installation was incomplete. Also, virus software could delete standard antivirus files.
What to do to fix the error
There are many ways to fix the error:
- Using System Restore is an alternative method. It is necessary to roll back the system to the moment when the error did not occur.
- If there is a file to restore the registry, then you can restore it too.
- It is advisable to analyze the files of your personal computer for the presence of a virus. To do this, you can use a free utility Dr.Web Cureit.
- If all of the above does not help, then scan your Windows system files.
- Update all available operating system software, as well as drivers on your personal computer.
- Reinstall Windows Defender.
- If error 577 still appears, you will have to reinstall the operating system.
Everyone has their own preferences, some have built-in Defender is disabled and it uses other antiviruses, but for some people standard protection is enough. A full package of licensed antivirus costs a lot of money, so those who use licensed software and do not need enhanced protection are content with the built-in antivirus. Well, those who use pirated software cannot update the built-in Defender and prefer to turn it off.
Video on the topic
Restoring Windows 10 allows you to return the operating system to a working or original state from an automatically or manually created system rollback point or a full system image stored on a hard drive.
Also included in the “tens” toolkit is an OS reset tool, which will save you from time-consuming reinstallation of Windows 10, and the creation of a recovery flash drive, which is necessary to resume the functioning of the operating system in critical situations (when Windows 10 does not boot and does not provide the opportunity to get into the recovery environment) .
The proposed instructional article talks about all the tools that make up the system recovery environment in Windows 10, the mechanisms of their functioning, how to use a particular function and the effectiveness of recovery methods in certain situations.
Before you begin studying the material, it is recommended that you read the instructions on restoring the operating system bootloader, checking its files for integrity, and restoring damaged registry files.
The first thing you should try if problems occur is to boot into safe mode. Let's consider a situation where "ten" does not load and does not allow you to reboot with the appropriate parameters (you will not be able to get into this mode via msconfig or special boot options).
1. Launch from bootable media with the Windows 10 distribution using the Boot Menu.

4. Run the command “bcdedit /set safeboot minimal” to then start the computer in safe mode.
5. Reboot, closing all windows.
After starting the computer, you can begin to solve the problem that is preventing the PC from starting/functioning normally.
We return the computer/laptop to its original state
The most notable recovery feature that came with Windows 10 is the ability to restore Windows to its original state. You can use it through “Options”.
1. Call up the menu using Win→I.
2. Go to the “Update/Security” section.
3. Click on the “Recovery” tab.
This opportunity should be used as a last resort when the options below did not help solve the problem, because in the end you will get a clean, only installed operating system with or without personal data, depending on the specified parameters.

4. Click “Start”, after which a dialog will appear asking you to specify the parameters for resetting the operating system.
The first option is to completely clear the system volume of all files and quickly reinstall Ten without using the installation disk with the operating system distribution; the second method is to quickly install Windows 10 while saving user files and settings of applications installed on the PC; the programs themselves will not be saved. .

There is another way to call the operating system reset dialog even without authorization in the system. Everything is done on the login screen. To access the function, click on the “Reboot” icon while holding down the Shift key. After restarting the computer, click on the “Diagnostics” icon, then click on the button to return the system to its original state.
The advantages of this method are that there is no need to have an installation disk/flash drive and all actions are performed automatically without any user intervention.
There is only one drawback - if the user deletes the system image or locates this file in damaged sectors of the hard drive, it will not be possible to perform a quick reinstallation, but here the “ten” has several additional tools in its arsenal: using a system recovery disk if available (a very rare occurrence) and backup Windows 10 using OS tools on a volume other than the system volume.
Windows 10 recovery flash drive
The tool is called a Windows recovery disk, but in the “top ten” it should be renamed a recovery flash drive (we will use this term).
If previously the Microsoft OS had utilities for performing automatic system resuscitation, which in most cases only tried to do something, then in the “ten” there is an option to create a system image for the subsequent return of the system volume to the state imprinted in this image by automatically reinstalling the OS , as discussed in the section above.
A similar image is created in the following way:
1. Call the Control Panel applet called “Recovery”.

3. Check the option to back up system files to a recovery flash drive in order to be able to instantly reinstall Ten.

4. Upon completion of all recording operations or, if necessary, boot from the created drive using the Boot Menu function.

5. In the action selection window, go to the “Diagnostics” section.
While in it, we will open the opportunity to perform the following operations:
- using a flash drive with an image, return Windows 10 to its previous state;
- visit UEFI/BIOS settings;
- resort to resuscitation of the “tens” through a rollback point;
- run via the command line, for example, to create a copy of the bootloader on the corresponding volume;
- restore Windows 10 from a full OS image.

The presence of such a flash drive in the case of the “ten” is much more useful than even the installation one, although the latter allows you to launch some of the operating system recovery operations on the screen with the “Install” button immediately after selecting the language.
We create a complete image of the system resuscitation
Preparing an automatic recovery involves taking a snapshot of Windows 10 at the time of its current state. It is best to create such an image immediately after installing the operating system with all the drivers and software, while the system volume is not littered, like the registry.
It is not necessary to create a snapshot in the first hours of operation of the new OS; this can be done a couple of days after its reinstallation, so that Windows gets used to it and is brought to a normal functioning state, but does not have time to acquire junk files and registry keys.
1. The process begins with cleaning drive C: the system registry from garbage and uninstalling programs that turned out to be unnecessary.


5. We decide on the storage location for the snapshot of the operating system and the partitions that will be backed up (it is best to specify a removable drive).

Once the system files are compressed and transferred to the specified digital media, it can be used to quickly return Windows 10 to its captured state. In order to start recovery from an image, you must boot the computer from the flash drive on which the file is stored, or through the Windows 10 installer (“Diagnostics” - “Advanced options” - “OS image recovery”).
Windows 10 rollback points
There are no innovations with this feature; all its features work as in previous versions of the OS. It provides a chance to return the system to one of the preserved states through a recovery environment or in a running operating system. To take full advantage of the feature, it must be activated. You can check the status through the Control Panel applet called “Recovery”. In the window, click “System Restore Settings”.

To change the settings, click “Configure” and indicate the space allocated for storing rollback points on the system disk.

When using a licensed image, this function is activated, but if you installed Windows 10 downloaded from pirated sites, the author of the assembly may have deactivated this function. How to enable system restore? Select the system partition, click “Configure” and move the checkbox to the “Enable system protection” position.

Typically, rollback points are created automatically when changes are made by the user or any application to system files, settings, services, and registry settings. The option to manually create restore points is also available. In the “System Properties” window, click “Create” and enter a name for the image to make it easier to identify.
To use the system rollback function using one of the restore points, go to the same applet and click “Run system restore.” If Windows 10 does not start, boot from a recovery disk or installation distribution and call “System Restore” through “Advanced options” in the diagnostic window.
File history
Another innovation in Windows 10 that allows you to make and store backup copies of specified files (often text documents and various projects) and retrieve the desired copy of the file from the reserve if necessary.
As you can see, the “ten” has an expanded set of effective functions to return the system to a working state in any case and without reinstalling the OS. In addition to all the listed tools, you should definitely include the bootloader recovery function using Windows 10.
By default, System Restore is disabled in Windows 10, or rather, if you did a clean installation of the system, then in most cases System Restore is disabled. And if you are from previous versions of Windows, and you had this function enabled there, then most likely it is enabled here, but it won’t hurt to check :)
How to enable System Restore
Using the toolbar we can enable System Restore again if it was disabled. And Windows will begin to take snapshots of the system state according to your settings, and you will have to allocate some amount of hard disk for all this.
If the System Restore function has been disabled and you currently have problems with Windows, enabling this function will not help you! When we enable the system restore function and set all the parameters, Windows will only begin to take snapshots of the system that we can roll back to in the future. Therefore, if you have problems with Windows now, skip this point and we will try to help you in the next one.
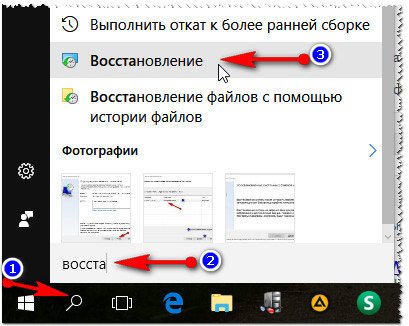
This feature is only available in the toolbar, not in Options. The fastest way to access "System Restore" is to write "Recovery" in the search bar (as in the picture) and select it from the options found. Now click "Create a recovery disk". You can also right-click on “Start” and select “System” => on the left side select “Advanced system settings” => “System Protection” tab

In this window you will see whether system recovery is enabled or disabled. If it says off next to the disk. and you want to enable monitoring of it - select the drive and click "Configure"

Check the "Enable system protection" box and use the slider to select the maximum disk space for storing system snapshots. The less disk space you allocate for recovery, the fewer recovery points will be stored.

To later restore the system from a snapshot taken earlier, go to “System Protection” (Start with the right mouse button and select “System” => on the left side select “Advanced system settings” => “System Protection” tab) and click "Restore"

Also, if Windows does not boot, you can restore the system from a previously created snapshot.
Other ways to fix system problems
If your computer starts to work poorly after installing some update, try it.
There is another way to fix problems in Windows 10 - resetting the system. Using the reset function, you will get a clean Windows 10 system without errors, but then you will have to reinstall the necessary programs and configure everything again according to your preferences. To use the system reset function, go to “Start” => Settings => Update and Security => Recovery => and in the “Reset the computer to its original state” item, click “Start”

There are still ways to restore the system, but we will talk about them in the following articles. If you have any additions, write comments! Good luck to you :)
Windows 10 Defender, or otherwise known as Windows Defender, is a free built-in antivirus from Microsoft that works on the PC until the user installs software from third-party developers. There are several ways to enable Windows 10 Defender. And although it does not guarantee 100% system protection, it works stably and does not affect the performance of Windows 10.
How do I enable built-in Windows Defender on a new operating system?
Full protection of the Windows 10 operating system is carried out using three components, namely:
- Built-in Defender antivirus;
- Firewall or firewall;
- Smart Screen Filter.
Defender provides basic protection for Windows 10. It starts automatically after system installation. To check if it works or enable protection, you should do the following:
- Click “Start”, “Settings” and select “Update and Security”.
- In the left menu, select “Windows Defender”. In the “Real-time protection” section, the slider should be set to the “Enabled” position. If not, then we expose it. This is how we turn on Defender.

- If you enable Cloud Protection, all information about viruses and attacks on your PC will be sent to the Microsoft server. If you don't want to share data, you can disable this option. The “Send samples” function is similar to the previous one.

- If you go lower, you can see the “Exceptions” item. If you click on the “Add exceptions” button, the settings window will open.

- You can add both a file and a folder of a program.

- By clicking on the corresponding button, Explorer will open. Specify the file to exclude.

- At the very bottom of the Windows Defender section there is a button that says “Use Windows Defender.” If you open this link, a Windows Defender window will appear. It has three tabs: Home, Refresh and Journal. If you click on the "Options" button, you can turn the service on or off.


You can also enable Windows Defender Antivirus through the registry. To do this we do the following:
- Press “Win+R” and enter “regedit”.

- Go to the branch “HKEY_LOCAL_MACHINE”, “SOFTWARE”, “Policies”, “Microsoft”, “Windows Defender”. Right-click on the last section and select “New”, “DWORD Value”. Give this parameter the name “DisableAntiSpyware”. Set the value “0” to enable the defender, or “1” to disable it.

IMPORTANT! Before making changes to the registry, you should create a backup in case an error occurs.
You can also manually enable standard Windows 10 antivirus through the Local Group Policy Editor. To do this we do the following:
- Press “Win+R” and enter “msc”.

- The Group Policy Management Editor will open. Go to the address: “Computer Configuration”, “Administrative Templates”, “Windows Components” and find “Windows Defender” in the list. It may also be called as "Windows Defender". Double-click to start the “Turn off Windows Defender” service.

- The settings window will open. Check the “Disabled” checkbox to activate the antivirus.

- Close the Group Policy Management Editor and restart the PC.
How to disable Windows Defender manually in Windows 10?
If you are planning to install a third-party antivirus and do not know how to disable Windows 10 Defender, you should use the following recommendations.
- Click “Start”, select “Control Panel”, “System and Security”, “Administration”.

- Selecting services. If you want to manually disable the antivirus, find “Windows Defender Service” or “Windows Defender” in the list and double-click to open the settings.

- In the startup type we set it to “Disabled”.

You can also disable the defender through the registry. In it, go to the branch “HKEY_LOCAL_MACHINE”, “SOFTWARE”, “Policies”, “Microsoft”, “Windows Defender” and set the value “1” in the “DisableAntiSpyware” parameter.
Also, if you are interested in the question of how to disable Windows 10 Defender programmatically, it is worth noting that only some utilities are suitable for this purpose. Among them, it is worth highlighting “Win Updates Disabler” and “Destroy Windows 10 Spying”.
The principle of their operation is as follows: download and install programs. We launch them on our PC. In “Win Updates Disabler” check the box “Disable Windows Defender”.

In “Destroy Windows 10 Spying”, check the “Disable Windows Defender” checkbox.

You can also remove some applications using this program.
If, when you try to disable the built-in antivirus, you receive a notification that “The application is disabled and is not monitoring the computer,” it means that you installed a third-party defender or disabled Defender yourself. You can also go to Control Panel and select Action Center. In “Support Center Settings” we enable Defender.

After completing these steps, you should restart your computer or laptop.
Also see the video on how to turn off Windows Defender 10:
Hello.
Folk wisdom: There are two types of people - those who do not yet make backups, and there are those who already do them.
Needless to say once again that a timely backup can save a lot of nerves, time and data. In general, Windows 10 (as far as I have become familiar with it) is a fairly “stable” system, at least in comparison with Windows XP, and it is much more difficult to “kill” it with your incompetent actions. But still...
In this article I want to dwell on the most common questions regarding Windows recovery, creating checkpoints and other issues. The article will be useful for those who are simply thinking about what to do if Windows “flies” tomorrow, and for those for whom something has stopped working (errors and crashes have begun to appear), and for those who no longer boot Windows and he wants to get his computer working again. So, I will consider all the questions in order.
How to set up the creation of system restore points
Important note: I don’t know why, but in Windows 10, by default, the function of automatically creating checkpoints (to which you can rollback Windows) is disabled! Therefore, I think that the first step in an article of this kind is to show how to enable this function. What’s strange is that before this, in Windows 7, 8, this function was always enabled!
Actions in order
1) First open Windows control panel, go to the section " System and safety", then open the “System” section (see screenshot below).

System and Security / Windows 10

3) After, you need to select the system drive (on which Windows is installed - it is marked with an icon) - usually this is " local drive C:\ (system)", and click the "Configure" button.

- switch the slider position to " Enable system protection";
- move the slider to the right - we determine the place, which will be allocated for recovery points;
- save the settings (clearly shown in the photo below).

Now system protection is enabled, Windows will make backups from time to time. By the way, the more space on your hard drive you allocate for backups, the more points you will have. As soon as the space is used up, each new point will overwrite the old one...
Create a checkpoint manually
By the way, immediately after enabling automatic creation of points, I recommend creating a point manually (especially if everything is working as it should for you so far :)).
To do this, click the "Create" button, the tab is still the same "" (by the way, this button has become active (previously it was impossible to click on it)).


Creating a restore point
After which, Windows will “think” for a minute or two, and a checkpoint will be created (by the way, Windows will notify you about this in a separate window). Actually, that’s all for the sim about “manual” work...
Note! I recommend creating a restore point manually whenever you are going to change drivers (for example), or perform any actions with the system registry.
Running recovery from Windows
How to open the recovery window (option 1)
Open the Windows Control Panel at the following address: Control Panel\System and Security\System

Then in the window that opens, click the "Restore" button (shown in the screenshot below).

After which, the "" window should appear. Windows will warn you that this operation will not affect your documents, but drivers and programs installed before creating the restore point will be deleted. Click next...

Afterwards a window with recovery points will appear. Now you need to select the desired point and click next.
Selecting a restore point
By default, Windows selects the most recent (i.e. most recent) point and prompts you to agree and click next. The last point is not always the solution to the problem. You need to select the point at which Windows was working normally for you. You can navigate by the date the point was created and its description.
Note:
- some points may be marked as "critical". There is nothing wrong with this; usually, they are created during a system update;
- If you select a specific point and click the "Search for affected programs" button, you can find out which programs will be changed when you roll back the system. For example, you will find out which programs will not work after a rollback - i.e. they will have to be reinstalled.

The last step is to agree and confirm to roll back the system to the previously created restore point. The computer will then restart and the changes will take effect.

System Restore: Confirm Rollback
Second way to open the recovery window
There is another faster and easier way to open the recovery window in Windows 10. To do this:
- open the search window (the “magnifying glass” icon is located next to the START button);
- enter the word “recovery” into the search bar (most likely, you won’t have to enter the entire word);
- Among the results found, open the one you need (each step is illustrated in the screenshot below).
How to roll back Windows 10 to a restore point if your computer won't boot
It’s good when Windows at least boots and you can normally open the control panel, the security section and enable the rollback function. And when it doesn't load? In this case, you need an installation DVD or flash drive. In my article I will focus on the second :). So, first things first...
Preparing and creating a bootable USB flash drive (if you don’t have one)
In general, I advise more than once, but it is better to use the flash drive with which you installed Windows - do nothing, save it and have it in reserve. Such a flash drive will help you out more than once. If your Windows won't boot and you don't have such a flash drive, you'll have to ask a friend or neighbor for help (if you don't have a second PC/laptop).
Remark! In order not to repeat myself (especially since the topic is extensive), I recommend that you read the following article on my website:. The article provides various options for creating bootable flash drives: Windows Xp/7/8/10, UEFI, multiboot, etc.
BIOS settings. Selecting boot media (i.e. “our” flash drive)
To boot from the installation USB flash drive with Windows, you need to configure the BIOS accordingly. In general, there is nothing complicated in setting up the BIOS (in terms of changing the boot order). Rather, the problem often lies in an incorrectly written bootable media.
In general, in my opinion, it is much more convenient to use a special boot menu - Boot Menu (English title). It can be called up when you turn on your computer/laptop. The point is that in this menu you can select the device from which to boot the computer (without going into the BIOS at all!).
Each manufacturer has its own hotkeys for entering the Boot Menu, for example, Acer laptops have F12, Samsung laptops have Esc. Press them immediately after turning on the computer/laptop. After this, usually a special menu appears in which we must select our media (an example is shown below). An expanded list of manufacturers is also available at the link below.
Hot keys (buttons): BIOS boot menu, Boot Menu, Boot Agent, BIOS Setup. Laptops and computers -

System rollback using a restore point
If the flash drive is written correctly, the Bios is configured correctly, then the Windows installation should start. Please note that on the screen on which you will be asked to install the OS, there is a link “” at the bottom of the window, and you need to click it (see screenshot below, note: green arrow).


In additional parameters - select the very first tab " System Restore (system restore using a restore point)" (see screenshot below).

Then a standard window should open asking you to roll back the system to a previously created point.

Recovery of boot records
By the way, it is not always necessary to look for a backup point and roll back the computer to it. When Windows stops booting (suddenly, for no reason at all), it is most often due to damaged boot records.
To restore them, just go to the " Extra options" (see the previous step of the article) select the tab not "", but "" (see screenshot below: green arrow under the number 2).
Windows itself will automatically diagnose and try to restore functionality.

Addition. Even in cases where the OS tells you that the attempt to restore boot records was unsuccessful, try rebooting the computer; not once in my “practice” (despite this error), after such a procedure, Windows booted successfully.
Creating a full system image
Windows 10 has one good backup option - creating an image of the entire system on a separate disk or DVD (you will need several, in my opinion it is better to use an external hard drive, or a second disk - if you have 2+ of them in the system).
The difference between this method and classic restore points is that this method creates a complete archive with all programs, drivers, user files, settings, shortcuts, etc. that are on the system.
Note. It makes sense to create such an image when you have everything set up and everything works well. Typically, this time comes after 2-3 days after installing Windows.
Creating an image
1) First open control Panel, then section " system and safety", then " Backup and Restore" (an example is shown in the screenshot below).


3) Now you need to specify the media on which the image will be saved. Usually, they choose an external hard drive (or a “large” flash drive of 64 GB, 128 GB, for example).

4) Here you need to indicate which disks you want to archive. Windows, by default, includes the disk on which it is installed and several system partitions. If this is not enough for you, you can include other local drives.
Note. Pay attention to the space that will be needed for archiving. Windows will show you the free space on your media and the required backup space. When selecting several more local drives, the required space for archiving will increase in proportion to the selected drives.

Using an image. When you start having “problems” with Windows 10, you can quickly and easily roll it back completely to its previous state using this image. To start recovery from such an image, there are 2 ways:
- - use a recovery disk;
- - in the Windows setup program, select: Diagnostics/Advanced options/System image recovery.
Addition.
By the way, you can make a complete cloning of a hard drive using third-party programs (many of them, frankly speaking, have many more options and are more convenient to use than standard Windows tools). For example, such programs are: Acronis True Image, EASEUS Disk Copy, Paragon Drive Backup Personal, etc.
It's no secret that problems with Windows are often caused by viruses and adware. Often for this reason, many users want to restore their Windows OS. If you start to see advertising banners appear on your desktop, on websites (where they didn’t exist before), your browser constantly opens tabs (that you didn’t ask it to open) - most likely you have picked up adware (this “infection” is very popular now).
To get rid of all this “good” and restore the computer’s functionality, I recommend using the utility - AVZ.
AVZ
One of the best antivirus utilities, no installation required. Works with all popular versions of Windows: XP, 7, 8, 10. Main tasks solved in it:
- - removal of SpyWare and AdWare inserts, modules (more relevant than ever - advertisements and other “good” constantly pop up in browsers);
- - search and elimination of Dialer (Trojan.Dialer);
- - neutralization of Trojan programs;
- - closing holes (BackDoor);
- - removal of network and mail worms;
- - neutralization: TrojanSpy, TrojanDownloader, TrojanDropper, etc.
In addition to neutralizing viruses, this program can restore system settings, close some “holes” by setting optimal parameters. Let's get down to business :).
1) Virus check
This is the first place to start working with AVZ. Even if you have an antivirus installed, it would still be a good idea to run your AVZ computer. The fact is that this antivirus utility “sees” and finds a lot of “good” that ordinary antiviruses miss.
To scan your computer for viruses, run AVZ, select the drives (be sure to select the system drive) and click the START button. Fortunately, scanning is quite fast (relative to third-party programs of a similar kind).

The second thing I recommend is to set the optimal settings (it’s no secret that not all default settings in Windows provide the optimal level of security). So, AVZ finds such problematic settings and offers you to fix them (the program fixes them itself automatically).
To run such a wizard: go to the "File" menu and select "".

Quite often, “problems” with Windows also occur due to the fact that viruses and adware change some system files, edit files, and introduce “malicious” lines into them. Because of this, for example, you see ads in your browser, even on sites where they shouldn’t be!
You can also restore many system settings in AVZ if you go to: " File/System Restore". The program will offer a whole list of various options for recovery (all options are shown in the screenshot below).

Note. If you unknowingly check all the boxes and click restore, then nothing criminal will happen, just the system settings will return to their original form, as if you had just installed Windows.
I'll wrap this up, have a good and quick fix of Windows!


