Disable automatic hyphenation. Managing automatic and regular word hyphens in Microsoft Word
If you copied some voluminous text from the Internet, and after pasting it into a document or simply opening a finished file, you noticed that the hyphens placed in Word do not match the page layout, and removing hyphens manually will take a lot of time, this is where the question arises how to remove hyphens automatically in Word. This article will focus specifically on this issue. In it we will look at an example in detail, how to remove word hyphenation in Word.
Ways how to remove hyphens in Word , described in this article work both in Word 2003 and in all versions of Word 2007, 2010, 2013 and 2016.
First of all, we must determine whether these are automatic word hyphens in Word or manually placed.
Let's conduct one test that will help us determine the type of transfers. Try highlighting the hyphenation sign.
How to remove hyphens in Word - Highlighting hyphens
If you were able to identify the hyphenation sign, it means that the hyphens were placed manually. If not, then the document uses automatic hyphenation, and it will be much easier for us remove word hyphens. Let's consider how to remove word hyphens in both cases.
How to remove automatic word hyphenation
Let's figure it out first how to remove automatic word hyphenation. To do this, go to the “ Page layout" and in the "Page Options" section select the item " Hyphenation" In the list that opens, select “No” to disable automatic hyphenation.

How to remove hyphens in Word - Disabling automatic hyphenation in Word
After this, all automatically created transfers will be deleted.
How to remove hyphens placed manually
In order to remove hyphens, which were placed manually, in the “Home” tab, in the “Editing” section, select the “Replace” item.
How to remove hyphens in Word - Opening the “Find and Replace” window in Word
In the dialog box that opens, “ Find and Replace“Click on the “Special” button, and in the list that opens, select the “Soft transfer” item.

How to remove hyphens in Word - Selecting a hyphen
The corresponding combination of symbols will appear in the “Find:” field. We leave the “Replace with:” field empty. And click the “Replace all” button to remove hyphens throughout the entire document.

How to remove hyphens in Word - Removing hyphens in Word
That's all. After this, Word will tell you how many replacements were made.

How to remove hyphens in Word - Number of hyphens removed
That's all, now you know how to remove hyphens in Word. After you have removed hyphens that do not match the page layout, and you need to automatically place hyphens, you can read how to do them in this.
Perhaps each of us, copying text from the network into a document on a PC, did not know what to do with unnecessary spaces and characters. They interfere with the neatness of what is written. How to remove word hyphenation in Word? You can do this manually, but it just takes time. In this article we will look at instructions that allow you to quickly and easily solve this problem.
Getting rid of word separation using pre-installed MS Word features
Not everyone knows that Word provides extensive functionality. First of all, it allows you to eliminate many shortcomings. Often, only a few people know about the simplest and most useful options and tools. Consequently, users rarely understand the full functionality, although it saves a lot of time. It’s easy to remove automatic word hyphenation in the editor 2007 and 2010:
- first, open your file;
- secondly, go to Page Layout;
- thirdly, in the subsection with Page Options, click “Arrangement”;
- finally, in the block that appears, instead of the “Auto” field, put a tick next to the “No” line;

- dictionary divisions placed automatically will be deleted.

In Word 2003 the steps will be as follows:
Menu/Tools/Language/Hyphenation
Finally, uncheck the “Automatic placement” checkbox.
When you need to do them again, you need to go again to the corresponding key and select the item that interests you.
How to remove word hyphenation after manual division in Word?
You cannot deal with such symbols using the method described above.
If editing was done manually, it must be deleted in the same way. This happens because in the parameters of a text document, data about hyphens added manually cannot be saved.
In this case, the scheme will be like this:
- launch the search line by pressing CTRL + F;
- go to a more advanced search mode by clicking the desired item in the menu that appears;

- press the “More” button in the lower left side;

- click on the “Special” button and select a line with a soft hyphen;

- define the “territory” of the inspection, for example, in the main document;
- Click “Find”, close the window, click on the Backspace key.
You can use this instruction and learn how to remove unnecessary word hyphenation in Word. The most remarkable thing is that it is actually easy to do; if necessary, you can watch the video below.
If you have to edit other people's text documents created in Word, then you probably have to correct many different errors. For example, remove extra or unnecessary hyphens.
If the document is small, then this is not difficult to do manually, but in large documents it will require a lot of time and effort. In this article we will tell you how to quickly remove hyphens in Word, both automatic and manual. The material will be useful for both Word 2003, 2007, 2010, 2013 and 2016.
If your document was hyphenated automatically using the built-in function in Word, then removing them is very easy. To do this, go to the “Page Layout” tab, click on the “Hyphenation” button and select the “None” option in the menu that opens. As a result, all hyphens will be automatically removed from your Word document.
If you use Word 2003, then automatic hyphens are removed differently. In your case, you need to go to “Tools – Language – Hyphenation” and in the window that opens, disable the “Automatic hyphenation” function.

After that, close the window by clicking on the “Ok” button and automatic transfers are deleted.
Removing manually placed hyphens
If your document was hyphenated manually, then the method described above will not work. In your case, in order to remove hyphens, you will have to use the Find and Replace tool.
To do this, press the key combination CTRL-F and then click on the arrow that is located to the right of the search bar.


As a result, the Find and Replace tool will appear in front of you. You can use it to search and automatically replace text in a Word document. In order to remove line breaks, open additional settings using the “More” button.

After this, you need to click on the “Special” button and select the “Soft transfer” option in the list that opens.

After selecting “Soft Transfer”, two characters will appear in the “Find” line, but this is normal, as it should be. Leave the “Replace with” field empty; you don’t need to enter anything in it. Now just click on the “Replace All” button.

After clicking the “Replace All” button, the Word document will search for and remove hyphens.
It should be noted that in some cases, instead of “Soft hyphen” in the search window, you need to select “Continuous hyphen”.
When working with documents in the Word text editor, the user may encounter many problems, especially if the work is carried out with someone else's file. The article will tell you how to remove word hyphenation in Word, because this function is quite rare in the program, and the average user simply does not know how to disable it. In total, two types of transfer can be distinguished: automatically placed and manually. Both of them will be discussed below.
Method 1: Remove automatic transfers
We’ll start with how to remove automatic word hyphenation in Word, since this type is considered the most common. Most often, you encounter migration when downloading a document from the Internet in which another author has enabled this function. It is quite easy to distinguish it; to do this, follow these steps:
- Open a document with automatic word hyphenation enabled.
- Go to the "Layout" tab.
- Click the “Hyphenate” button, which is located in the “Page Setup” tool group.
- In the new menu, click on “No”.

After this, all transfers that were made automatically will disappear in the document; accordingly, it will be restored to the normal form that the user is used to seeing when working with a text file. This was a way to remove word hyphenation in Word.
Method 2: removing manual hyphens
Word hyphenation in Word is not always performed automatically; sometimes, after opening a document or copying text from some Internet resource, you may notice that syllable hyphens do not appear at the end of lines, as they should be, but in general at any places. In this case, unfortunately, it will not be possible to remove word hyphenation in Word using the previous method, but you won’t have to remove each “-” sign yourself. Let's move directly to the instructions for eliminating incorrectly placed hyphens:
- Open a document with incorrect hyphens.
- On the “Home” tab, click on “Replace”, which is located in the “Editing” tool group. By the way, you can perform the same action by pressing the hotkey combination Ctrl+H.
- In the window that appears, we will need its extended version, so click the “More” button.
- In the additional menu that appears, click on the “Special” button.
- In the list that opens, select the symbol you plan to work with. In this case it is “Soft hyphen” or “Continuous hyphen”.
- A symbolic definition of this sign will be inserted into the “Find” field. In the “Replace with” field, do not write anything, leaving it blank.
- Click on “Replace All” to get rid of all hyphens in the text. If this does not happen, then you have selected the wrong symbol. Try replacing "Hyphen" with "Soft Hyphen" or vice versa, depending on your previous choice.

This is how you can easily remove word hyphenation in Word, which was placed manually and is not displayed correctly for you.
Conclusion
Now you know how to remove word hyphenation in Word; as you can see, doing this is quite simple. There is, of course, a difference when the transfer is placed automatically, by the program itself, and when manually, but in any case this is not a big problem. We hope this article helped you understand everything.
Formatting a document is a very delicate matter. It is not enough to stretch the text from the right edge to the left to give it aesthetic beauty.
The correct placement of hyphens is what will help.
Here we will not study the rules for placing hyphens, but will touch on more mundane questions: “How to remove word hyphenation,” “How to hyphenate words,” etc.
Let's get started...
How to enable word wrapping in Word
The program exists and is used in different versions, they have a different interface and functionality, so there are differences in enabling the same settings.
In Microsoft Word 2003 editors, automatic word hyphenation is enabled in the “Tools” tab, “Language” command, “Hyphenation” mode and we will get into the hyphenation design.
For versions of Word 2007, 2010, 2013 and 2016, you can hyphenate words in the “Page Layout” tab, which contains a “Hyphenation” button.

Automatic word hyphenation
This command is very convenient: it simplifies writing documents and saves time. As you type, hyphens create themselves.
To activate the command, use the “Page Layout” tab and find the “Hyphenation” button. Select “Auto” in the list and click, a check mark appears next to the command.
Manual hyphenation of words by syllables
You can use the manual transfer option. The function is very convenient if you want to control the placement of words by syllables in the right places.
For example, your text is aligned to the width of the page. If there are many long words in one line, then they can be located far from each other and long gaps will appear, this looks ugly.

To activate the manual installation command, you need to use the “Page Layout” tab and select the “Hyphenation” button. From the list, select “Manual”, after which you will immediately be offered to divide the word into syllables with a hyphen placed at possible break points.
Thus, hyphenating words in Word is not the most difficult task. Let's dive deeper into the topic and look at all the different options for the function.
Word wrap setting modes
The Word text editor provides several modes for setting word hyphens. Each mode serves specific purposes, so you need to know about them.
Soft hyphenation
This function helps make the text more beautiful to look at. Sometimes, with automatic hyphenation, words are broken in a different way than the user would like.
You can insert the hyphen your way. This option is labor-intensive, you will have to do everything yourself, but in the end, it is very attractive.
To set a soft hyphenation, you need to place the cursor after the syllable where you want to hyphenate and press “Ctrl” + the “-” sign (hyphen).
The beauty of the feature is that if you change the font or font size and a word moves to the middle of the line, the hyphen is automatically removed from it. No additional text editing is required.
Add a non-breaking hyphen
In some combinations of letters or numbers, moving one part of the text to another line will be incorrect and inconvenient. The Wicrosoft Word editor cannot independently recognize the correct or incorrect hyphenation of a word.
The most obvious example is the use of a telephone number (8-905-457-85-62). The numbers must follow one after another, without being carried to the next line, otherwise the reader may get confused in the numbers.

In this case, a non-breaking hyphen comes in handy. When set, words and letters on both sides will not be separated by hyphenation, thus we can prohibit word hyphenation in Word.

To place it in the required place, simultaneously press the key combination “Ctrl” + “Shift” + “-” (hyphen).
Setting hyphens in the selected fragment
In books or magazines, very often you encounter a single style of writing an article and insertions of text to which the author wants to pay special attention.
You can not only decorate a fragment of text with a different font, but also add hyphens that will be missing in the remaining text.
Select the fragment of text of interest, go to the “Page Layout” tab -> “Hyphenation” and select “Manual”.
The Word editor will offer hyphenation options only in the selected text fragment.
If further formatting is not required in the document, you should cancel word wrapping by clicking the “No” button.
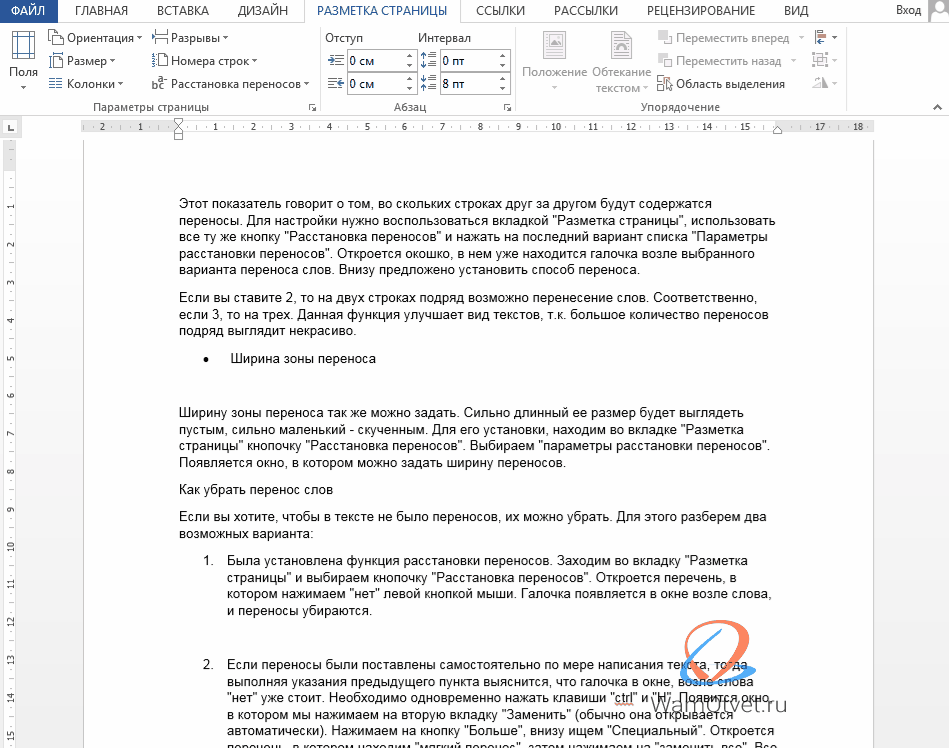
Configuring transfer and changing zone width
You can set the parameters for word hyphenation in Word yourself. For example, the size of transfers or the number of transfers in a row.
Changing the number of consecutive transfers
This indicator tells you how many lines one after another will contain hyphens. To configure word hyphenation, you need to use the “Page Layout” tab, use the same “Hyphenation” button and click on the last option in the “Hyphenation Options” list.
A window will open, it already contains a check mark next to the selected word hyphenation option. Below you are prompted to set the transfer method.

If you set the value to “2”, then word wrapping is possible on two lines in a row. Accordingly, if “3”, then on three.
This function improves the appearance of texts, because a large number of word hyphens in a row looks ugly.
Transfer zone width
The width of the transfer zone can also be set. A very long size will look empty, a very small size will look crowded.
To install it, find the “Hyphenation” button in the “Page Layout” tab. Select “Hyphenation Options”. A window appears in which you can set the width of the hyphens.
How to remove word hyphenation in Word
When drawing up contracts, according to internal regulations, the document must be formatted without word hyphenation in the text. Let's figure out how to remove them.
Let's look at the two most likely options for document execution and cancel transfers, depending on the situation.
Hyphenation feature enabled
If your document uses the standard hyphenation mode, you can disable word wrapping as follows.
Go to the “Page Layout” tab and select the “Hyphenation” button. A list will open in which we click “no” with the left mouse button.

Hyphens are automatically removed from the document.
Word hyphens are set manually
If hyphens were added independently as the text was written, then following the instructions in the previous paragraph, it will turn out that the checkbox in the window next to the word “no” is already selected.
In this case, to remove word hyphens, you can manually find the hyphen and remove it, or use the automatic “Find and Replace” form.
You must simultaneously press the “Ctrl” and “H” keys. A window will appear in which we click on the “Replace” tab (usually it opens automatically).

Select the “More” button and look for “Special” at the bottom. A list will open in which we find “soft transfer”, then click on “Replace all”.

In this simple way, you can cancel word wrapping in the entire document at once.
That's all. This article provides the most complete information on the issue of “Word wrapping in Word.”
Initially, I was interested in the questions: “How to remove word hyphenation” and “How to make word hyphenation.” I think the information has been conveyed completely.
Still have questions? Write in the comments, let's discuss.


