Calibrate the sensor through the engineering menu. Simple and fast screen calibration on Android
Although touch devices are very convenient, over time the sensor performance can become less accurate, and this, in many cases, does not depend on the type of screen or the make and model of the device.
In this regard, any such sensor (and screen) sooner or later requires debugging or calibration. This article describes how to calibrate and configure the screen on Android.
The essence of the problem
It is known that while the phone or tablet is new, the quality of the sensor is very high.
It responds quickly enough to touches, quite accurately determines the point the user pressed, etc.
But over time, as the actual life of the device increases, it decreases significantly, and errors and inaccuracies begin to occur.
How do you know when you need to calibrate the display on your mobile device?
Usually, this has to be done when they start errors of the following type appear, significantly interfering with work:
- The sensor does not always work– some actions are not recognized and the device does not respond in any way;
- Some types of actions are not recognized or work poorly, but not all (for example, tapping may work fine, while swiping may not work every time, or vice versa);
- The actual location of where the action took place is not accurately determined(for example, the wrong button is pressed that you actually touched);
- The waiting time for a response after performing a particular action has increased significantly on the touch screen;
- The display has become worse only when using a stylus, or, on the contrary, only ;
- In graphical applications, this problem may appear as interruption of the drawn line and so on.
The occurrence of such a problem is, in fact, a normal and natural process, the consequences of which can be quite easily eliminated with basic means, that is, without involving a service.
When does it occur?
Long-term operation of the device– the first reason that the quality of the sensor on a phone or tablet will gradually decrease.
This is a normal process that all modern phones are subject to, all the more so the lower the quality of the screen installed on the device.
Also, this phenomenon occurs, on the contrary, when a device that was previously actively used is inactive for too long.
In some cases, such screen debugging is required immediately after purchase, since it happens that The sensor was initially configured incorrectly.
After changing the display, it is also almost always necessary.
Changes in software settings also affect the quality and speed of the sensor. These can be any settings, or they can be settings, deliberately or accidentally, changed by the user. For example, the sensitivity of the sensor can be changed for ease of use in the phone settings.
But, A decrease in the performance of the device may also occur for other reasons.
For example, this happens when scratches and abrasions appear on the screen, a poor-quality protective film is applied or bubbles remain underneath it, etc.
In this case, the calibration will not be effective enough and the problem will not be resolved.
Definition
What is calibration, and how does it solve the problem of an unresponsive or inaccurate sensor?
Calibration is an adjustment of the touch screen made by the device based on user interactions with the sensor.
The standard calibration procedure is as follows: Dots, circles or crosses appear on the screen in random order and the user must click on them.
Based on this process, the system builds a certain scheme of points and areas on the screen, thus determining which of them are more responsive, which are less, which have higher accuracy, which have lower accuracy.
Based on these diagnostics, the system makes adjustments and troubleshoots.
Carry out calibration with the device you use most often. If you use a stylus more often, then calibrate the screen with it, but if you usually use the phone manually, then calibrate with your finger. This is due to the fact that different objects have different thermal conductivity and the display may react to them slightly differently from a technical point of view.

Calibration Methods
This debugging can be done using several methods. The simplest and most effective of them are described below.
If after using one or another method there are no significant changes for the better, then it is advisable to try another method.
Device Settings
Since device calibration is a necessary process, the creators of most have included such a function in the device settings. How to use it?
1 Go to Device Settings;
2 Go to the section Screen or Display(may be called differently, depending on the device model, Android version or the nature of Russification;

3 Go to the section Screen calibration/calibrate the screen or similar (note that on some devices there is no such section at all, this means that debugging will have to be done in a different way);

4 If there is such a function, then after clicking on it a special test will be launched, in which you need to click on certain points as they appear or in a certain order (on different devices the order of the test may vary slightly, but the essence remains the same);

5 After completing all the necessary steps, the system will show you a notification that the test is finished, now section Settings can be closed.
Sometimes significant improvements in sensor performance are observed immediately after this. But in most cases, the tablet or smartphone needs to be rebooted.
Engineering menu
Engineering menu– this is a special settings section in which you can carry out more complex and more precise debugging and adjustments. In any case, it contains a calibration function, for example, on those devices in which this test is not included in the simple device settings menu.
Download and install Touchscreen Calibration
In order for this application to appear on your phone, do the following:
- Open the Play Market application on your device;

- In the search engine, enter Touchscreen Calibration and open the application with the icon of a phone and a wrench;
- Click the Install button;

- After that it will automatically download and install, and a shortcut will be created on the desktop of your device.

After clicking the Install button, the application will automatically download and install on your device. You can find a shortcut to launch it on the main desktop.

The application is distributed and is aimed at English-speaking users, therefore it does not have Russification, just like the previous one.
It has quite a wide functionality and helps to carry out high-quality configuration. In order to debug the sensor using it, do the following:
1 Launch the application from the shortcut on Desktop;

2 Find the item in the main menu of the program Display Calibration and click on it;

3 Now we need to wait a little, since this process is not presented in the form of a point-by-point test, but in the form of automatic troubleshooting, and then automatic debugging of the screen;
4 When the process starts, A notification will appear on the main screen of the application showing the debugging progress;

5 When the process is completed, you only need to restart your phone.
After turning it on again, there should be no difficulties with the operation of the sensor.
Although touch devices are very convenient, over time the sensor performance can become less accurate, and this, in many cases, does not depend on the type of screen or the make and model of the device.
In this regard, any such sensor (and screen) sooner or later requires debugging or calibration. This article describes how to calibrate and configure the screen on Android.
The essence of the problem
It is known that while the phone or tablet is new, the quality of the sensor is very high. It responds quickly enough to touches, quite accurately determines the point on which the user pressed, etc. But over time, as the actual life of the device increases, the quality of the sensor significantly decreases, and errors and inaccuracies begin to occur.
How do you know when you need to calibrate the display on your mobile device? Usually, this has to be done when they start errors of the following type appear, significantly interfering with work:
- The sensor does not always work– some actions are not recognized and the device does not respond in any way;
- Some types of actions are not recognized or work poorly, but not all (for example, tapping may work fine, while swiping may not work every time, or vice versa);
- The actual location of where the action took place is not accurately determined(for example, the wrong button is pressed that you actually touched);
- The waiting time for a response after performing a particular action has increased significantly on the touch screen;
- The display has become worse only when using a stylus, or, on the contrary, only when using a finger;
- In graphical applications, this problem may appear as interruption of the drawn line and so on.
The occurrence of such a problem is, in fact, a normal and natural process, the consequences of which can be quite easily eliminated with basic means, that is, without involving a service.
When does it occur?
Long-term operation of the device– the first reason that the quality of the sensor on a phone or tablet will gradually decrease. This is a normal process that all modern phones are subject to, all the more so the lower the quality of the screen installed on the device. Also, this phenomenon occurs, on the contrary, when a device that was previously actively used is inactive for too long.
In some cases, such screen debugging is required immediately after purchase, since it happens that The sensor was initially configured incorrectly. After changing the display, it is also almost always necessary.
Changes in software settings also affect the quality and speed of the sensor. These could be any viruses or other software problems, or there could be settings, deliberately or accidentally, changed by the user. For example, the sensitivity of the sensor can be changed for ease of use in the phone settings.
But, A decrease in the performance of the device may also occur for other reasons. For example, this happens when scratches and abrasions appear on the screen, a poor-quality protective film is applied or bubbles remain underneath it, etc. In this case, calibration will not be effective enough and the problem will not be resolved.
Definition
What is calibration, and how does it solve the problem of an unresponsive or inaccurate sensor? Calibration is an adjustment of the touch screen made by the device based on user interactions with the sensor.
The standard calibration procedure is as follows: Dots, circles or crosses appear on the screen in random order and the user must click on them.
Based on this process, the system builds a certain scheme of points and areas on the screen, thus determining which of them are more responsive, which are less, which have higher accuracy, which have lower accuracy. Based on these diagnostics, the system makes adjustments and troubleshoots.
Carry out calibration with the device you use most often. If you use a stylus more often, then calibrate the screen with it, but if you usually use the phone manually, then calibrate with your finger. This is due to the fact that different objects have different thermal conductivity and the display may react to them slightly differently from a technical point of view.
<Рис.2 Калибровка мультитач>
Calibration Methods
This debugging can be done using several methods. The simplest and most effective of them are described below. If after using one or another method there are no significant changes for the better, then it is advisable to try another method.
Device Settings
Since device calibration is a necessary process, the creators of most Android devices have included this function in the device settings. How to use it?
1. Go to Device Settings;
2. Go to the section Screen or Display(may be called differently, depending on the device model, Android version or the nature of Russification;
<Рис.3 Настройки>
3. Go to the section Screen calibration/calibrate the screen or similar (note that on some devices there is no such section at all, this means that debugging will have to be done in a different way);
<Рис.4 Экран>
4. If such a function exists, then after clicking on it a special test will be launched, in which you need to click on certain points as they appear or in a certain order (on different devices the order of the test may vary slightly, but the essence remains the same);

<Рис.5 Тест>
After completing all the necessary steps, the system will show you a notification that the test is finished, now section Settings can be closed.
Sometimes significant improvements in sensor performance are observed immediately after this. But in most cases, the tablet or smartphone needs to be rebooted.
Engineering menu
Engineering menu– this is a special settings section in which you can carry out more complex and more precise debugging and adjustments. In any case, it contains a calibration function, for example, on those devices in which this test is not included in the simple device settings menu.
In order to access the engineering menu, you need to perform a number of actions:
1. Open the application Telephone on your device;
2. Dial one of the special numbers (they are different for different devices, on some they all work, so it makes sense to try each code in turn until you come across one that works) - *#*#3646633#*#*, *#*#4636*#*, *#15963#*;
<Рис.6 Вызов меню>
3. There is no need to press the call button; after entering the last character of the suitable combination, the engineering menu will open by itself - go to the Hardware Testing section in the top ribbon;
<Рис. 7 Инженерное меню>
4. Scroll down the menu that opens after this to the item Sensor and move on to it.
<Рис. 8 Сенсор>
5. Now let’s start the actual calibration - to do this, go to the section Sensor Calibration.
<Рис.9 Настройка>
6. In the calibration menu, find the section Clear Calibration and click on this button to reset the old sensor settings;
<Рис.10 Сброс настроек>
7. Now press the button Do calibration 20%, if you want to set the maximum screen sensitivity and 40% - if a little lower;
<Рис. 11 Запуск>
8. There is no need to make additional saves– just leave the engineering menu by pressing the button Back or Home;
<Рис. 12 Выход>
9. Reboot your device.
After turning your phone back on, the problem should be completely resolved. The sensor should work more clearly. Moreover, this method gives.
Often, the result is better than calibration using a test in the phone settings, therefore it can be carried out even if after the test in the settings the user did not notice a significant improvement in the condition of the sensor.
Using apps
If calibration is not listed in the device settings menu, if the engineering menu does not open (this sometimes happens), or if the quality of the calibration does not suit you, then you can download a special application that will help you debug the sensor. It is distributed free of charge on the Play Market.
Download and install Touchscreen Calibration
In order for this application to appear on your phone, do the following:
- Open the Play Market application on your device;
<Рис. 13 Гугл Плей>
- In the search engine, enter Touchscreen Calibration and open the application with the icon of a phone and a wrench;
- Click the Install button;
<Рис. 14 Скачивание>
After that it will automatically download and install, and a shortcut will be created on the desktop of your device.
<Рис. 15 Иконка>
The app is now installed on your device and you can start using it. It does not take up much memory and is distributed free of charge.
The load on the phone's hardware resources is moderate or minimal (depending on the technical characteristics of the device).
Using Touchscreen Calibration
As mentioned above, the shortcut to launch this application is located on Desktop your device. Launch it from there. It should open right away, since it does not require a large amount of RAM, and therefore runs without freezes or failures.
- In the main menu of the application find the big blue button Calibrate and click on it;
<Рис. 17 Запуск>
Complete all actions suggested by the program– this will be, just like in the first method, a point-by-point test, at the same time, for different types of actions – tap, double tap, long press, etc.;
<Рис. 18 Тест>
After completing all the steps a notification will appear on the screen indicating that the process has completed successfully;
<Рис. 19 Завершение>
Now you can close applications in any familiar way.
Quick TuneUp App
This application is in many ways similar to the previous one. Essentially, they both accomplish the same goals, but use different methods to do so from a hardware and software perspective.
Therefore, if after working in the previous program there were no significant changes in the quality of the sensor, then it makes sense to download this application and try to correct the situation using it.
You need to download this application in the same way as the previous one, just enter a different combination in the search engine in the Play Market, namely Quick TuneUp. After clicking the Install button, the application will automatically download and install on your device. You can find a shortcut to launch it on the main desktop.
<Рис. 21 Ярлык приложения>
2. Find the item in the main menu of the program Display Calibration and click on it;
<Рис. 22 Функционал>
3. Now you need to wait a little, since this process is not presented in the form of a point-by-point test, but in the form of automatic troubleshooting, and then automatic debugging of the screen;
4. When the process starts, A notification will appear on the main screen of the application showing the debugging progress;
<Рис. 23 Процесс калибровки>
When the process is completed, you only need to restart your phone.
After turning it on again, there should be no difficulties with the operation of the sensor.
Other problems
In some cases, errors in the operation of the sensor may be of a different nature. For example, a common situation is when at certain points the screen periodically triggers spontaneously.
This happens when the touch glass of the screen is seriously damaged enough that it bends and at some points fits too tightly to the screen, causing the sensor to trigger.
From the outside, such a problem may not be noticeable at all.. However, it is quite complex and requires correction in a service center. Typically, in such cases, a complete replacement of the display glass is recommended.
It is also worth contacting the service center when none of the listed calibration methods help. This may also indicate that the quality of the sensor has decreased due to damage to the glass or malfunctions in the hardware of the device.
While using mobile devices, problems may arise with various functions and then you have to calibrate the Android device and return it to normal life. Let's just learn how to do this.
The main areas of calibration in Android are the battery and the touch screen, but you also have to calibrate various sensors, such as “ proximity sensor”, “brightness sensor” and others, and sometimes you have to calibrate navigation using GPS satellites. We will try to look at the most common problems and their solutions using Android calibration.
Android Battery Calibration

How do you know if you need to calibrate your Android battery? Most likely you should experience the following problems:
- Your Android device began to discharge too quickly
- The % of remaining battery charge changes very sharply
- It takes too long to charge from the mains
- Self-shutdown when battery is sufficiently charged

If you have at least one of the listed symptoms, then you should try calibrating your Android battery, maybe this will solve your problem. Let's look at the step-by-step instructions for calibrating the battery:
- The first step is to completely discharge the battery; to do this, load your device by any means until it turns off completely, and then try to turn it on until it stops responding altogether.
- Remove the battery, if it is removable, and leave it outside the device for at least 5-10 minutes. (If the battery is not removable, do not connect the device to the network for at least 2-3 hours)
- Insert the battery and connect the charger, but do not turn on the device!
- After fully charging (it is advisable to leave it overnight), remove the battery and after 1-2 minutes insert it back, connect it to the charger again.
- Turn on your device.
That's all, Android battery calibration finished! For better results, you can repeat the procedure up to 5 times, but most often once is enough. If the problem with the battery is not resolved, most likely the problem is with the battery itself.
Android screen calibration

The touch screen on Android devices is quite finicky, especially after falls and bumps. It happens that the accuracy of pressing or sensitivity drops so that you can press the desired button 3-4 times. Of course, this situation can be very annoying and interfere with the comfortable use of the device. In such cases, it is most likely necessary to calibrate the Android screen.
What is Android screen calibration?
This is setting up the display sensor to correctly and accurately execute commands with your hands or stylus. In order to understand whether you need to calibrate the Android screen, it is best to use a special application from the Play Store. For example, you can download Simple Touchscreen Tester and other similar programs. In it you will find all the non-functional parts of the screen sensor.
How to calibrate the Android screen?
There are many calibration methods, but we will look at 2 main and simplest ones. The first way is to simply download the application from the Play Store, but unfortunately I cannot guarantee that at least one of them will be able to actually calibrate your display. But I still recommend a couple of programs: TouchScreenTune And Display Calibration. The second method is more reliable, so consider it in more detail.
Screen calibration via menu:
- Go to the settings of your Android device
- Select “Display”
- At the bottom there will be an item “Calibrate G-sensor”, click
- Place your device on a flat(!!!) surface
- Click the “Calibrate” button
- After screen calibration is complete, reboot your device
That's all, the Android screen calibration procedure is complete! If this procedure does not help get rid of problems with the touch display, you will most likely have to replace it.
Android proximity sensor calibration

Another common problem on Android devices, typical mainly for smartphones, is the incorrect operation of the proximity sensor. This manifests itself in the fact that the screen does not go off when you bring the phone to your ear during a call or, on the contrary, does not turn on after the call ends. Functions may also not work Air Gesture, which is present in many modern smartphones.

Let's again resort to the simplest method of calibration - installing a special application from the Play Store. It is worth mentioning that to use the calibration program you need to have Root rights on your device.
So let's get down to calibrating the proximity sensor:
- Download the application “ Proximity Fix” in the Play Store
- Run it
- The program will require you to provide root rights - provide
- No further messages will follow, but the program has already done its job.
You can check using another application (Proximity Sensor Finder) or by calling. If sensor calibration does not help, then the sensor may need to be replaced at a service center.
Touch screen calibration on mobile devices with the Android operating system may be required if the touch screen does not correctly recognize touches. Depending on the smartphone manufacturer, the system may have various built-in calibration utilities. You can also use third-party apps to configure the sensor on Android.
Screen calibration on Android using the built-in utility
Standard methods for calibrating the display on smartphones from different manufacturers differ. As a rule, configuration is performed through the engineering or service menu. To call it, you need to enter a special code in the Dialer application (a standard program for making calls on Android). The code may consist of numbers, symbols “*” and “#”. The specific combination for a specific phone brand can be clarified in the documentation for the device or on the manufacturer’s official website.

Advice! To change touch screen settings, use the Touch or Calibration menu item. The exact address can be found in the instructions for your Android smartphone.
If basic Android tools are unavailable or ineffective, use programs from third-party developers. One of the most popular options for such applications is Touchscreen Calibration. The utility is free and available for download through Google Play Market. It will help improve the accuracy of touch recognition and gestures.
After installation, you will be asked to do several steps to calibrate the screen on Android:
- Touch;
- Double tap;
- Long press;
- Scroll;
- Approximation;
- Distance.

Important! If your Android smartphone does not recognize all gestures, there may be problems with the touchscreen. Restart your device, and then test screen movements in other apps.
Tutorial Video: Android Spot Screen Calibration
SGS Touchscreen Booster Program
Unlike the previous utility, setting the sensor parameters through SGS Touchscreen Booster is done manually. Using the sliders, you can change the values of five basic touchscreen settings:
- Sensitivity;
- Duration for registering a click;
- Minimal movement;
- Motion filter;
- Maximum number of simultaneous presses.
The default value is indicated in parentheses after the parameter name. If necessary, you can return the standard screen settings by specifying this number. You can also use the "Defaults" button in the bottom right corner to set the default Android display settings.

The program has a set of predefined templates. You can select the optimal sensor operation option from the “Presets” drop-down list. To ensure that the settings are applied every time you boot Android, check the “Start service on boot” checkbox.

Note! This utility does not work on all phone models and versions of the Android operating system.
Read also:
 How to fix spontaneous computer reboots with your own hands
 Find and recover deleted messages on Android and iPhone
And interesting features hidden from prying eyes.
Why are they hidden? Firstly, so that an inexperienced user does not break anything, and secondly, they are needed in especially rare cases and are not used regularly. Today we will talk about the engineering menu - a section for programmers, testers, geeks, experienced users and those who want to get into the very “heart” of gadget settings.
What is an engineering menu?
We are talking about a special program or system section that developers usually use at the final stage of configuring the software platform of a mobile device. With its help, they make final changes to the operation of the device, check the functioning of various sensors and test system components. Also, the hidden functionality of the service menu is used to obtain a large amount of system information, conduct various tests (about 25 pieces) and configure any Android parameters - various sensors, mobile networks, equipment, etc.
The engineering, service or system menu is available on smartphones and tablets running on a MediaTek processor. On the Qualcomm chipset it is either reduced or absent altogether.
Attention! This section is intended for experienced users who bear full responsibility for the consequences. Careless actions can harm the file system and render the smartphone unusable.
How to enter the engineering menu?
To enter the engineering menu, you need to enter a special command in the dialing application: *#*#3646633#*#*. On some versions the code *#*#4636#*#* or *#15963#* may work.
If the engineering menu code on Android does not work, or there is no dialing application on the phone (relevant for tablets that do not support calls), the MobileUncle Tools or MTK Engineering applications, which can be downloaded for free via Google Play, will help.
After entering the command or launching the application, the desired section will open. It may close immediately - you need to have “Developer Mode” activated on your smartphone. To do this, go to the gadget settings, find the kernel version there and quickly click on it 5-10 times in a row.
Engineering menu functions
The engineering menu is divided into several categories, each of which will be discussed separately.
- Telephony. All settings related to mobile communications are located here. For example, you can activate or disable certain BandModes (frequencies for 2G/3G/4G operation), check the operation of SIM cards, and even disable mobile data transfer in the background.
- Connectivity: Configure Bluetooth, Radio, Wi-Fi and Wi-Fi CTIA settings. For example, in the radio settings you can specify the radio wave, antenna type (you need to use headphones) and sound format (mono or stereo). The radio will play straight from this section.
- Hardware Testing. In this section, you can configure the operation of various components of the device, in simple words, hardware: sound levels of headphones and speakers, adjusting microphone sensitivity, various camera parameters (photo aspect ratio, adjusting ISO, HDR, focusing and much more), operation of the touchscreen, sensors (calibration right there) and so on. This category is very large and global; you need to understand each section separately and have serious knowledge and skills.
- Location. In this category, you can configure GPS operation, see how many satellites the gadget has picked up, and simply conduct testing.
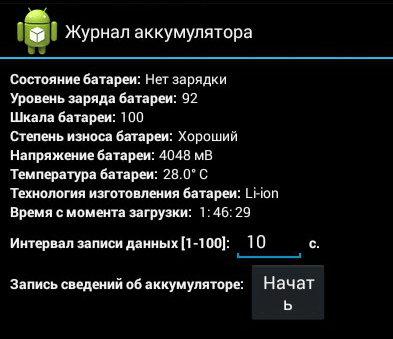
- Log and Debugging. Here, logs (logs) of the battery are kept (percentage of charge, voltage, operating time, temperature) and other functions little known to the average user.
- Others. Contains two functions also unknown to the average user.
Engineering menu settings
The engineering menu opens up enormous possibilities for customizing the phone; we will consider the most interesting ones in detail.
- SAR Test - determining the level of harmful radiation from a smartphone or tablet.
- Connections - testing available wireless connection types: Bluetooth, Wi-Fi, WLAN CTIA and FM receiver.

- Audio - adjusts the sound in the speakers, microphone and headphones. About how to increase the Android volume through the engineering menu.
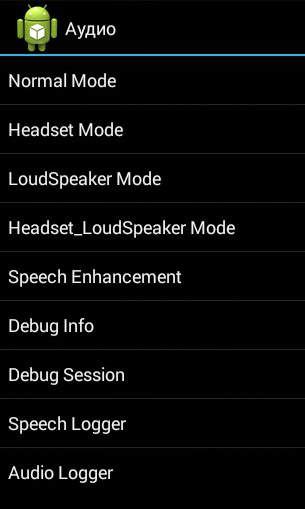
- Camera - configure various camera settings.

- Turning on the current camera - the operating current of the camera is displayed (in our tablet it is 2 mA).
- Load test of the CPU (central processing unit) - checking the stability of its operation, identifying errors in the operation of the processor-memory channel, testing the cooling system and power supply of the processor.
- Device Manager - activate automatic SMS registration, manage configuration parameters.
- Disable detection - adjust the signal frequency.
- Display - Sets the pulse width modulation indicator cycle, which affects the perceived brightness of the screen by quickly turning the backlight on/off; backlight adjustment; controller behind the vertical and horizontal lines of the display.

- Wake mode - its activation will not allow the device to “go” into sleep mode.
- IO - management of data input/output operations.
- Memory - detailed information about the RAM module.
- To a certain extent - detailed information about the battery (the strange name of the section is most likely due to errors in the automatic translation of names in the application, but there is no option to switch to English).
- SD card test - the name of the tab speaks for itself.
- Touch screen - checking the sensitivity and response of the display when pressed, as well as setting its additional settings.
- USB - testing the operation of the USB port.

- UART/USB switch - switching between two data transfer modes.
- Sensor - calibration (adjusting clarity and sensitivity) of the touch screen. Standard methods.
- Location - testing the GPS performance and determining the exact location.
- Battery log - detailed information about the battery and the ability to activate the recording of battery consumption information.
- MTKLogger - collection of system logs (MobileLog, ModemLog and NetworkLog).
- Temperature sensor - shows the battery and processor.
- Font parameter - change the font size.

When installing the application, some features may not be available without .
Xiaomi engineering menu
Despite the fact that our test Redmi 2 runs on a Qualcomm Snapdragon 410 processor, it also has the functionality that interests us. To enter it, you need to tap on the “Kernel version” item several times in a row.

The menu is represented by five items:
- Automatic Test. Automatic test of all device parameters.
- Single Item Test. Each of the 25 tests is taken separately. We will talk about this in detail below.
- Test Report. Report on the completed texts and their results.
- SW add HW version. Information about the smartphone version, IMEI and other numbers.
- Device View. Smartphone hardware data.

Of course, the most interesting point is the Single Item Test, where you can take a huge number of tests.

Let's make a reservation right away that there was no way to configure anything in the device we tested - only a functionality test. At the end of each procedure, you need to note its status: successful (success) or not (failed).
- Key - functionality of physical buttons. Interestingly, it was not possible to complete it successfully, since when checking the power button, the smartphone turns off.
- Backlight - display brightness.

- TouchPanel. The touch screen test includes two procedures: “Crossed calibration” and “Touch panel calibration”. The first one checks so-called “swipes”, the second one checks single taps on the screen. An easy way to calibrate your display.

- TFlash. Testing a memory card with two results: either everything is fine, or the card is damaged.
- Bluetooth. Searches for available devices.
- SIM Card. Test for the presence of SIM cards.

- Vibration. The gadget vibrates - everything is ok.
- RTC (Real Time Clock) - operation of the built-in clock.
- Speaker. Testing the conversational speaker. We didn’t understand how to get through it. We will be grateful if you can tell us in the comments.
- Receiver. Translated as receiver, receiver, but music plays during testing.
- Headset. Testing the 3.5mm jack to detect headphones, play sounds, and support headset control buttons.

- LED. Notification indicator, everything is obvious here.
- FM (radio). Click Search, and if you hear noise in the headphones, then everything is working properly.
- Camera. Everything is obvious: a test of the main and front optics, as well as the flash.
- Battery. An informative section with information about the correct operation of the USB cable (charging), the condition of the battery, its charge level and temperature. Similar data can be obtained more.

- Wi-Fi. Detection of nearby access points. There are no settings.

- Torch (flashlight): shines/does not shine.
- The loopback test includes a test of the spoken microphone. First, click Recording, then Playing.
- LCD. Screen colors.
- GPS. Detection of available satellites.
- Gyro (gyroscope). Three parameters - X, Y, Z - change depending on the position of the device in space.
- G-sensor (Accelerometer). Rotate the gadget in all planes and turn it over. The three parameters should be ok.
- Proximity Sensor. It is usually located near the speaker and is designed to dim the gadget screen during a conversation, thereby eliminating accidental clicks.
- Optical and Magnetic Sensor (optical and magnetic sensors) - points we don’t understand, share your knowledge in the comments.
After passing all tests, you can go to the Test Report section. As you can see, our “animal” is in excellent shape and has passed all the tests, which is very pleasing.

conclusions
Above we have listed the main sections of the engineering menu available on the tested devices. Now let’s summarize what features the user gets during installation:
- Formatting, restoring to factory settings.
- Testing the operation of individual elements of a smartphone or tablet, such as sensors, touch screen sensitivity and calibration accuracy.
- Detailed information about the device and its parts. For example, you can track battery consumption since the last charge and view statistics on the programs used.
- Energy optimization. Alternatively, unnecessary frequency ranges are turned off. In Russia, the standard indicators for working in 2G and 3G networks are 900 and 1800 MHz, while in the USA they are 850 and 1900 MHz.


