Windows 7 System File Recovery Wizard. Restoring damaged Windows system files using SFC and DISM commands
Windows 7 File Recovery from the backup we created, the article is written as a continuation of the interesting topic Archiving computer data, in which we went through the process of creating a backup archive of personal data and a Windows 7 system image from the very beginning.
Windows 7 File Recovery
Next, we will restore personal data from our archives using the Computer Data Archiving tool built into Windows 7 and not just restore, but present various tricky situations. We will learn recover Windows 7 files all at once or separately. For example, we will not restore all the data entirely, but only the file that we need. We can also find out our data from a backup archive on someone else’s computer if something completely catastrophic happened to ours.
As we agreed in the previous article, you created backups on a portable USB hard drive, and I created them on a simple SATA hard drive with a capacity of 465.76 GB, which I use exclusively for storing data archives. For a better understanding of exactly how this happens Windows 7 file recovery, let's imagine that on the hard drive of the computer that we have at work, an inexperienced system administrator (this also happens to experienced ones) accidentally destroyed all the partitions with Acronis Disk Director, and accordingly all our data, along with the Windows 7 operating system, disappeared. The TestDisk program, as well as Acronis Recovery Expert, do not always help. There are two options left for R-Studio and... here we remember about the backup copy of our data created the day before on a portable USB hard drive. We are reinstalling Windows 7, connecting a USB drive with our archive and restoring all our data.
- Note: If you do not want to install Windows 7 again and you want the backup archive to already include the operating system with all your programs and settings, you need to use the System Image Creation tool for archiving, read our article.
Start -> Control Panel->Archiving computer data ra

If you have created several backup archives of your data, select the one you need in the Select another backup to restore files window.

So Recover my files, now attention, if we want to restore a specific file from a backup archive, we need to click the Browse files button and find it ourselves, but if we know the name of the file, we can use the Search function,

For example, let's find the CDImage music file in my backup, type CDImage in the search, we found it, click OK and restore it.

If you don’t know the exact name, then in this window you need to select Browse files, then double-click on our archive with the left mouse and find our file,


Let's, for example, find the My Music folder in my backup archive, and in it the CDImage music file.


If you need to restore another file, you need to click Browse files again and repeat the search. We will now restore our file, to do this we will press the button Add files. 

click Browse, select, for example, Local drive C and create a folder, call it Recovered files and OK.
How to recover damaged files in Windows XP:
There are times when you need restore damaged or deleted Windows XP system files. System files have every chance of being deleted, corrupted, or replaced with infected files as a result, for example, of viruses. There are frequent cases of defective system files when the computer is turned off incorrectly (as an option, when the lights are turned off) due to errors in the file system.
Below you will get the answer to the question: How to recover damaged system files without reinstalling the Operating System.
The method is suitable for cases where it is known which system files will need to be returned.
If the PC stops booting after an incorrect shutdown (power outage, turning off with a button, unplugging the power cord from the outlet), you first need to check the hard drive for logical errors.
The recovery process involves copying the required system files from the Windows XP installation disk. The Windows distribution contains all the system files. They are located in the I386 folder. All the necessary files on the installation disk are written in compressed form and have the extension .dl_ .ex_, etc.. I.e. the last character is replaced with an underscore.
We will need to unpack the files removed from the system from the Windows installation disk into the folder where they should be present. If you do not have a windows distribution, you can download archive with folder I386 for 32-bit version of Windows XP.
To return system files you need to boot from a bootable CD, for example ERD Commander. . You can burn a disk image using free ISO Burner program(you can download via this link)
Let's look at how to unpack system files from a Windows installation disk using the example of restoring the file C:\Windows\System32\userinit.exe, which is often replaced with banners blocking Windows. The process of restoring damaged system files from the installation disk is not fundamentally different for other files. The main thing is to know in which folder this or that file is located.
Booting from disk ERD Commander. Select a download ERD Commander 5.0 for Windows XP. In the window that appears at the end of the download, select the path to the installed Windows OS and click OK.
Open My Computer. Insert the Windows installation CD. From the I386 folder, copy the required system files with the extension dl_ or ex_ to the folder where they should be present in the installed system. For us, this is the USERINIT.EX_ file. Copy USERINIT.EX_ from the I386 folder to the C:\Windows\System32\ folder. To achieve the desired result, right-click on the USERINIT.EX_ file and select from the context menu Copy to.
In the window that appears, select the path C:\Windows\System32 and click OK.

After the file is copied to the system folder, you will need to unpack it. Unpacking system files with the dl_ or ex_ extension from the Windows installation disk is done using the expand command.
Command syntax: expand [source file] [target file]
To run the command, you will need to launch the Command Prompt. From the Start menu, select Run. In the window that appears, enter the cmd command and press Enter.
In the command line window, enter the command to unpack our file: expand c:\windows\system32\userinit.ex_ c:\windows\system32\userinit.exe and press Enter.

The unpacking will be completed, as indicated by the text: “c:\windows\system32\userinit.ex_: 11863 bytes expanded to 26624 bytes”. System file recovery was successful. Now you can restart your PC.
Any other Windows system file can be restored in the same way.
How to restore corrupted Windows 7 system files without reinstalling the system.
Now let's look at how to restore system files in Windows 7.
We boot from the "ERD-Commander" disk (in the menu on the disk when loading, you must select the version for Windows 7) Disk image.
In the network settings window, select "Skip", and confirm the reassignment of disks. Next, choose the path to Windows system folder.
Let's launch "recovery tools" MSDaRT.

Select from the menu "System File Checker"

Click "Fare"

Select an item "Scan and query before fixing"- click "Further"

Eventually it will start the process of searching for damaged or deleted Windows 7 system files. It can last about 5 minutes. When the process is completed, a list of damaged or deleted Windows files. We tick the files that we want to restore and click "Further".

Will begin Windows 7 system file recovery process, after which a window will appear recovery results. Click "Further" and in the next window - "Ready".

Keep in mind!
You need to be careful when choosing files to recover , especially when using a pirated version or assembly Windows.
It is possible that certain system files will be changed so that Windows does not ask for activation. Recovery tool may consider these files corrupted and will replace them with the original ones, which is why Windows may display a message during its loading about an unlicensed version of your Operating System. In case of restoring system files after removing the banner, select files to restore from the table below.
Windows system files and the folders in which they should be located:
Here are specific Windows system files and the folders where they should be located. By the way, if you find a certain file, but in a different folder, most likely it is a virus! (except for the folder c:\windows\system32\dllcache).
| File | Folder |
| explorer.exe | c:\windows |
| iexplorer.exe | c:\windows |
| regedit.exe | c:\windows |
| notepad.exe | c:\windows |
| userinit.exe | c:\windows\system32 |
| taskmgr.exe | c:\windows\system32 |
| taskman.exe | c:\windows\system32 |
| cmd.exe | c:\windows\system32 |
| logonui.exe | c:\windows\system32 |
| winlogon.exe | c:\windows\system32 |
When to use these commands
These commands are useful when diagnosing a faulty Windows operating system. If the system displays a blue screen, applications crash, or some system functions do not work, the SFC command can help. Even if executing the SFC command does not fix anything, this will allow you to verify that the system files are not damaged and you can continue diagnostics in other ways.
The DISM command is not required under normal circumstances. But if the SFC command fails or fails to replace damaged files with normal ones, DISM or System Update Readiness Tool can fix the operating system itself and allow the SFC command to run normally.
Fixing system files with the SFC command
The SFC command must be run as an administrator. To do this, in Windows 10 or 8.1, right-click on the Start icon and select the Command Prompt (Admin) option. Additionally, in all versions of Windows, you can search the Start menu/Start screen for “command prompt,” right-click the link, and select “Run as Administrator.”

To perform a full system scan, enter the following command in the command prompt window and press :
Do not close the window until the command completes. The process can be quite lengthy. If everything is in order, at the end of the scan the message “Windows Resource Protection did not find any integrity violations” will appear.

If you see the message “Windows Resource Protection found corrupt files but was unable to fix some of them,” first try booting your system into Safe Mode. In Windows 10, 8.1 or 8, to do this, hold down the key when selecting the “Restart” option in the shutdown menu to get to the screen for selecting additional boot options. In Windows 7 and earlier versions, restart your computer and hold down the key during startup. After booting into safe mode, run the sfc /scannow command again.
Fixing SFC problems with the DISM command
In Windows 10, 8.1, and 8, you can use the Deployment Image & Servicing Management (DSIM) tool to fix component store corruption that is preventing SFC from working properly.
To run this tool, open a Command Prompt window as an administrator, type the following command, and click . DISM will check the Windows Component Store for corruption and automatically fix any problems found.
DISM /Online /Cleanup-Image /RestoreHealth
Do not close the Command Prompt window until the process is complete. The verification may take up to 10 minutes. If the progress bar stays at 20% for a long time, don’t worry, this is normal.
If any changes are made as a result of running the DISM command, restart your computer. Once done, run the SFC command again and it will be able to replace the corrupted files with the correct ones.

In Windows 7 and earlier versions, the DISM command is not available. Instead, you can download the System Update Readiness Tool from the official Microsoft website, which allows you to check your system for problems and try to fix them.
Restoring the system or restoring it to its original state
If problems persist and these tools cannot correct them, more drastic measures can be taken. System Restore allows you to return Windows to an earlier state, which will solve the problem if the operating system was still working in that state.
You can also reset Windows to its factory state or reinstall it. In Windows 10, 8.1 and 8, you can use the Computer Restore (Restore) feature, which allows you to return Windows to its original state. After this, you will have to reinstall all programs, but user files will not be affected. In Windows 7 and earlier, you should use a recovery partition created by your computer manufacturer, or simply reinstall Windows from scratch.

If you encounter other errors when running the commands described above, try searching for their description on the Internet. Often the command output contains information about log files that can provide more detailed information about specific problems. And in the end, there's no need to waste time diagnosing complex problems when you can simply perform a factory reset or reinstall Windows.
The commands described above have other options. For example, you can use SFC to check and fix individual system files. And with DISM, you can perform a quick system scan without fixing it, or point the utility to a WIM or ESD file containing Windows system files.
| Materials |
Restoring a working system configuration is an interesting, but very voluminous topic. Even the seemingly simple question of how to recover damaged Windows 7 files has several solutions that can be implemented in different ways.
The most convenient and easiest method for users is to use the system restore function, which allows you to roll back the configuration to the last working state. But what if this useful feature is disabled or checkpoints are deleted?
The system is booting
If damaged files do not prevent the system from starting, you can try to restore its functionality using the Windows command line.
If the system files are ok, you will see a message like this: 
If the utility detected Windows errors and was able to fix them, the following notification will appear on the screen: 
In any case, the system files have been restored. Now you can restart your computer and enable the function of creating restore points, which will greatly simplify the process of rolling back the system to a working state.
Sometimes users encounter the fact that in normal mode, damaged files are not restored using the sfc.exe utility. If this problem occurs, you need to restart your computer, start the system in safe mode with command line support, and try running the sfc.exe utility again.
System won't boot
If the computer refuses to boot, you will have to use the recovery environment to restore functionality. You can launch it in two ways:
- By pressing the F8 key when turning on the computer.
- Using the installation disk or flash drive.
The first option works if a boot partition was created when installing Windows and partitioning the disk. If you don't know what this is, still try pressing the F8 key several times when you start your computer. A window with additional download options will appear on the screen, in which you need to select the “Troubleshooting” option. 

So, you are at the command prompt using the first method to launch the recovery environment. In it you need to enter the command sfc /scannow /offbootdir=D:\ /offwindir=D:\windows. 
After a short wait, a message will appear on the screen indicating that the files were successfully restored.
Attention! In the body of the command, instead of the letter “D”, you indicate the designation of your disk on which the operating system is recorded.
If it suddenly happens that you cannot remember the letter of the partition with Windows installed, try the following options for viewing it:

Another way to find out the letter is to use the Diskpart utility.

By the size of the partition you can easily determine which one the system is installed on.
Using bootable media
If you can’t get into the recovery environment using the F8 key, try using an installation disk or flash drive. To do this, you need to configure the BIOS by setting the boot priority.

Enter the command sfc /scannow /offbootdir=D:\ /offwindir=D:\windows and wait until the system file recovery process completes.
Windows 8
Users who want to recover damaged files on Windows 8 or 8.1 can use another method that allows them to restore functionality to the system file backup storage and replace damaged data.
Windows PowerShell
If the system starts, try opening the PowerShell utility through the Start window or Start menu. You need to run it with administrator rights. 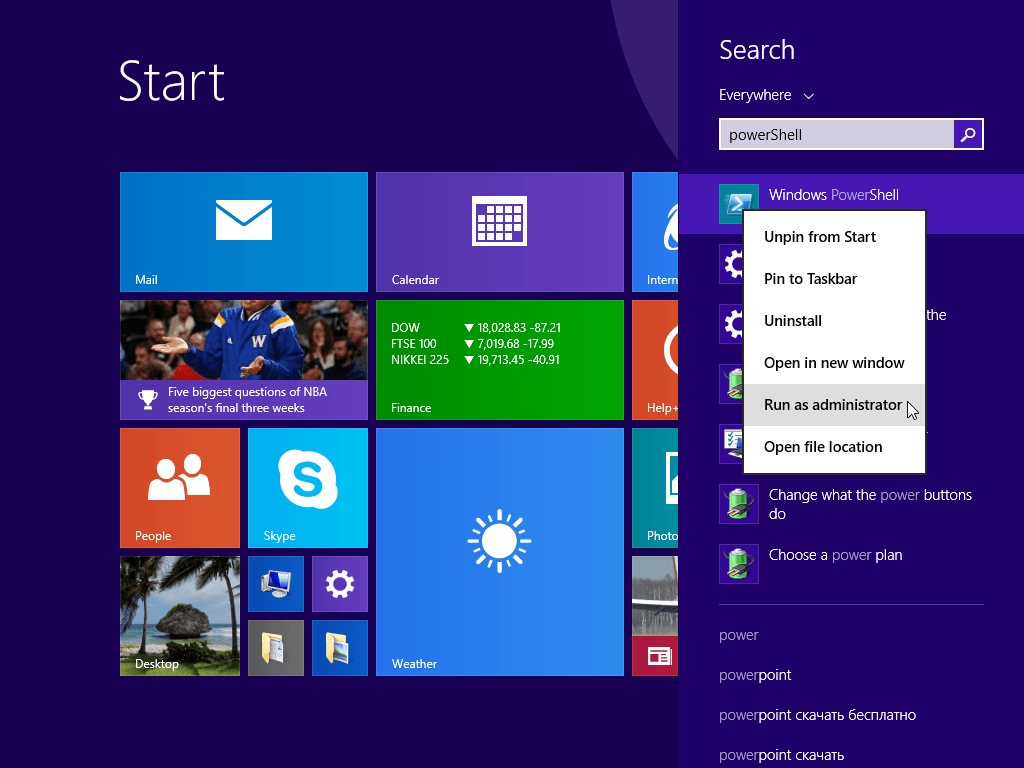
In the window that appears, enter the command “Online /Cleanup-Image /RestoreHealth”. If the backup storage is intact or can be restored, you will see a message like this: 
After the reboot, you need to launch the command line using one of the methods described above and try to restore files using the “Sfc” utility.
Using a Windows distribution
If Windows PowerShell cannot restore the backup file storage itself, you can try using a disk image with the Windows 8 distribution.

If the first edition doesn't work, try another version. After restarting the computer, try again using the command line to scan the disk and restore files.
Quite often it happens that it is necessary to recover damaged, deleted system files in Windows. Damage and deletion of system files are caused by viruses, inexperience of users using the operating system and a number of other factors, when the computer is turned off incorrectly, etc.
In this article I will tell you how to restore system files in Windows. By following these instructions, you can always restore almost any system file. Therefore, try to delve into the article, understand what’s what...
#1 Recovering system files in the Windows XP operating system! When you know which system files need to be restored.
If your computer stops booting after an incorrect shutdown of the computer (power outage, shutdown with a button), first of all you need to check the hard drive for logical errors.
The process of restoring system files in the Windows operating system involves copying from the installation disk "Windows XP" necessary system files. In folder "I386" Windows distribution contains all the system files of the operating system. They are written in compressed form and have an extension like ".dl_" ".ex_" and so on. That is, the last character is replaced with an underscore.
We need to unpack the files removed from the system from the Windows installation disk into the folder where they should be located. If you don't have a windows distribution, you can download “archive with folder I386” or for 32-bit version of Windows XP.
To restore system files, you need to boot from a bootable CD, such as ERD Commander or LiveCD by Alkid.
- Download disk image "ERDC.iso" you can here or
- Download disk image "LiveCD by Alkid" or
Now let's move on to the most important stage. How to unpack system files from a Windows installation disk, using file recovery as an example "C:\Windows\System32\userinit.exe", quite often this file is replaced by ransomware viruses and banners that block Windows. The process of restoring system files from the installation disk is no different for other files. The main thing is to have information in which folder this or that file we need should be located.
Booting from disk "ERD Commander". Select a download "ERD Commander 5.0 for Windows XP". In the window that appears at the end of the download, select the path to the installed Windows OS and click "OK".
Opening "My computer". Insert the Windows installation CD. From folder "I386" copy the necessary system files with the extension "dl_" or "ex_" to the folder where they should be located on the installed system. In our case this is the file "USERINIT.EX_". Copy "USERINIT.EX_" from folder "I386" to a folder "C:\Windows\System32\". To do this, right-click on the file "USERINIT.EX_" and in the context menu select "Copy to".
In the window that appears, you need to select the path "C:\Windows\System32" and press "OK".

After the system file is copied to the folder we need, we need to unpack it. Unpacking system files with the extension "dl_" or "ex_" from the Windows installation disk is performed using the command « expand» .
Command syntax: "expand [source file] [target file]"
To run the command, you must launch a command prompt. On the menu "Start" select an item "Run". In the window that appears, enter the command "cmd" and press "Enter". In the command line window, enter the command to unpack our file: "expand"
- "c:\windows\system32\userinit.ex_"
- "c:\windows\system32\userinit.exe"
and press "Enter".

Unpacking will complete, as evidenced by the text: "c:\windows\system32\userinit.ex_: 11863 bytes expanded to 26624 bytes". System file recovery was successful. Now you can restart your computer.
That's all! All other system files in the Windows XP operating system are also restored
No. 2 How to recover damaged system files in the Windows 7 operating system?
Now let's look at the process of restoring system files in Windows 7. It is different from restoring system files in Windows XP.
Booting from disk "ERD Commander"(select the version for seven in the disk menu when loading). Download disk image "ERDC.iso" you can here or
We answer the question about setting up the network « Skip", and confirm the reassignment of drive letters, after which we select the path as the Windows folder.
The next thing we do is launch the recovery toolkit. "MSDaRT".


To continue the wizard, click "Further"

Select an item "Scan and query before fixing" and press "Further"

The process of searching for damaged and deleted Windows 7 system files will begin. It may take some time (from 5 to 30 minutes). After the Operating System is scanned, a list of damaged or deleted files will appear. We put a check mark on the files that we want to recover and click "Further".
The recovery wizard will consider these files corrupted and replace them with the original ones, as a result of which Windows may begin to display a message about a non-licensed version of Windows when loading.
If you are restoring system files after removing the banner, select the system files to restore from the table below.
Windows system files and the folders where they should be located
Below are some Windows system files and the folders where they should be located. Keep in mind that if you find the corresponding file and it is located in a different folder, most likely it is a virus. (except for the folder: c:\windows\system32\dllcache).
| File | Folder |
|---|---|
| explorer.exe | c:\windows |
| iexplorer.exe | c:\windows |
| regedit.exe | c:\windows |
| notepad.exe | c:\windows |
| userinit.exe | c:\windows\system32 |
| taskmgr.exe | c:\windows\system32 |
| taskman.exe | c:\windows\system32 |
| cmd.exe | c:\windows\system32 |
| logonui.exe | c:\windows\system32 |
| winlogon.exe | c:\windows\system32 |


