Lg 422 weak gps navigator what to do. How to improve GPS reception on Android: instructions for setting up a GPS signal
Modern smartphones are equipped with a GPS chip, which greatly simplifies our travels or searches for a specific address. However, there are often cases when GPS does not work well. And this is not always the fault of an insufficiently well-built smartphone. You can often improve the functioning of the navigation module by tinkering with the settings.
Many motorists have a full-fledged GPS navigator. Some of these devices have an antenna connector on the back wall or side. This allows you to enhance signal reception several times - you just need to get the appropriate antenna.
As for modern smartphones, we hasten to disappoint you. You will never find a special antenna connector in their composition. You can improve GPS reception on Android only using software methods. If they don't work, then you will have to come to terms with the current state of affairs. As you might guess, budget devices work worst with GPS satellites. This is explained by the fact that they are equipped with the cheapest and oldest navigation chips, which have a low operating speed and a weak signal receiver.
Visiting the settings section
In many smartphones and tablets, the GPS chip is completely disabled by default. In this case, the device determines its location using cell towers and Wi-Fi networks. To enable the navigation chip, you need to configure the device. To do this, do the following:
Step 1. Go to the section " Settings».
Step 2. Here you should be interested in the item “ Location».

Step 3. This item may have a different name on different devices. For example, on Samsung tablets you need to select the “ Connections" and click on the item " Geodata", at the same time activating the corresponding switch.

Step 4. In this section, you need to enable high location accuracy. The device must use all sources for this - GPS satellites, Wi-Fi networks and data from cell towers.

It should be noted that in this operating mode, energy consumption increases. And if this is practically not noticeable on new smartphones, then owners of budget and older devices will definitely feel the reduced battery life.
Compass calibration
If it’s impossible to enhance signal reception on smartphones, then no one can stop you from improving the performance of your digital compass. The fact is that on some devices it is not calibrated, as a result of which the navigation program cannot understand in time which direction of the world your smartphone is facing. At this moment it seems to you that the device does not pick up GPS.
To calibrate the compass you will need an app GPS Essentials. Download and install it, then do the following:
Step 1. Launch the program.

Step 2. Enter the mode Compass.

Step 3. If the compass works stably, then the problem is not with it. If the compass refuses to show the cardinal directions correctly, then calibrate it.
Step 4. First, rotate the smartphone around its axis with the screen facing up. Next, turn it over from bottom to top. Well, then turn it over from left to right. This should help. In some versions of the application, you must first select Calibrate in the section settings.
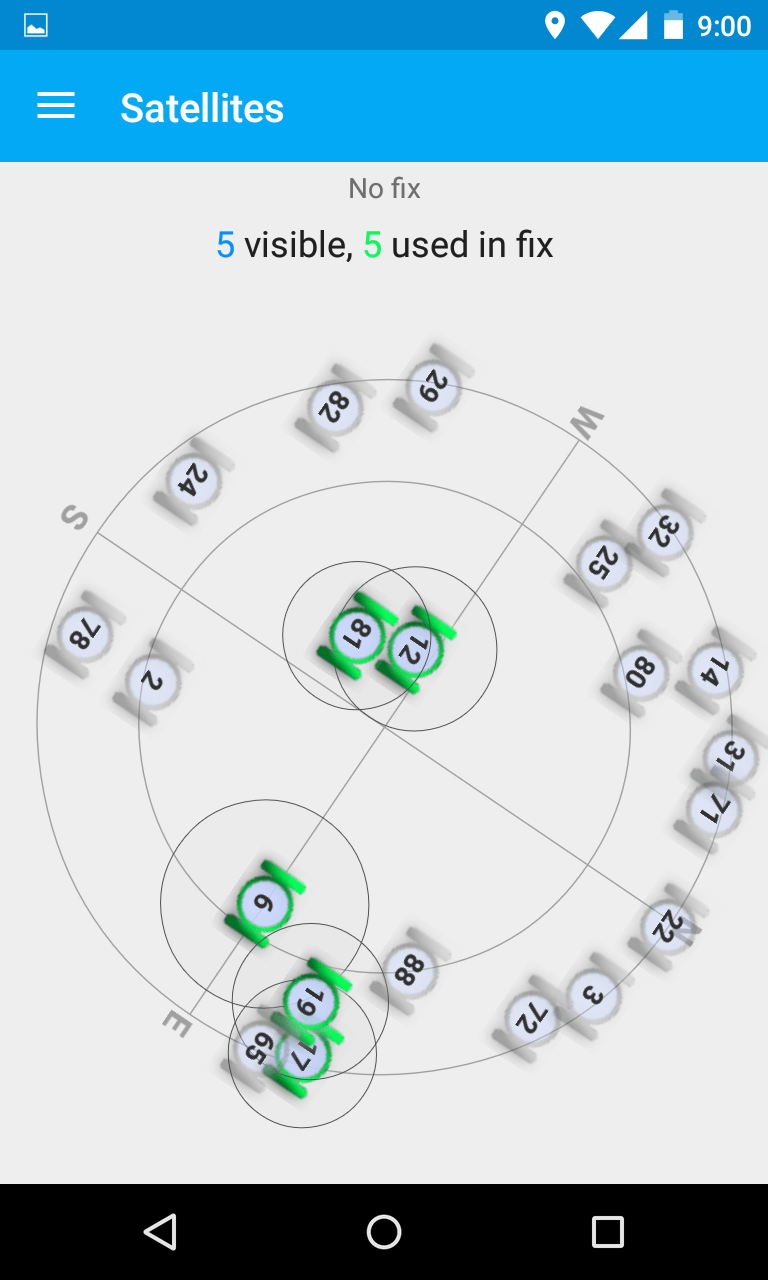
View the number of visible GPS satellites
In the same GPS Essentials you can look at how many satellites your smartphone connects to. If it is large enough, then the navigation chip should not be blamed - the problem is in one of the programs. To view satellites, you need to select the item in the application menu Satellites.
Resetting GPS data
A common problem with some devices is that they take a long time to lock onto specific GPS satellites, even when they have managed to move out of sight. The application can help in this case GPS Status & Toolbox. It will reset the GPS data, after which the connection to satellites will be made from scratch.
Step 1. Download and install the utility.
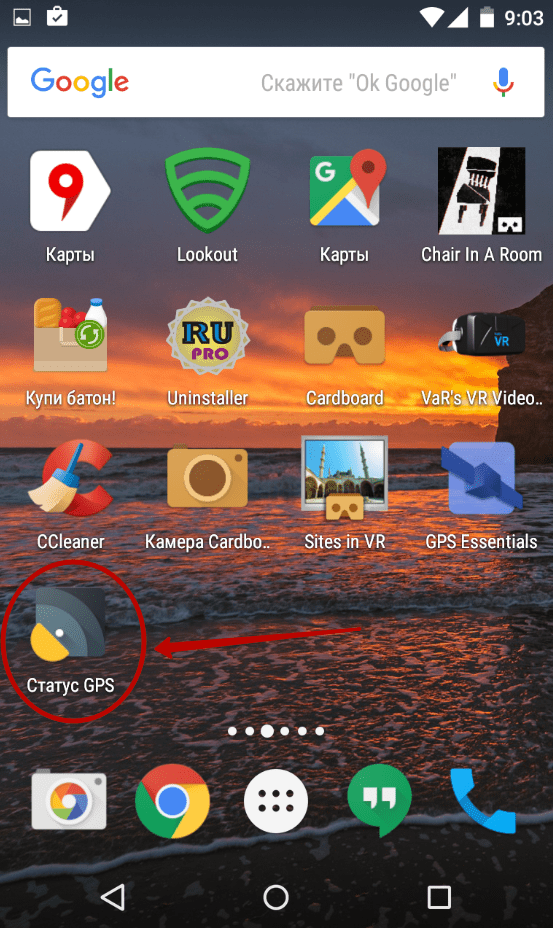
Step 2. Launch the installed application, agreeing to the terms of the license agreement.

Step 3. On the main screen of the program you will see readings from various sensors, as well as information about the number of GPS satellites overhead.
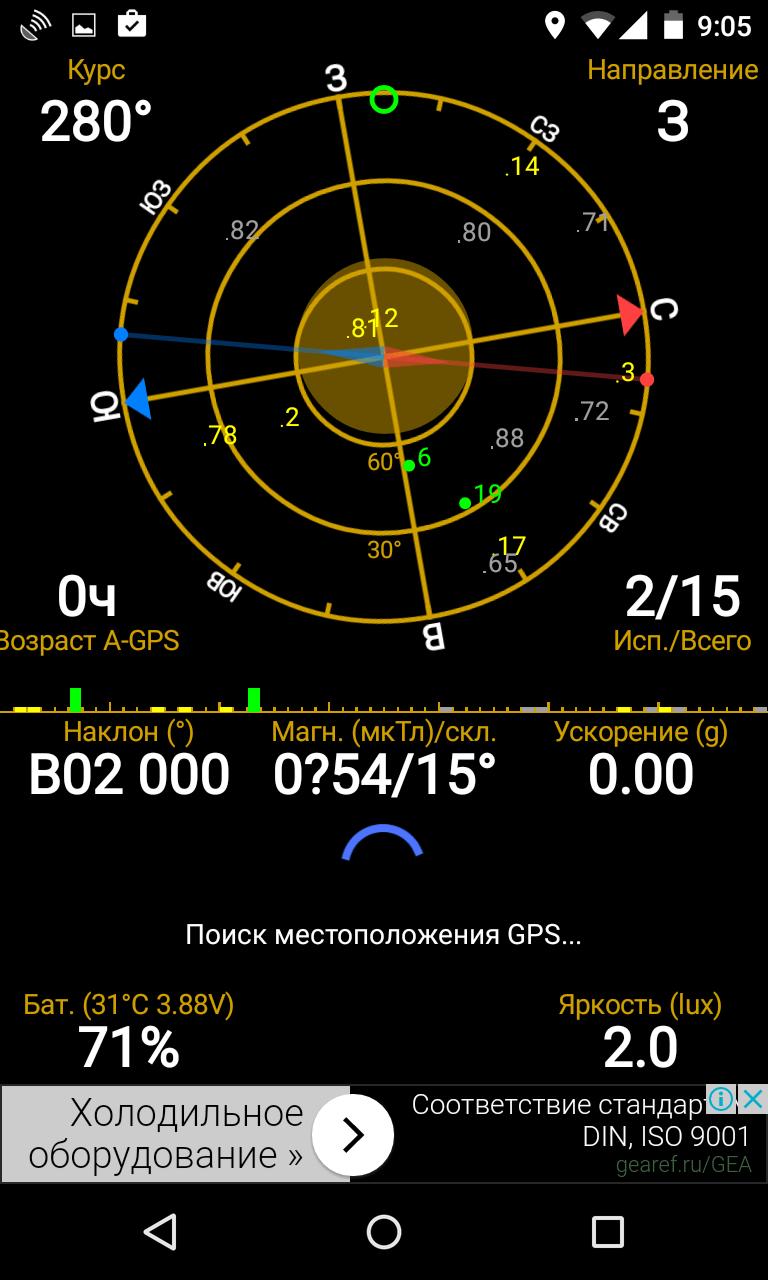
Step 4. Click anywhere on the display, after which you can pull out the curtain with the main menu on the left. Here you can calibrate the compass if this was not possible using the application discussed earlier. But now you need to click on the item “ A-GPS state management».

Step 5. In the pop-up menu, click the button " Reset».

Step 6 After the reset is complete, return to this pop-up menu by clicking the " Download».
What to look for when buying a new smartphone?
Now you know the answer to the question “How to set up GPS on Android?” But all this will not help you very much if you want to use your smartphone as a GPS navigator on a regular basis. It is better to get a good modern smartphone for these purposes. When choosing it, be sure to read the full technical specifications. In them you need to find a mention of support for A-GPS technology - it greatly reduces energy consumption. The ideal smartphone for you will be one that also works with GLONASS satellites. Fortunately, almost all devices that have been imported into our country over the past year have support for the Russian navigation system. But, again, you still need to look at the specifications of the device before purchasing it.
Nowadays, it’s probably impossible to find a device without a built-in GPS module. With the development of civilization, we, as “humans,” are shifting more and more responsibilities to robots, in particular to green ones. Now it is no longer necessary to look for moss on a tree (which, moreover, is always growing on all sides) or to easily find the polar star in the night sky; it is enough to launch a navigation application on your smartphone. However, GPS not only helps you get out of the forest, it is quite in demand every day: starting from the same navigation, but around the city, and ending with geo-tags in photographs. However, it happens that the module does not work properly. This may be due to problems in the hardware, then only the service can help the user, or maybe with the system settings, in which case you should read the following few tips.
Wipe the windshield, tap the wheel
Let's start with, perhaps, the most “significant” tips. What will any technical support advise, regardless of what device the user is having problems with? Absolutely right, “Have you tried turning it off and on?” To paraphrase this lifehack, first of all, you should make sure that GPS is turned on: Settings \ Location \ Use GPS.
Test run
To eliminate the possibility of the GPS receiver itself losing its functionality, you should use one of the special applications, for example GPS Essentials. Click on the satellite icon and the application will clearly show you where and how many satellites your smartphone is observing and which of them it is communicating with at the moment.


If the app shows that you are out of range of any satellite, try leaving the building or at least going to a window. Often, Soviet “anti-missile” houses block not only the GPS signal, but also the cellular network.
Sometimes the device can lock onto certain satellites even when they are out of sight, resulting in a weak or no signal.


To solve this problem, you might want to try resetting all GPS data on your device and starting from scratch. The GPS Status & ToolBox application helps with this. To do this, press the “menu” key in the application, select “Tools”, “manage A-GPS states”, and then press “reset”. Then click “download” there.
One possible problem that can affect the accuracy of your location is an incorrectly calibrated compass. In this case, the device receives incorrect orientation information, which causes problems when using navigation applications.
You can calibrate the compass properly in the same GPS Essentials. To do this, launch the application, click on the compass icon, and then follow these steps:
- choose a smooth surface away from electrical appliances to avoid the influence of electromagnetic fields, and place the smartphone on it with the screen facing up
- Slowly and smoothly rotate the device 3 full circles around each of its axes. The direction of rotation does not matter.
The process is clearly demonstrated in this video:
Nothing helps
Some smartphone firmwares themselves are not very good at working with GPS, so flashing the firmware can sometimes solve this problem. But this solution is not for everyone, but rather for a passionate user, because in this case you will have to read a lot of specific discussions, most likely not in your native language, in order to choose the optimal solution for yourself. For everyone else, it may be time to simply upgrade your device.
Does your smartphone replace a GPS navigator? Or cutlets separately, flies separately?
![]()
Tablets are devices that are actively used not only as multimedia centers. They are used by motorists and pedestrians as a navigator, which allows them to quickly navigate a place and find the desired building, street, or object. However, after one or two years, the device may no longer perform as intended. A user whose tablet does not see GPS satellites needs to know what to do.
Why can't my tablet see GPS satellites?
Some devices come with a built-in navigation device, but this does not affect satellite tracking setup. It will be the same either way. But the main reasons why the device does not see satellites may be the following:
- Problems with the firmware.
- Programs crash.
- Almanac failure.
- Mechanical damage.
- GPS module failure.
And if physical damage will have to be repaired by professionals, then you can deal with software damage yourself.
Almanac failure
This is a software problem, which is determined by the fact that the device will not be able to correctly determine its location and connect to satellites. It is proposed to solve a problem of this nature in one of two ways.
Fast start
The method is used only for those cases when the tablet computer was recently turned on and correctly determined its location. Using the “old tracks” he will be able to correct the time and location of the satellite. The technician will spend up to a quarter of an hour on such work.
Delayed start
It assumes that quite some time has passed since the last moment of use and it is difficult for the tablet to determine its location. This task can take an hour. The tablet needs:
- Search for satellites.
- Read the position of the orbit and its parameters. Only after this the tablet will receive a special type of parameters - ephemeris, which will be responsible for binding location and time.
And if the user has not used the GPS location search function for a long time, then the tablet needs a decent amount of time to do this work. Sometimes the waiting time can take up to 6 hours. To make it go faster, you need to move away from massive metal products, trusses, mesh, etc.
Accelerating the search for GPS satellites
For such work, you will need super administrator root rights to change the equipment parameters. You can speed up your search for satellites by doing the following:
- Open file system.
- Find the /etc directory.
- Open the gps.conf folder (open as text).
- Find the line: NTP_SERVER=north-america.pool.ntp.org.
- Instead of the specified text, write: NTP_SERVER= ru.pool.ntp.org.
In some cases, to solve the problem you need to reflash the gadget or take it to a service center.
The geolocation function in Android devices is one of the most used and in demand, and therefore it is doubly unpleasant when this option suddenly stops working. Therefore, in our material today we want to talk about methods of dealing with this problem.
Why GPS stops working and how to deal with it
Like many other problems with communication modules, problems with GPS can be caused by both hardware and software reasons. As practice shows, the latter are much more common. Hardware reasons include:
- poor quality module;
- a metal or simply thick case that shields the signal;
- poor reception in a particular location;
- manufacturing defects.
Software reasons for problems with geopositioning:
- change location with GPS turned off;
- incorrect data in the gps.conf system file;
- outdated version of software for working with GPS.
Now let's move on to methods to fix the problem.
Method 1: Cold start GPS
One of the most common reasons for GPS failures is moving to another coverage area with data transmission turned off. For example, you went to another country, but did not turn on GPS. The navigation module did not receive data updates in time, so it will need to re-establish communication with the satellites. This is called " cold start" It is done very simply.
1. Leave the room to a relatively free space. If you are using a cover, we recommend removing it.
2. Enable GPS reception on your device. Go to " Settings».

On Android up to 5.1 - select the option " Geodata"(other options - " GPS», « Location" or " Geopositioning"), which is located in the network connections block.

In Android 6.0-7.1.2 - scroll down the list of settings to the block " Personal data" and tap on " Locations».

On devices with Android 8.0-8.1, go to " Security and location", go there and select the option " Location».

3. In the geodata settings block, in the upper right corner, there is an enable slider. Move it to the right.

4. GPS will be turned on on the device. All you need to do next is wait 15-20 minutes until the device adjusts to the position of the satellites in this area.
As a rule, after the specified time has passed, the satellites will be put into operation, and navigation on your device will work correctly.
Method 2: Manipulating the gps.conf file (root only)
The quality and stability of GPS signal reception in an Android device can be improved by editing the system file gps.conf. This manipulation is recommended for devices that are not officially supplied to your country (for example, Pixel, Motorola devices released before 2016, as well as Chinese or Japanese smartphones for the domestic market).
In order to edit the GPS settings file yourself, you will need two things: and the ability to access system files. The most convenient way is to use Root Explorer.
1. Launch Ruth Explorer and go to the root folder of the internal memory, also known as root. If required, grant the application access to use root rights.

2. Go to the folder system, then in /etc.

3. Find the file inside the directory gps.conf.

Click and hold on it to select it. Then tap on the three dots at the top right to bring up the context menu. In it select “ Open in a text editor».

Confirm your consent to file system changes.

4. The file will be opened for editing, you will see the following options:

5. NTP_SERVER parameter should be changed to the following values:
- For the Russian Federation - ru.pool.ntp.org;
- For Ukraine - ua.pool.ntp.org;
- For Belarus - by.pool.ntp.org.
You can also use the pan-European server europe.pool.ntp.org.

6. If in gps.conf Your device is missing the INTERMEDIATE_POS parameter , enter it with the value 0 - this will slow down the operation of the receiver somewhat, but will make its readings much more accurate.

7. Do the same with the DEFAULT_AGPS_ENABLE option , to which you need to add a value TRUE . This will allow you to use cellular network data for geopositioning, which will also have a beneficial effect on the accuracy and quality of reception.

The use of A-GPS technology is also responsible for the DEFAULT_USER_PLANE=TRUE setting, which should also be added to the file.

8. After all manipulations, exit the editing mode. Don't forget to save your changes.

9. Reboot the device and check the GPS operation using special testing programs or navigator application. Geolocation should function correctly.
This method is especially suitable for devices with SoC made by MediaTek, but is also effective on processors from other manufacturers
Conclusion
To summarize, we note that problems with GPS are still rare, and mainly on devices in the budget segment. As practice shows, one of the two methods described above will definitely help you. If this does not happen, then you are most likely experiencing a hardware problem. It is impossible to fix such problems on your own, so the best solution would be to contact a service center for help. If the warranty period for the device has not yet expired, you should have it replaced or your money refunded.
Almost every Android smartphone or tablet has a GPS sensor. This is a standard feature of a modern device. However, not all GPS sensors work the same. The speed and strength of the GPS signal is affected by device characteristics such as RAM, processor and software.
GPS allows you to use navigation applications such as Google Maps or Yandex Maps. If you often travel, or play augmented reality games (for example, ), then you need to have a strong GPS signal on Android. What can I do to strengthen the GPS signal on Android?
1. Enable high precision mode.
If you want to fix a weak GPS signal on Android, then you will have to make some sacrifices. A good GPS signal consumes more battery power. If you are not afraid that your smartphone will quickly run out of power, then turn on the high accuracy mode.
Open menu Settings and select " Location" Next, open the section “ Mode" and make sure you have enabled the " According to all sources«.

However, this option is not available on all Android devices. If you do not find such a feature in your smartphone, then you need to find out what is the reason for the weak GPS signal.
2. Determine the cause of the weak GPS signal.
If the reason for the weak GPS signal is hardware related, then we will not be able to help you. In any case, you should install an application called GPS Essentials to find out why the GPS signal is weak.
Once you install the application and open it, you will see the option " Satellites" on the main screen. Click on it and your Android device will begin connecting to satellites around the planet.

If the result shows that the smartphone is connecting to the satellites, but the GPS is still not working, then the problem is in the software. If you do not see any satellites on your smartphone screen, then the problem is in the hardware. Also try to remove metal objects near you, as they create interference.
3. Weak GPS signal due to apps.
Sometimes various applications on Android can cause GPS problems.
For example, if you use multiple location apps at the same time, such as Google Maps and FourSquare, this may cause a weak or no GPS signal.
You should close all background applications to get a stronger GPS signal.
4. Recalibrate the compass.
Sometimes recalibrating the GPS can correct a weak GPS signal. You can do this using a compass. Some smartphones already come with a compass. If you don't find it on your device, then use the GPS Essentials app that we talked about earlier.

Open the application again and click on " Compass" Take your phone and rotate it vertically three times. Make sure to keep the phone parallel to the surface and move it slowly.
When you're done moving it vertically, rotate it again, but this time horizontally. Be sure to do this three times.
- Update GPS– open the quick notifications panel and turn off GPS. Wait five seconds and turn it on again.
- Remove the back panel or case– sometimes the GPS signal is blocked by a protective case or back panel. Try removing them and checking the quality of the GPS signal.
- Turn on airplane mode– open the quick notifications panel and turn on the “Airplane mode” option. Wait 15-20 seconds and then turn it off.
- Get outdoors— The GPS sensor works better in open areas. Test your GPS signal outside or on a balcony where you have direct access to the sky.
Conclusion
Every Android device user faces the problem of a weak GPS signal. Some of the tricks described in this article can improve the GPS signal on your smartphone or tablet.
How do you deal with weak GPS signal on Android device? Share your thoughts in the comments below.


