Where to point the wifi router antennas. Selecting a Wi-Fi antenna to strengthen the signal
The best location for the router antennas is vertically upward. Because it is in this position that the Wi-Fi network signal is transmitted over the longest possible distance. If your computer does not have a built-in module, or it does not support the N standard, you can use a special Wi-Fi adapter with a (removable) antenna. The antenna of the adapter and the router should be installed in the same plane (parallel). It is best to place the device antennas vertically, and the devices themselves at the same height level.
WiFi router antenna and placement principles
Signal strength can be affected by many factors. Here are some guidelines for wireless router antenna placement and configuration:
- The best location for the router antenna is in the center of the house
- Install the antenna and router on a shelf or wall above furniture level
- Make sure your router has the latest firmware
- Keep the router antenna away from windows, mirrors and steel beams.
Also, if your router supports a directional antenna, you can use it or install wireless repeaters throughout your home to expand the signal propagation front.
All 802.11b/g access points are equipped with standard miniature whip antennas, which can be either removable or fixed. A whip antenna is the simplest version of the antenna, it is also called asymmetrical vibrator. If a whip antenna is placed vertically, then in the horizontal plane it will radiate energy in all directions evenly, therefore in the horizontal plane such an antenna is omnidirectional and, therefore, it is impossible to assert that there is preferential radiation in a certain direction. But, at the same time, such an antenna radiates unevenly in the vertical plane, and there is no radiation at all along the antenna axis. That is why, even in the case of the simplest whip antenna, it is possible to identify the directions corresponding to the maximum gain. For whip antennas, maximum gain is achieved in a plane perpendicular to the antenna and passing through its middle.
If you disassemble a standard whip antenna, in most cases it turns out that the length of its active part is only 31 mm. Naturally, this length was not chosen by chance. The fact is that the frequency range for Wi-Fi devices is from 2400 to 2473 MHz. Accordingly, the emission wavelength varies from 12.12 to 12.49 cm, and the quarter wavelength is approximately 31 mm. That is, in most cases, the length of the whip antenna is chosen equal to a quarter of the radiation wavelength.
3-D, horizontal and vertical antenna patterns are shown in the figure.
three-dimensional radiation pattern (the antenna is located along the Z axis)

vertical radiation pattern

horizontal radiation pattern
If you have other questions about installing router antennas, its configuration and location, please contact us.
Sometimes it happens that if there is a wireless network in a building of 2-3 floors, the WiFi signal does not reach some rooms, or there is a signal, but the connection speed is weak. One of the reasons why this may happen is an incorrectly selected wifi antenna for the router.
WiFi is a technology that only works well in a “line of sight” environment. Any obstacles in the form of walls, cabinets, mirrors, etc. have a very bad effect on the propagation of the wireless signal. Therefore, comfortable operation on the network will depend on a reasonable choice of antenna for the router.
What types of WiFi antennas are there?
All WiFi antennas can be divided into two types: directional or omnidirectional antennas, which, in turn, are divided into indoor and outdoor.
Omnidirectional antennas
The class of these antennas is fundamental for building wireless networks. The majority of “home” routers are equipped with these antennas. They evenly distribute the WiFi signal throughout their entire range. Basically, omnidirectional antennas are a regular rod that distributes a WiFi signal in a plane perpendicular to its own axis.
Internal omnidirectional antenna option
Please note that omnidirectional antennas should only be installed vertically. Then the signal will propagate in the correct way, and the wireless network coverage area will be maximum.
Sometimes it happens that you need to cover a large area with a wireless network, for example, some kind of production facility. Then an external omnidirectional antenna with a gain of 8 dB is installed on the central building. Such an antenna is capable of transmitting a WiFi signal within a radius of 600 meters at a speed of 54 Mbit and to 1800 meters at a speed of 1 Mbit.

Outdoor omnidirectional antenna option
Directional Antennas
This class of antennas is used to organize a point-to-point Wi-Fi network. Those. they work well if you only need to connect to one access point or one computer.

An example of how directional antennas work
An example of how directional antennas work
Inside a building, a directional antenna can “break through” impenetrable walls for a WiFi signal. A good option would be to use a panel-type directional antenna. This antenna is a flat rectangle capable of emitting radio waves in one direction. In this case, the gain can reach up to 6 dB.

Internal directional antenna option
But if you need to transmit a signal, for example, to a neighboring house, then you can use an external cylindrical antenna. It is installed horizontally and directed towards the place where the receiver is located. With such an antenna you can achieve a gain of up to 18 dB.

Outdoor directional antenna option
If suddenly you are not quite sure where you need to place your antenna, then you can use the universal directional option. This type of antenna is suitable for both indoor and outdoor installation. The gain is about 8 dB.

Universal directional antenna option
Principles of placing a wifi antenna
The power of a wifi antenna is influenced by many factors.
- If the antenna is omnidirectional, then it must be placed in the center of the building.
- It is better to install the antenna or the router itself above the furniture level.
- Check the router firmware, it should be the latest version.
- It would be a good idea if the antenna is located away from windows, mirrors and steel structures.
Connecting the router to an external antenna and setting it up
For example, the MikroTik RВ751U-2НnD router was selected.
Connecting an external antenna
We take the router and look for the MMCX connector on the rear panel.

MMSH connector
To connect an external antenna, you will need a special adapter that will connect your router to the antenna. Typically these adapters are small in size, approximately 20 cm, so you can use two or three of them. You can purchase one adapter, but it is long. Now we make the connection, as shown in the figure below.

Antenna connection option
After making a physical connection between the router and the antenna, it needs to be configured so that it “sees” it.
Configuring the router to work with an external antenna
To configure the router, use the WinBox utility. We launch it on a computer connected to the router and in the Connect To field, select your router.

Choosing a router
To enable the use of an external antenna, perform the following steps:
- Open the Wireless menu.
- In the menu – Interface, go to the NT tab.
- From the Antenna Mode list, select the operating option – antenna b.
- Click – Ok.

Setting up the router
After making the settings, the external antenna should work in parallel with the internal ones. If you suddenly want one external antenna to work, then uncheck the box - chain0, and leave chain1. Don't forget to click Apply to save the settings.

Example of setting up an external antenna
Setting the transmitter power
This router has the ability to programmatically adjust the power level of the Wi-Fi transmitter. This feature can be useful if you need to transmit a signal from an external antenna over a long distance.
To set the power, perform the following steps:
- Open the Wireless menu.
- B Wireless Tables we specify the Wi-Fi interface wlan1.
- In the Interface menu, click the button – Advanced Mode.
- Select the tab..., and there is the item Tx Power.

Setting the transmitter power
In the window that appears, you can adjust the transmitter power. In Tx Power Mode you can select the power setting mode, and in Tx Power you can specify the power itself.

Selecting power setting modes
Types of installation modes:
- Default – in this mode, the power is selected from a table located in the router’s memory.
- card rates – power selection mode using a special algorithm using the power value specified by the user.
- Manual – here you can set your own power for each speed.
- all rates fixed – the power is the same at all speeds, it is specified by the user.
Boosting your WiFi signal is simple and easy
From time to time we all face the problem of insufficient signal strength from the router. The signal is unstable at some points, often disappears or does not exist at all. This is noticeable in rooms with a large area: in a country house, in a private house, at a recreation center, in an apartment with more than one room. In this article we will describe options to solve this problem.
Figure 1. WiFi coverage area of a router in a typical apartment (router next to the front door).
We produce passive and active antennas, including for data transmission networks and WiFi. In this article, we are interested not so much in the problems of wireless access, but in ways to increase the WiFi coverage area. Note that we are not considering specific options for creating special “powerful” access points. Everything is within the framework of the standards and norms adopted in the Russian Federation.
In our experience, the router is usually placed: next to the front door, in the corridor behind the closet, or in the distribution panel. In such cases, the area of the apartment is covered unevenly by the WiFi network. Depending on the layout of the apartment, the back rooms, kitchen, loggia are outside the zone of stable coverage. (Example in Figure 1)
The same situation is true for a private house. The area of the house is usually larger, and the Internet is needed not only indoors, but also outside - near the barbecue area, swimming pool, or on the playground. Here the problem is more serious.

Figure 2. WiFi coverage area of a router in a country house
Figures 1 and 2 show examples of WiFi coverage; zones with a good network level are highlighted in green, zones with a low level, which often does not allow normal work on the Internet, are highlighted in red. Please note that the WiFi signal, being a radio wave, travels better in free space, so walls and other partitions in the room will weaken it and, as a result, reduce the level of the signal passing through them.
The problem has been identified - insufficient WiFi network coverage indoors. Let's figure out why this happens. The standard antenna of the router has a circular radiation pattern - it emits WiFi in all directions. Including in the direction of your neighbors, which is usually pointless and unnecessary. At the same time, the antenna’s own gain is relatively low, as a result of which such an antenna is insufficiently efficient. As a result, the WiFi signal coverage area is small.

Figure 3. Radiation pattern of the standard router antenna (f=2.45 GHz)
Figure 3 shows the radiation pattern of the external antenna of a standard router, calculated in the physical simulator. A dipole is used as an antenna.
How to Improve WiFi Coverage
The first thing that comes to mind is to replace the router with another one. Buy a device with a more powerful external antenna or with several antennas. If you have an outdated router model, then it's worth a try. Be prepared that this will require additional costs, and a positive result is not at all guaranteed. Most likely the picture will improve, but the problem will not be eliminated (Fig. 4-5).
Figure 4. Router with two external antennas.

Figure 5. Router with three external antennas.
The next method is to use an active WiFi repeater, also called a WiFi repeater. This device is specifically designed to increase the range of a WiFi network. An excellent way that often allows you to solve the problem at the root. But it also has disadvantages:
— prices from one and a half thousand rubles and above;
— need for configuration;
- limited area of use.
And that’s not all: the repeater will again receive the signal from all directions and radiate it around. That is, if we have an “uncovered” corner of the apartment far away, then we will need two or even three repeaters. It would be great to concentrate the signal in a given direction, but it won’t work - the built-in antennas of repeaters have a circular diagram. We have not seen repeaters with a socket for an external antenna.
It is worth mentioning another feature of the WiFi repeater - the presence of a 220V mains power supply. Not all people are ready to leave some devices plugged in when leaving home. And turning it on and off every time is an amateur job. In addition, for a home or cottage, the decision is complicated by the fact that there is most often no power supply between the house and, say, a barbecue area, and repeaters are often not intended for outdoor use.

Figure 6. How the WiFi repeater works
The next solution is to use an external directional antenna. The simplest thing is to unscrew the standard antenna from the router and connect a directional one, which will focus the entire signal in the desired direction. There are a lot of antennas of this kind, but we will focus on the developments of our enterprise.
The first solution is the WiFi Extender antenna (Figure 7):

Figure 7. WiFi Extender Antenna
This is an indoor antenna of the “wave channel” type in a radio-transparent plastic case. Antenna gain 10 dBi.
The second option is more complex and effective - a panel antenna. In our case - BAS-2301 WiFi (Figures 8-9). Inside the radio-transparent sealed case is a patch antenna. Gain of at least 12.5 dBi.

Figure 8. BAS 2301 WiFi antenna

Figure 9. Radiation pattern of the BAS 2301 WiFi antenna (f=2.45 GHz)
The third option is a “wave channel” antenna for the WiFi range (2400-2500 MHz). In the REMO version, this is the BERKUT WiFi antenna (Figure 10). There are already 19 elements (6 of them are placed in a box on a printed circuit board), the maximum directional gain is 15 dBi.

Figure 10. Berkut WiFi antenna
All the methods mentioned above will most often solve the problem. WiFi will appear in the right place, and with an excellent signal level. But there are some nuances here:
- The price of the issue. These antennas are cheaper than a repeater, but their price is above 1000 rubles.
- Installation. All such antennas require installation. The bracket needs to be installed. If you live in a rented apartment, then obtain permission from the owner to secure this structure. Also, this may entail some inconvenience if you do not have the opportunity to mount the bracket on the wall yourself. I think the reader understands that it is not always possible to secure the bracket for various reasons, even despite the simplicity of this procedure.
— Accommodation. If in a house or cottage you can install an antenna outdoors by running only a cable inside, then for an apartment this is not a suitable option.
Another limitation on the use of such antennas is that not all routers have an antenna connector for connecting external antennas. The middle and budget segments often have non-detachable antennas and, as a result, the above-mentioned solutions are not suitable for such routers by definition.
Therefore, remote antennas are a good solution, but not applicable in all cases. What else can you increase the coverage of your WiFi network?
We have been asking this question for a long time. What could you come up with that would be applicable in almost all cases, would be effective, inexpensive and simple?
The reader may be familiar with our popular modem product Connect 2.0 or its older versions.
The principle of operation is simple - using the device’s (modem) own internal antenna as an active element of the antenna system. So, in a simplified way, you can imagine the entire series of “Internet signal amplifiers”.
We thought - is it possible to apply the same principle in a WiFi router with an external antenna?

Figure 11. Connect 2.0 Antenna
Development of an antenna attachment for a router (WiFi Ladder)
So, we have a router with an external antenna (important: we do not consider routers with a built-in antenna). The question arises: how to use this own antenna as an active element (vibrator) of the antenna system? Our goal is to give directional properties to the external antenna of the router, which will entail an increase in the range of transmission and reception of the WiFi signal in a given direction. The first thing that comes to mind is the “wave channel” antenna, also known as “UDA-YAGI” (after the names of its inventors from Japan). This is a simple and at the same time effective antenna design that has proven itself throughout the world.So an idea appeared and it had to be translated into a design. The developers were faced with the task of calculating a multi-element wave channel for the 2.4-2.5 GHz range, into which it would be possible to “implement” the standard antenna of the router. During the simulation, it was decided that the best option would be a 7-element “wave channel”. With quite compact dimensions of the structure, we received an antenna system, the amplification of which allows us to solve the assigned problems. The dimensions of the directors and the distances between them were optimized in the physical model; we consider them the best for solving the problem (Fig. 12).

Figure 12. “Stuffing” of the BAS-2002 WiFi Ladder antenna
The next stage was the development of the antenna mounting design. After monitoring the router market, we decided to place a “wave channel” on the external antenna of the router, using it as a supporting element (Fig. 13). We encountered the fact that routers have antennas of different diameters, and sometimes their shape is far from cylindrical or conical. For example, a “flattened” external antenna is very popular. For this reason, the designers have developed a universal clamp that allows you to mount the product on almost any external router antenna. In some cases, this will not be the most rigid mount, but we would like to note that the antenna is usually installed indoors and only once, so third-party physical impacts on it will be minimal.

Figure 13. BAS-2002 WiFi Ladder antenna mounted on the external antenna of the router
A series of tests were carried out, during which the “shaded” areas of the room became covered by WiFi, and with a decent level (Fig. 14). The area with a good WiFi signal level is highlighted in green in the figure.

Figure 14. WiFi coverage area of a router with an antenna attachment
BAS-2002 WiFi Ladder in a typical apartment
Below is the radiation pattern of the developed antenna, which is attached to the external antenna of a typical router (Fig. 15).

Figure 15. Radiation pattern of the external antenna of the router with the BAS-2002 WiFi Ladder antenna attachment
The router antenna acquired directional properties and, as a result, directional gain, resulting in an increase in the range of WiFi signal transmission in a given direction. In red in Fig. Figure 15 shows the maximum antenna radiation - the direction in which the WiFi network coverage area will increase.
During development, the working name firmly attached to the antenna - “ladder”, therefore, without thinking twice, we decided to name this product, translating only into English, taking into account our export practice: “BAS-2002 WiFi Ladder”.
One more question cannot be ignored: where should the product be mounted on the external antenna?
Having studied the designs of external antennas of different routers, we came to the conclusion that the antennas inside the plastic case are not always located as we expect (Figure 16).

Figure 16. “Inside” of one of the router’s external antennas.
As can be seen from Figure 16, the antenna is not located along the entire length of the plastic case, but only in its lower part.
Most often, the antenna structure is located in the lower or middle part of the plastic housing. That is why the user needs to find the optimal height location for mounting on an external antenna (Fig. 17). It happens that the user forgets or ignores this important setting point and does not get the expected result, so let us remind you once again - height adjustment is important and mandatory!

Figure 17. Adjusting the BAS-2002 WiFi Ladder antenna height
The antenna operates in IEEE802.11 b/g/n standard networks using frequencies of 2.4..2.5 GHz.
As we said earlier, there are routers with multiple external antennas. In this case, you can use an antenna attachment for all antennas or just one or two. Depends on the tasks. You can create maximum gain in one direction, then all antennas will be “aimed in one direction” and their gain will add up (Fig. 18).

Figure 18
You can strengthen WiFi in different directions, i.e. expand coverage area:

Figure 19
It is worth mentioning programs that will help you adjust the direction of such antennas (not only WFi LADDER).
Nowadays it is difficult to find a smartphone, laptop or tablet that does not support wireless networks - Wi-Fi. Not only them, but also many modern household appliances can be connected to the network. Even multicookers are connected to Wi-Fi, so it is important to ensure good reception in all corners of the apartment or house. But a significant problem is the excess of wireless networks. In this article we will look at how to strengthen the signal of a Wi-Fi router with your own hands.
Reasons for a bad signal
Before we consider ways to strengthen the signal, we will talk about the reasons for its fading. The main ones include:
- Wall material. The most common problem is a significant difference in signal levels in different rooms of an apartment with concrete walls.
- Router location. In order for the Wi-Fi signal to be uniform over the entire intended coverage area, you need to place it in a place equidistant from all the far corners of the coverage area. Otherwise, every wall, cabinet, shelf or other piece of furniture will degrade the Wi-Fi signal.
- Antenna gain. Cheap wifi routers usually have one 3 dbi antenna installed - this is a rather weak option.
- Incorrect router settings.
- Bad Wi-Fi receivers.
- Many networks running in parallel.
How to strengthen Wi-Fi
Now that we already know what leads to deterioration in the propagation and reception of a Wi-Fi signal, let's look at each problem and its solution separately. To strengthen Wi-Fi you need:
- Find the ideal place to install your router.
- Set its operating mode.
- Replace the antennas with more powerful ones.
- Install reflectors.
- Install repeaters or strengthen the network with another router.
Correct location of the router
If you want to boost your Wi-Fi signal, before you do anything, make sure your router is positioned correctly and minimize sources of interference and reflections. The router must be located so that a normal signal level is provided in each room.
If you have chosen the optimal place, but did not get the desired results, pay attention to the recommendations:
- Microwave ovens, remote controls and other equipment operating at high frequencies, in particular 2.4 GHz. If such equipment is located nearby, move either it or the router.
- Neighborhood Wi-Fi. You can improve the situation slightly if you install the router in a place where the signal level is the lowest. You can determine this if you walk around your apartment with your smartphone and pay attention to the level of signal reception from your neighbors. You need to install the router where all signals will have the lowest level. The Wifi Analyzer program for Android will help you with this.
Configuring the router correctly
Before you run to the store for a new antenna, Wi-Fi receiver or router, let's go to the settings and check what parameters are set there. To do this, you need to enter the address of the router in the address bar of your browser; it is usually indicated on a sheet pasted on its bottom. Most often this is 192.168.0.1 or 192.168.1.1
First of all, you need to look at the standard in which it operates. In different models of Wi-Fi equipment, settings and web interfaces differ significantly from manufacturer to manufacturer. Therefore, we will try to give general recommendations.

You need to connect to the router via the web interface and find the list of modes. Their names begin with the numbers 802.11, followed by letters, for example, 802.11b/g/n. To strengthen the router’s Wi-Fi signal, you need to select the item with the type name:
802.11n only
You should already see an increase in the Wi-Fi signal.

After this, you can try to increase the transmitter power; to do this, look in the settings for an item called transmit power type. It can be specified either as a percentage or as:
- High;
- Medium;
In any case, you need to set the maximum possible percentage value closer to 100% or High.
We have completed the basic settings for signal amplification. Now let's check the computer. If you have a laptop, check your power mode settings. In power saving mode, the signal gain from the built-in receiver is reduced, which causes problems with unstable connections and reduced speed. Set the mode to "normal" or "high performance".

Duplicate the network
If you need Wi-Fi reception at 100 meters or more, then you won’t achieve this with a regular router. Their coverage range also depends on the number of obstacles, transmitter power and antenna gain. On average you can count on 30-50 meters. The easiest way to strengthen the signal is to install a Wi-Fi repeater. This is a signal repeater that simply plugs into an outlet.

The outlet should be located in an area where the signal is not too bad, but not next to the router. You can amplify the signal with one or two repeaters to obtain a larger coverage area. But you need to configure it - select a network and enter a password for it. This reception distance is often required in a private home in order to have a signal in the yard.

The second way is to increase coverage with another router. Some models support operation in repeater mode. This can also be done by connecting the first and second routers with a simple network cable with rj-45 type plugs, as you would do when connecting the cable to a computer’s network card.
Upgrading or changing the antenna
If the router does not have an antenna, then the only method of amplification is software; we have already considered the optimal settings. The next option to boost your Wi-Fi signal is to experiment with antennas.
Experiments could be as follows:

If you are a fan of constructing something, then a biquad antenna can help to strengthen the signal for Wi-Fi reception at 200 meters; its drawing is shown in the figure below:

And this antenna, a Wi-Fi gun, will help transmit the Internet over 1 km or more (depending on the installation height and the accuracy of the signal direction). Its developer claims that he managed to achieve reception at a distance of up to 10 km.

In this way, it is possible to organize communication between houses remote from each other, or an apartment and a dacha, for example.

Important! It is not correct to talk about the range of the antenna. This figure depends not only on its design, but also on the installation location, the number of obstacles, and, importantly, the antenna of the device that will receive the signal. If in the field a regular router with a standard antenna can transmit a signal over 50-100 meters, then in concrete buildings there are problems with communication when moving to the next room.
We looked at the main available methods to strengthen the signal of a Wi-Fi router, as well as increase the coverage area. If you follow all the recommendations, you will achieve an improved signal, but you need to take into account the quality and serviceability of all equipment. For example, if after all the manipulations done, the quality of signal reception on the phone leaves much to be desired, it may be due to a weak Wi-Fi module and built-in antenna.
Materials
A weak WiFi signal is a pressing problem for residents of apartments, country houses and office workers. Dead zones in a WiFi network are typical for both large rooms and small apartments, the area of which even a budget access point can theoretically cover.
The range of a WiFi router is a characteristic that manufacturers cannot clearly indicate on the box: the WiFi range is influenced by many factors that depend not only on the technical specifications of the device.
This material presents 10 practical tips that will help eliminate the physical causes of poor coverage and optimize the range of your WiFi router; you can easily do it yourself.
The radiation from the access point in space is not a sphere, but a toroidal field, shaped like a donut. In order for WiFi coverage within one floor to be optimal, radio waves must propagate in a horizontal plane - parallel to the floor. For this purpose, it is possible to tilt the antennas.

The antenna is a donut axis. The angle of signal propagation depends on its inclination.

When the antenna is tilted relative to the horizon, part of the radiation is directed outside the room: dead zones are formed under the “donut” plane.

A vertically mounted antenna radiates in a horizontal plane: maximum coverage is achieved indoors.
On practice: Mounting the antenna vertically is the easiest way to optimize indoor WiFi coverage.
Place the router closer to the center of the room
Another reason for the occurrence of dead zones is the poor location of the access point. The antenna emits radio waves in all directions. In this case, the radiation intensity is maximum near the router and decreases as it approaches the edge of the coverage area. If you install an access point in the center of the house, the signal will be distributed throughout the rooms more efficiently.

A router installed in a corner transmits some of the power outside the house, and distant rooms are at the edge of the coverage area.

Installation in the center of the house allows you to achieve uniform signal distribution in all rooms and minimize dead zones.
In practice: Installing an access point in the “center” of the house is not always feasible due to the complex layout, lack of sockets in the right place, or the need to lay a cable.
Provide direct visibility between the router and clients
WiFi signal frequency is 2.4 GHz. These are decimeter radio waves that do not bend well around obstacles and have low penetrating ability. Therefore, the range and signal stability directly depend on the number and structure of obstacles between the access point and clients.

Passing through a wall or ceiling, an electromagnetic wave loses some of its energy.
The amount of signal attenuation depends on the material the radio waves travel through.


*Effective distance is a value that determines how the radius of a wireless network changes in comparison with open space when a wave passes an obstacle.
Calculation example: WiFi 802.11n signal propagates under line-of-sight conditions over 400 meters. After overcoming the non-permanent wall between the rooms, the signal strength decreases to 400 m * 15% = 60 m. The second wall of the same type will make the signal even weaker: 60 m * 15% = 9 m. The third wall makes signal reception almost impossible: 9 m * 15 % = 1.35 m.
Such calculations will help calculate dead zones that arise due to the absorption of radio waves by walls.
The next problem in the path of radio waves: mirrors and metal structures. Unlike walls, they do not weaken, but reflect the signal, scattering it in arbitrary directions.

Mirrors and metal structures reflect and scatter the signal, creating dead zones behind them.

If you move interior elements that reflect the signal, you can eliminate dead spots.
In practice: It is extremely rare to achieve ideal conditions when all gadgets are in direct line of sight to the router. Therefore, in a real home, you will have to work separately to eliminate each dead zone:
- find out what interferes with the signal (absorption or reflection);
- think about where to move the router (or piece of furniture).
Place the router away from sources of interference
The 2.4 GHz band does not require licensing and is therefore used to operate household radio standards: WiFi and Bluetooth. Despite the low bandwidth, Bluetooth can still interfere with the router.
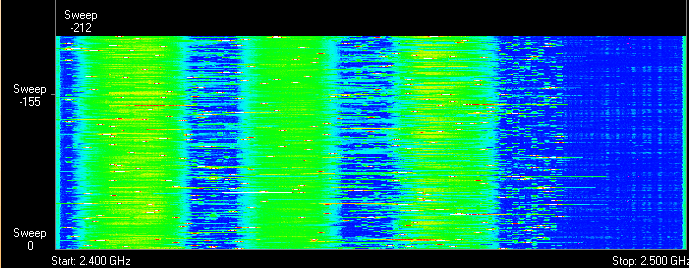
Green areas - stream from the WiFi router. Red dots are Bluetooth data. The proximity of two radio standards in the same range causes interference, reducing the range of the wireless network.
The magnetron of a microwave oven emits in the same frequency range. The radiation intensity of this device is so high that even through the protective screen of the furnace, the magnetron radiation can “illuminate” the radio beam of the WiFi router.

Microwave oven magnetron radiation causes interference on almost all WiFi channels.
On practice :
- When using Bluetooth accessories near the router, enable the AFH parameter in the settings of the latter.
- The microwave is a powerful source of interference, but it is not used very often. Therefore, if it is not possible to move the router, then you simply won’t be able to make a Skype call while preparing breakfast.
Disable support for 802.11 B/G modes
WiFi devices of three specifications operate in the 2.4 GHz band: 802.11 b/g/n. N is the newest standard and provides greater speed and range compared to B and G.
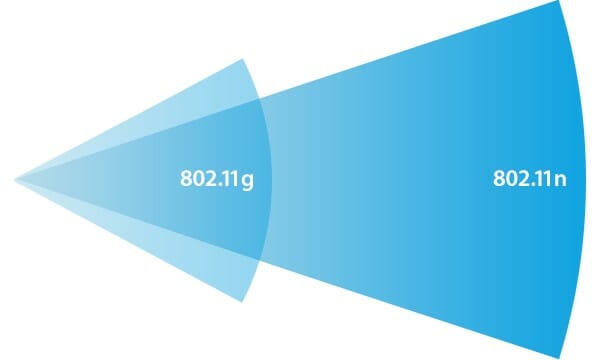
The 802.11n (2.4 GHz) specification provides greater range than legacy B and G standards.
802.11n routers support previous WiFi standards, but the mechanics of backward compatibility are such that when a B/G device appears in the N-router's coverage area - for example, an old phone or a neighbor's router - the entire network is switched to B/G mode. Physically, the modulation algorithm changes, which leads to a drop in the speed and range of the router.
In practice: Switching the router to “pure 802.11n” mode will definitely have a positive effect on the quality of coverage and throughput of the wireless network.
However, B/G devices will not be able to connect via WiFi. If it is a laptop or TV, they can be easily connected to the router via Ethernet.
Select the optimal WiFi channel in the settings
Almost every apartment today has a WiFi router, so the density of networks in the city is very high. Signals from neighboring access points overlap each other, draining energy from the radio path and greatly reducing its efficiency.
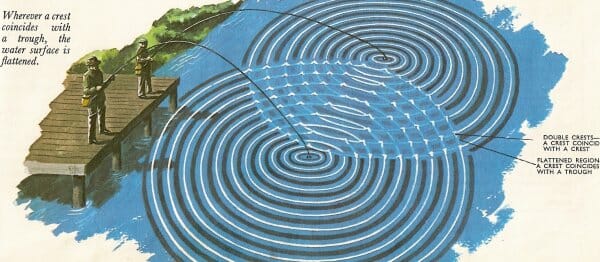
Neighboring networks operating at the same frequency create mutual interference, like ripples on the water.
Wireless networks operate within a range on different channels. There are 13 such channels (in Russia) and the router switches between them automatically.

To minimize interference, you need to understand which channels neighboring networks operate on and switch to a less loaded one.
Detailed instructions for setting up the channel are provided.

In practice: Selecting the least loaded channel is an effective way to expand the coverage area, relevant for residents of an apartment building.
But in some cases there are so many networks on the air that not a single channel provides a noticeable increase in WiFi speed and range. Then it makes sense to turn to method No. 2 and place the router away from the walls bordering neighboring apartments. If this does not bring results, then you should think about switching to the 5 GHz band (method No. 10).
Adjust the router transmitter power
The power of the transmitter determines the energy of the radio path and directly affects the range of the access point: the more powerful the beam, the further it hits. But this principle is useless in the case of omnidirectional antennas of household routers: in wireless transmission, two-way data exchange occurs and not only clients must “hear” the router, but also vice versa.
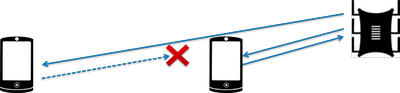
Asymmetry: the router “reaches” a mobile device in a distant room, but does not receive a response from it due to the low power of the smartphone’s WiFi module. The connection is not established.
In practice: The recommended transmitter power value is 75%. It should be increased only in extreme cases: turning the power up to 100% not only does not improve the quality of the signal in distant rooms, but even worsens the stability of reception near the router, since its powerful radio stream “clogs” the weak response signal from the smartphone.
Replace the standard antenna with a more powerful one
Most routers are equipped with standard antennas with a gain of 2 - 3 dBi. The antenna is a passive element of the radio system and is not capable of increasing the flow power. However, increasing the gain allows you to refocus the radio signal by changing the radiation pattern.
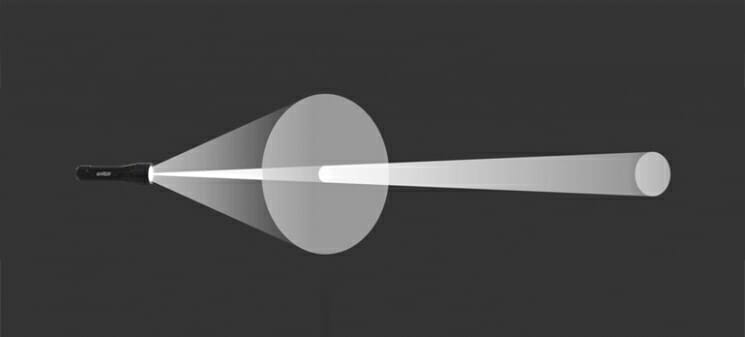
The higher the antenna gain, the further the radio signal travels. In this case, the narrower flow becomes similar not to a “donut”, but to a flat disk.

There is a large selection of antennas for routers with a universal SMA connector on the market.


In practice: Using an antenna with high gain is an effective way to expand the coverage area, because simultaneously with the signal amplification, the sensitivity of the antenna increases, which means the router begins to “hear” remote devices. But due to the narrowing of the radio beam from the antenna, dead zones appear near the floor and ceiling.
Use signal repeaters
In rooms with complex layouts and multi-story buildings, it is effective to use repeaters - devices that repeat the signal from the main router.


The simplest solution is to use an old router as a repeater. The disadvantage of this scheme is that the throughput of the child network is half as much, since along with client data, the WDS access point aggregates the upstream flow from the upstream router.
Detailed instructions for setting up a WDS bridge are provided.

Specialized repeaters do not have the problem of reducing bandwidth and are equipped with additional functionality. For example, some Asus repeater models support the roaming function.

In practice: No matter how complex the layout, repeaters will help you deploy a WiFi network. But any repeater is a source of interference interference. When there is free air, repeaters do their job well, but with a high density of neighboring networks, the use of repeater equipment in the 2.4 GHz band is impractical.
Use 5 GHz band
Budget WiFi devices operate on the 2.4 GHz frequency, so the 5 GHz band is relatively free and has little interference.

5 GHz is a promising range. Works with gigabit streams and has increased capacity compared to 2.4 GHz.
In practice: “Moving” to a new frequency is a radical option, requiring the purchase of an expensive dual-band router and imposing restrictions on client devices: only the latest models of gadgets work in the 5 GHz band.
The problem with WiFi signal quality is not always related to the actual range of the access point, and its solution broadly boils down to two scenarios:
- In a country house, most often it is necessary to cover an area in free air conditions that exceeds the effective range of the router.
- For a city apartment, the range of a router is usually sufficient, but the main difficulty is eliminating dead zones and interference.
The methods presented in this material will help you identify the causes of poor reception and optimize your wireless network without resorting to replacing the router or the services of paid specialists.
Found a typo? Select the text and press Ctrl + Enter


