How to get back photos deleted from a Lenovo phone. Recover photos and contacts on Android: Tenorshare Data Recovery program. Photo recovery program for Android
Hello, friends! Today we’ll talk about a situation that, perhaps, has not spared anyone. So... Did you accidentally click “Delete” and confirm your choice? The child played with the phone, and now those photos that “were only there” are missing? Cold sweat and nervous trembling of fingers. Don't panic! Deep breath. Not everything is lost! This article will tell you whether it is possible to recover photos deleted from your phone and how to do it.
Synchronization and autoloading
They say that people are divided into two types: those who make backups (a backup copy of data), and those who will soon do it.
Modern Android mobile devices make it easy to set up copying information. Just turn on “Startup” and “Synchronization”, all your data will be linked to your account.
Google Photos is used to store images and videos, thanks to which you can view pictures from any other device by logging in with your account. And if you accidentally delete a media file, you can simply restore it from the service recycle bin. All these operations can be performed as from android, and from a computer.
“How simple!”, you say. Indeed, it’s easy to be careful when setting up your account, and the safety of your data is guaranteed. However, there is a fly in the ointment here too. The free memory capacity of Google services is 15 GB (this includes letters, files from disk, etc.). If you want to increase the space for backup storage, you can purchase one of the tariffs: 100 GB or 1 TB.
Android Data Recovery
If you belong to the second category and already vow to create a backup storage, because you have lost “everything that you acquired through back-breaking labor,” then there is an opportunity for you to return the data.
This will help application for android Android Data Recovery. Here are the situations in which the program offers recovery:
- device firmware;
- accidental deletion of information;
- restore to factory settings;
- failure or damage to the device.
Manufacturers claim that even if the SD card is not visible or is infected with viruses, data can be extracted from it.
You can download a trial version of the program here https://www.tenorshare.com/ru/products/android-data-recovery.html. The site also provides complete step-by-step instructions for restoring information.
Now let's look at a short guide to returning lost photos:
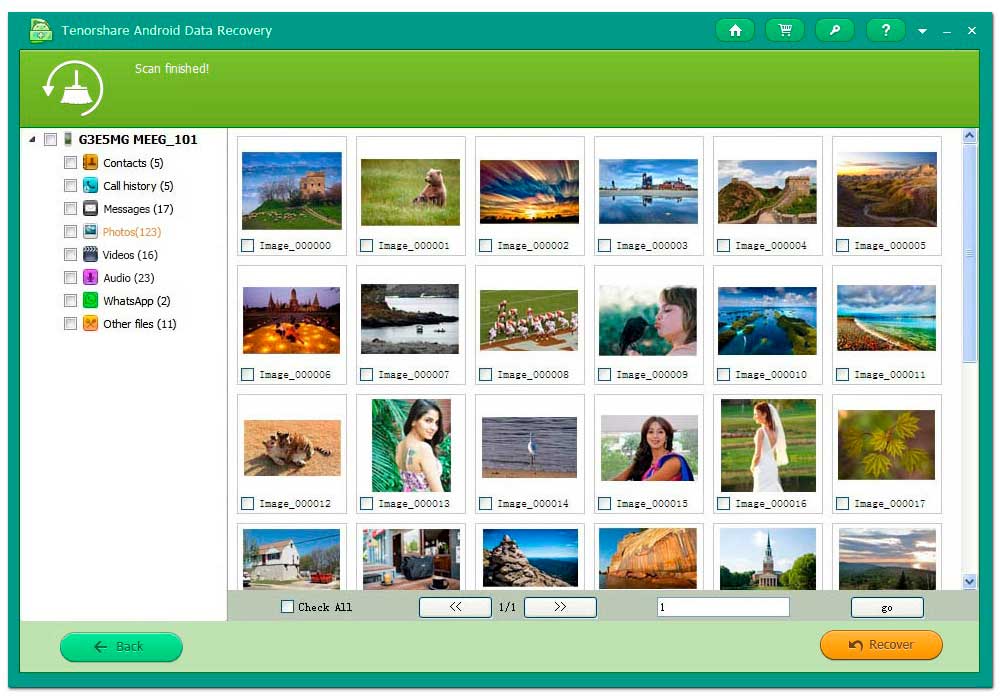
- The phone is connected to the PC using a USB cable (connection option: as a data storage).
- A superuser login request will appear, which you must accept.
- You can select the type of information required for recovery (for example, Photos).
- The program will scan the phone and display files, among which you can find deleted or damaged ones.
- Then all that remains is to restore what you are looking for.
Dr. Fone
A program for iOS devices, Dr.Fone, also has similar functionality. Even the sequence of actions is identical: the device is connected to the computer, scanned, and the user selects the necessary files from the results.

Detailed instructions and a demo version can be obtained on the official website ( http://ru.wondershare.com/data-recovery/iphone-data-recovery.html). There is also a version of the program for Android devices.
Data loss loses all its tragedy when you are armed with knowledge and determined to get the information back. Read our blog and learn a lot more useful and interesting things about modern devices.
Deleted photos end up in the computer's recycle bin if they were deleted using standard operating system tools. If the recycle bin has already been emptied, you can restore photos from your hard drive. To do this, special utilities are used that scan the surface of the HDD for the presence of erased files.
Recovering photos from the recycle bin
When deleted through the context menu, photos end up in a special system folder for temporary storage of deleted data. This folder is called “Trash”; deleted information remains in it until manual cleaning. Also, files can be deleted automatically if the directory size exceeds the maximum value set by the user. You can set the storage limit through the system catalog menu, in the “Properties” section.
If deleted photos need to be recovered, check this folder on your computer desktop. If you have the necessary photos in this directory, select them, right-click on any of the files and select “Recover”. The images will be moved to the folders in which they were originally stored.
You can also use drag and drop files. Select the photos you want to restore. After that, drag them with the cursor into the directory in which the recovered photos will be saved. This method works even if the photos were originally placed in different directories or on different HDD partitions.
Note! If the photo was deleted using the “Shift + Del” key combination or the recycle bin was emptied after deletion, it will not be possible to restore the photos using the standard method.
PC Inspector File Recovery Application
If the photos you need are not in the trash, you can use third-party utilities to restore them. Their work is based on the principle of deleting information in the NTFS and FAT file systems. When a user deletes data, the link to access it is erased in the operating system. The information itself remains on the media, but becomes available for rewriting.
The following storage operations on the HDD may use the space where deleted photos were previously stored. In this case, the ability to restore files is lost, since they are overwritten with new information. You can find photos that have been deleted from the file system, but still remain on the disk, using the PC Inspector File Recovery application.
The utility is available for free download. The installation consists of several stages and is carried out using a special wizard. To unpack the application, you must specify the path to which the information will be copied. The interface has been translated into several languages, including Russian. You can also select localization during the installation process.

After launching the utility, select its operating mode. The program provides the ability to search for deleted files of various types and lost disks. These refer to HDD partitions, access to which was lost during the process of setting up the computer. Select the first item from the menu on the left side of the interface.

On the Physical Disk tab, locate the storage device on which the deleted photos were recorded. Confirm your selection by clicking the checkmark located under the buttons on the right side of the window. If photos are stored on a flash drive or other external storage device that is not displayed in the general list, click the “Rescan disks” button.

Advice! In the case when the search needs to be performed only in a specific local partition, go to the “Logical Drive” tab and click the “Find Logical Drives” button. After that, select the desired part of the HDD.
Tutorial video: Retrieving deleted photos on desktop
You can also recover deleted photos using the ReclaiMe File Recovery application. Its installation takes no more than 1-2 minutes. The program has a simple interface, implemented as a step-by-step information recovery wizard. At the first stage, you will need to select the partition in which the photos were stored.

After this, a scan of the HDD surface will be launched, the duration of which depends on the volume of the media and the speed of the computer. The result will be displayed as a directory tree. To restore found photos, select a folder in the table on the left. Then mark the necessary files on the right side of the window and click “Save”.
One ill-considered click, a technical glitch or a virus attack - and important photos have disappeared? Alas, almost every computer, camera or smartphone user has encountered a similar situation. Important do not panic, do not perform unnecessary actions with files on the storage medium, because then there is still a chance to get the necessary photos back. Today there are numerous programs for recovering deleted photos that literally work miracles. We will focus on the best of them.
One of the easiest to use is the PhotoDoctor program. It features a well-thought-out and intuitive interface that allows you to recover photos from a computer, smartphone, tablet, camera, memory cards and flash drives. It is possible to restore images recorded in all the most common formats, incl. JPEG, JPG, PNG, BMP, GIF, TIFF, PSD, RAW, NEF and some others. Using the program, you can return photos that were seemingly irretrievably lost due to a technical failure, virus tricks, or erroneous deletion.
The developers convince us that their product, while highly effective, is as easy to use as possible. Well, that's what we'll check. Download the program from the site http://foto-doctor.ru/download.php and run it. It should be noted that this process takes a minimum of time, saving nerves that may already be on edge due to the loss of important data.

The user is greeted by a concise and understandable dialog box of the program. As you can see, the program also allows recover deleted photos from phone and a tablet, which is very important.

Let's check how quickly and efficiently the program can cope with recovering deleted photos from a computer: we created a folder with photos in advance, deleted them, and also emptied the trash bin. The only thing that is advisable is to know on which disk the photos were stored so that the whole process takes a minimum of time.

Now you need to select the photo formats and sizes to be restored. In order not to bother, you can check the boxes for all possible file types and sizes.

After a short recovery process, we get a list of all found photos; they can be viewed and restored to the required folder.


We were able to completely restore a folder that we had “irretrievably” deleted from the computer the day before. All photos are in place. The speed and quality of the software really pleased me, as well as the nice design and ease of use of the program, not the most advanced user can handle it.


It is better to choose a full analysis, if, of course, you want to get a good result and do not regret spending an extra 10-15 minutes of time.


The program allowed us to recover photos from the camera’s memory card, not only those that were recently deleted, but also frames from almost six months ago. You can preview the file before restoring.


To be honest, we were pleasantly pleased with the result: we never expected to see photos deleted back in July (now December), given that this memory card has gone through several rewrite cycles since then. The fact that the program’s algorithms allow you to recover only image files is a big plus, because its efficiency in recovering lost pictures is noticeably higher than that of utilities that can recover not only photos, but also other data formats. To fully use all the functionality of the program, you need to pay, but the amount is small compared to similar offers - 980 rubles, and there is a high probability of getting a promotion from the developer and getting a discount.
Recuva
The program gained great popularity because it was one of the first to allow free recovery of lost files from a computer, flash drive and memory card. Today it is obvious that the program is a little primitive, but from old memory it continues to be actively used. The program can be installed to your computer or use the portable version.

The utility restores different types of files, incl. and photographs. The program interface is understandable, but it lacks modernity, but this does not affect the work in any way. It’s not difficult to understand the program; you can also perform recovery; you can choose what type of files need to be restored so that you don’t get all deleted text documents, for example, along with photos. A file's chances of recovery are indicated by a green, yellow, and red circle.
You will most likely be able to get your photos back if a little time has passed and no more information has been recorded on the media. The disadvantage of the program is that it is practically powerless when the card or disk has been formatted or too much time has passed and the media has been in use.

Bonus from the program – ability to securely erase files, and this is also sometimes necessary. The location where the file was stored is recorded several times so that recovery is not possible in any way.
PhotoRec
Despite the name, this program copes not only with photo restoration, but also with the “resurrection” of files of other formats. It uses completely different operating algorithms than other utilities, and the results can be called quite decent. Initially, the program was presented only in a command line interface, but with the advent of a regular graphical interface, the popularity of the utility increased. 
This program does not use file system analysis, which allows us to talk about a lot of features of the program. It can recover files of about 225 different formats, and is capable of saving some data that other programs, due to different algorithms, simply do not see. Even completely deleting the file system cannot worsen the result, but the utility does not clearly distinguish “garbage” from important data, so among all that it will restore, you will still need to find what is really necessary. If the file was fragmented, then this program will be powerless. Thus, the program is used in cases where the file system is deleted or damaged, and at least something needs to be restored.


R-studio
One of the most powerful tools to recover deleted files. This is a professional program, distributed for a fee, and costs a lot : from 50 to 900 $ depending on the version. The program copes with the recovery of various kinds of files from a hard drive, memory cards, flash drives, disks; it restores damaged hard drives and reformatted partitions. Work with Windows, Linux and Mac OS, there is a portable version. Even a formatted disk is not a hindrance to this program. 
The interface of this utility is more complex than in all the options described above, but it also has many more functions. It will not be easy for an ordinary user to understand the program - this is software for professionals. This tool is, of course, suitable for photo recovery, but if you only recover photos, then pay attention to simpler and cheaper options.

Pandora Recovery
This program for recovering deleted photos and videos has proven itself well and received a lot of positive reviews. It works quickly, allows you to recover data from different media, but if we are talking about damaged file systems, then the utility will be of little use.
The program interface is quite understandable, but a little primitive. It is convenient that you can search not only by the required data format, but also by size, time of creation or deletion. In the most serious cases, you can full disk scan and see the chances of recovering different files. It’s convenient that a preview is available for most formats, since the names of the files are not clear.


conclusions
You can find a lot of other programs on the Internet with similar functions. At first glance, many utilities are similar, but they are better used to solve different problems. So, for example, if important photos are lost, then it is better to use a specialized tool for image recovery - PhotoDOCTOR, since with it the chances of returning photos are higher. If you often lose other data formats, then you might want to consider not Recuva and PhotoRec, but for the most advanced users and system administrators, R-studio is better suited.
Deleting photos on your phone is a common problem for owners of devices running Android OS. Files are deleted due to the user's fault, due to a software failure or mechanical damage to the drive (programs here will not help to revive photos). Regardless of this, the question of how to recover deleted photos on Android worries both users. There are two ways to solve this problem:
- Using special mobile applications.
- Using a laptop or PC.
Advice
To avoid such problems in the future, it is recommended to save all important information in cloud services. For example, in Google Drive. In comparison with similar programs, the presented utility will allow you to store up to 15 gigabytes of information completely free of charge. Thanks to this service, you don’t have to worry about the safety of your photos and don’t waste space on your phone’s memory card. It is also possible to activate the backup function on your phone.
Preparatory processes
Before starting recovery, turn off the device (data is recorded on the internal memory) or remove the memory card. This will increase the chances of recovering erased information. Files deleted by the user or destroyed by an OS crash do not disappear instantly. They remain in memory. Such processes are called residual information. Each deletion creates a new cycle, so it is important to reduce the number of operations with the memory card to increase the likelihood of recovering photos from your phone.
Photo recovery using apps
We offer the three best programs that answer the question of whether it is possible to recover deleted photos exclusively using a phone. Presented applications are a reliable way to quickly get lost information back.
DiskDigger photo recovery is a mobile application that specializes in recovering accidentally deleted data on an Android phone. The advantages of the utility are an intuitive user interface and no requirement to obtain root rights (local scanning) if they have not been obtained previously. The program runs on Android devices starting from version 2.3. All you need to do is select the partition where the deleted photos were stored and wait until the program processes the data.
Note
Root rights are an opportunity to expand the functionality of the software through simple operations. However, upon receipt of these rights, the device being used is excluded from free warranty service.
Hexamob Recovery PRO is another assistant in “reanimating” deleted data. It features a user-friendly interface, where recovery is automated and for the convenience of users and is divided into five steps:
- Selection of recoverable media: SD card or internal memory;
- Selecting the type of data to be recovered: videos, documents, photos and others.
- Select media scanning type: fast, medium and slow. They differ in the depth of search and, accordingly, the time it takes to process information.
- Displaying the found data on the phone or tablet screen.
- The program restores the selected photos.
SDCard Recover File is today's latest representative of free utilities that allow you to recover lost data without a computer. A distinctive feature of the project is its expanded functionality, which makes it possible not only to recover deleted photos, but also to “heal” damaged files. Like all utilities of this kind, they are mastered on an intuitive level.
Conclusion
Overall, using mobile recovery apps is a great way to quickly and effortlessly get your erased photos back. However, if we talk about cyclicality, then mobile applications have less functionality than computer programs. In addition, most of these utilities require super user rights, which will void warranty service. In some situations, photos may be restored in lower quality.
Recovery via PC
If you have previously been involved in recovering files located on your hard drive, then there should be no problems with recovering photos on Android via a computer. In fact, the phone’s memory or SD card is the same removable storage device (hard drive), so similar programs can be used to “reanimate” them.
Recuva is one of the most popular programs that allows you to recover once lost photos. The principle of operation is similar with portable applications. In order for photos to be recovered, you need to: select the disk where the information was stored, indicate the file type, select a recovery method and start scanning. The difference lies in the deep processing of information, from which the results of the analysis will be more detailed.
There are other utilities for “reanimating” photos (Photo Recovery or File Recovery), but they all operate on the same principle:
- Connecting a mobile phone or tablet to a PC via a USB port or a special card reader.
- Launch a program where the recovery object (device or memory card) is selected.
- Selecting the scan type based on the parameters: operating life of the drive, file type and number of cycles performed.
- Selecting the required files.
Conclusion
Computer programs have a number of significant advantages, including: a deep process of processing deleted files, the quality of recovered photos (correspondence to the original photos), and the absence of a requirement for obtaining root rights. The disadvantages of this method lie in the need to have a computer and a USB cable at hand. In situations where the user deleted files on the way to work or while traveling, these utilities and the laptop may not be at hand.
Today, a mobile device is not just a means of communication between people, but also a repository of large volumes of multimedia content. Photos and videos created using built-in cameras often contain valuable information for the user, so losing them can be a very unpleasant event. But, as you know, no one is immune from mistakes and rash actions, so sooner or later each of us is faced with the problem of accidentally deleted files. Most often we are talking about photographs. A reasonable question arises: is it possible to recover photos deleted from a phone, and if so, how to do this? Let's try to figure it out using the example of devices running Android.
All files stored on smartphones and other gadgets are written either to internal memory or to removable media, such as SD cards. Regardless of where the data is located, after it is deleted, it is possible to restore all information. The chance to return lost photos appears thanks to a special principle of memory operation. The fact is that when you erase some data, they themselves are not deleted as such; the cell they occupy is simply marked as free and ready to be overwritten. That is, if a new file appears that needs to be placed on the media, such cells will be used to save it. In this case, the old content will, of course, be replaced by the new one.
Knowing about this feature of memory, it is not difficult to come to the conclusion that the success of measures to restore photos deleted from an Android phone depends on how much time has passed since the deletion. The faster you start recovering erased data, the greater the chance of getting your photos back. And, of course, you can’t do this without special software.
You can recover deleted photos on Android using a computer or without it. In the first case, a special application is installed on the PC, after which the phone is connected using a cable in debugging mode. As soon as the connection is established, the program will try to find deleted photos on the device. If all the data you need was on the memory card, then it is better to remove it and work directly with the media, and the gadget itself will have nothing to do with it. The removed SD card is simply connected to the computer via a USB adapter and scanned as if it were a regular hard drive.
You can often get back photos deleted by mistake without using a computer. The Google Play store offers many applications designed specifically for these purposes. True, most of them require availability, so you will have to resolve this issue first. So, it’s time to move on directly to the program review.
Recovery via computer
First, let's look at PC applications. But first, let’s repeat once again that in this case you need to be in debugging mode. It is activated through the section Settings – For Developers. If there is no such section, then go to the “About phone” page and click on the build number seven times in a row. A corresponding message will appear and access to the settings for developers will open.
Recuva
Let's start the review with the Recuva application from Piriform. Download the utility from the CCleaner website and install it.

After launching, you can work with the Wizard or switch to the advanced mode (you must check the “Do not open the wizard at startup” checkbox in the first window).

Let's use the second option. In the drop-down list of media, select the desired drive (if the phone is not displayed, then information can only be retrieved from a memory card connected via an adapter), and set the data type to “Graphics”. Next, click the “Analysis” button.


The program will scan your memory and find deleted photos. They will be displayed as a list and marked with a circle of a certain color. Files that can be recovered are marked green, and files that are irretrievably lost are marked in red.

Detailed information about the condition of the photo can be found on the right side in the “Summary” tab. If the file is in the “Lost” state, then it will definitely not be possible to restore it, and accordingly, its preview will not work either.

Check the boxes for those photos that are available for recovery and click the button in the lower right corner. We select the folder where they will be saved, and after the operation is completed, see what happened.


iSkysoft Toolbox for Android Data Recovery
The next application we will review is the Android Data Recovery utility from iSkysoft. It is interesting because in addition to multimedia data it allows messages. The application is located at https://www.iskysoft.us/android-data-recovery.html, download it and install it. Next, on the initial screen, select the “Data Recovery” tile.

The next window asks you to connect your mobile device to the computer, but there is also a link “Android SD Card Data Recovery”. It is not difficult to guess that it is intended for those cases when photos are planned to be restored from a memory card. We will work directly with the phone, so there is no point in following the link.

We connect the gadget to the PC and wait until the program detects it. Next, check the “Gallery” box and click “Next”.

The window that opens suggests scanning only deleted files or all files; you may have to try both options. We select the “Scan for deleted files” item and start the search.

We wait for the scanning to complete and check which photos we were able to find.

If the list contains the files you need, select them and restore them with the “Recover” button.

Without a computer
Now let's move on to applications that allow you to recover deleted photos from your Android phone using the device itself, without connecting to a computer. Let’s immediately say that this kind of application is a dime a dozen in the Google store and you need to be ready to try more than one or two of them to get results. We will present in our opinion the most convenient and effective tools.
Undeleter
First on our list is the Undeleter program. It only works if you have root rights, so you should obtain them first. The application is installed in the classic way, from the Play Market. After installation, launch Undeleter and click “Next” on the first page.

We wait until the root rights check is completed, select the recovery type and storage medium (phone internal memory or SD card).

At the next stage, we set the scanning method and file format. Let's start the procedure.

Open any of the found photos, click on the floppy disk icon at the top right and save the file (you can save it to the Google Drive or cloud).

DiskDigger
This application has versions for both mobile devices and PCs. If the missing photos were stored on a memory card, then it is better to remove it and scan it on a computer using the desktop version. We will look at a way to restore photos on Android through a mobile application presented in the Google Play repository.
After installation, open DiskDigger and run a simple search, after selecting the file format.


Restore Image & Photo Recovery
Another working tool to recover accidentally deleted photos on your Android phone. The program interface is simple and intuitive. We start the scan, wait for the procedure to complete, select the files and click “Restore” to restore.

As we have already noted, there are many other applications that allow you to return photos lost due to negligence to the owner of an Android smartphone. There is no point in considering all programs, since they have approximately the same functionality. Finding them is also not difficult, just enter the query “Recovery photos” or “Recovery data” in the Google Play search bar.

Try, test, perhaps some tool specifically in your case will demonstrate the greatest effectiveness.
In conclusion, I would like to note that the best way to ensure the safety of content was, is and will be backup. Recovering deleted photos on Android is not always possible, especially if a lot of time has passed since the deletion and other data was recorded on the phone. So it makes sense to periodically dump the most important files onto your computer or any portable storage device, such as a flash drive. A good option is to create comprehensive backups of the system with all settings and information stored in the device’s memory.
Perhaps this is all that can be said on the issue under consideration. Write about your data recovery experience and provide examples of well-proven applications in the comments to the article.


