How to set the time on a Beeline set-top box. Home TV Beeline
A minimum of effort and time will be required to enjoy realistic pictures and surround sound. Connect digital television it can be simple and fast!
- Check whether Beeline TV is connected to your home now on the website or by calling 8 800 700 8000.
- Select a tariff plan and additional TV channel packages.
- Submit your application. A Beeline specialist will soon contact you to clarify at what time connecting digital television will be most convenient.
If you simultaneously* connect Home Internet and Beeline Digital Television, our specialist will come to you free of charge and set up* the equipment.
If you are already a Home Internet subscriber, then you can connect to Beeline TV yourself.
Equipment for digital television and the Internet is connected via one cable - no extra wires in the apartment.
To watch Beeline TV you need special equipment - a set-top box, which you can:
- receive free rental when you connect Home Internet and Beeline Digital Television at the same time**;
- buy;
- rent.
All Beeline TV set-top boxes support the HD high-definition television standard.
Use your Xbox360 gaming console as your primary or secondary console***!
Connect up to 4 TVs to Beeline Digital Television using additional set-top boxes and pay only for the package of TV channels of the main set-top box****!
*Due to the physical and technological features of the simultaneous provision of Home Internet and Beeline Digital Television services, the quality of Digital Television may be affected by the high speed of data loading and the settings of the client equipment and software used.
**The cost of renting a TV set-top box with a recording function is compensated in the form of an accrued discount for communication services, equal to the rental fee for a TV set-top box with a recording function.
****From October 1, 2013, the cost of the service will be 95 rubles/month for each connected TV.
So how to set up IP television yourself at home?
Actually, this question has two parts:
How to connect digital television, or, as many say, how to install IP television;
How to set up digital terrestrial television.
Setting up IP television begins with the need to connect the switch that comes with Beeline TV to the network.
The first step is very simple. Take the patch cable out of the box and insert it into any of the switch ports, for example, the first one, and the other end to the TV set-top box into the port labeled “Network”. Connect the Internet cable that our employees provided to you during installation to any other port of the switch.
The next step is setting up digital television.
Connect the set-top box to the TV. If you are connecting them using a composite cable (also known as a “tulip”), make sure that the connectors match: yellow cable to yellow socket, etc. But we recommend using an HDMI cable - setting up digital cable television in this case is much easier - it is easier to connect and the image quality improves by several orders of magnitude.
Let's start by turning on the TV set-top box by pressing the "Power" button on the front panel. Before setting up digital TV, make sure that the “Link” LED is on; if not, double-check the cable connections, otherwise the cable TV setup cannot be completed.
On the switch, two indicators should be lit opposite the ports to which the Internet cable and TV set-top box are connected. Wait for the initial setup to complete - it will take 10-15 minutes.
That's all! Setting up digital terrestrial television did not take you much time, but now you can rightfully give advice to your friends on how to connect IP television.
The Tp-link router is very simple to set up, and also fits perfectly with the Beeline provider. This article will fully describe setting up the Tp-link router for Beeline with all its flaws, since all routers have minor flaws. Let's get started.
Setting up the Internet on the router.
First, we need to go to the web interface of the router; to do this, we need to enter the IP address of the router in the address bar of the browser; in our case, on Tp-link routers the default address is 192.168.0.1.
After you try to go to this address, you will need to enter a login and password, if the router is new, then the login and password are the default (login admin, password admin), if the logins and passwords do not match, try resetting the router to standard settings. After you have logged into the web interface of the router, you need to go to the network tab, then select WAN.

Here we need to change the connection type to L2TP Russia (marked in the picture as number 1), after which you need to enter your logins and password for Internet access (2), whether you configure the tp- router will depend on the correctness of the entered logins and passwords. link to Beeline or not. Next, we need to register the IP address, or server name (3), for Moscow it is tp.internet.beeline.ru. This completes the configuration of the tp-link router. We need to specify the MTU size (for Beeline 1400), after which we need to specify the maximum downtime time, in our case 0, because if we do not change it to 0, then after every 15 minutes of downtime the router will break the connection. After you have entered all the settings of the tp-link router for Beeline, you need to save them, after which the Internet should work.
Setting up Wi-Fi, security.
In order to set a password for the network, you need to go to the wireless mode tab, then select the wireless mode settings, and let’s proceed with the settings. The network name is what your wireless network will be called (5) (you can call it whatever you want),

In the region field, select the USA, since the Wi-Fi power potential will be lower if you select Russia. Many people have problems connecting iPad 2 to these routers; in order for the tp-link router settings for Beeline to work correctly, you need to select a channel width of 20 MHz (6), and then save all the settings you entered. Let's move on to setting up network security. We need the wireless security tab, in which you need to select the encryption type WPA-PSK/WPA2-PSK (Recommended).

In the password field, we will need to enter a password that you will not forget, since this password will need to be entered to connect to your Wi-Fi network. In the Group key update period field, you must enter the value 3600, and then save all the settings you have made.
Setting up television on a tp-link beeline router.
If you have television, then you will also need to register it and configure it on the router; to do this, go to the network tab, then we need the IP-TV tab.

In it you need to select the bridge mode and indicate on which port the set-top box is connected to the router, then save all the settings and reboot the router to be completely sure. This completes the configuration of the Tp-link router for Beeline.
(Click on image to enlarge)
1. Remote control for Beeline TV set-top box with decoding of buttons. Useful for subscribers who are looking for information and want to set up Beeline TV. Let me make a reservation right away, this manual (guide) was written for those who first picked up the remote control from a Motorola set-top box
2.
In order to see what package is currently connected, change Beeline channel package or connect additional channel packages, click the button Menu, then press Right Down scroll to Channel packages and press the button OK.  You see the available channel packages on the screen by using the buttons Up down from the menu, select the channel package you are interested in and press the button OK. Now you can view information about the package or connect the desired channel package by selecting it and pressing OK.

3. View your Beeline TV account status. In order to see the status of your personal account, you need to click the button Menu, then press Right follow to the " " position, then press the key Down Scroll to "Account Status"

Next, use the keys to select Up down"Account Status" and click OK button. If you are connected + to , then the account status will be displayed as a single balance, for example, like mine. Here you can pay using a VISA card directly through the set-top box or look at your personal account number and pay in any convenient way.

4. Interactive services of Beeline TV. This is not simple cable television, this is interactive digital TV. It has Yandex weather, exchange rates, exact date and time; watching videos from Rutube; social networks Facebook, Twitter, VKontakte, Odnoklassniki; Battleship game; sports news from Rambler.
All this can be used using the remote control directly on your TV screen. Click Menu and a key Right to the "Interactive" position. Select the service you need using the keys Up down and press OK.


5. Recording TV shows. There are several ways to record broadcasts. For example, by simply pressing a button Record on the remote control while the program is being broadcast. In this case, the program will be recorded from the very beginning, provided that you are watching it first and did not change the channel while watching, otherwise from the moment you press the key Record. This was the first way.
You can also schedule a recording of a TV show that will be tomorrow or in a week (up to two weeks in advance). You can also plan a series of TV shows, suppose the recording of a series, each episode of which will be recorded automatically. For example, “Housing Question” on NTV will be recorded on the hard drive of the Beeline set-top box every Sunday at 12 noon, regardless of whether you are watching a different channel or whether your TV was turned off.
6. Planning a recording. To schedule a recording, you need to enter the menu by pressing the button Menu, scroll with key Right to point Record and scroll with the key Down to the "Set up recording" item. Click OK and start scheduling the recording of the show you want using the navigation buttons (Up, Down, Right, Left)  Choose navigation buttons desired menu item and press OK
  Using the same principle, select the desired program and program the recording with the key OK. If you did everything correctly, the message “Recording scheduled” will appear.

7. Changing recording parameters. To cancel a recording or edit recording settings, go to the "Scheduled" menu  Find your scheduled recording.
the entry you want to delete or edit using H navigation buttons and select it with the button OK  Now you can delete a scheduled recording, configure recording settings, record everything (this means all programs with this name that will be broadcast in the future, for example, either record one episode of a series or record all episodes)

8. Watching recorded TV shows. Go to the menu, use the navigation keys to select "View records"  Select the desired entry and click OK

9. Channel settings. With Beeline TV you can configure the channels you need in the desired sequence. Go to the menu and select "Settings" 
Set up channels Mark the channels you want using Navigation keys And 
click OK on the "Save" item, now you can make sure that when scrolling through the channels are displayed in the order you want, to do this, select the "Arrange" item  Use the navigation keys to move through the list of channels and
Click OK on the arrow indicating the direction where you want to move this channel.


10. TV program is right in the menu of your TV, you don’t need to buy it at a kiosk, you don’t need to look for it on the Internet. Go to the set-top box menu and select "TV program"  You can see the description of the program directly from the TV program.
(movie), set up recording. To do this, follow the menu Navigation keys, select the desired gear with the key OK  Here you can see
information about actors, description, set up recording.

11. Set-top box settings. The settings menu allows you to customize the image format for your TV, customize the sound for navigating through the menu using keys, configure the audio transmission format, select the style of the TV program, and much more. Anyone who has reached this point in the article will understand the settings in two steps.

12. Parental lock. You can block children's access to watching channels that you consider undesirable by setting a password for the channel. I described how to do this in a separate article.

That's all, I tried to briefly and meaningfully talk about the main opportunities in Saratov. There is a video on how to set it up here. Leave questions and comments in the comments. Connect your friends and acquaintances at a discount and at your benefit.
Lesson 1.
Lesson 2.
That's all for today guys))
Beeline launched digital television back in 2009. The indisputable advantages of IPTV from Beeline include the fact that when connecting, a switch and even an STB set-top box are provided for rent. And the model range of such consoles is quite impressive. Conventionally, they can be divided into two groups, which differ in the presence of a hard drive.
The first group without railway includes:
- Cisco – models CIS 2001 and ISB 2200;
- Motorola – VIP 1002E and VIP 1200 models;
- CA also Tatung STB2530.
To the second from the railway:
- Cisco - CIS 430, ISB 7031, ISB 2230;
- Motorola – VIP 1216, VIP 2262E;
- Tatung STB3210.
An equally pleasant option from Beeline is the ability to watch TV programs through the Xbox 360 game console. The company uses the simplest switches - TRENDnet TE 100-S5 and D-Link DES-1005D.
So, what does a standard subscriber package look like? Equipment from Beeline upon delivery has the following appearance.
What do we see in the box
Note that in addition to the set-top box itself, the kit is full of cables and other equipment - there is even an HDMI cable! The switch from Trendnet is so compact that it easily fits into a box.
Well, and finally, a nice little thing. Where would we be without her? In the kit you will find a refrigerator magnet. Let us note that the Beeline company monitors its branding - it is present on literally every item, and the kit includes stickers.
The connection diagram itself is elementary simple: the cable brought to the house is connected into a switch, and from it the STB set-top box is connected directly, and, of course, your PC. Do you have a router with which you can programmatically allocate one port for an STB set-top box? Great - in this case, you can safely connect through the router. Otherwise, if the router does not connect to IPTV, you will have to connect it to the switch.
When you turn on the STB set-top box for the first time, the Beeline software will update itself and connect to the portal. Authorization of the set-top box on the portal is organized only at the link level - a rigid binding is used according to the so-called. MAC address. Once the connection is complete, the Microsoft Mediaroom screensaver will appear on your desktop. Yes, the company did not skimp in this regard - in general, in digital television today it is the most advanced and most expensive platform. It is used by well-known operators - AT&T, Deutsche Telekom Vodafone.
The interface is quite functional and convenient
A very convenient channel management has been created - now you can watch a TV program by scrolling through the list of channels one by one, pre-sorted by topic, or you can select your favorites. In the channel list you will find an online TV program that has a picture-in-picture option.
Maybe the main and only disadvantage is that the recorded video cannot be deleted from the set-top box, because... The recording is in encrypted form. You can record several programs at once. Recording occurs either at the touch of a button or according to a set schedule.
Unencrypted ones - there are only 9 of them - can also be watched through a computer on a VLC player. The remote control is programmable and can be used to control four devices. Oddly enough, you can even program key combinations - for example, sound control can be used on a TV or set-top box. The instructions are in English, but can also be found in Russian on the company’s official website.
An important flaw is that only one TV can be connected to each separate set-top box. Another disadvantage is the fairly long loading time of the set-top box when turned on after a complete shutdown of the equipment.
In general, interactive television from Beeline is a fairly good investment. And this takes into account the fact that today the package is issued without rent, and savings with package offers are up to 30% of the subscription fee. You can see all the possibilities of IPTV from Beeline in the video below.
We examined the possibility of connecting home digital television using the example of the Moscow provider OnLime. OnLime provides its services for broadcasting digital television, delivering the signal to the subscriber directly through a public home antenna - this is its main feature. In this case, the home antenna plug is connected not to the TV, but to the subscriber receiver - STB (Set-top-box). STB is a digital receiver that receives a digital signal, decrypts it and converts it into analog for further transmission directly to the television receiver.
Today we will consider another option for the appearance of digital television in an apartment, using not a public home antenna, but the networks of an Internet provider. However, a digital receiver will also be needed here. Only this time it will connect directly to the Internet. The main difference between IPTV (IP Television) lies precisely in the “IP” (Internet Protocol) prefix, which means that an Internet cable must be present in the apartment.
It is not surprising that IPTV providers are usually the Internet providers themselves, because they have the opportunity, using their networks, to provide subscribers with access to digital television in addition to Internet access. One of the largest Internet providers and at the same time a supplier of television content in our country is the VimpelCom company (Beeline trademark). Using Beeline TV as an example, today we will look at all the pros and cons of using IPTV at home.

To connect to Beeline TV Home Digital Television, you need to purchase or rent a set of equipment, the basis of which is the same digital receiver, or, simply put, a set-top box. The kit comes in two types: with or without a built-in hard drive. This determines whether the subscriber will be able to use services such as recording and subsequent viewing of recorded programs, as well as the ability to pause the program being watched. All these functions will be available only if you have a built-in hard drive in the set-top box. However, upon initial connection, the subscriber is given a set-top box with only a hard drive. Kits without a hard drive are used to connect additional TVs in the house. Of course, a kit with a built-in hard drive costs more.
The equipment will be delivered to your home free of charge by the company’s specialists and connected themselves, however, the subscriber must already have a universal payment card purchased in advance. It will not be possible to pay for the first month of use in advance, because it is the installers who give the new user his personal account number when connecting.
To be honest, this is not a very convenient scheme. With this scheme, even if you have the opportunity to pay, for example, via the Internet with a credit card, this cannot be done. It will not be possible to pay the bill either in advance or later - payment must be made exactly at the moment the installers appear in your apartment. For example, OnLime has thought out this process much better, and installers, when they come to the apartment, connect the equipment only in “test” mode. After this, the new user has several days to slowly pay the bill in any way convenient for him. Of course, such a problem (if it can be called a problem at all) will not affect regular users of the Beeline Home Internet service, who already have a personal account and money on it. Everything is simple: just check the box next to the new service in your Personal Account and select a channel package. However, in this material I would like to abstract from the knowledge that regular Internet users already possess and consider Beeline Home Television as a separate service.
So, as already mentioned, a set of equipment called “Beeline TV” is available for purchase from the provider in two variations: with and without a built-in hard drive. Let's consider a kit with a more functional set-top box inside, which is equipped with a built-in 320 GB hard drive.
Contents of delivery
- Decoder with recording function and hard disk (TV set-top box)
- Multi-function remote control
- RCA to RCA cable
- HDMI to HDMI cable
- Ethernet Switch
- 2 Ethernet cables
- Subscriber directory
- Device operating instructions

Having opened the Beeline TV box, the buyer will find everything necessary for connection; there will be no need to purchase anything additional. By the way, the packaging itself has not only a utilitarian, but also an informative function: the box with high-quality printing is “decorated” with brief user instructions in pictures. In addition to the receiver itself, the box also contains a switch (splitter), two Ethernet connecting cables and two cables for connecting to the TV - HDMI and RCA (tulips). The equipment is maximal, there is nothing more to add to the kit.
Appearance and connection

The console itself is small - its physical dimensions are only 290x200x55 mm. Such compact dimensions allow it to be placed anywhere and in any combination with other equipment - there is no need to allocate a separate shelf for it. You just need to remember the need to ensure sufficient outflow of warm air, because the set-top box gets slightly warm during operation. The heating, however, is not strong, so there is no need to take special cooling measures.

The decoder is manufactured by the world-famous leader in the production of network solutions - Cisco. By the way, we recently talked about how the company set up the production of these set-top boxes in our country. At the same time, Marketing Director of VimpelCom Moscow region Anatoly Smorgonsky said that Beeline TV is one of the largest customers of this equipment in Russia.

The Cisco ISB-7031 is a horizontal all-in-one, covered in a black metal casing with multiple ventilation holes. The front panel contains only the most necessary navigation elements. All keys are mechanical and they duplicate the main functions of the remote control in case the latter is absent. Here, in addition to the “Power” and “Menu” buttons, you will find only a four-way “joystick” with an OK key inscribed inside, confirming the entry of information. But the “Back” function was completely forgotten here, so navigation can only be done in one direction without room for error. Otherwise, you will have to start your journey through the menu items again. This is completely inconvenient, so it is recommended to control all functions of the set-top box only from the remote control.

In addition to the keys, on the front panel you can find several more indicators that notify you about the operating modes of the system, as well as a USB input. However, it serves exclusively official purposes, which is clearly stated even in the instructions. So you won’t be able to connect any external media to it. Neither the hard drive formatted in NTFS, nor the flash drive in FAT32 were read. Yes, in fact, there is no corresponding menu section where you can select your files either. The internal hard drive of the set-top box itself, modified by Cisco ISB-7031, has a capacity of 320 GB and is manufactured by Western Digital.
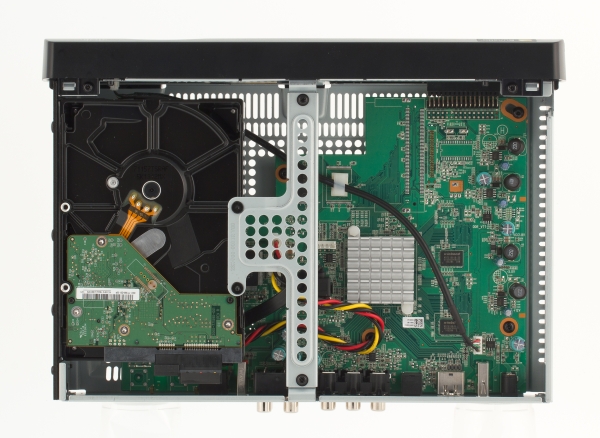
The rear panel of the Cisco ISB-7031 contains the following connectors:
- Ethernet - network port
- USB connector is used for service purposes
- HDMI - connecting the receiver to the TV using an HDMI cable
- YPbPr out - component connector for video transmission
- S-Video - video output
- eSATA - port for connecting external drives
- RCA (tulip) - outputs for video and audio signals
- Optical Audio - S/PDIF audio output
- Power - power supply input connector

Unlike the decoder of the same OnLime, which receives the signal through a public antenna, this set-top box connects directly to the Internet, because it works with IPTV. Consequently, if a user wants to use not only a TV, but also a computer, then he will have to build a small cable system. To do this, using two complete patch cords and a switch, the signal is branched in two directions and supplied to both the computer and the receiver. After all, no one will lay a second Ethernet cable in the apartment specifically for TV. As a result, the process of installing a Beeline TV set-top box turns out to be a little more complicated, but still quite feasible by the user himself. But the user receives two services at once over one cable. The only thing that can upset you during the installation process is the need to occupy two electrical outlets instead of one, because the switch also has its own separate external power supply. The set-top box is connected to the TV itself using the supplied connecting cables. If your TV has an HDMI input, you should connect the receiver using an HDMI-to-HDMI cable to ensure the best picture quality. If not, then all that remains is to connect using RCA-RCA “tulips”, again included in the kit. Turning on is done by pressing the Power key on the front panel, and a reboot can be done by using a switch embedded in the power supply cord, turning the device off and on again. Everything is quite clear and quite logical - you can figure it out without instructions.
Menu
The two largest and most frequently used buttons on the Beeline TV remote control are GUIDE and MENU. By the way, all the keys, both on the remote control and on the console itself, have only English-language labels, designations and icons - you can’t find a word in Russian here.

The Main Menu is extremely extensive. However, it has a well-thought-out branching system of points and sub-points, which are quite easy to navigate without the need to study the manual.

All main work with TV channels is summarized in the items in the “TV Channels” section of the main Menu. Here you can not only find the program schedule, but also in a few clicks select channels of interest by topic, search for content by letter, block individual TV channels or add them to Favorites.


Here in the main menu there is also “Video Rental” - a section where you can independently select a film or program and order them for viewing for a fee, which will be debited from your account. Sampling and searching can be done by a variety of characteristics, from “hit” or “new” to a specific movie title, or even by standard or high definition broadcast format. There was even a separate list of programs with 3D images, but it is still practically empty. The price of renting one film or program for a day varies from 50 to 100 rubles.


A separate menu item includes the option to subscribe to TV series. In this section, for a fixed monthly fee, you can subscribe to series, programs and popular TV shows of three entertainment channels: STS, DTV and Home.

The section called “Interactive” is interesting. It is of greatest interest to those who cannot tear themselves away from communicating on their favorite social networks even while watching TV. For such lovers of social entertainment, there are built-in clients for the most popular social networks Facebook, Twitter, VKontakte and Odnoklassniki. They allow you to view friends' posts directly while watching a movie or program in a separate window that opens. Right here you can “like” something, where would you be without it?
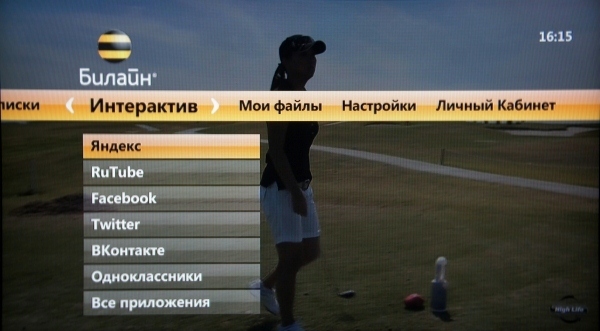

In addition, the section also contains obviously useful applications, such as Yandex widgets, for example. Weather forecasts, traffic jams or exchange rates can now be viewed on the TV screen without having to look at the computer. In order to kill time, there is even an elementary game - Sea Battle.


View
When you turn on or change a channel for the first time, the name of the TV channel and its number are displayed on the TV screen for a few seconds. By default, the channels themselves are numbered in a special sequence, where each hundred has its own theme. There will also be a 500th and even an 800th channel, but the numbering order can be changed at your discretion. To do this, use the menu for changing the list of channels and sorting them. You can even create your own list of channels available for viewing.


While watching, you can press the INFO button and see a brief description of the program being broadcast, the start time of the broadcast and the time remaining until the end of the show. In this menu you can also change the broadcast language or subtitles. Here you can select all related programs of a cycle or all episodes of one show in a separate list, which is convenient. Then you can program them all to record in one motion, after which the set-top box will begin to turn on and conscientiously record each required episode day after day.


The second most important button on the remote control after the Menu is GUIDE. Clicking it opens the TV guide window - a TV program for the week ahead, containing detailed information about all programs on all channels with the time of their broadcast and the ability to preview current ones. Clicking on any cell in this huge table will again open INFO and allow you to view information or immediately put a program that has not yet aired for a future recording.


An interesting feature called Video Wall. This is a navigation function that allows you to monitor what is on air on 4 channels simultaneously. That is, in addition to the main window, three more auxiliary windows open, and the interface helps you select channels by genre. This makes it possible to quickly find programs and movies of interest with previews in these three additional windows.

While watching any program or movie, you can use the Pause function and calmly step away from the TV for a while. In this case, the set-top box will continue to record the entire broadcast to the internal disk.


Upon returning, the user will be able to unpause and continue watching as if nothing had happened, with the ability to fast forward and rewind. The function is very convenient and will allow, for example, not to miss a single important moment during the broadcast of a football match. The maximum duration of the pause can be one and a half hours.
Recording and playback
Using the built-in video player, you can record up to four TV channels simultaneously and at the same time watch something else, for example an old recording. To start recording, simply press the RECORD button while watching. “Recording” will briefly appear at the top of the screen, and the red LED on the front of the set-top box itself will light up. Recording will stop automatically when the current program ends, or you can stop it at any time by pressing the STOP button.

To program the recording of multiple programs at different times and on different channels, you can use the manual recording function with the ability to select the channel, time, date and storage duration. If you run out of hard disk space during the current recording, recording will still continue by deleting the oldest recordings. For records that are especially dear to your heart, you can set the storage mode “until I delete it myself.”


To find a recorded fragment, you need to enter a special menu with a list of previously recorded programs through the general menu or by pressing a separate RECORDED TV key. A list of recorded files will open, with those currently being recorded marked with an icon. Viewing recordings can be controlled by standard actions: Forward, Stop, Pause, Rewind.
Settings
The system settings menu is not too extensive; the path there is from the main menu. Here you can select the style of displaying the TV program in the form of a grid or list, change the audio language, select a picture display format suitable for the TV and configure the audio output to stereo or surround sound. From the same menu you can configure various locks or reboot the system using software.


Connection of packages and tariffs
When you first connect to a TV viewing service, you must choose one of two main packages: Basic or Maximum. The number of channels appearing in Beeline TV broadcasts is constantly growing - literally in November last year, Beeline announced the launch of another 20 new TV channels for Home Digital Television. And although the website still shows figures of 104 and 172 channels, in reality the basic package has already grown to 134 channels, and the number of channels in the Maximum package is now 199. The bulk of them are broadcast in standard definition (SD services), and 22 are transmitted in high definition (HD services). HD channels can be connected as a separate package for an additional fee, as well as several other packages, which are collected by topic: Children's, Cinema, Music, NTV Plus, Sports and so on. There is even a special package for adults with erotic content channels - Night. The choice of packages is wide and will satisfy any sophisticated TV fan, but the prices for individual packages are not cheap: from 95 to 650 rubles, with an average price of 300-400 rubles per package. This pricing policy clearly indicates that it is cheaper and easier to connect to one Maximum package and not be tricky. Because if you add the base cost to the price of a couple more interesting packages, it will become more expensive. The contents of the basic package alone are not very interesting, but this is a matter of personal preference.

Among the related services when connecting to Beeline Home Television, it is worth mentioning the possibility of renting equipment instead of purchasing it as a property, as well as the Multiroom option, which allows you to connect up to 4 TVs in an apartment to digital television for an additional fee.
It is worth especially noting another interesting offer from the operator, which is the ability to use the Xbox 360 game console as a digital receiver instead of the set-top box described in this review. However, you need to remember that in addition to the need to install additional software on the game console, you will also have to pay an annual subscription for using the Xbox Live service, and at the Gold level. The software itself can be downloaded from the Beeline website, burned onto a DVD and installed on the console. After installation is complete, this console will be assigned its own GUID.

Need I say that when connecting an Xbox 360 as a set-top box, you must already be a Beeline Home Internet user? In other words, no one will extend an Ethernet cable to your apartment if you express a desire to watch Beeline television via Xbox 360. It will only be extended if you are connected to the Internet, or if you purchase a Beeline TV set.
Results
During testing of the Beeline Home Television service, no malfunctions in the operation of the equipment, as well as “slowdowns” or “scattering” of the picture were ever noticed - the quality of the signal was not satisfactory. But the ease of control of functions and navigation through menu items are implemented a little doubtfully. Here you can recall the English labels for the buttons on the remote control: for people not familiar with the language, these keys will be difficult to identify without instructions. Also, perhaps, one of the disadvantages is the relative high cost of individual thematic packages, but their very presence and a fairly large variety are a definite plus. One thing remains absolutely clear: if watching TV takes up a significant part of your life time, then whatever digital television you bring into your apartment, it will undoubtedly eclipse today’s broadcast television in all respects. You just need to make your choice.


