How to check all computer parameters. Built-in operating system tools. The fastest way to find out the characteristics of a laptop
In the modern world, a computer is our first assistant in various matters, be it work or leisure. To understand exactly where the limit of its capabilities is, you need to know the parameters and characteristics. You can find and view them using standard built-in methods in Windows 7 or using external software.
Why do you need information about the characteristics of a computer running Windows 7?
Of course, every owner of a personal computer or laptop with the Windows 7 operating system has an approximate idea of its computing power and speed of work in a particular program. But there are cases when parameters expressed in numerical values need to be known more accurately.
For example, a PC owner decides to buy a new game. Modern games are very demanding on computer resources - a good video card or a stronger processor may be required. If the current PC specifications do not meet the requirements, the gamer may think about upgrading, that is, improving the computer’s parameters, purchasing new or additional configuration elements. Then it will be necessary to take into account the compatibility of new components with existing ones, which means you need to know their composition.
The problem is relevant not only for those who like to play computer games, but also for any person who is in one way or another involved in installing programs and applications on a computer. Programs usually have minimum system requirements, especially for serious professional software - graphics packages, 3D processing programs, publishing systems, powerful word processors.
You can also determine the upper limit of PC performance experimentally, when the installed program begins to slow down when performing certain actions. However, why spend extra time installing it if you can immediately see whether the PC parameters meet the requirements. Moreover, this can be done easily and quickly using standard methods, that is, using built-in utility programs, and by installing additional software.
How to find out the parameters, properties and information of a PC or laptop
Standard methods
The Windows 7 operating system already has a set of built-in programs and methods to quickly find out the PC settings without resorting to installing other software. Methods for obtaining information differ in the level of complexity of the call, so the user can choose the most convenient and easily accessible options for himself. Every PC user knows at least two methods.
There are no differences for different OS versions. These methods will work in all versions of Windows 7: Home, Professional, Ultimate and other builds.
System Information utility
The built-in system information utility program can be launched in a few mouse clicks:
 The call is made by clicking on the computer icon
That, in fact, is all you need to view information about the system. The window that opens will display information about the version of the Windows 7 operating system, installed updates, and licenses. The following contains information about the characteristics of the processor, RAM memory, OS bit depth, as well as the system performance index. Below is the computer name.
 The main part of the window contains information about the OS, processor parameters and other information
Hotkeys for calling the window with system properties
You can access this window even faster by using the hotkey combination Win (Windows window icon) + Pause/Break. The Pause/Break key is present on standard personal computer keyboards, but may not be present on laptop keyboards whose creators strive for compactness and abandon some rarely used keys for the sake of other functions.
Via control panel
It's not always easy to remember keyboard shortcuts for different programs. There is no need to despair. It is worth remembering that any computer has a main central point for controlling all devices and parameters. This is the Control Panel. All you have to do is remember how to launch it, and you will always have access to all important functions and information.
 Features are divided into categories
If the window looks like this, select “System and Security”.
If icons with names are displayed on the screen, without breakdown into categories, then you should immediately go to the “System” item. You can change the display type to one that suits you in the upper right corner of the window, the “View” option, then change it to “Category” or “Large/small icons”.
 Display all Control Panel items without categorizing them
After selecting the appropriate item, the same system information window will appear with information about the version of Windows 7, processor properties and other data.
How to open using Device Manager
Often, the information provided in the system properties window is not enough to make a decision about upgrading a PC. For example, you need to know the exact model of the processor, audio and video device, or information about other components. This is where Device Manager comes to the rescue. It contains information about absolutely all components inside your PC and connected external devices.
You can access the “Device Manager” through the “System Properties” window, from the tab in the left side menu.
 To launch the dispatcher, you need to select the appropriate item in the left menu of system properties
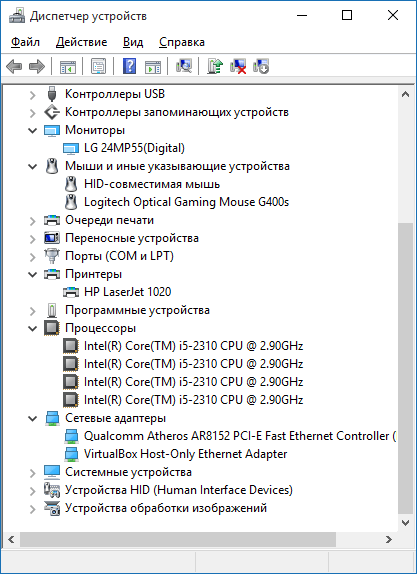
The Device Manager itself looks like this and contains a list of PC components divided into categories. To view the composition of each category, you need to expand it by clicking on the triangle on the left side of each item.
 The manager contains information about components by category
In addition to general information about the composition of your PC's hardware, Device Manager can provide even more valuable information - whether it's time to update the device driver or whether there are any conflicts between devices. You can right-click on each list item and select “Properties”, where detailed information about the component, installed drivers and other information needed in exceptional cases will be presented. Conflicting devices will be marked with a yellow triangle - by this icon you can determine that there is a problem with the component, perhaps it is incompatible with some other device, then you need to reinstall the component or update its driver.
Via the command line
A little more information than the “System Information” window is provided by launching a special utility through the Windows 7 command line.
 Result of executing the systeminfo command
How to open by launching the Run applet
The Run applet also allows you to launch the system properties window directly from it, you just need to know a special command.
 System properties can be accessed through the control system command
If this method does not work and gives an error, try writing the full name of the command “control /name Microsoft.System” in the applet (without quotes, with a space before the slash (slash) and without a space after it). Click OK.
 Full name of the command to view system information
The convenience of this method is that the “Run” applet remembers all the commands you previously entered. It is enough to remember approximately what words it contains or what letter it begins with. When you enter this letter into a line, the applet will display all the commands that you entered that begin with this letter.
How to Check Specifications Using the DirectX Diagnostic Tool
Detailed information about the main devices can be obtained using the DirectX Diagnostic Tool, this utility is also included in the system.
 The utility is launched through the execution applet and the dxdiag command
How to log in via BIOS
If the above methods of obtaining information about the system are still not enough, you can be determined and “get into” the very core of the computer - the BIOS. In addition to basic information, you can find out there, for example, the temperature of the hard drive and processor.
This method of finding out the parameters is not recommended for beginners, since, firstly, to enter the BIOS you will need to determine its type in order to find the required entry key, because it is different for all manufacturers. Secondly, you will need to press this key very quickly when loading the PC, since this only takes a few seconds. Thirdly, the BIOS in most cases is a blue or black screen with text, which is unusual for GUI users. Accidentally changing settings in it can lead to a malfunction of the PC.
 Below you can find information about the button to enter the BIOS
Popular keys to access the BIOS are DEL or F2.
And also knowing the name of the BIOS on your PC (you can see it in the very top line of the black screen during boot if you did not notice the BIOS entry key), you can find information about the key combination, this depends on the PC manufacturer.
The most common brands of PCs and laptops and buttons for entering BIOS:
If the input does not work the first time, even when you press the desired key, try again. It happens that the key simply does not have time to work, and the OS boot process proceeds as usual.
The BIOS looks different on every PC and the information presented may vary greatly. The main thing to remember is that you don’t need to change settings unless you need to and understand what this might lead to.
 Displays information about PC components
Using third-party programs and utilities
The most complete information about the system, presented in one place in a user-friendly form with graphs, can be obtained using specialized programs that are installed separately on the PC. With them you can not only have data about your computer, but also monitor the temperature, memory and hard drive load in “real time”.
Aida
It is considered the most popular program for obtaining complete information about the characteristics and current state of the PC. Here you can learn everything about computer hardware and software, operating system, and additional external devices. In addition, the program has a number of tests to determine PC performance, analyze configuration features (which allows you to find out even what is not in the documentation), check system stability, and much more.
The program is very functional, but therefore it is not free. The Extreme Edition and Engineer Edition are available to download for free with a 30-day trial. The versions are almost fully functional; they only lack some reports. However, this will be more than enough to test the system and identify faults.
You can download the program from the official website using the link - http://www.aida64.ru/download.
After launching the program, an interface similar to “Device Manager” appears, where all PC components are divided into categories.
 PC components are categorized and you can view information for each
Everest
Previously, it was also one of the most famous programs for monitoring the configuration and status of a PC. Now its support has been discontinued, the program has been replaced by AIDA64. However, you can still find versions of this software on the Internet. However, you can’t hope for stability of its operation, and it’s better to use other utilities.
HWInfo
In the HWInfo utility, information about a PC is not displayed as structured as in other programs, but the software has a number of details that may seem convenient to someone.
The only negative is that there is no Russian language.
 Display system data on one screen
">http://www.hwinfo.com/">http://www.hwinfo.com/.
PC Wizard
The functionality of the PC Wizard program is similar to previous programs. Through it you can obtain information about the system, test PC performance, check driver updates, and more. It contains less data than the AIDA leader, but for some this is more than enough.
The program quickly minimizes to the tray and displays indicators and notifications there. The only drawback is that when you first start the software, it may freeze for several minutes as it collects data about the system.
">http://www.cpuid.com/softwares/pc-wizard.html">http://www.cpuid.com/softwares/pc-wizard.html.
 The program displays system data
Speccy
Another convenient program in its class is Piriform Speccy. The program is completely free and also offers many PC characteristics and indicators for all major devices to view. At the same time, various brands and manufacturers of PCs, laptops, and netbooks are supported. It works quickly and is Russified. Conveniently, there is a portable version of this program - that is, it does not require installation and starts immediately after downloading. You can carry it with you on a flash drive and open it directly from it.
">http://www.piriform.com/speccy/download">http://www.piriform.com/speccy/download.
 Displaying system characteristics by partition
Video: where to find and view information about the properties of the operating system
Having become familiar with the information on viewing system parameters using various standard methods and built-in programs, the user will always be able to accurately find out the configuration of his PC, the status of the devices, and also check their stable operation.
My name is Elizaveta, I am 27 years old. Higher education in pedagogy, specialty: teacher of computer science and English; the second is a systems engineer. She worked in the educational field, as well as in the IT field. Since childhood, I have been interested in writing articles, stories and other literary opuses :-), with spelling, punctuation and grammar, everything is in perfect order. As a student, I worked part-time as a rewriter/copywriter. I wrote on topics that were suggested to me, most often these were children’s/women’s topics: health, pregnancy, children, development. Less frequently came across news and announcements on finance/business and technology. Now I run my own thematic communities on social networks, and I write articles for them myself.
Sometimes there is an urgent need to find out the characteristics of your computer. For example, in order to update drivers, upgrade some parts of the system unit, or simply show off to peers, and in many cases you just need to find out the markings of a particular system component. There are only two ways to do this: and read the markings or check them using software.
The first method, although simple, in most cases may not be available due to a violation of the warranty (if the computer is under warranty). Therefore, let's take a closer look at the second method, how to find out the characteristics of your computer using programs, both built-in operating system tools and additional specialized software.
We look at the characteristics of the computer using the operating system
1. In order to find out the three main system parameters, just go to the “My Computer” tab in the “Start” menu. To do this, you need to hover the cursor over it and right-click on it; in the list that opens, select “Properties”.


This can also be done in one more way: from the “Control Panel” tab, select “System”. In the window that opens below, you can view the same parameters.
2. You can find out what equipment is installed on your computer, but without detailed characteristics, through the “Device Manager”.

To launch it, you can simply type the key combination “Win+Pause”. In Windows 7, in the window that opens, you will need to select the “Device Manager” tab. Now we can see what devices are installed on your computer and their names, for example, processor type and frequency, video card, sound card, network adapters, disks, etc. The Device Manager in XP can be launched using the key combination “Win+Pause” “, then at the top you need to click on the “Equipment” tab, and already launch “Device Manager” in it.
3. This method involves using the integrated “System Information” software. To launch it, you need to click on the “All Programs” drop-down list in the “Start” menu, then “Accessories”, open the “Utilities” tab and launch the “System Information” utility there. You can also do this faster by pressing the Win+R key combination. The program launch window will open. In the “Open” line you need to type “msinfo32.exe”. This is the same utility, only launched through the console.

Using this built-in software, you can obtain basic information about the system and components. But this utility is quite inconvenient due to the complexity of the branches of transitions along the tree. This software can be used in the absence of other software that is easier to understand and read.

4. You can also view system characteristics through the DirectX Diagnostic Tool. This utility is used mainly for testing both video and audio cards. The utility window displays general information about the system and, more specifically, about the video card.

5. You can find out the characteristics of your computer from the BIOS. To do this, when booting the computer, you must press the F1, F2, Del or Esc key. It all depends on the version of the BIOS itself. Further, some knowledge of English is required.
Programs for viewing computer characteristics
For more detailed system performance diagnostics, you can use special programs. For example, AIDA64, ASTRA32, PC-Wizard programs are excellent software both for diagnostics and for testing all components separately.

To begin with, let's say that the AIDA64 (formerly Everest) application belongs to the paid category. However, it is possible to take advantage of the free 30-day period provided by the developers so that the user can familiarize himself with the capabilities of the program. This is quite enough for us. In our case, we will use the AIDA64 Extreme Edition to familiarize ourselves with the basic parameters of the computer. There is, of course, a business version of this application, but for our purposes the Extreme version will suffice. This application must be downloaded from the developer’s website () and installed on your computer.

AIDA is very simple and easy to use. The main application window is divided into two parts: the left side displays a tree of the main subsystems of the computer, and the right side displays detailed information about the subsystem selected on the left side. To view summary information on your computer, just expand the “Computer” section, and then select the “Summary Information” subsection.

Selecting this subsection will allow you to find out all the characteristics of your computer: the type of computer, information on the installed operating environment, information about the system board, available partitions, network, peripheral devices, etc.

You can view data on your computer's central processor by selecting the "CPU" subsection in the root "System Board" section. The right side of the application will display the parameters of all processors installed on the PC. This data will tell you about the type of processor installed, its model, clock speed, supported instructions, cache of different levels. You can also find information about the load on the microprocessor cores. If you need more detailed information about the functions supported by the system microprocessor, then feel free to click the “CPUID” subsection.

If you move a little further in your selection and select the “Motherboard” section, then detailed information on the motherboard will be displayed in the main application window. For a desktop PC, AIDA64 will display the properties of the board with its name, the properties of the system bus with its real and effective frequencies. Data on the properties of the memory bus with its width, frequencies, and bandwidth will also be demonstrated. Equally important technical information on the physical parameters of the board: supported CPU socket, installed connectors for expansion cards, the number of slots for RAM sticks, as well as the type of sticks themselves and the type of supported memory. In the same section, the application will show data about the form factor of the motherboard, its physical dimensions and the chipset.

Selecting the “Memory” subsection in the “Motherboard” section will display summary information about the computer’s RAM. Here you can find out information about the RAM and virtual memory available in the system: how much has already been used and how much is currently available for use by the system and applications. Also, this section shows the path to the system swap file.

You can easily find out about the properties of installed RAM modules by clicking the “SPD” subsection. This action will allow the application to show all memory modules installed on the PC, which are displayed at the top of the main window area. Selecting one of the displayed modules will allow you to obtain data that is shown in the lower part of the main area of the program window. By default, when you go to the “SPD” subsection, this part displays the data of the first module displayed in the list. Here you can find the following data about the properties of the module: its type, the amount of memory it provides, the type of this memory, its speed. Also, the width and voltage of the module, timing characteristics and functions supported by it are displayed here.
Video card

In order to view data on the characteristics of the video adapter, you need to go to the root section “Display”. Among its subsections you need to find “Graphics Processor”. Selecting this subsection will allow you to display data about the video adapter installed on the PC in the main area of the program. Among them is information about the type of video chip, its BIOS version, the memory of the graphics card (volume, frequency, type), some characteristics of the graphics processor (frequency, technical process).

The “Monitor” subsection of the same root partition will allow the user to become familiar with the main characteristics of the system monitor. These include model, resolution, aspect ratio, vertical and horizontal scan.

AIDA64 allows you to get a wide range of information about your computer's hard drives. To view information about the HDD, click on the “Windows Data Storage” subsection of the root “Data Storage” section. At the top of the main area of the application window, a list of all devices that are associated with data storage will be displayed. The hard drives will be displayed first, and information about the characteristics of the hard drive designated first in the list of devices will be displayed at the bottom of the main area of the window. Among the most useful characteristics: hard drive form factor, spindle rotation speed, read/write speed, etc.
Sensor data
It is necessary not only to be able to view data about the system, but also to analyze the current information provided about the system by its sensors. Data on sensors can be found by going to the “Sensors” subsection of the “Computer” section in the general subsystem tree.

The main sensor information window displays data on the temperature of the microprocessor, as well as its cores. The “CPU” designation shows the temperature of the processor under its cover. Traditionally, this indicator is lower than the temperature indicators of the processor cores, displayed as: “CPU1”, “CPU2”. This is due to the fact that the cover is in direct contact with the heat sink of the heat sink unit. Do not be afraid of the high parameters of the “AUX” indicator, since it means practically nothing. If its values never change, then it is not used by the system. The GPU Diode sensor shows the temperature on the GPU.

Using the ASTRA32 program you can also find out the characteristics of your computer. Like the previous program, ASTRA32 is paid, but the demo version is enough for us. Its interface is similar to AIDA64, also so simple and clear. Download the program from the official website: www.astra32.com and install. By clicking on the link you will see two versions - one for regular installation, and the other is portable, that is, it does not require installation. I will use the second version of the program.

I run the program file astra32.exe as administrator.

In the window that opens, all information about my computer is immediately displayed (the “General Information” tab), namely:
- what processor is installed, its operating frequency, cache levels;
- brief information about the motherboard;
- information about RAM;
- what disks are installed and their capacity;
- information about the video card and sound card;
- information about the operating system, etc.
You can stop there, but for those who want to study the components of their computer in detail, you can select the appropriate section in the left column and study the data that is displayed in the right column.

For example, you need to find out more detailed information about the processor: what Socket it has, how many cores, what power consumption, dimensions, etc. Go to the “Processor” tab and then “CPU”. In the Right window we look at detailed information about the processor.

Finally we come to free programs. PC-Wizard is one of the best utilities for determining the characteristics, configuration and testing of a computer. It can be downloaded by following the link - http://www.cpuid.com.

The program interface is similar to the previously discussed utilities. The only difference is that instead of boring lists, icons are displayed in the right column, and there are also tips for almost every action.
→ How to find out information about your computer
How to find out information about a computer
Even a novice user would do well to know detailed information about his computer and its characteristics. The need for this may occur if there is a need to diagnose system problems, update drivers or, say, upgrade a computer. To receive the most complete and professional advice from the customer service, you may also need Windows version information, processor frequency, hard drive size, RAM capacity etc.
This information can be found out in various ways: both using special programs and standard tools in Windows itself.
1. So, the first method:
See the information that appears on the monitor when you turn on the computer.
For this:
- When you turn on and boot your computer, press the “PAUSE” key on your keyboard.
- Review all information on the monitor screen and write it down.
- To continue loading, press the “Esc” (“Escape”) key on your keyboard.
From the summary table of information about the computer configuration that is displayed on the monitor screen, you can find out:
- processor type, its clock frequency and identification number;
- volume and type of installed RAM;
- cache memory size;
- information about installed memory slots;
- information about the video adapter;
- information about your hard drive, CD or DVD drive, etc.
2. Second method:
View in Main Menu.
For this:
Open the “Start” menu → “My Computer” (right-click on it) → “Properties” → the “System Properties” dialog box will appear → the “General” tab.
Here you can see the Windows version number, general information about the processor (CPU), its clock speed, and the amount of RAM.
You can get to the “System Properties” window like this:
“Start” → “Control Panel” → “Performance and Maintenance” → “System”. As a result, the System Properties window will appear.
Write this information down, or save it as an image on your computer so you can print it later. To do this, press the “PRINT SCREEN” key on your keyboard (or “Prt Scr” on some keyboards). Then launch the Paint program (“Start” → “All Programs” → “Accessories” → “Paint”), press the key combination “CTRL + V” - this way you can paste the image into the program - save the image (it is advisable to select the format JPEG).
Note:
Pay attention to the "Equipment" tab. There is a so-called "Device Manager", with which you can get true information about all the devices installed in your computer, which is very useful when buying a computer or diagnosing problems. All devices in the Device Manager window are divided into categories corresponding to device types. For example, to find out what video card you have installed, click on the appropriate category. Using the menu buttons, you can view more detailed information for each device, update the driver for each device, or remove a device from the list so that it is no longer recognized by the system.
3. Third method:
using the utility msinfo32.exe System Information
.
For this:
“Start” → “Run” → then in the command line that appears, type msinfo32 - the “System Information” window will appear. Review the information received.
Here you will find the following information: information about the Windows version, processor, BIOS version, total and available physical memory, paging file size, etc.
You can also call this window through the “Main Menu”:
“Start” → “Accessories” → “System Tools” → “System Information”.

You can also use the key combination " to view system information Ctrl» + « Shift» + « F1».
There are also software ways to view detailed information about the computer, its real characteristics and all kinds of system parameters:
- Using informant test programs Sisoft Sandra , PC Wizard , Everest, providing not only complete information about the hardware, but also capable of testing and analyzing its operation.
- Utility dxdiag.exe(DirectX Diagnostic Tool from Microsoft Corporation) launched from the Command Prompt.
- Using the program System Info (sysinfo.exe) from the package Norton Utilities"System Information". Program System Information provides detailed information about the hardware and software systems installed on the computer, and also calculates three characteristics of system performance.
Users are often interested in how to find out the characteristics of their computer. In this material we will look at built-in tools and specialized programs that are best suited for this task.
Built-in tools for viewing computer characteristics
First, let's look at the built-in tools with which you can get information about the characteristics of your computer. Built-in tools are not as convenient as specialized programs, but they are available in just a couple of clicks, so in most cases it is more convenient to use them.
System properties or view basic information about your computer
If you need to find out the basic characteristics of your computer, then all you need to do is open the “System Properties” window. This window can be opened in various ways. The easiest way is to right-click on the “My Computer” (or “This Computer” if you have Windows 10) icon on the desktop and select the “Properties” menu item. You can also open this window using the Windows + Break key combination or through the Control Panel (Start - - System and Security - System).
After this, a window with the basic characteristics of the computer will open in front of you. Here you can find out the processor model, its clock frequency, the amount of RAM, as well as the bit depth of the operating system and processor.

If you need more detailed characteristics of your computer, then you should use the System Information utility. This utility is built into the Windows operating system, and you can call it using the msinfo32 command. To do this, press the Windows + R key combination and enter the command “msinfo32” in the window that appears. You can also enter this command into the search in the Start menu or simply search for the phrase “System information”.

The System Information utility provides much more information about your computer. Here you can get information about most computer components, as well as about them.

The disadvantage of this utility is the rather confusing presentation of information.
Another way to obtain information about the characteristics of a computer is a utility called “Diagnostic Tool”. This utility can be called using the “dxdiag” command or using search.

Using the DirectX Diagnostic Tool, you can get information about the processor model, amount of memory and video card.
If you need to know what components are used on your computer, then you can use “”. This built-in utility can be launched in different ways. For example, you can right-click on the “My Computer” icon and select “Manage”, then go to the “Device Manager” section. You can also open Device Manager using the command “mmc devmgmt.msc”.

The device manager has a tree structure in which all components are divided into different categories.
Here you can find out the names of components, as well as get information about their drivers.
Specialized programs for viewing computer characteristics
Below we will look at a number of free programs for viewing computer characteristics. All described programs can be downloaded from official websites.
CPU-Z
is one of the most popular programs for viewing computer characteristics. Using CPU-Z you can find out all the possible information about, as well as information about the motherboard, RAM and video card.
As children, we asked each other: “What Pentium do you have?” Most answered that they had a Pentium IV computer, but there were always children who wanted to be the best and already owned a Pentium V, which was never released by Intel.
But let's not blame them. Back then, none of us had any idea how to find out the technical characteristics of our computer. Used information received from parents or the seller when purchasing. Now you can also get by with these authoritative sources of information, but when it comes to technical characteristics, it is better to look at them yourself.
How to find out the characteristics of your computer
Download information
When you turn on your computer, a scribbled black screen with some icons appears for a moment. On it you can see which buttons to press to enter the BIOS and launch the Boot Menu.
There are very few PC technical parameters here. The screen disappears too quickly to rewrite data from it, so you cannot do without perfect photographic memory. Although they say that if you press the Pause Break key, the download will freeze. To make it die back, press Esc.
Properties of the system
The most you can find out from the boot screen is the BIOS version and processor model. This is not enough to say that you know the characteristics of your computer. Therefore, after loading Windows, wait a while to launch the browser. First look at the system properties:

There is much more interesting information here. As you can see, I have a “seven”, and the hardware is not very fresh. If it were 2008, my computer would be a beast of a machine, but in 2016 it looks more like a quiet office clerk: Word, Excel, Internet.
If the information you found in the properties is not enough, then use another Windows tool called System Information.

Here the eyes are a little wide-eyed from the abundance of characteristics. Processor, motherboard, BIOS version, video card, amount of RAM, page file size, even the time zone, which no longer matters. If you want to learn even more about the motherboard, then look at a separate article dedicated to how to use a computer. After reading this data, no one will risk accusing you of not knowing the technical parameters of your PC. 
You can also use other Windows tools: for example, Device Manager or the DirectX diagnostic tool, which I already mentioned when telling how to find out what is installed on your computer. These system applications also display a lot of information about the system and components, so you will know exactly what kind of Pentium you have.
Monitoring programs
Missing features? Do you want to know how long the RAS# to CAS# latency (tRCD) of the RAM is or whether the CPU supports parallelization (bet you couldn’t read that word the first time either)? Then forget about uninformative Windows tools and use special software for PC monitoring.
The first program that comes to mind when I hear the word “monitoring” in relation to computer technology is Speccy. I talk about it so often that Piriform has to pay extra for advertising. But this is a free utility, so I won't expect any reward.
Launch Speccy and wait while the program gets acquainted with your PC components. When the equipment is presented, Speccy will generously “leak” all the information received to you, including the temperature of the processor, motherboard, video card and drive. If there is not enough general information, browse through the tabs. You'll have to google half the values, but you'll learn a lot about your computer. 
Speccy is not the only one who is so inquisitive. There is also the AIDA64 program, which will also tell you everything about the computer, and utilities for components - GPU-Z for a video card, CPU-Z for a processor, motherboard, RAM, etc. AIDA64 used to be called Everest, and it truly is the pinnacle of monitoring.
One problem is that the program is paid, and demo access only works for a month. But it shows even more information than Speccy, although the product from Piriform is also for real computer geeks.


