How to roll back the firmware version on an iPhone. Proven ways to roll back iOS to a previous firmware version
Everything written below will only work if you have SHSH hashes from the firmware you are going to restore to.
Read about what SHSH hashes are and what role they play when flashing Apple gadgets.
Even if you didn't save the hashes yourself, that doesn't mean you don't have them. For devices that have been jailbroken at least once, hashes for all future firmware updates can be automatically stored on Cydia servers on the Internet.
Remember that for iPhone 3G, iPhone 3GS, iPhone 4, iPod touch 2G, iPod touch 3G, iPod touch 4G, iPad 1G and Apple TV 2G, SHSH hashes can be extracted directly from the firmware currently installed on the device, even if it is no longer signed Apple. Read about how to do this.
Using this method, you can restore your iPhone not only to an iOS version lower than the one currently installed, but also to a more recent version, provided that it is no longer current and is not signed by Apple. For current versions of iOS you should use .
You can find out which versions of iOS are current on the pages with information on the corresponding firmware, or in ours.
This instruction does not apply to devices with Apple A5 processors and newer - iPhone 4S, iPhone 5 and everything that came out later. It is impossible to upgrade the iOS version on them without upgrading the modem version.
- Download from ours the firmware version you want to update to without upgrading the modem. Place the firmware file on your desktop.
- Download the latest version of redsn0w for Windows.
- Unzip the archive and place redsn0w on your desktop.
- In the context menu of the redsn0w.exe file, select "Run as administrator":
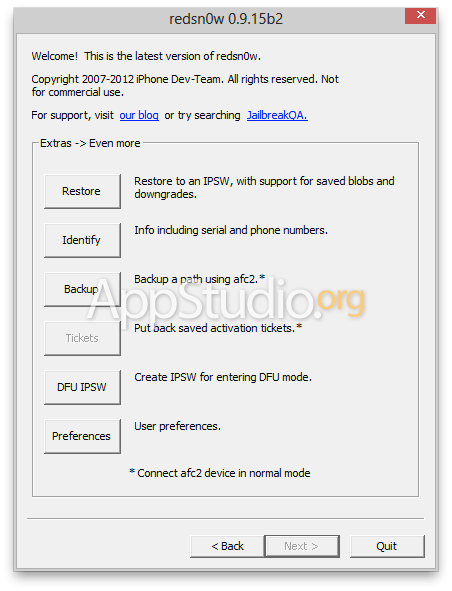
- On the redsn0w start screen, click the "Extras" button.

- Then click the "Even more" button.

- On the next screen, click "Restore".
- Click the "IPSW" button, specify the path to the firmware file to which you want to restore without upgrading the modem.

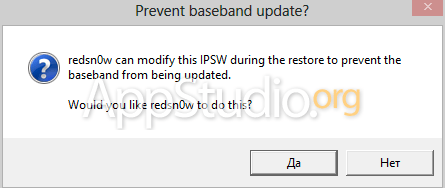
- redsn0w will ask you if you want to prevent the modem from being raised. Be sure to answer yes!
- Then you will receive a warning about the need to enter the device into Pwned DFU mode. Click "OK".

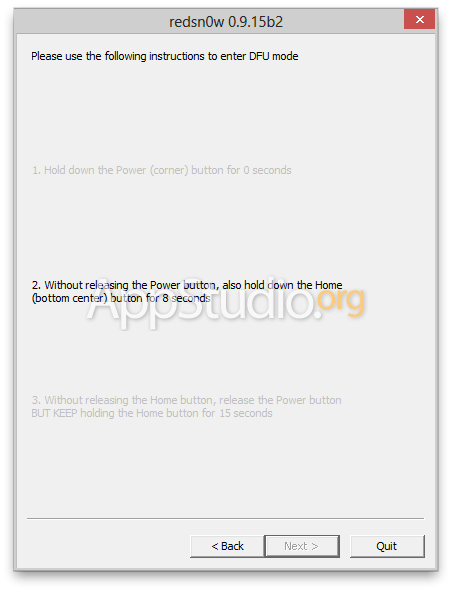
- Redsn0w will then help you enter the device into the required mode. You will need to connect your iPhone to your computer via cable and turn it off by holding the Power button (on the top end) and then sliding the slider that appears. Then click "Next".

- In the next step, you will need to press the Power button for 3 seconds, then hold down the Home and Power buttons for 10 seconds, then release Power and hold Home for about 10 more seconds.
- You will be returned to the firmware recovery screen, where the "Local" and "Remote" buttons will become available.

- If you previously saved hashes using redsn0w or TinyUmbrella on your computer, you can click the "Local" button and specify the path to them. If you did not save the hashes on your computer, click the "Remote" button to have redsn0w look for hashes on the Cydia servers. If the hashes are found, the "Next" button will become available, all you have to do is click on it. Otherwise, there will be no way to restore your iPhone.
- Further actions will not require your participation. redsn0w will process the firmware itself and upload it to the device. All you have to do is wait for the gadget to load in normal mode.

- When the iPhone turns on, we advise you to go to the iOS settings, to the “General-About this device” section and make sure that the modem version remains unchanged.

- If any error occurs and the iPhone remains in DFU mode (with the screen off, not responding to any presses), you can bring it out of there by holding down the Home and Power buttons until the apple appears on the screen.
Hello everyone, dear users of iOS devices – iPad and iPhone. In today's article I will tell you how you can return the previous, old version of iOS. Why might this be needed? For example, you updated to a new version of the operating system, you don’t like it and want to return to the previous version of iOS. You won’t be able to do this (return) using standard methods; you will have to carry out some manipulations.
The process of “rolling back” to an old version of the iOS operating system is as follows:
- Select and download from the Internet the version of the iOS operating system you need.
- Connect your gadget (iPad or iPhone) to your computer and launch iTunes.
- Adding the downloaded version of iOS to iTunes, then automatically rolling back the system.
But, before you start restoring the old version of iOS, I want to clarify a few points:
- Before starting work, be sure to make a backup copy of your iOS device, this will prevent you from losing data if the rollback fails.
- You will not be able to or the iPad is too old versions of iOS, for example, iOS 6 and below. Apple simply stopped signing (activating) these versions. Perhaps by the time you read this article, Apple has stopped signing iOS. Before rolling back, please take this into account.
- The rollback process is painless for your iPhone or iPad, even if you fail to rollback successfully, you can always restore your iPhone or iPad. But in any case, you act at your own peril and risk.
So let's begin the process of upgrading your iOS operating system to an earlier version..
First of all, before you downgrade, you need to download the version of the operating system that you want to install on your iPhone or iPad. I’ll say right away that you can download iOS completely free of charge. So, let's move on to the download process:
- Follow the link - http://www.getios.com/.
- In the “YOUR DEVICE” field you need to select the type of your mobile device. For example: iPhone or iPad.
- Next, in the “THE MODEL” field you need to select the model of your device. For example: iPhone 4s or iPad 2 Wi-Fi.
- Next, in the “iOS VERSION” field you need to select the version of iOS that you want to install on your iOS gadget.
- To complete the entire operation, you need to click the “Download” button, after which the process of loading the operating system will begin.

So, after the file with the system is downloaded to your device, proceed to the next step.
Move on to the fun part - replacing iOS with an earlier version. To return iOS, follow these steps::
- Connect your gadget to a personal computer on which the latest version of iTunes is installed (if the program is not there, then you need to install it. You can download it from the link - http://www.apple.com/itunes/download/).
- Launch iTunes.
- In the side menu (if not visible, press CTRL+S) select your device.
- In the field that opens, in the “Overview” tab, find the “Update” button.
- Hold down the Shift key (if you have Windows) or Alt key (if you have a Mac) and click on the “Update” button. A window will open in which you need to select the previously downloaded file with the operating system.
- After all the steps described above, the iOS version will begin rolling back. This usually doesn't take long.

That's all for today, I hope this short note helped you, you were able to return the version of iOS that you need.
I would be grateful if you leave a comment. To do this, you can use the comment form from the social network VKontakte. Attention: in order to be able to leave comments you must be logged in to VKontakte.
iPhone restoration is a standard operation to return an Apple smartphone to a working state after various failures. Unsuccessful firmware, incorrectly executed jailbreak, incorrect iOS update - if you know how to restore an iPhone, you can fix almost any problems that arise during the operation of this device.
Recovery procedure
To restore your iPhone, you need to enter Recovery Mode. It's easy to do:
When the iPhone is ready for the rollback and error correction procedure, click the “Restore” button. 
iTunes will independently find the current firmware version and install it on the smartphone, returning it to the state in which it was immediately after purchase.
Working in DFU mode
If iPhone recovery does not work in Recovery Mode, then you need to enter the device into DFU mode. This mode is used when there are software errors - for example, when the iPhone does not turn on. DFU mode works at the hardware level, so it helps to reset all settings even in the most difficult cases. To enter DFU mode:
- Connect your device to your computer.
- Press and hold Power and Home for 10 seconds.
- After counting to 10, release Power while continuing to hold the Home button.
It's difficult to enter DFU mode the first time because nothing changes on the screen. If the recovery mode detects itself as an iTunes icon, then the phone does not seem to turn on in DFU. Therefore, you need to look at the computer screen where iTunes is running. As soon as the iPhone enters DFU mode, a notification will appear in iTunes informing you that the program has detected the device in recovery mode, and you need to reset all settings and content to continue working with your smartphone. 
If you need to install another firmware, hold down Shift and click “Restore”. An explorer will appear through which you need to specify the path to the previously downloaded firmware.
Recovery without a computer
If you don’t have your computer at hand, it won’t turn on, or you can’t connect your iPhone to it, then try resetting all settings through the device settings. As a result of this operation, you will receive a clean smartphone without settings and user information, so be sure to make a backup before resetting. If the smartphone turns on normally:

It is not necessary to delete user files. If the iPhone turns on, then you can eliminate problems with its operation by simply resetting the settings. In this case, the user’s personal data will remain intact.
Recovery after reset
If you need to restore your iPhone after resetting all settings and deleting content, you won’t be able to do this without a backup copy. The presence of a backup file with information stored in the device’s memory is the main point that needs to be checked before performing a reset. After restoring the iPhone to its factory state, all personal data of the user is erased from it.
Creating a backup before resetting:

After the reset, the iPhone will be like new: no content or settings will remain on it. To get all the information back, you need to connect the device to your computer and restore from the backup via iTunes. Choose the most recent backup, as it stores the most current information. 
You can also restore all settings after a reset via iCloud, provided that you stored backups on the cloud. In this case, when setting up your iPhone, you need to select the “Restore a copy from iCloud” option and specify a suitable backup.
Problems during recovery
If after a normal recovery the phone does not turn on, then it makes sense to put it in DFU mode and try restoring it through iTunes again. This time you should not trust iTunes: download the official firmware and select it in the Explorer window by holding Shift and clicking on the “Restore” button . 
Sometimes the TinyUmbrella utility helps solve the problem that the smartphone does not turn on after resetting the settings via iTunes. This program has an “Exit Recovery” button. If the iPhone does not turn on after recovery, you need to select it in the TinyUmbrella window and click “Exit Recovery”.
On September 19, Apple released the final version of iOS 11. Millions of iPhone, iPod and iPad users immediately began updating over the air, and today everyone decided whether it was worth staying on the new version of the system or whether it was better to wait for the time being on the more stable iOS 10.
At the time of publication of this instruction, Apple continues to sign the iOS version 10.3.3, so the rollback procedure is still possible. If you decide to return to the top ten, try not to hesitate - then it may be too late.
What needs to be done before downgrading from iOS 11 to iOS 10?
The process of preparing an iOS device is quite simple and allows you to restore all data immediately after installing iOS 10, but with one condition - you must have a backup copy in iTunes or iCloud created under iOS 10.
If you downgrade the firmware, you cannot restore data from a backup copy from a newer version of iOS.
Head to the menu Settings -> Touch ID & Password and turn off the corresponding slider. Rollback is possible only when protection is disabled.
How to downgrade from iOS 11 to iOS 10. Step-by-step instructions
1. Hold down the Power key and turn off your iOS device. For iPhone 7: Hold the Volume Down button while holding down the Home button.
2. Hold down the Home key and connect your smartphone using a USB cable to a computer or Mac with iTunes installed. Hold down the Home key until you see the iTunes icon.
3. The iTunes app should recognize your device and offer three options: Cancel, Update, or Restore. Select “Cancel”.
4. Download the firmware image specific to your device.
Apple's new operating system is not ready for full operation, and therefore it is especially important to know how to roll back an iPhone and restore to version 9 as simply and quickly as possible. Although I am sure that when the official version is released this fall, there will be few people willing to carry out such an operation.
So how to roll back from iOS 10 to iOS 9, it’s actually very easy to roll back in our article.
Preparing to downgrade from iOS 10
It's much easier to roll back if you had a backup version saved on your phone or computer, but even if you don't, the most that will happen is data loss. It is important that you can only downgrade from iOS 10 and switch to iOS 9 using a computer. Make sure you have the latest version of iTunes installed and have a USB cable from your phone.
The next step before rolling back is to create a backup copy. This can be done in two ways:
- On the device. Go to Settings, General and select iCloud. In the window that opens, click on “Backup”.
- On the computer. To do this, in iTunes, find the “Backup” item and select the location to install the copy.
Basic rollback process
In order to roll back, you will initially need to download an image of the old firmware. Next you should take the following steps:
- Go to the “Devices” tab and switch your phone or tablet to DFU mode. This is done by holding down the Home and Power buttons for 10 seconds.
- Next, release the second button and continue to hold the first until a message appears in iTunes prompting you to restore.
- Before disabling and uninstalling iOS 10, to downgrade you will need to find a previously downloaded image of the previous firmware version. To do this, click on the “Restore iPhone” button and hold down the “Shift” key on Windows and the “Alt” key on Mac. Next, double-click on the found file to roll back the firmware.
- iTunes itself knows how to remove iOS 10 and return iOS 9. This process takes up to 10 minutes.
Important! If the device is not first switched to DFU mode, the program will display an image incompatibility and you will not be able to roll back. Unfortunately, today it is not known how to remove iOS 10 without iTunes. To save most of your data, you can synchronize with a cloud server and upload data from your calendar, contacts, notes and photos to it before rolling back. After restoring the old version and logging in with your ID, all information will become available on the device. 


