How to format Windows 7 installation. How to format a hard drive before installing Windows in four different ways - step-by-step instructions
Have you recently bought yourself a computer and still don’t understand it well? Have you switched to Windows 7 from another system and still don’t really understand what’s what? Are you wondering how format hard drive toWindows 7? If so, then you are in the right place.
The procedure for formatting disks, flash drives, or anything else in Windows 7 is not much different.
I want to warn you that after formatting the disk everything data will be deleted. So be careful when choosing a drive to format.
By the way, the disk with the operating system, usually the drive (C:), cannot be formatted. This can only be done when reinstalling the system.
So, let's begin the process of formatting a hard drive in Windows 7. Go to My Computer by clicking on the icon on the desktop or through “Start” by clicking on “Computer”.
Now right-click on the disk that needs to be formatted and select the item in the list that appears "Format".

In the window that opens, we need to set some formatting settings. The line “Capacity” indicates the full volume that we will have after formatting. In line "File system" select NTFS. This is a modern file system and it is best to choose it. "Cluster size" We leave it at the default, “Volume Label” is the name of the disk, write there whatever you want. And lastly "Format Methods", there is a tick opposite "Quick (clear table of contents)" we remove. Now click the “Start” button.

We confirm that we are aware of deleting all data from this disk by clicking “OK”.
According to available statistics, several hundred people every day are interested in the answer to the question of how to format a hard drive via BIOS. I note that the question is not entirely correct - in fact, formatting using BIOS alone (at least on regular PCs and laptops) is not provided, but, nevertheless, I think you will find the answer here.
In fact, when asking a similar question, the user is usually interested in the ability to format a disk (for example, drive C) without loading Windows or another operating system - since “from within the OS” the disk is not formatted with a message that this volume cannot be formatted. Therefore, we will talk about formatting without loading the OS - this is quite possible; By the way, you will also have to go into the BIOS along the way.
Why do you need a BIOS and how to format a hard drive without going into Windows
In order to format a disk without using an installed operating system (including the hard drive on which this OS is installed), we will need to boot from some bootable drive. And for this you will need it yourself - a bootable flash drive or disk, in particular, you can use:

Once you have one of the specified drives, simply boot from it and save the settings. Example: how to enable booting from a flash drive in the BIOS (will open in a new tab, the steps are similar for a CD).
Formatting a hard drive using a Windows 7 and 8 distribution or a recovery disk
Note: If you want to format the driveC before installationWindows, then the following text is not quite what you need. It will be much easier to do this in the process. To do this, at the stage of selecting the installation type, select “Full”, and in the window where you need to specify the partition for installation, click “Configure” and format the desired disk. More details: .
In this example, I will use the distribution (bootable disk) of Windows 7. The steps when using a disk and flash drive with Windows 8 and 8.1, as well as recovery disks created within the system, will be almost the same.
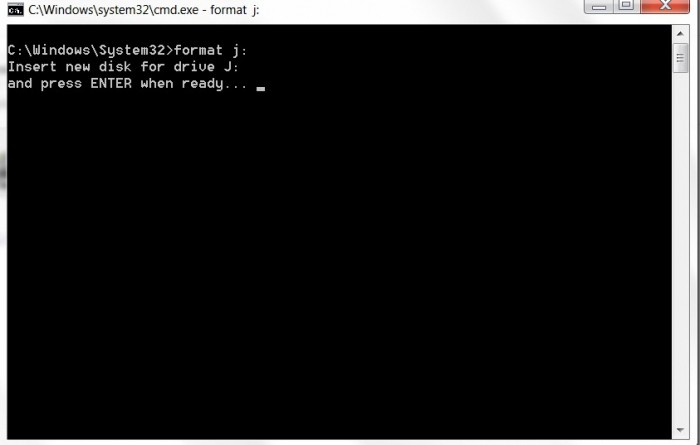
After downloading Windows Setup, on the language selection screen, press Shift + F10, this will open the command prompt. When using the Windows 8 recovery disc, select Language - Diagnostics - Advanced Options - Command Prompt. When using a Windows 7 recovery disk, select “Command Prompt”.
Taking into account that when booting from the specified drives, the drive letters may not correspond to those that you are used to in the system, use the command
Wmic logicaldisk get deviceid, volumename, size, description
To determine the disk that needs to be formatted. After that, to format, use the command (x - drive letter)
Format /FS:NTFS X: /q - quick formatting in the NTFS file system; format /FS:FAT32 X: /q - quick formatting to FAT32.

After entering the command, you may be prompted to enter a disk label and also confirm that the disk is formatted.
That's all, after these simple steps, the disk is formatted. When using a LiveCD, everything is even simpler - set the boot from the desired drive in the BIOS, boot into a graphical environment (usually Windows XP), select the disk in Explorer, right-click on it and select “Format” from the context menu.
In recent years, computer literacy of the population has increased slightly. In any case, many people know about the programs, and some can already figure out their home router themselves, since they can’t get anything meaningful from the technical support of most domestic providers.
But still, the overwhelming majority of users do not know anything about the computer that would be more difficult than spending time on social networks. In particular, if some serious software failures occur that can only be fixed by completely reinstalling the OS, they have no idea how to format a disk with Windows 7.
Of course, such a need does not arise very often, but if a beginner encounters it, then there can be a lot of problems. That is why it will probably be useful for you to read this article in order to form your own idea of the process.
The essence of formatting. Why is it needed?
Formatting is the process by which the surface of a hard drive is marked. The most basic thing is low-level formatting, which is performed only at the manufacturer. We are interested in the high-level process that modifies logical partitions on disks.
Before formatting a disk with Windows 7, the user must determine the file system type, cluster size and other technical characteristics of the newly created partition. This should not be taken lightly, since the survivability of the media and the amount of free space on it depend on these operations.
What is the best cluster size?
In particular, if you set it to the maximum possible and store only text documents on such a disk, you will waste your free space. Let's assume that you have defined the volume as 512 KB. That is, by writing just one text document file of 20 B to disk, you are occupying an entire cluster, 99% of which will be wasted.
How to format the system partition?

If you know a little about computers, then you perfectly remember the procedure for standard preparation of a new section. You can right-click on its icon and select “Format” from the context menu. But there is one problem.
The fact is that you cannot format the system partition (on which the system is installed) this way. If you try, a warning will appear stating that this operation is impossible. How to be?
Using a boot disk
If you really want to find out how to format a disk with Windows 7, you will have to get the boot disk from which you installed the system. If there is none, you need to make it yourself. To do this, you need to write an image downloaded from the network (or created by yourself) to
You need to insert it into the drive, restart the computer, and set the BIOS to boot from the CD/DVD drive. You will have to find out how to do this yourself, since different manufacturers provide different versions of BIOS with radically different interfaces.
As a rule, all the information you need should be posted on the motherboard manufacturer's website. So, having learned how to format a disk through the BIOS, you will have to find this information.
So, immediately after booting from the optical drive, you will be taken to the OS installation menu. Since we are talking about Windows 7, even the most “green” beginners can relax: everything is so clear (almost at the level of intuition) that even a child can handle it.
Immediately after the first dialog box appears, select “Install”. Next, select the required OS version (if you enter the key, the installation program will select the required one). After this, work with disks appears. Having finally understood how to format the system disk, find out its letter in advance, otherwise you can easily lose your entire collection of music or movies.

That's what we need. Select the required section by left-clicking on it. At the very bottom of the window there should be a “Disk Settings” link. Once you select it, you will see other options appear. You need the Format section. Select the required file system and click OK. Then you can either continue installing Windows, or install some other operating system.
Since the system itself offers to format the disk during installation, if you do not have any experience, it is better to leave the settings that are offered by default.
Live CD
If you have ever dealt with system administration, then you probably know about Live CDs, which in the case of Windows OS are often called BartPE. From such media you can not only boot from the BIOS, but also get a fully functional system as a result. Since formatting the system disk under a working OS will not work (this is not Linux, after all), this option may be the only correct one.
Since the system is loaded from a “live CD” into RAM, you can right-click on any disk (including the system disk), and then select “Format” from the context menu. All subsequent actions are no different from those that we have already described in this article.
The same can be done using an installation disk with any Linux distribution. As a rule, they all have Live CD mode, so you don’t have to do any dances with the console. Ubuntu is ideal, the interface of which is as simple and intuitive as possible.
Another variant
But it often happens that two systems are installed on one disk at once. In particular, this happens due to inexperience when a person mistakenly installs several copies of an identical OS on one physical disk.
This cannot be done, because such a combination may well cause problems when loading and operating programs. In addition, the human factor cannot be ruled out when users delete system files from the second system from under the first system. Of course, there is no need to talk about stable work in the latter case.
So how to format a drive with Windows 7 then? Everything is much simpler here.
Cleaning via context menu

To do this, you need to go to “My Computer”, and then select the drive on which the copy of Windows you don’t need is installed. There is no need to worry that the Windows you are currently working on will be targeted. We have already indicated that in this case the system itself will not allow you to do this.
Next, you should right-click on the section you need, and then select “Format” from the menu that appears. A dialog box will also appear asking you to specify the file system type. It all depends on your preferences and requirements.
File system selection
The main (and most reliable) is NTFS, but if necessary, FAT32 can be used. We have already written about determining the size of a standard cluster above. As for the type of formatting, here again everything depends only on you.
But! You need to carefully understand how to format an NTFS hard drive. It should be taken into account that the reliability of this file system is based on the fact that it creates a sufficiently large recovery partition.
In the case when you are preparing a disk whose volume exceeds several hundred GB, this can be sacrificed. But you shouldn’t mark disks with a capacity of 40 GB and below this way. However, where can you find such “dinosaurs” now? But if you need to prepare the hard drive of an old computer, then our recommendations will certainly be useful to you.
If you check the “Quick (Table of Contents Cleanup”) checkbox, the process will not take much time, but there will still be a chance that deleted files from the disk can be recovered.

If you intend to sell this hard drive, we recommend that you uncheck this box. After clicking on the “Start” button, all data will be erased from the media, including the operating system installed there. This may take some time, which will directly depend on both the power of your computer and the size of the disk.
Perform cleaning through Disk Management
This method is somewhat more reliable. Having understood Windows 7 using this method, you must first click on the “Start” button, and in the menu that appears, select “Control Panel”. In the Panel that opens, look for the “Administration” option.
In the dialog box that opens, select the “Computer Management” shortcut. A control window for the utility of the same name will open, in which we are interested in the “Storage devices” item. In it you need to double-click on the “Disk Management” line.
After all these manipulations, a window will open with a list of storage devices installed in the system. Select the disk you need from it and right-click on it. The same context menu will open, in which you should select the “Format” item. You have already been familiarized with further actions above.
Using the Command Line Emulator

Now we have reached the most “advanced” method, which is used only by the most experienced users. This way, formatting a disk with Windows 7 is very convenient and quick, but you need to remember or write down all the commands that we will give you in the text below.
It’s best to simply copy them into and then paste them into the command line using the right mouse button (“Paste”).
Once again, pay attention: carefully monitor the drive letter that you need to format. A mistake can cause you to lose data that is of considerable value (to you, anyway).
First you need to run the emulator with administrator rights. This is done simply. First, click on the “Start” button and look for the “Search” field there. Enter the CMD command into it, and then press the Enter key. A window with search results will open on the right side, in which you need to right-click on the file of the same name and select the “Run as Administrator” option in the context menu.
Having decided how to format a disk partition with the system or unnecessary data, first of all write the command format Y: on the command line, where instead of Y there should be the letter of the partition you need. We repeat once again: make no mistake! There have been cases when absent-minded users lost all archives with family videos.
After this, you need to press the Enter key, after which the data will be completely formatted. Important! When using command line emulation mode, no warnings are issued about the possible loss of important data in the event of an error, so be extremely careful when entering commands!
A little about flash drives
If your external drive asks you to format it before using it, you can also use the Command Prompt. All steps of the action are exactly the same, but the main command will have a slightly different form: format Y: /Q. As in the previous case, the letter Y is the designation of your disk, which you need to change to a value relevant to your case, and the key Q stands for Quick, which indicates a quick format with a simple clearing of the table of contents.
What is it for? The fact is that you should not completely format flash drives again, as this once again reduces the number of rewrite cycles.
Modern hard drives (HDDs) are becoming more spacious and less expensive, and many people believe that it is better to buy one large drive - 2 - 3 - 4 terabytes - than several small ones. But not everyone realizes what difficulties they will encounter when installing an operating system on such a disk. The fact is that disks larger than 2 TiB use a non-standard, new type of data organization - the GPT partition table. It contains “surprises” that await the inexperienced user.
The main differences between GPT (new) and MBR (old) disks
- Disk partitioning according to the MBR standard cannot address space exceeding 2.2 TiB, and for GPT disks there are no restrictions (or rather, their limit is an astronomical number by our standards - 8.6 billion TiB).
- Only 64-bit versions of Windows, starting with Windows Vista x64, can be installed on GPT disks. Windows XP 64-bit and all x86 versions since Vista can write to and read data from GPT partitions, but cannot boot from them. Windows XP x86 and higher versions do not support the GPT platform.
- The GPT partition table is part of the UEFI interface - the new BIOS, so to speak. Computers with traditional BIOSes do not support the GPT structure.
But this does not mean that modern, capacious GPT hard drives cannot be used the old fashioned way - on computers without UEFI or for installing 32-bit systems. You can: to do this, the GPT partition table just needs to be converted to MBR. Part of the volume - that which is beyond 2.2 TiB - will be inaccessible, but nothing can be done about it.
Convert partition table from GPT to MBR
Work with hard drive up to 2 TiB
When installing Windows 7 x86 (32-bit) on a GPT disk, an error message pops up clearly indicating the reason:

If your hard drive is less than 2 TiB, a full format and deleting all partitions will solve the problem. This can be done through the “Disk Setup” option from the distribution kit.
- When, during the installation of Windows 7, you get to the selection of the partition where to install the system, and you see an error message, click the “Disk Setup” button.

- Select each section, starting from the bottom, and delete by clicking the button of the same name. You should end up with one total unallocated space equal to the size of the entire hard drive.

- Now you need to create each partition again. To do this, click the “Create” button, set the desired partition size and click “Apply”. Repeat the operation as many times as you want to obtain partitions. The system will ask you to allocate an area for its needs (boot partition 100 mb), it is advisable to agree.

- Formatting of newly created partitions is done by clicking the “Format” button. After these steps, the GPT hard disk partition table will be converted to MBR, suitable for installing the 32-bit version of Windows 7. Further installation proceeds without any special features.
Working with a hard drive larger than 2 TiB
To create an MBR on disks of such large capacity, you will need a utility DiskPart, which is part of the seven distribution kit. It starts and works via the command line.
- Having reached the choice of installation location, launch the command line by pressing “Shift” + “F10” on the keyboard. In the black window that opens, enter: diskpart and press Enter.
- Next command: list disk– to view all hard drives installed on your computer.
- Select the disk on which you will create the MBR. If he is alone, enter the command select disk 0, if there are several, instead of zero, substitute the serial number of the disk that you need.
- Next, delete all data and all markings from the selected HDD with the command clean.
- Team convert mbr converts GPT table to MBR.
- To close the console, enter: exit.

- Then you can proceed to installing Windows 7.
Preparing a disk for installing Windows 7 using third-party programs: partitioning, formatting, etc.
You can also partition and format the HDD before installing Windows 7 using third-party programs, such as “Acronis Disk Director”, “Paragon Partition Manager”, etc. There are enough applications for these purposes, but these two are familiar to many and are the best in in our class, so we will consider them.
Acronis Disk Director
Powerful disk management tool. Available in two versions - for working in the Windows environment and as a boot image. The second allows you to repartition, format, delete, move and restore volumes, and transfer data from partition to partition without booting into Windows.
The principle of using Acronis Disk Director is intuitive - each of its options has a clear, unambiguous definition. Interface – English and Russian.

In order to divide the HDD into partitions and format it in any of the proposed file systems (their list is quite extensive), select “Create partitions” and follow the wizard’s instructions.

Acronis Disk Director has one very useful feature - the Partition Recovery Wizard. It allows you to restore deleted volumes to disk with all their data. Unless, of course, the information was overwritten.

Paragon Partition Manager
Another full-featured set of disk management tools. It is a boot image with which you can do a lot of things: split disks into volumes, format them in various file systems, create boot menus, create installation packages for OS distributions (not only Windows), manage system bootloaders, etc.
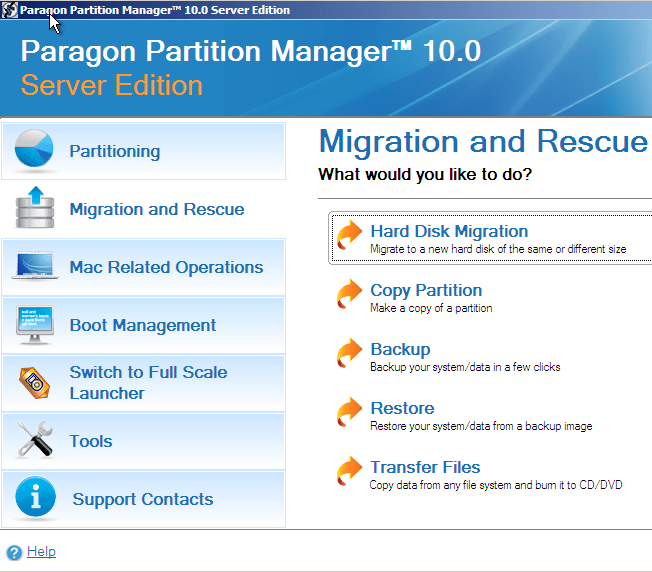
As for partition management functions, Paragon Partition Manager allows you to create, delete, divide, copy, restore, merge, make backup copies and transfer them to external media. You can even transfer the entire contents of your hard drive to another. In addition to the above, the application has network functions that make it possible to create a connection with other computers on the local network.

Despite the English-language interface, Partition Manager is quite easy to manage. Most options launch a built-in wizard that guides the user through all stages of the selected operation. It doesn’t take much time to master the program, and the result of what is done is always good.

Partition management, formatting and other operations through the disk manager
You can also redistribute disk space from under a running system through “Disk Management,” a native Windows 7 tool. The tool is located in the “Computer Management” set.
- Launch Control Panel and open the Administrative Tools application. From the list of administrative tools, select “Computer Management”.

- Next select “Disk Management”.

- You will see a “map” of hard drives and other storage devices installed on your computer - flash drives, memory cards, etc., if they are connected.
If the disks are divided into parts, each partition, otherwise called a volume, will be displayed on the map with its letter, size and type designation: primary or logical. At the top is a table of the properties of each volume. Here you can see which of them your system boots from - the boot partition has the “Active” attribute.
The active partition in Windows 7 is a 100 MB partition at the very beginning of the hard drive (MBR standard). It does not have a letter and does not appear in Explorer.
Right-clicking on one of the partitions on the disk map opens a list of available commands: what operations can be performed on this volume.
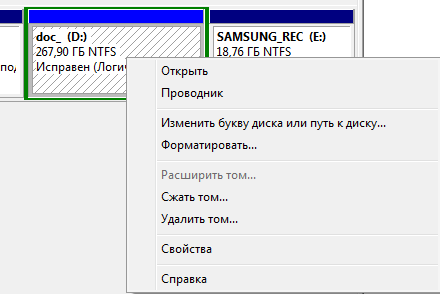
So, on logical partition D of our only hard drive, you can do the following:
- open (via explorer);
- change letter;
- change the disk path;
- format;
- expand;
- squeeze; compress
- delete;
- view properties;
- read the help.
If you remove the volume letter, it will not appear in Windows Explorer, like other hidden partitions. Such as SYSTEM - where the Windows 7 boot loader is located, and the RECOVERY partition. This protects the files stored there from accidental damage and deletion.
The “format” command will destroy all information, the “expand” and “shrink” commands are intended to control the size of the partition. “Delete”, accordingly, will turn the selected area of the hard drive into unallocated space.
In short, working with the disk manager is not difficult, but it requires attention and caution from the user.
As various statistics show, not all users know how to perform the specified action. The biggest problems arise if you need to format the C drive in Windows 7, 8 or Windows 10, i.e. system hard drive.
Formatting a non-system hard drive or partition in Windows
In order to format a disk or its logical partition in Windows 7, 8 or Windows 10 (relatively speaking, drive D), just open Explorer (or “My Computer”), right-click on the disk and select “Format”.
After this, simply specify, if desired, the volume label, the file system (although it is better to leave NTFS here) and the formatting method (it makes sense to leave “Quick Format”). Click "Start" and wait until the disk is completely formatted. Sometimes, if the hard drive is large enough, this may take a long time and you may even think that the computer has frozen. There is a 95% chance that this is not the case, just wait.

Another way to format a non-system hard drive is to use the format command in a Command Prompt running as an administrator. In general, a command to quickly format a disk in NTFS will look like this:
Format /FS:NTFS D: /q
Where D: is the drive letter of the drive being formatted.

How to format C drive in Windows 7, 8 and Windows 10

In general, this guide is also suitable for previous versions of Windows. So, if you try to format the system hard drive in Windows 7 or 8, you will see a message that:
- You cannot format this volume. It contains the version of the Windows operating system currently in use. Formatting this volume may cause your computer to stop working. (Windows 8 and 8.1)
- This disk is in use. The disk is in use by another program or process. Format it? And after clicking “Yes”, the message “Windows cannot format this disk. Quit any other programs that are using the drive, make sure no windows are displaying its contents, and then try again.
What is happening is easily explained - Windows cannot format the disk on which it itself is located. Moreover, even if the operating system is installed on drive D or any other, the first partition (i.e., drive C) will still contain the files necessary to load the operating system, since when you turn on the computer, the BIOS will first start loading from there.
Some notes
Thus, when formatting drive C, you should remember that this action implies the subsequent installation of Windows (or another OS) or, if Windows is installed on another partition, the OS boot configuration after formatting, which is not the most trivial task and, if you are not too If you're an experienced user (and apparently you are, since you're here), I wouldn't recommend trying this.
Formatting
If you are confident in what you are doing, then continue. In order to format drive C or the Windows system partition, you will need to boot from some other media:
- , boot disk.
- Any other bootable media - LiveCD, Hiren’s Boot CD, Bart PE and others.
There are also special solutions such as Acronis Disk Director, Paragon Partition Magic or Manager and others. But we will not consider them: firstly, these products are paid, and secondly, for the purposes of simple formatting they are unnecessary.
Formatting using a bootable USB flash drive or disk Windows 7 and 8
In order to format the system disk using this method, boot from the appropriate installation media and select “Full installation” when selecting the installation type. The next thing you will see is the selection of the partition for installation.

Another way is to press Shift + F10 at any time during installation, the command line will open. From which you can also format (how to do this was written above). Here you need to take into account that in the installation program the drive letter C may be different; in order to find it out, first use the command:
Wmic logicaldisk get deviceid, volumename, description
And, to clarify whether something was mixed up, use the DIR D: command, where D: is the drive letter. (Using this command you will see the contents of folders on the disk).
After this, you can already apply format to the desired section.
How to format a drive using LiveCD
Formatting a hard drive using various types of LiveCD is not much different from simply formatting it in Windows. Since when booting from a LiveCD, all the really necessary data is located in the computer’s RAM, you can use various BartPE options to format the system hard drive simply through Explorer. And, just like in the options already described, use the format command on the command line.

There are other formatting nuances, but I will describe them in one of the following articles. And in order for a novice user to know how to format the C drive, this article, I think, will be enough. If anything, ask questions in the comments.


