Car strobe light made from a laser pointer. Scheme, description. Car strobe from a laser pointer Disadvantages of industrial models
One of the most important conditions for the proper operation of a gasoline car engine is the correct setting of the ignition timing. In VAZ car engines, the ignition timing is set using four marks - one on the crankshaft pulley, and three on the block housing. Usually, to adjust the ignition, they use a rather cumbersome device - a strobe light. For power supply, the strobe is connected to the car battery, and the third wire is connected to the spark plug wire of the first cylinder. When the engine is running, the strobe lamp flashes every time a high voltage pulse reaches the spark plug of the first cylinder. The light of the lamp is directed to the marks; as a result of the synchronous flashing of the lamp, we see four marks - three on the block and one on the pulley, which seems motionless to us; the relative position of these marks determines the correct installation of the ignition (the mark on the pulley should be opposite the middle mark on the block, if this is not the case, you need to correct it by turning the distributor housing).
A standard strobe is a rather bulky, heavy and fragile device, mainly due to the gas-discharge lamp and pulse transformer it contains, but using a modern element base, you can make a strobe a little larger than a ballpoint pen.
Figure 1 shows a diagram of a strobe in which a 12V LED car bulb operates instead of a gas-discharge lamp (nowadays it has become fashionable to install such LED lamps in sidelights instead of incandescent lamps).
The device is connected to the vehicle systems using three wires with crocodile clips. Two are to the battery, and the third is to the wire of the 1st cylinder. The third “Crocodile” (connected to the spark plug wire) is slightly modified - its “teeth” are bent inward so as not to spoil the spark plug wire, and it rather resembles a metal clothespin.
As soon as a high voltage pulse arrives at the spark plug of the 1st cylinder, through the capacitance between the core of the spark plug wire and the body of the “Crocodile-clothespin”, a voltage surge is supplied to pin 2 of element D1.1 (zener diode VD1 protects the input of the element from overvoltage). A single vibrator based on elements D1.1-D1.2 generates a pulse whose duration is about 1 mS. This pulse, through a buffer cascade on elements D1.3 and D1.4, is supplied to the base of transistor VT1, which is part of the pulse switch VT1-VT2. The key opens and the HL2 LED light flashes.
Now about the details of the circuits C1, R1 and R2 are soldered directly into the “Crocodile” handle, connected to the spark plug wire. The connecting cable is soft shielded, no more than 50 cm long. For connecting to the battery, ordinary wires, as for “carrying”, of any length (within reasonable limits). Diode VD2 serves to protect the circuit from accidental power reversal. LED HL1 - indicator of correct connection to the battery. The basis for the device was a cylindrical Chinese pocket flashlight. All its “internals” (switch, light bulb, batteries) were removed, leaving an empty body and a conical reflector. The base of the reflector is slightly widened to accommodate an LED car light bulb. The case contains a printed circuit board (Fig. 2) on which most of the parts are mounted. The housing has holes drilled for connecting wires and the HL1 LED.

Trimmer resistor R4 is used to set the duration of the HL2 flash such that the mark on the rotating pulley of a running engine is visible stationary and not blurred, but visibility remains sufficient.
If the device does not respond to impulses in the spark plug wire to which the “Crocodile-clothespin” is connected, or begins to respond only when the “Crocodile” is strongly compressed, you need to increase the resistance R2.
Instead of an LED light bulb, you can use a regular super-bright LED by connecting it through a resistor with a resistance of about 10 ohms. But using a strobe will not be so convenient, because due to the lower brightness of the light, it will need to be placed closer to the marks on the engine.

Radio magazine Murovin S.I.
Literature:
1. N. Zaets. Car strobe from a laser pointer. Radio No. 1, 2004.
Car enthusiasts know how important the correct setting of the initial fuel ignition timing in carburetor engines is for good driving. Using the proposed device, you can not only set the initial ignition timing at idle speed, but also find a broken spark plug, check the operation of the ignition coil, and monitor the operation of the centrifugal and vacuum ignition timing angle regulator up to 3000 rpm. A high frequency is simply dangerous for an engine running without load. The strobe light circuit is shown in Figure 1.
Pulses from the high-voltage wire through the differentiating chain C1, R2 and resistor R1 trigger the standby monovibrator on elements DD1.1, 1.2. Single-vibrator pulses, lasting about 1.5 milliseconds, pass through a key stage on transistors VT1, VT2 and turn on the LED of the laser pointer. The laser pointer is used with a line-expanding attachment. This can be a nozzle with an image of a person, a dinosaur, a fish or a bird - the main thing is that the image resembles a line. In sunny weather, but in the shade, you can use the pointer without an attachment, directing the beam only to the movable mark. Without the attachment, the brightness of the laser beam increases. The fixed mark on the engine housing is clearly visible in sunlight.


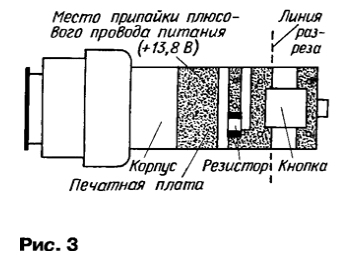
The printed circuit board of the strobe is shown in Figure 2 for the option using a microcircuit with planar leads - a and a microcircuit with leads in a DIP-14 package - b. The numbers under the board indicate the installation locations of resistors with the number corresponding to the circuit in Figure 1. Thin lines indicate the conductors on the side where the microcircuit is installed. On the same side, transistor VT1 is installed in the holes (E-K-B). Transistor VT2 and capacitor C2 are installed on the side of the printed conductors. Resistor R3, for the version with a microcircuit with planar leads, can also be placed on this side of the printed circuit board. The circuit board is designed to fit into the battery compartment of a laser pointer. The input circuit (C1,R1,R2) is located at the end of a wooden clothespin (Fig. 3b).

First check the operation of the board on a motor with any LED, connecting it in the appropriate polarity instead of the laser.
The pointer can be disassembled in two ways - by squeezing it out from the side of the battery compartment or pulling it out from the side of the nozzle. The nozzle is unscrewed and a suitable ring 1-2 mm thick is installed under it so that the ring rests against the body. Then the nozzle is screwed in, gradually pressing out the body with the laser. If necessary, the operation is repeated with a ring of greater thickness. You can do without the rings by placing a screwdriver under the nozzle, but then the edges of the aluminum body of the pointer are damaged. The second method is to place an M5, M4 nut or any other round dense object under the battery compartment cover. Gradually, by twisting the lid, we squeeze out the housing with the laser. Here you need to be careful not to damage the laser power button. When the button is released, it must be pulled out of the housing. This method of disassembling the pointer must be used CAREFULLY, without applying much force, as the laser can be damaged.
In the disassembled pointer, the push-button switch is soldered off (Fig. 4).

The board is shortened with side cutters so that one strip of printed conductor remains, which was used by the switch. Here you need to work carefully so as not to damage the 68-82 Ohm surface mount resistor. If you do damage it, it doesn’t matter. Increase the value of resistor R5 to 270 Ohms, and short-circuit the conductors where the surface-mount resistor was located. Transistor VT2 and capacitor C2 are installed on the side of the printed conductors. It is better to take the KT type capacitor C1 - tubular, since they are designed to work with high voltage. Place insulating pads made of paper or cellophane under the 564LE5 chip and the KT815 transistor. Check the assembled board by inserting it into the cylinder of the pointer body. Inside the case where the board will be placed, insert cellophane if you don’t have the standard one. After checking the board for free passage into the pointer body, you can solder the pointer and the board into a monolith with a copper wire passed through the holes for installing the push-button switch. You can connect the board and the pointer using MGTF-0.07 wire. Be sure to solder the power plus wire to the printed conductor near the laser going to the housing; the soldering location is shown in Figure 4. Insert the board and press the pointer into the housing.
Provide power wires of the required length with alligator clips with markings or a connector that fits into the connector of a standard portable backlight. If the connection to the backlight lamp connector is not unambiguous, then any diode with a plus to the connector must be placed in the gap of the positive wire to protect against polarity reversal. The wire going to the clamp to the high-voltage wire must be shielded. For safety when working with the engine running, the clamp to the high-voltage wire is made of a wooden clothespin (Fig. 3). From the pack of wooden clothespins, not a single one was found with matching holes, so it is better to drill a new hole Ø6 mm closer to the edge of the jaws. The hole is easy to drill if you hold the clothespin in a vice. One of the jaws of the clothespin is wrapped in tin, no more than 3 mm wide, or several turns of tinned wire. On the outside of the clothespin, the ends of the tin are soldered together. Capacitor C1 is also soldered here. The shielded wire is attached to a clothespin with a copper clip. High-voltage wires on a car may have cracks that are not visually detectable. If a clothespin current collector is installed on a wire with a crack, a breakdown will occur and the strobe light will burn out. Therefore, it is necessary to wrap the current collector with several turns of electrical tape or fill it with sealant.
Check the strobe for functionality (first with the LED!) and seal the housing on the side of the board and wires, as well as the divider on the clothespin with silicone sealant. To prevent the laser attachment from becoming clogged with dirt in the glove compartment of your car, place a lid on it to protect it from medical vials.
Working with a strobe light is easy. Before work, wipe off the white paint on the crankshaft housing and pulley marks. If the marks are not painted, then paint them with white paint - this will be useful in the future. Turn on the well-warmed engine at idle speed (600-800). Connect the supply voltage terminals. Clamp the high-voltage wire of the first spark plug with a clothespin and point the laser at a fixed mark located on the body. Then use the laser beam to find the moving mark on the flywheel pulley. If the ignition timing on your car is incorrect, the moving mark may be far from the fixed mark. By rotating the ignition distributor housing, ensure that the movable (on the crankshaft pulley) and stationary marks coincide. Lock the distributor in this position. Then you can briefly increase the speed and observe the divergence of the marks. As the speed increases, the ignition should be earlier, to check which there are two other fixed marks located at 5 degrees of ignition timing. At 3000 rpm, the ignition timing for VAZ cars should be within 15-17 degrees. Do not increase the speed above 3000! This is dangerous for the motor and laser pointer! To check the operation of the spark plugs, clamp the high-voltage wires with a clothespin one at a time. If the spark plug pierces the housing or a misfire occurs, the laser flashes will be of a lower frequency. ATTENTION! Do not direct the laser beam into your eyes! Do not forget that the strobe light body is under voltage plus 13.8 volts (or other voltage supplied by the regulator), so you cannot place it on the car body with the laser turned on unless the strobe light body is insulated.
Literature.
Belyatsky P. LED car strobe light. - Radio, 2000, 9, p. 43.
Motorists know how important it is to correctly set the fuel ignition timing in the cylinders of a carburetor engine. Stroboscopes are used for this. The article by P. Belyatsky “LED car strobe” (“Radio”, 2000, No. 9) describes a simple device with a flashlight in the form of an assembly of bright LEDs instead of a pulsed photo lamp.
The stroboscopic device offered to the attention of readers allows not only to set the optimal ignition timing (IAP) at engine idle speed, but also to find a faulty spark plug, check the operation of the ignition coil, and monitor the operation of the centrifugal and vacuum angle regulators 03 at crankshaft speeds up to 3000 min-1 (high frequency is dangerous for a motor running without load). The device is not designed for use at service stations, but can provide an invaluable service to a car enthusiast who is stuck on the road due to malfunctions in the ignition system.
The strobe light circuit is shown in Fig. 1. Pulses from the high-voltage spark plug wire, passing through the input node, consisting of a differentiating circuit C1, R2 and a limiting resistor R1, trigger a one-shot unit assembled on elements DD1.1, DD1.2. The output pulses of the single-vibrator with a duration of about 0.15 ms are supplied to the base of the composite transistor VT1VT2, which operates as a current amplifier. The collector circuit of the transistor includes a laser pointer BL1, which serves as an amplifier load. Since the output pulses of the monostable have a high level, during their action the composite transistor opens and the laser of the pointer generates light flashes.
The pointer is designed for a supply voltage of 4.5 V, and in the strobe it operates from an on-board network with a voltage of 13.8 V, so the duration of the monovibrator output pulses should not exceed 0.15 ms - the value was selected experimentally and cost several “burnt out” lasers. With a pulse duration of more than 0.15 ms, the average power dissipated by the laser reaches the maximum permissible and the risk of burning the pointer sharply increases, and with less, the mark on the crankshaft pulley becomes visually “hard to catch.” It must also be remembered that a flash frequency of more than 100 Hz (corresponds to an engine speed of 3000 min-1) is dangerous for a pointer operating at high voltage.
Structurally, the strobe consists of an ignition pulse sensor attached to the spark plug wire of the first cylinder of the engine, and the pointer itself, inside of which all other parts are placed. The sensor is connected to the pointer by a shielded cable 50 cm long.
The basis of the ignition pulse sensor is a clothespin, on the side of which there are parts C1, R1, R2 of the input unit. On one of the halves of the clothespin, in the place where the working half-hole is located, a coil of tape no more than 3 mm wide made of tin or thin sheet copper is wound in the form of a bandage (Fig. 2). The lead of capacitor C1 is soldered to it. The terminal of resistor R1 is soldered to the central wire of the connecting cable, and resistor R2 - to the screen. The cable is attached to the handle of the clothespin with a wire bandage. The top parts of the input assembly should be coated with silicone sealant and protected from impacts with a PCB strip (not shown in the figure).

To install the strobe parts, the pointer must first be disassembled. Having unscrewed the nozzle, install a puller ring with an axial thickness of 1...2 mm under it so that it rests against the edge of the cylindrical casing. Then the nozzle is screwed on with force, gradually pressing the “filling” out of the casing. If necessary, the operation is repeated with a ring of greater thickness.
Attempts to disassemble the pointer without a puller ring usually lead to damage to the edge of the casing made of soft aluminum alloy. Squeezing the “filling” out of the casing from the side of the battery compartment, as practice has shown, also carries a high risk of damaging the pointer.
Remove the push-button switch from the board of the disassembled pointer (Fig. 3) and, using side cutters, carefully, so as not to damage the resistor, shorten it to the dashed line (printed conductors are shown in gray). If the resistor still turns out to be damaged, it doesn’t matter, it’s enough to short-circuit its terminals with a jumper, and increase the resistance of resistor R5 in the diagram (see Fig. 1) to 270 Ohms.
The parts of the single-vibrator and the output current amplifier are placed on a printed circuit board made of fiberglass foil on both sides with a thickness of 0.5 mm. The board drawing is shown in Fig. 4 (a - print side; b - parts side). Both transistors and capacitor C2 are soldered from the printing side directly to the printing pads.

The holes for the microcircuit should be such that it can be mounted as close to the board as possible - this will make it easier to insert the board into the pointer housing during assembly. Pin 7 of the microcircuit and one of the pins of resistor R3 must be soldered on both sides of the board. Since the board is quite cramped, try to think through the sequence of installing the parts in advance so that you don’t have to unsolder the already installed ones later. Mount the chip last. The square pads on both sides of the board must be connected with pieces of copper wire and soldered. A thin insulating gasket should be placed under the VT2 transistor.
Before connecting the assembled strobe board to the prepared pointer board, it is advisable to check its operation with an LED instead of a laser. An LED (for example, AL307B) is temporarily soldered with the anode to the positive power terminal, and the cathode to resistor R5.
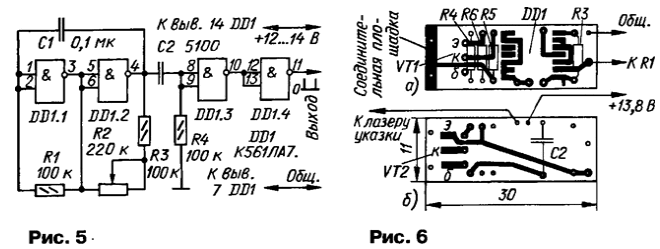
In order to be able to set up a strobe in laboratory conditions, it is advisable to assemble it according to the diagram in Fig. 5 test multivibrator. It produces short high-level pulses with a repetition rate controlled by variable resistor R2.
The pulses are supplied to the input of the strobe and resistor R3 is selected so that the duration of the output pulses does not exceed 0.15 ms.
After this, you need to make sure that the assembled board fits freely into the pointer housing.
Three flexible leads are soldered to the assembled board - common, input (to resistor R1 of the sensor) and positive power supply (+13.8 V), applied to the pointer board with the connecting foil pads facing outward, and a piece of copper wire with a diameter of 0 is inserted into both assembly holes of the boards .5 mm and soldered. Do not forget to connect the positive terminal of the laser on the pointer board (see Fig. 3) with the positive power wire on the strobe board using a separate conductor. Check again whether the structure will fit into the pointer housing.
If everything is in order, an insulator made of a thin hard plastic film rolled into a tube is inserted into the casing and a laser with a circuit board is inserted into it. The end with the pointer leads is filled with sealant. Flexible power leads are equipped with alligator clips with polarity markings or a connector for connecting to a portable lamp socket.
In all cases, it is advisable to insert a diode into the positive wire gap to protect the strobe from accidental activation of the strobe in reverse polarity (this diode is not shown in the diagram in Fig. 1). Any diode with a reverse voltage of at least 50 V and an average rectified current of at least 100 mA is suitable. You can mount the diode near the alligator clip.
In addition, given that the casing of the laser pointer is electrically connected to the positive power wire, it must be carefully insulated and not allowed to come into contact with vehicle parts during use. Nevertheless, it will be easier to work with a strobe if you connect a miniature fuse with a current of 0.16 A in series with the protective diode (also not shown in the diagram).
To operate the strobe, a clothespin sensor is attached to the spark plug high-voltage wire of the first cylinder of the engine. Triggering pulses arrive at the device through the capacitance between the high-voltage wire and the bandage in the working hole of the sensor. The capacity should be the minimum required for a stable start.
If the capacitance is chosen to be excessively large, the amplitude of the trigger pulse under unfavorable circumstances may exceed what is permissible for the microcircuit and cause its damage. Therefore, at the beginning, the sensor should be installed on the wire through a dry gasket 1 mm thick made of polyethylene or PVC. If the strobe does not start - there is no blinking laser light at the lowest engine speeds - the gasket must be replaced with a thinner one.
It is more convenient to work with a strobe when its light spot has an elongated shape - this makes it easier to fix both marks in the field of view. Therefore, one of the included attachments is put on the pointer, pulling the stain into a line. When working during daylight hours, but in the shade, you can do without an attachment (the brightness of the spot will be greater), directing the beam only to the movable mark. The fixed mark on the body will be clearly visible in these conditions. To protect the laser and attachment from dirt and dust during storage, choose a suitable plastic case for it.
Perhaps someone will find it easier to assemble a single-shot strobe light on a miniature K564LE5 microcircuit. A board drawing for this option is shown in Fig. 6. Here, on the parts side (Fig. 6, b) only capacitor C2 and transistor VT2 are soldered, the rest of the parts are on the printing side. In addition, pin 2 of the microcircuit is connected to the input node.
Before working with the strobe light, wipe the white paint on the marks on the body and crankshaft pulley of the car engine. If the marks are not colored, you should definitely do this - it will be very useful in the future. With the engine well warmed up, set it to idle speed 600...800 min-1. Connect the power terminals of the strobe so that its power wires do not come into contact with high-voltage ones. Install the sensor on the high-voltage wire of the first spark plug and direct the laser beam to a fixed mark located on the body. Then use a laser beam to find a moving mark on the flywheel pulley - the brightness of the spot in this place increases due to reflection from the white paint. If the mark is not colored, the brightness of the reflected beam, on the contrary, will decrease, but this is more difficult to detect, especially in bright light.
You can make sure that the location found is indeed a mark by slightly changing the speed of the motor shaft, while the mark moves forward or backward as the pulley rotates.
If the ignition timing on your car is incorrect, the moving mark may be far from the stationary one. At idle speed, the mark on the flywheel pulley should be opposite the middle fixed mark, i.e., the ignition timing should be 5 degrees. By rotating the body of the ignition switch-distributor, ensure that the moving and fixed marks coincide and fix it in this position.
Briefly increase the speed and observe the divergence of the marks. As the crankshaft speed increases, ignition should become earlier. At a rotation speed of 3000 min-1, the ignition timing for VAZ cars should be within 15... 17 degrees. .
Do not increase the rotation speed above 3000 min-1 - this is dangerous for both the engine and the laser pointer. Never point the laser beam into your eyes!
The strobe uses a laser pointer with a power of up to 1 mW. Recently, laser pointers that are five times brighter have appeared on sale. They have the same dimensions, and their use in a car strobe is preferable.
Literature
- Belyatsky P. LED car strobe light. - Radio, 2000. No. 9, p. 43, 44.
- Ershov B.V., Yurchenko M.A. VAZ passenger cars. - Kyiv, "Vishcha School", 1983.
Addition
“Car strobe from a laser pointer” - under this heading in “Radio”, 2004, No. 1, p. 45, 46 an article by N. Zaets was published. I liked the idea of using a laser pointer as a strobe light. For those who would like to repeat this design, but do not know the structure of the pointer, I suggest you get to know it in more detail.
The figure shows the “filling” of the keychain pointer. The light source is a semiconductor emitting crystal 3, soldered to a massive base that serves as a heat sink 2. The heat sink is attached to the board 1, on which the power button, current-limiting resistor and spring contact of the battery are mounted. The heat sink with the board is tightly inserted into the slot of the holder sleeve 4, at the other end of which external and internal threads are cut.

The light from the crystal is highly scattered and is collected into a thin beam by lens 6. The position of the lens relative to the crystal can be adjusted by threaded bushing 7. Spring 5 presses the lens to the bushing.
To use the pointer as a strobe illuminator, it is better to defocus the light beam by screwing the sleeve in as far as it will go (but do not press too hard!). As a result, the diameter of the light spot at a distance of 1 m will increase to approximately 6 cm. At a shorter distance, the diameter of the spot will be smaller. In any case, with a spot wider than the dot, it is easier to “hold” the mark on the engine pulley, and there is less danger to vision if the beam accidentally hits the eyes.
Many articles emphasize that the pointer is powered from a 4.5 V source, but the presence of a current-limiting resistor in its design suggests that the voltage can be any, you just need to select the required current. This is how the laser in the strobe is turned on. To calculate the resistor, you need to measure the laser current of the pointer and the voltage drop across it. On the laser samples I have, the drop was 2.6 V at 35 mA. When choosing a current limiting resistor, do not forget about the built-in 68 Ohm resistor.
In the process of conducting experiments on powering the pointers with excessive current, one of them was damaged. But, as it turned out, the crystal remained intact, but its thin lead burned off. The laser's functionality was restored with a drop of conductive glue. The tools used are a sewing needle and lens 6.
To accurately set the ignition on the engine, it is necessary to use special devices - stroboscopes. They can be purchased at auto stores or made by yourself. In the second case, you will save a decent amount and make the most suitable device for your car model.
Features of factory stroboscopes and the principle of their operation
It is quite difficult to accurately adjust the ignition without using a strobe light. Such a device significantly speeds up the setup process; the lamp signals the appearance of a spark, which allows you to correctly set the ignition timing. Despite the fact that factory devices work efficiently and accurately, many car enthusiasts are in no hurry to buy them. The main limiting factor is the high price of stroboscopes. Most models use an expensive gas-discharge lamp; replacing it is equivalent to buying a new device.
The device itself can be made with your own hands using simple and affordable materials. There are several good manufacturing schemes that will help you save on purchasing factory analogues. For example, you can see the prices for the most popular stroboscopes that are on sale:
- Multitronics C2 - 900-1000 rub.
- AstroL5 - 1300 rub.
- Focus F1 - 1700 rub.
- Focus F10 - 5600 rub.
Homemade devices are made from flashlights, LEDs or a laser pointer. At a low cost (about 500 rubles), the device will work no less reliably and efficiently.
Instructions for the manufacture of a device for installing the ignition
Easy way
There are many different schemes on the Internet, almost all of them are easy to assemble and do not require large costs for materials. Let's consider one of the most popular schemes for creating a strobe light at home. From the details we will need:
- transistor KT315;
- thyristor KU112A, resistors 0.125 W;
- any flashlight with diodes (there should be 6 or more diodes);
- capacitors C1;
- low frequency diode V2;
- relay with index RWH-SH-112D;
- power cord 1 meter long;
- special clamps;
- copper wire about 10 cm.
All parts can be purchased at the radio market or in a specialized store. You can use an old flashlight or camera flash as a housing for the device.

Assembly diagram of a car strobe light in a housing from an old flashlight

Such a device can be used not only for installing the ignition. They can check the spark plug and adjust the operation of the regulator.
Homemade gadget using a timer
A strobe based on timer devices has a more complex circuit. Its main advantage is stable light pulses that do not depend on battery voltage. The device can also operate in tachometer mode; to do this, you just need to change the position of the regulator.

Timer strobes can also be used as a tachometer
Tip: It is better to use diodes from the KD521 series in the circuit. If you can’t find a domestically produced timer, you can take the foreign analogue NE555.
Scheme of manufacturing a device using LEDs
This device is based on the 155AG1 microcircuit; it is triggered by pulses with negative polarity. The circuit uses resistances R1, R2, R3, which limit the amplitude of the input signal. The required pulse duration is set by capacitor C4 and resistor R6. With standard settings this is 2 ms. The car's battery will be used as a power source.

LED strobes are highly reliable and can be used even in bright daylight
Video: how to make a strobe light with your own hands
How to properly set up a homemade product
To test the device in practice and set the ignition timing, do the following:
- Warm up the engine and leave it idling.
- We connect a homemade strobe to a power source.
- We wind the copper sensor onto the core of the first cylinder.
- We direct the light source to a special mark that is applied to the body.
- Find a fixed point on the flywheel pulley.
- In order for the two points to come together, it is necessary to rotate the ignition housing and then fix it in a certain position.
In practice, homemade stroboscopes are in no way inferior to factory ones. The main thing is to correctly assemble the circuit and check the operation of the device. Home-made stroboscopes are quite inexpensive and can be easily repaired if necessary.


