Windows 10 keeps asking for password
Often the situation may turn out to be such that the password for the operating system is forgotten. This is not surprising - you can quickly write down your authorization data, work on your PC for several months, safely lose the piece of paper with the code, and at one point realize that you need it. Someone will ask - but if a password is not required when logging into the system, then why enter it? It's simple - even on machines where authorization is disabled, you may need to enter a password, for example, after manually locking Win+L or after the next update. The thought immediately arises: how to remove the password when logging into Windows 10?
Today this is exactly what we will talk about. Moreover, the situation will be considered when you work from an account associated with Microsoft, and when a local account is used. The password reset process is similar to that in previous versions of Windows, but there are some differences. We will assume that for some reason you do not know your password, for example, you simply forgot it.
First of all, try entering your password in the usual and English layout. This approach can help if you entered data and forgot to switch it. It is also worth trying to log in with Caps Lock enabled. The fact is that for the operating system there is a difference between the words Alyosha and Alyosha. If for some reason you do not understand how to reset your password on Windows 10 or you encounter other difficulties, there is a video at the end of this article that duplicates what was written.
If your account has been synchronized with Microsoft and your computer is connected to the network, there will be no difficulties at all in recovering your password. You can do this directly on the Microsoft website. Let's look at the issue in more detail: follow all the steps of our step-by-step instructions. Let's get started:
- Visit the password recovery page on the official Microsoft website. To do this, follow the link. We will be asked to indicate the reason why we cannot enter - choose any. We indicate “I don’t remember my password.” Click “Next”.

- At the next stage, indicate the email from your account, enter the confirmation number and click on “Next”.

- A letter with a confirmation code will be sent to the email specified at the previous stage - copy it.

- Enter the confirmation code in the window shown in the screenshot and again press the key with the text “Next”.

- Enter a new password, confirm it and click on the “Next” button.

That's all. Our password has been changed and we can use it when logging into the operating system. Naturally, in order for it to be updated on your computer, you need to have a working connection to the network.
Try to constantly link your account to your Microsoft account. Firstly, this will prevent you from forgetting your authorization data or restoring it without problems. Secondly, all your data will be synchronized, and the user’s folder will be completely saved in the OneDrive cloud, which Microsoft gives to all its users for free.
How to reset your local account password
In order to use this option, you need to have a flash drive or disk for installing Windows 10. We discussed how to create it in. Let's move on to the instructions, each step of which will be shown in the screenshot for clarity.
- First you need to boot from our media. To do this, you need to set the USB or DVD drive as the first boot device in the computer's BIOS. In order to enter the BIOS, you need to press the Del or F2 button when the computer starts. You can also call up the boot menu - for this, each computer or laptop has its own key (see documentation). When the PC is started from a flash drive or disk, we need to get to the command line. To do this, click on the “System Restore” item.

- Next, go to the “Troubleshooting” section by clicking on the tile indicated in the screenshot.

- Select the “Command Line” tool.

You can open the command line by pressing Shift + F10 on the language selection screen. However, this option does not always work.
- In the command line, type diskpart and press the Enter button.

- Now we need to get a list of partitions mounted on the computer. To do this, enter list volume and press Enter.

- A list of sections appears. We need to remember the one on which Windows was installed. You can understand this by the size of the disk. In this case, our partition has a volume of 31 GB - this is Volume 2 with the letter D. Let's move on. Exit diskpart by entering the exit command.

- We continue resetting the Windows password, write a phrase like: move c:\windows\system32\utilman.exe and press Enter.

- The next line to enter is: copy c:\windows\system32\cmd.exe c:\windows\system32\utilman.exe and Enter again.

- If you followed our steps and entered your drive name correctly, then everything went fine. All that remains is to enter the wpeutil reboot command and press Enter again. Next, our PC will reboot and you will see the start of diagnostics.

- This will be followed by an automatic recovery process - in our case it will simply reset the password.
Note: the entire procedure described above boiled down to the fact that the cmd.exe file was copied to the System32 directory and renamed utilman.exe. This will make it possible to activate the command line without logging into Windows.
- When the computer starts, on the password entry screen, click on the “Accessibility” button - we have circled it in red in the screenshot.

- The whole trick is that at the last stage we replaced the standard Windows 10 tool with the command line and now “Ten” launches it, not realizing that it is no longer the same program. Go ahead. Enter the following operator in CMD.exe: net user your account name new_password and press Enter.

- If your login consists of two or more words, it must be entered in quotation marks. And if you don’t know the login, simply enter net users and Windows 10 will show you all users of the system.

Ready. Now you can log in using a new password without rebooting the system. Don't forget to return the list of accessibility features through Windows 10 Explorer running as an administrator.

Another option on how to remove the password from a Windows 10 computer
In order to use this method, you need to have Windows 10 Professional installed on your PC. The described option works with the command line already running. We talked above about how to call it through the special features button. The algorithm of actions will be as follows:
- We launch the command line and enter the following into it: net user Administrator / active: yes (if your Windows is an English release, or it was one, but you Russified it, then instead of “Administrator” enter Administrator). Finally, press Enter.

- Now you need to restart your PC, after which you will have the choice of the Administrator user, who can log in without entering a password.

- Just click on the name “Administrator” and log in.

Sometimes the second user appears even before Windows 10 reboots. Therefore, before you start rebooting, look in the lower left corner - perhaps an administrator has already been added there.
- But we need a password change, so let's move on. Once you log in (this may take a while the first time), right-click on the Start button and select the Computer Management menu.

- We follow the path indicated in the screenshot. In the right part of the window, click on the name of the user who forgot the password, and select from the context menu the item indicated by number 2 in the screenshot.

- Windows will notify us that changing the password is dangerous (we advise you to read the text in full), but we click “Continue”.

- It's time to change your password. Enter the code itself, confirm it and click “OK”.

Ready. The password has been changed and you can now log in to the system using it.

This option only works with local accounts. If you need to recover your Microsoft account password, use the first method or, after logging in, create another user.
Once the necessary changes have been made, revert everything back. Go to the command prompt and type: net user Administrator /active:no. This will disable login through the administrator account without entering a password. Leaving things like this is very dangerous.

Ready. Now your Windows is the same as it was, and you can safely log in.
New login method
- Boot from the installation media and when the language selection window appears, press Shift and F10 at the same time. (On some laptops you need to add the Fn button to this combination).

- The command line will open - which is what we actually needed. Type regedit and press Enter. This will launch the Registry Editor. Go to the registry section indicated in the screenshot.

- Open the “File” menu and select “Load hive” from it.

- Open the C:\Windows\System32\config section and select the SYSTEM.
Note! The disk on your system may be different. For example, in our case it is not C, but D.

- Windows will ask you for the name of the future parameter. This does not play any role - write any word in small Latin letters.

- Click on the newly created system registry section and select the Setup folder inside it. In the right part of the window you need to set parameters for the following keys:
- Assign the cmd.exe parameter to the CmdLine key;

- We assign parameter 2 to the SetupType key.

- We finish with the registry editor. We need to unload the bush. To do this, select the key we created on the left side of the program.

- Using the “File” menu, unload the bush into place.

- Confirm the action by clicking on the “Yes” button.

After these manipulations, you need to close regedit and the black command line window. Reboot and when the system starts you will see a command prompt open.

Now the user password can be reset by the operator: net user user_password - exactly as described above. Once the changes are made, type exit at the command line and press Enter. If you close the window with a cross, all changes you have made may disappear.
There is no need to return the system to its original position in the future. Any changes you made while working with the command line will automatically be restored to their default value.
If none of the described options helped you or after a series of experiments the system stopped starting at all, use the mode.
Password reset programs
On the Internet you can find utilities that are supposedly capable of removing the password from a Windows computer. We do not recommend using such software. The fact is that, firstly, it needs to be written to a bootable USB flash drive (and these are additional difficulties), and secondly, utilities most often work by brute-force methods and, if the password is of average complexity, you will not be able to find the correct combination. But most importantly, why is this necessary? After all, using our instructions, you will recover your forgotten code in 5–10 minutes. Moreover, there are several options that are enough for any situation.
This is where we will end. Now you know how to remove the password on Windows 10 in several ways. We hope our article helped you, but if you have any difficulties, describe them in the comments, and we or other users will help resolve the situation.
Video on how to reset a forgotten Windows 10 password
At the final stage of installing Windows 10, the installer requires you to enter the login and password for your Microsoft account or register a new account. If you agree to enter this data, the operating system will begin to require you to enter a password every time you turn on the computer.
Naturally, this is quite annoying, so many users are interested in how to disable the password request in Windows 10. And now we will try to answer this rather popular question.
Step No. 1. Execute the “netplwiz” command.
In order to disable the password request in Windows 10, you need to configure it to be entered automatically. To do this, we need to open the User Accounts window. To do this, you need to run the “netplwiz” command. Therefore, open the “Run” menu (key combination Windows-R) and enter this command.
You can also run the command “netplwiz” through the Windows 10 search bar. In this case, you need to enter “netplwiz” in the search and open the program that the operating system will offer you.

Step No. 2. Disable the password request in Windows 10.
After executing the “netplwiz” command, the “User Accounts” window will appear in front of you. In order to disable the request here, you need to uncheck the box next to the “Require username and password” function. After that, simply click on the “Ok” button.

Step No. 3. Confirm that the password request is disabled.
After you uncheck the box and click on the “Ok” button, a window will appear in front of you to confirm the changes. In this window, you will need to enter your current password that you currently use to log into Windows 10 twice.

After entering the password and clicking the “Ok” button, the password request will be disabled. And the next time you start Windows 10, you won't have to enter it.
It should be noted that this method of disabling the password request should be used only in cases where there is no danger that your computer will be used by strangers.
Addition. The method described above only works to turn on the computer. After resuming from sleep mode, you will still be prompted for a password. In order to disable the password request when exiting sleep mode, you need to make some additional settings.
If you have Windows 10 without the latest updates, then you need to open “Power Management” and disable the password requirement for the active power plan there. This is done quite simply. Right-click on the Start menu and select Power Options.


Here you need to activate the “Do not ask for password” function and save the settings.
 As a result, we disable the password request completely.
If you have the latest updates for Windows 10 installed, then you will not have the settings described above in the “Power Options” section. In your case, you need to use the new “Options” menu. To do this, click the “START” button, go to “Settings” and open the “Accounts - Sign-in Options” section there. In this section, there will be a function called “Login required”, you need to switch it to the “Never” state. After this, the system will not require a password either when turning on the computer or when exiting sleep mode.

If you have Windows 10 Professional or Windows 10 Enterprise, you can also disable the password when resuming from sleep mode using the Group Policy Editor. To do this, run the command “gpedit.msc” and in the window that opens, go to the section “Computer Configuration - Administrative Templates - System - Power Management - Sleep Settings”. In this section, you need to disable two options related to the password request when waking up the computer (marked in the screenshot below).
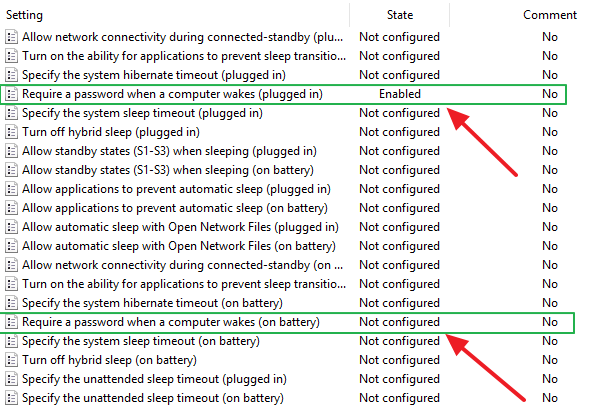
Once again, I note that the Group Policy Editor (gpedit.msc) is only available for Windows 10 Professional or Windows 10 Enterprise. If you have Windows 10 Home, you can disable the password prompt when resuming from sleep mode only through the Settings menu.
Typically, during the Windows 10 installation procedure, an account is entered, which subsequently entails the need to enter a password each time you log in to the system.
This causes some inconvenience to the user, and if the code contains a large number of heterogeneous characters, then there is also significant unjustified loss of time. Windows 10 has several options to shut down and quickly resume its working state.
For example, each time the computer owner exits the hibernation state, he or she must enter a password. Below is a guide that will help you disable the code request when logging into Windows 10.
Stage 1. Log in to the “User Accounts” menu
The following steps need to be taken:

Stage 2. Disable the display of the window for entering account data and code when logging into the OS
In the main menu “User Accounts”, enter the “Users” tab and here you need to uncheck the “Require user login and code” section. Then click “Ok”.

Stage 3. Confirm to the system the seriousness of your intentions to deactivate the password request
 Performing the steps in the second step will cause a menu to appear on the screen asking Windows to confirm whether to cancel the code disabling. The algorithm of sequential actions is as follows:
- In the menu that appears, enter the valid code to log into Windows 10 in the “Password” field;
- In the next field “Password Confirmation” enter the same code again;
- Next click on “Ok”.
Ready! Following the steps prescribed in steps 1-3 allowed us to successfully disable the code prompt when starting Windows 10. Now, after loading the OS, entering account credentials is not necessary.
However, after hibernation, the system will continue to prompt for a code.
Below are instructions in the form of “4 steps” to solve this problem.
Stage 4. Disable the code entry window when resuming from hibernation mode
To remove the OS login code after hibernation, you need to take the following steps:

All! Now logging into Windows 10 will not require the user to enter a code. Following the steps in all four stages of the instructions allowed us to remove the interfering window every time Windows boots or after the system “wakes up”.
The described method is not the only one. You can also remove the code prompt when logging in from the OS through the registry editor.
Alternative methods to solve the problem
There are two additional ways by which you can also effectively get rid of the problem in question.
Remove password using Registry Editor
An additional effective method to remove an annoying request is to use the Windows 10 Registry Editor.
To do this, follow the following step-by-step guide:

Getting rid of the user credentials request
In the case where the user uses a local account on the PC, you can remove the request for this data for a specific user. To do this, you need to perform several sequential actions:
- Open the command line with Administrator rights;
- Type “net users username”;
- Click “Enter”;
- Quit the command line;
- Ready! The OS will no longer prompt a specific user for a password.
Conclusion
As you can see, the process is quite simple to follow. The computer now quickly launches the operating system desktop. No need to waste precious time by simply skipping the login screen every time you turn on your PC. From now on, the user will not need additional effort to remember and type characters. But now the computer owner will need to take special care to prevent people who could unwittingly delete the necessary files, for example, children, from accessing important information, since to access the user’s desktop now you only need to press the computer’s power button.
Disable password prompt in Windows 10
Requiring a password when logging in is the main and, often, the only protection of your computer from unauthorized access. However, some users neglect this protection for the sake of convenience and prefer to log in without a password.
On the one hand, this is unsafe, but on the other hand, everyone has the right to choose for themselves whether they need security or not. Therefore, today we will look at several options on how to disable the password prompt when logging in.
Starting with Windows 8, there are three types of user account - local, domain, and Microsoft account. Regardless of the entry type, a password is required to log in. For a local account, you can simply specify a blank password, but for others this number will not work. However, there is a way out, and although it is impossible to completely remove the user’s password, you can set up automatic login, in which the password for a specific account will be entered automatically.
For local and Microsoft accounts, you can use the User Accounts snap-in. To open the snap-in, click Win+R and execute the command netplwiz or control userpasswords2.
In the window that opens, select the desired user, uncheck the box “Require username and password”
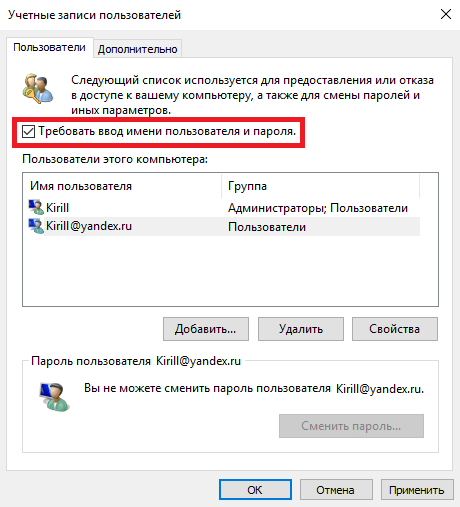
and enter the user password and confirmation. Then we restart the computer and automatically log in under the selected user.

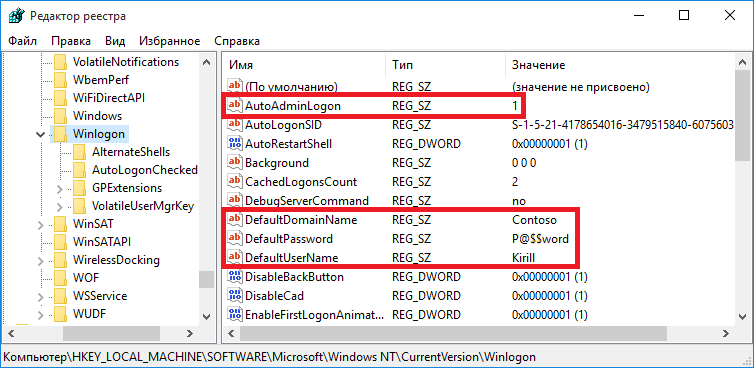
The previous method is not suitable for computers that are members of an Active Directory domain. In this case, you can disable the password request only by editing the registry. To do this, open the registry editor with the command regedit, go to the HKLM\Software\Microsoft\Windows NT\CurrentVersion\Winlogon section and perform the following actions:
Change parameter value AutoAdminLogon on 1
;
In the parameter DefaultDomainName enter the name of the domain or computer (if the computer is not in the domain);
In the parameter DefaultUserName enter a username that must log in without a password;
Create string (REG_SZ) parameter DefaultPassword and specify the current user password as the value.
After this, we reboot and log into the system under the specified user.
This method is suitable for any type of account - domain, local and Microsoft. However, you must understand that this method is less secure, since the user’s password is stored in the registry in clear text.
Disable password prompt when waking from sleep
So, we can disable the password prompt when the system boots. However, if you use sleep mode, the system will still require a password when you wake up. There are two ways to disable the password prompt when resuming from sleep mode.
The first method is power settings in the classic control panel. You can quickly open the desired section by running the command control /name Microsoft.PowerOptions and selecting "Power Button Actions".

By default, the desired option is inactive; to enable it, you must click on the “Change parameters that are currently unavailable” button.

And then in the “Password protection on wake-up” field, switch to the “Don’t ask for a password” option.

The second method is to set up accounts in the new control panel. To do this, open the Start menu, select Settings - Accounts - Sign-in options and in the “Sign-in required” field, select “Never”.

After this, your computer will wake up without a password. But you should understand that this is not safe, because... anyone with access to a computer will be able to easily access your account.
Conclusion
In conclusion, there are a few important points to note.
As already mentioned, passwordless login allows anyone with access to your computer to easily log in and gain access to your data and other resources, both local and accessible over the network. Therefore, you should use automatic login only if you are confident in the integrity of your computer;
Disabling the password request only applies to interactive login; when accessing a computer remotely (for example, accessing a file share), you will still need to enter a password;
The article is focused on Windows 10, but all methods also work successfully on Windows 8 and Windows 7.
When the Windows 10 operating system boots, a user with a Microsoft account must enter a password to sign in. This setting (password request) is performed by default to protect user data.
If unauthorized people have access to your computer, entering a password for your Microsoft account (formerly known as Windows Live) will prevent others from logging into the operating system and gaining access to user data. Therefore, keep in mind that requiring you to enter a password to log into Windows 10 increases the security of your computer and protects you from possible negative consequences.
Constantly entering a password when booting, rebooting, or waking up from sleep mode is not always justified for those users whose computers do not have access to unauthorized persons. Therefore, in this case, it makes sense to disable the password in order to use Windows 10 without a password by removing the corresponding prompt when logging in.
In this article, I will talk about how to remove the password in Windows 10 when the computer boots and when the computer wakes from sleep mode.
How to disable login password in Windows 10
To disable the password when logging into Windows 10, you need to change your user account settings.
Press the “Windows” + “R” keys on your keyboard, in the “Run” window that opens, enter “netplwiz” (you can enter “control userpasswords2”), and then click on the “OK” button.
You can run this command in another way: enter the expression “netplwiz” in the “Search in Windows” line, and then click on “Run command”.
After this, the “User Accounts” window will open in the “Users” tab. Here you will see a list of users on this computer. Select the required user if there is more than one.

In the Automatically sign in window, enter your Microsoft account password, confirm the password, and then click OK.

After applying these settings, the password prompt will be removed when loading the Windows 10 operating system.
Now all that remains is to disable password entry when Windows 10 wakes from sleep mode (changing power settings).
Disable Windows 10 password prompt when resuming from sleep mode
To disable the password in Windows 10, when waking up from sleep mode, go to the Start menu, go to Settings. In the Settings window, click on Accounts. In the Accounts window, go to the Sign-in Options section.
In the “Login required” setting, the operating system asks the user: “If you are away, how long should Windows require you to sign in again?” By default, the “Time when the computer wakes from sleep mode” setting is activated. Select the Never setting option.

After you disable the password prompt when waking from sleep in Windows 10, the operating system will no longer require you to enter your Microsoft account password.
After the reboot, the password entry field in Windows 10 will be removed from the operating system login window.
Conclusions of the article
When the Windows 10 operating system boots, if the computer is using a Microsoft account, the user is required to enter their Microsoft account password to sign in. These are security requirements to protect user data from unauthorized entry into the operating system. The user can remove the password prompt in Windows 10 when turning on the computer, or when Windows exits sleep mode.
How to remove password when logging into Windows 10 (video)


