Installing windows xp step by step instructions. Installing Windows XP is an installation process via BIOS. Setting initial parameters
Greetings to those who have visited the site, today we will talk about how to reinstall Windows XP on your computer. In fact, there is nothing complicated about reinstalling the operating system; the main thing is to do it yourself at least once! So, gentlemen, let's get down to solving our issue!
Before installing the operating system, you need to move all the necessary information from the system disk (the disk on which your version of Windows is installed, usually drive C) to any other location, for example, to a disk or USB drive, or to another system partition! Next, you need to take care of the correct booting of your computer for the subsequent installation of the operating system. The fact is that in normal operation, your computer boots from the hard drive. But when reinstalling the operating system, you need to boot, for example, from a DVD drive of your drive or from a USB drive, via a USB port. After all, to reinstall the axis we will need to boot from the Windows XP distribution in the form of a boot disk or bootable USB flash drive.
In order to change the computer's boot priority, we need to correctly configure the BIOS (a small program located on a permanent storage device). There's nothing wrong with this: you just need to change one function. Thanks to this, the main boot will be done from the installation disk.
Preparing to reinstall Windows XP
To enter the BIOS program settings, you must restart the computer, and when the initial black screen appears (you can determine it by the running numbers and rapidly changing inscriptions), you must press the Delete button. If it doesn't work, then F10, shift+F2 or shift+F1. The key combination for entering the BIOS interface may vary depending on what brand of motherboard you have. Each developer is trying to make their own adjustments, which is undoubtedly not very convenient for the average PC user.
Then a screen will appear with many tabs, among which there is the inscription Boot. Navigation is carried out using the arrow keys. Let's move to Boot. The download setting appears there. Moving up/down, we reach Boot Device Priority. Press the Enter key. A window appears to select the device from which to download. In it, again use the up/down buttons to select the first boot device. Press Enter. The monitor will display a list of several devices, for example: IDE, CD ROM, HDD, 1st FLOPPY DRIVE, USB, DVD ROM.

Using the arrows, we get to the CD ROM or DVD ROM (i.e., to any device that allows booting from a disk). Then press Enter again. Now our disk drive is the first device on the priority list! Press F10 on the keyboard. A small window will appear with an inscription asking about our consent/disagreement to save the changes. We agree. To do this, use the arrows to select OK and Enter. That's it - the preliminary stage of installing the operating system is complete. Next comes the main installation process.

Reinstalling Windows XP
After setting up the BIOS, the computer will boot from the drive. Therefore, you should insert a Windows disc into the DVD-ROM before starting. Turn on the computer. If the message Press any key... appears, press any key and begin to enjoy the OC installation process. This will start the installation process. The first thing you will see is a blue screen with the words “Installing Windows”.

First, the files will be automatically copied to your hard drive. There is no need to press anything here - just patience. Then a menu will appear with 3 options to choose from: proceed with installation, restore the system, or exit. We are interested in the first line. Press Enter.

Next, the menu awaits us again. This time a list of partitions on the disk will be displayed. They represent the parts into which your hard drive is divided. Here you should select the location where Windows will be installed. Navigation is carried out using arrows. As a rule, section C is selected. Mark it, after which 3 lines will appear again: delete, create a new area or install here. After selecting the last option, press the Enter button to continue the installation process.


Now a window should open with suggestions for formatting (deleting information) or leaving everything as is, without changes. Formatting will be offered in NTFS or FAT format. I recommend leaving the formatting format that was set before your intervention. If you saved the files you need on a flash drive or somewhere else before installation, feel free to clean the disk by selecting the first option. This will install Windows in a completely empty area. Using the arrows, we mark the selection, then the Enter button confirms our intention.

Then you should confirm the formatting or, on the contrary, cancel it. This offer will appear on the menu. Press the F button. Cleaning will then begin. You can’t touch anything further, just wait.


Once formatting is complete, the computer will automatically continue copying files from the disk. After this, there will be a reboot. Here you need to go into the BIOS again and set the boot priority in the order in which it was originally set. For example, on Floppy Drive (see preliminary stage). Attention: the IDE should be in second place, and the CD ROM should be in third place. It is advisable to put HDD first - booting from the hard drive! At the end, just like F10 – OK – Enter. Essentially, we remove the boot priority from the DVD or CD drive.

After exiting, the installation of the system will continue. During it, you will be asked to configure regional standards and language. Russian-speaking users do not need to change anything here. The next step is to enter the company name and full name. This form is completed at your discretion.

Then you need to write the administrator password and computer name. The latter is indicated automatically, but you can change it, and as for the password, whatever you want. If you want to increase security, then indicate it. The most important thing is not to forget it later. However, you can later enter a hint for it, reducing the risks to a minimum.

Then you are prompted to set the date and time. The current date and time according to Moscow time are also automatically written here. But if changes are required, then other data can be installed. It all depends on the region in which you live!

The installation of the operating system will then continue. Once completed, the computer will automatically restart. When you first start up after installation, a window will appear on your monitor notifying you that the screen resolution has changed. Move the cursor to the OK square and click on it with the left mouse button. You can subsequently set the screen resolution in accordance with the maximum possible resolution of your monitor.

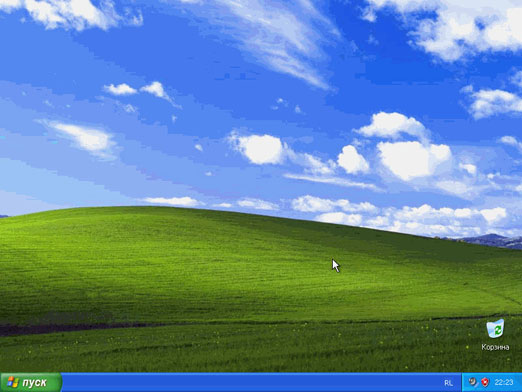
The last stage is the users window. Here you should fill out an account (preferably two). You can write your name or your favorite word. Then the long-awaited desktop will appear. Installation completed. Congratulations!
It may seem strange to some that in 2014 I am writing an article on installing such an old operating system. But as practice shows, people still often ask me to install Windows XP. In addition, in the past month alone, more than 30,000 queries for “installing windows xp” were entered in the Yandex search engine, which indicates the continued popularity of this version of Windows. And this is not surprising. There are many users who have become so accustomed to this operating system over the years that they are reluctant to explore new ones. They are happy with everything, because under Windows XP they can still while away the hours in games, the Internet, and various applications. It’s a matter of habit, what can I say 😉 There are also many people who own old computers. They simply have no choice, even if they wanted to install something fresh.
I will go directly to the essence of the article. To begin with, I strongly recommend that you read my entries “” and “”. Also, if you are installing a pirated version of Windows, you must write out the product key, without which installation will not be possible. The key can be viewed on the website where you downloaded the Windows image, in the description of the distribution. Another key may be in one of the text files of the image. Some pirated builds of Windows show you the key at the very beginning of the Windows installation. For licensed Windows, the key can be found on the sticker of the original disc box.
If you already have a bootable flash drive or disk, and in the BIOS you were able to set the computer to boot from the appropriate device, then you can start installing Windows. Insert a bootable USB flash drive into the computer’s USB port or a CD/DVD disk into an optical drive, and restart the computer. If you are installing the system from a disk, a white message should appear on a black screen with the text “Press any key to boot from CD...”. Immediately press any key to get into the Windows Installer. If you install Windows from a bootable USB flash drive, then you may see a boot menu where you must select the phrase “Windows 2000/xp/2003 setup” or “Installing Windows XP” (depending on the method you used to create the bootable USB flash drive) , press Enter. Next, select the 1st line with the text “First part of Windows XP setup from partition 0”, press Enter again. The Windows Installer should launch (blue screen titled “Installing Windows”). We wait for a while and don’t touch anything. When the “Welcome to Setup” screen appears, press Enter.
Next you will be forced to read the license :) Press the F8 key on your keyboard. A screen appears where you must select which logical drive you will install Windows on (recommended drive with the letter C), press Enter. Attention, all information from the selected disk will be destroyed! If you see “Unallocated area” instead of logical drives, you will have to create the drives manually. Press the C key and assign the volume of the future system disk (preferably at least 50,000 MB), confirm the choice with the Enter key.

In the next window, select “Format partition in NTFS system”, Enter again. After formatting, the process of copying Windows files to your hard drive begins. Wait until the computer shuts down and reboots. After rebooting, it is advisable to go into the BIOS and set your hard drive as the boot device (just as you set your flash drive or optical drive as the boot device).

The Windows installation process begins. Just watch until the computer asks you to intervene in the installation process. In the “Language and Regional Standards” window, leave everything by default, if you have it as in the figure below (if not, then select the country and language manually), click “Next”. In the “Setting program ownership” window, write what you want in the “Name” line, again “Next”.

In the next window, enter the product key (I wrote about it at the beginning of the article), click the “Next” button. Another window with time and date settings, change the time zone and date if necessary.

In the next two windows you don’t have to change anything, just click “Next”.

You can go have coffee or tea, Windows installation will continue without your participation. All that remains is to complete the basic setup once the installation is complete. Do as shown in the pictures below.


As a result, a window with screen parameters will appear, just click “OK” and then “OK” again. The Windows XP desktop loads. You did it! All that's left is .
Best regards, Alexander Molchanov
Most likely, the reason for this is the clogging of the system registry with various files that remain after installing/uninstalling programs, applications, games, etc. In addition, the cause of system “brakes” and “glitches” can also be viruses, trojans, spyware that have crept into you and other “evil spirits”.
Our specialists can help and “cure” your computer from the consequences of virus attacks. But it is still advisable to reinstall the operating system for reliability. This article will discuss exactly how to reinstall Windows, in this case XP.
What to do before reinstalling windows xp
Before reinstalling windows xp, you should move/copy all important files (photos, documents, music, etc.) to a disk or flash drive. If your hard drive is divided into sectors, move important information from the system drive to another one, for example, from drive “C” to drive “D” or “F”.
This is necessary because all information from the system drive will be deleted, so in the future we do not advise you to save anything on the “C” drive. Typically it only serves to install the operating system and programs. We recommend installing even games on another drive, so that after reinstalling the system you can continue playing from the saved moments.
You should definitely check the presence of all the main drivers that came with your computer (graphics adapter driver, sound card driver, motherboard driver, etc.). If they are missing, you should download the missing ones from the Internet.
Correctly setting up the BIOS before reinstalling Windows XP
To reinstall windows XP we need to configure the BIOS. BIOS settings vary slightly on different computers, but the differences are not significant.
How to install Windows via BIOS? To do this, while booting the computer, you need to press the “delete” button or “F2” several times (5-6 times), depending on the motherboard. A blue BIOS window should appear in front of you (the screenshots show examples with the two most popular BIOS versions). In it you need to find the inscriptions: Boot, or Boot device priority, or Boot sequence, again, depending on the type of motherboard.
As everyone knows, to work with a computer we need an operating system, which over time becomes “unusable” due to viruses, “garbage” and other factors. Many people think that it is better to turn to a professional for reinstallation, but I offer you step-by-step instructions for installing Windows XP. After studying it, you will have no doubt that you can install Windows XP yourself.
Why do you have to reinstall Windows?
According to statistics, even if you have good computer protection from viruses and careful handling, you still have to reinstall Windows xp every three years. The “garbage” that accumulates in the system is sometimes the remnants of uninstalling programs and games, which contain settings, configuration files and other system files of the old application. Many programs make entries in the registry, and after deleting the entry remains “live” in the system. It also happens that the computer hangs and there is no way to “revive” it, and the conclusion suggests itself: you need to install a new Windows xp.
Setting up your computer to boot from disk.
Usually, when the computer boots, the motherboard splash screen appears for a moment, then the post is checked, and now we see the “Windows XP” greeting. To install, we do not need to launch Windows itself, but we need to launch a disk with our windows xp image. To do this you need to go to Bios. To enter Bios, you must press the DEL or F1 key when turning on the computer. (On laptops use F1, F2, F3, DEL, Ctrl+Alt+Esc. If more than one combination does not work, then you need to look on the official website for how to enter bios).
Most often there are only two types of bios:

1. Phoenix AwardBIOS.
If you have this particular version, then you need to do the following: enter the Advanced BIOS Features section, select First Boot Device and assign the value CD-ROM. Then press the F10 key (to save the settings and exit) and select Yes in the dialog box that appears.

2. American Megatrends BIOS.
In this version, the background will be gray and the sections will be written in a line at the top. First you need to enter the Boot section, then the Boot Device Priority subsection and in the 1st Boot Device item select your CD-ROM drive. And just like in Phoenix AwardBIOS, press the F10 key and confirm Yes.
This completes the computer setup.

Launch the windows installer.
The first step is to insert the Windows disk into the drive and restart the computer. On the dark screen we will see the inscription “Press any key to boot from CD”, which means press any key to boot the disk, which is what we do. This message is displayed for no more than five seconds, so you need to immediately press any key. If you didn’t have time, you should restart the computer and press the key again.

On the monitor we will see that the Windows installation has started. There is no need to interfere unless you want to install a special RAID or SCSI driver. In this case, you need to press the F6 key.


We press Enter and the license agreement appears; to agree and continue the installation, press F8. Next, you need to select the hard drive partition on which the installation will be performed. If the disk is new and there is only an unallocated area on it, you need to create a partition (C key), specify the required size in it.

We will also be offered to format the hard drive quickly and normally. Formatting is best done normally with the ntfs file system. After all, the long-awaited installation of windows xp will finally begin; upon completion, the computer will reboot itself and a window will appear with the inscription “Press any key to boot from CD”, this time we are not pressing anything!

A window like this will appear in which you don’t need to change anything, but in the next one, be sure to enter the Name and Organization.


The password is set at the user's discretion. We leave the date, time and time zone as is or adjust it if necessary.

If the network card driver was built into this build of Windows, then you will see a configuration of network parameters in which you need to select “Normal settings” and click “Next”.

When selecting a workgroup or domain, it is worth checking the first item with the value WORKGROUP.

Well, here we see the Microsoft logo and the latest windows configuration settings.
Welcome to logging in and loading the desktop.
In contact with
Probably every second computer-related website has an article about how to install Windows XP operating system. I thought that let my blog be no exception and remain on it Windows XP installation instructions.
You can install Windows on a blank hard drive; on top of an already installed system; or as a second (third, etc.) operating system. Each of these options has its own characteristics. Today I want to tell you how to completely reinstall your existing operating system while formatting the system disk.
In general, you can start installing Windows XP in two ways: 1) by booting from the installation disk; 2) directly from the installed system. The first option is preferable, and we will consider it.
A small digression: I did not take the screenshots used in the article myself. I borrowed them from the site compbegin.ru. I hope the author won’t be offended by me for this :)
So, for installation we need boot disk with Windows XP operating system. Only such a disk contains a special hidden partition with important system files that will allow the computer to boot directly from this CD.
We turn on our computer and first of all go to the BIOS to configure booting from disk. To do this, immediately after turning on, press the key on the keyboard Delete or F2(other keys may also be used, so you need to carefully watch the prompts on the screen).
Once in Bios, you need to find the section with the word Boot, and then change the order of boot devices in it so that the CD-ROM is in first place. Depending on the BIOS version, the device from which the computer will boot is either selected from the list or moved to the top using the keys F5/F6, +/-
.
After the changes have been made, we exit the BIOS, saving the settings. Before leaving, you need to insert a disk with Windows XP into the drive so that the computer can boot from it.
If any Windows operating system was already installed on your computer, then after rebooting you will see “” on the screen (this means “Press any key to boot from CD”). Accordingly, you need to press any button on the keyboard. If you wait more than 10 seconds, the current operating system installed on the hard drive will begin loading (then you will have to restart the computer again).  The Windows XP installer shell will appear on the screen. The OS will check the hardware installed on the computer and begin downloading installation files.
  At the end of this process, a window will appear asking you to begin installing Windows. Click Enter on keyboard.
 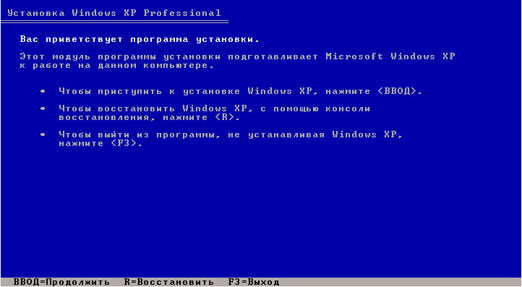 Next, accept the license agreement by clicking F8.
 It will then search for previous copies of Windows installed on your computer. If any are found, you will see a screen with a list of these systems.
 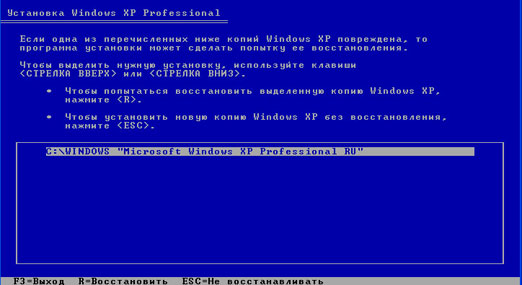 Here you will also be offered:
1) Restore the found copy of Windows by pressing the R key .
Recovery can help if Windows system files are damaged, deleted, or replaced by infected files.
If you select this option, you will have to go through the full system installation procedure, during which all system files of the old copy will be replaced with new ones from the CD. All your data, settings and installed programs will not disappear anywhere.
2) Install a new copy of Windows by pressing the Esc key .
Because we want to install a new Windows XP, then press now on the keyboard Esc.
You will not see a window with a list of installed systems if you are installing the system on a new hard drive, or if the previous copy of Windows has a different edition or service pack.
Because in my case, the operating system was already installed on the computer, and the hard drive was already distributed into logical drives. Therefore, a window appears listing all found partitions. 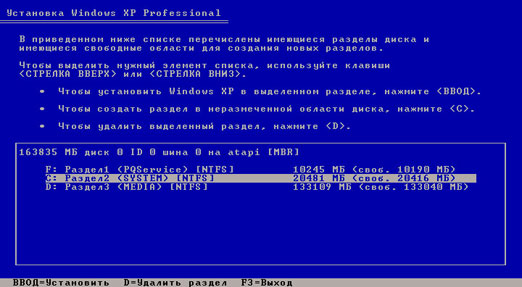 If the current partitioning of your hard drive does not suit you, you can delete existing partitions by pressing D(you can select the desired section using the arrows on the keyboard). After deleting a partition, the area it occupied becomes unallocated, and all data located on this logical disk is deleted.
The existing structure of the hard drive suits me, so I use the arrow on the keyboard to select the partition in which the system will be installed. Let it be C: Section2 (SYSTEM). Then I click Enter.
If the following window appears, just click Enter. Then select “Format partition using NTFS” and click Enter.
 The formatting process will begin:
  When it’s finished, Windows XP files will begin copying to your hard drive:
  After the copying is completed, the computer will reboot. If after rebooting a screen appears that says “”, do not press anything (just wait 10 seconds). Otherwise, the installation will start again.
Next, Windows will offer to configure the language and region. Click “Next”.  In the “Setting program affiliation” window, enter some name (for example: Ivan) and the name of the organization (for example: Nome). Click “Next”.
  The “Product Key” window will appear, in which you must enter the Windows XP serial number.
  Next, come up with and enter a computer name under which it will be visible on the network (use Latin letters). The administrator password can be left blank.
  In the “Setting time and date” window, check all the settings and click “Next”.
  You will see the next two windows only if the Windows XP distribution contains a driver for your network card. In the first of them, we leave the marker in the “Normal settings” position, and in the second, we agree with the name of the working group WORKGROUP and simply click “Next”.
 Windows will then begin setting up the network and copying files. After the installation is complete, the computer will restart and offer to automatically adjust the screen resolution - click “OK”.
  A welcome screen will appear - click “Next”.
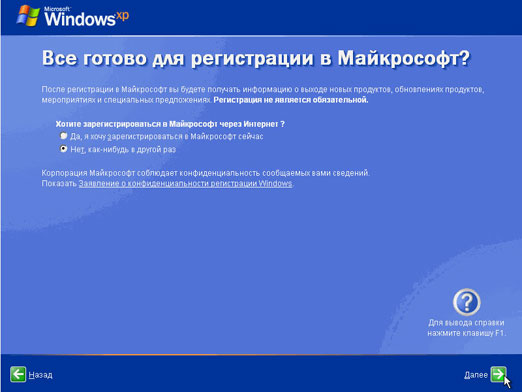
  The next window will ask you to enable automatic updates. You can select “Delay this action” and click “Next”.
  If the network card driver was installed during installation, two more windows will appear in front of you. In the first “Test Internet connection” click “Skip”. And in the second, put the marker in the “No, some other time” position and click “Next”.
 The account creation window will appear. In the “Your account name” field, enter any name in Latin letters and without spaces. You can also create a second, third, etc. now. users, but for now one is enough. Click “Next”.
  This completes the installation of Windows XP. After clicking the “Finish” button, the Desktop will appear.
 Do not forget to return the computer to boot from the hard drive in BIOS.


