Windows xp RAM testing. Program for testing RAM MemTest86: how to use? Instructions
There are situations when, to diagnose problems with a PC or laptop, you need to test the RAM. This operation becomes especially relevant if the computer reboots on its own or BSOD screens and errors like Memory could not be read are displayed on its display. The best program for testing RAM is MemTest86. Read the article on how to use it.
Symptoms of RAM failure
You should test RAM to identify a faulty PC component in the following cases:
- spontaneous computer reboots;
- frequent occurrence of BSOD;
- crashes of applications that use a large amount of RAM (3D games, compilers, complex office packages);
- the appearance of artifacts on the display, although the video card is fully operational;
- computer failure to turn on (possibly with sound signals).
In the latter case, it makes sense to read the instructions that came with the motherboard to determine which specific device is preventing it from turning on.
Description and principle of operation of MemTest86
Only one person took part in the development of the first versions of the application - Chris Brady. The program for testing RAM runs in DOS mode using its own bootloader, so the performance of the OS and hard drive does not affect its functionality in any way. MemTest86 can work with multi-core CPUs and almost all modern motherboard models.

During RAM testing, the application writes the same data to RAM cells. After they are completely filled out, the information is read and compared with the sample. The operation is repeated twice. The first time the MemTest86 program fills memory, starting from low addresses. In the second - from the older ones.
After each cycle, the sample is changed to a different one to most effectively identify errors. All operations can be repeated indefinitely (until the user completes the work) or a specified number of times (configurable before testing).
Utility versions
The program is distributed in several versions: Free Edition, Pro Edition, Site Edition. For home use, the Free Edition is quite sufficient. MemTest86 Pro and Site editions are designed for professional use. They added automation functions, creating custom reports, and downloading the program over the network.
There is also an application called MemTest86+. It was created by another person. The latest version was released in 2013, after which the development of the application stopped. Memtest86+ is not recommended for testing modern equipment.
MemTest86: instructions for creating a bootable flash drive
How to create a flash drive?
There are many different versions of the MemTest86 program distributed on the Internet. The application is not available in Russian. It is best to download the utility from the official website. The latest version of the application is always available on it, and the risk of infecting your computer with a virus with this approach is minimal.
This article focuses on creating both a bootable USB flash drive and a DVD. The first option is the most popular in the modern world of information technology. The second method is suitable for those users who do not have a USB drive at hand.
A detailed guide comes with the MemTest86 application. The developer's instructions are written in English. It is preferable to use it rather than materials from third-party sites.

Creating a bootable flash drive will not take much time, and even an inexperienced user can cope with this operation. Follow these steps:
- Unpack the downloaded archive and run the imageUSB.exe file.
- At the top of the expanded window, select the USB drive and click on the "Write to UDF" button.
- Once the process is complete, a bootable USB flash drive will be created.
Before recording a program onto a USB flash drive, be sure to copy all the data stored on it to another drive.
Creating a bootable DVD
If you don’t have a flash drive at hand, you can create a MemTest86 boot disk. Windows must be functional, so performing the operation on a failed computer will not work. It doesn’t matter whether you have a CD or DVD, it will take several tens of megabytes to write files to the drive.

To create a bootable disk, follow these steps:
- Download the ISO image from the official website of the software developer.
- The file comes in a ZIP archive, so extract it to any directory before proceeding with further steps.
- Download and install the UltraISO program. After installation, it is recommended to restart your computer.
- Unpack the image.
- In the main program window, click on the icon with a folder and an arrow. In the dialog that opens, select the image file.
- After that, click on the "Burn image" icon. A burning disk is drawn on it.
- If there are several recording drives on your computer, select the one that will be used at the moment.
- Check the box next to "Verification".
- Place the DVD in the drive and click the "Burn" button.
- Wait for the process to complete.
Setting up the BIOS and launching the program

Before starting the utility, you will need to change the BIOS settings, to do this:
- Insert the flash drive into the computer's USB port and reboot.
- Enter the BIOS configuration utility by pressing the DEL key as soon as the PC turns on. The button to launch the utility may differ depending on the motherboard used.
- Move the cursor to the line "1st Boot Device". Set the switch to "USB". Instead of "USB", in some BIOS versions the device may display the full name of the flash drive or "USB-HDD". Sometimes, to perform this operation, you first need to enter the "Advanced Features" or "Boot" submenu.
- Exit the BIOS and save the settings. To do this, press F10 and then answer the utility question in the affirmative. The computer will automatically reboot and the program will launch.

If the BIOS version allows you to boot from the selected device without preliminary configuration, just press the F8 key and then specify which drive to use as the boot drive.
If you are using a laserdisc, follow the same instructions, but set the first boot device to the floppy drive. If you cannot configure your PC, read the instructions that came with the motherboard. It can be found on the manufacturer's official website.
MemTest86: how to use the utility
After starting the program, RAM testing will begin automatically. The user will only need to wait for the verification to complete. The test time depends on the performance of the RAM and the presence of bad cells on it. Typically the diagnosis takes several hours. Professionals working in service centers recommend testing RAM for 3-4 hours, regardless of the diagnostic speed.

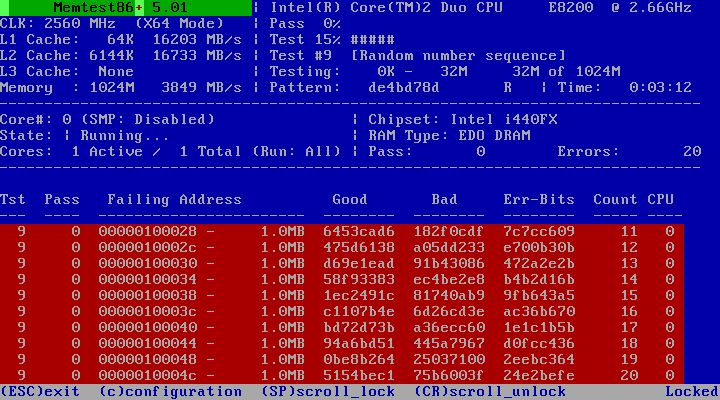
The percentage of completion of the scan is indicated at the top. The second line shows the number of the test currently running. The third shows the completion percentage of the current test. As said earlier, the application runs tests with different samples one after another. There are 9 of them in total, but after the last one ends, the program will not end, but will continue diagnostics. This will continue until the application is turned off.
After passing all nine tests for the first time, the message “Pass Complete” will appear on the screen and the number of errors detected by MemTest86 will be indicated. How to use this information? Even if only one error occurred during diagnostics, it means that the RAM modules require replacement.
If your computer has several RAM sticks, you can check to see if they are all faulty. To do this, you need to leave only one module in the PC and perform diagnostics. Then you need to disable it, install the next one and start testing again. Those modules for which no errors occur during diagnostics are operational.
It happens that the tests of each RAM stick separately pass without errors, but after installing all the modules on the motherboard, failures still occur in MemTest86. How to use memory modules in this case? Probably the RAM sticks operate at different frequencies. You won't be able to use them on the same computer. One or more modules need to be replaced.
Memtest86 freezing during operation also indicates a RAM failure.
Methods for restoring RAM strips
If a RAM testing program shows errors, this does not always mean that the RAM modules are faulty. Sometimes failures begin due to contamination of the contacts of the memory sticks themselves or the slots of the motherboard.
Try cleaning the shiny module contacts with a regular eraser and then wiping them with alcohol. The same procedure should be carried out with regard to the slots on the motherboard. After cleaning, run the test again. If errors still occur, it means that to restore the computer’s operation it is necessary to replace the RAM sticks.
If we can find out on a computer that the hard drive needs defragmentation, then we will not identify significant problems in the RAM of the computer or laptop. RAM-related errors are difficult to fix. A more detailed analysis can be obtained using third-party programs, but do not underestimate Windows 10, which develops instantly. In this guide, we will look at ways to diagnose and check RAM for errors, both in the standard way and check for errors using the popular MemTest86 utility.
Possible computer RAM errors:
Before throwing sins at RAM, you need to know approximate errors and symptoms that will help us move in the right direction. We will analyze the most popular symptoms of computer or laptop RAM errors.
- Your computer beeps several times during startup.
- Crash or under heavy load in 3D games.
- The computer keeps rebooting.
- Problem accessing and working with files.
How to check RAM in Windows 10 and Windows 7
- Enter in search mdsched.exe, in later Windows systems, press or the combination of Windows + R buttons.
- In the next window, select the mode that is currently suitable. (The tool also offers the option to schedule a test on the next reboot if you are unable to close your applications and restart immediately).

- As soon as the computer restarts, it will start in the Windows Memory Diagnostics environment, and tests will immediately begin running in standard mode. In this mode, the tool will run all the checks available in the main mode, in addition to LRAND, Stride6 (with cache), CHCKR3, WMATS+ and WINVC. You can also select scanning parameters by pressing the key F1.

- After clicking F1, the test selection will appear: basic, regular, wide. Below you can enable the cache and number of passes. In the expanded "Wide" test mode, more tools will be available, which will allow you to thoroughly diagnose RAM for performance. Disabling the “cache” will allow direct access to RAM, which will improve the quality of diagnostics. When you have configured the settings for scanning, click F10 and it will start checking the RAM.

Checking test results
While you can see the status during the scanning process, once the test is completed, your computer will restart automatically and you will need to use Event Viewer to see test results to see if you have a bad RAM module.
- Press a combination of buttons Win+R and enter eventvwr.exe to open Event Viewer.

- Expand the folder " Windows logs" and right click " System", select from the menu " Find"
- Enter "Find" in the search field MemoryDiagnostics-Results.


- In Event Viewer, double-click the source MemoryDiagnostics-Results and look at the result, if there are no errors, then you can not blame the RAM of your laptop or computer.

What to do if there are errors when diagnosing RAM?
- Your best bet is to replace the RAM stick.
- You can try cleaning the contacts from dust on the bar and in the connector.
- Try inserting one strip into different slots to identify the problem in the module or slot itself.
How to test RAM with MemTest86
If you checked the RAM using Windows and did not find any errors, but you are sure that there are errors in the RAM, then use the MemTest86 program. Select on the website, download a bootable CD image or for a USB flash drive to run the program from under BIOS.

After downloading, open the archive" zip" and run the file " imageUSB.exe" to start the program.
- Insert the formatted flash drive into your computer and click " Refresh drives", so that the program sees the drive.
- Select mode " Write to UFD".
- This is the image in the archive folder" MemTest86", which will be written to the flash drive.
- Click " Write to UFD" to write to a USB flash drive. After everything has been done, you can restart the computer and it will start under bios with the MemTest86 program and begin diagnostics.

- When you restart your computer, your computer's RAM will be checked.

- If errors appear, they will appear in red at the bottom, like in the picture.
The guide was covered on Windows 10, but the RAM Checker has been available for years, which means you can also use it on previous versions, including Windows 8.1 and Windows 7.
Checking RAM for errors is carried out to identify malfunctions in the operation of the RAM module. Memory problems manifest themselves on a computer in the form of “blue screens of death” (BSOD), unstable Windows operation, sudden termination of programs, freezes, constant computer reboots, etc.
Random access memory (RAM) is a random access memory device (RAM), produced in the form of a module containing microcircuits, which is inserted into the corresponding connector on the computer motherboard. RAM temporarily stores data and commands needed to operate the computer.
If the Windows operating system and installed applications are unstable, the user needs to find the cause of the failures on the PC or laptop. Problems in the system arise not only due to the operation of the software, but due to malfunction of the equipment installed on the computer.
When searching for the cause, in most cases, the causes of failures are not always obvious, since similar symptoms can occur due to different malfunctions.
If you're experiencing problems with your computer, there are some things you can do to make sure your computer's hardware components are working properly. Therefore, the user can independently check the hard drive for errors, check the RAM for errors, etc. After making sure that important equipment is working properly, you can continue to determine the causes of failures, narrowing down possible directions for troubleshooting.
It happens that computer malfunctions occur due to RAM errors. Therefore, to find out the possible cause of the problem, you should diagnose the computer's RAM.
To check the computer's RAM, we will use the standard Windows Memory Diagnostics Tool utility, which is part of the Windows operating system. The Windows Memory Checker is built into the Windows 7, Windows 8, Windows 8.1, and Windows 10 operating systems.
To check memory, you can use third-party utilities, for example, Memtest86 or Memtest86+.
Before performing a RAM test, pay attention to the following points:
- Before performing the test, if possible, carefully remove the memory stick or sticks (if there are several) from the corresponding connectors on the motherboard. Carry out maintenance: clean the memory module and connector from dust, make sure there is no oxidation on the contacts. Wipe the contacts with a regular eraser. As a result of these steps, after checking the computer's operation, further memory testing may not be necessary.
- The memory test can be carried out for all RAM sticks at once (if there are several of them), or you can check the RAM memory sticks first separately (preliminarily leaving one stick), and then together. Provided that the user has the technical ability to check individual memory modules.
In this article, we will look at using the memory diagnostic tool in the Windows 10 operating system.
Checking RAM in Windows 10 using the Windows Memory Checker
Diagnostics of RAM in Windows 10 using the Windows Memory Diagnostics Tool takes place in several stages:
- Launch the Windows Memory Checker.
- Test memory using the Windows Memory Diagnostic Tool.
- Receiving the result of the check.
First, run the Windows Memory Checker. You can do this in several ways:
- In the Windows Search box, type "Windows Memory Checker" (without the quotes), and then launch the desktop application.
- Press the "Windows" + "R" keys on your keyboard. In the “Run” window, in the “Open” field, enter the command: “mdsched” (without quotes), and then click on the “OK” button.
As a result, the Windows Memory Checker will launch on your computer. The "Check your computer for memory problems" window offers two options:
- Perform a reboot and check (recommended) - the RAM check will be performed immediately
- Run the test the next time you turn on the computer - the memory test will be performed the next time you start the computer
After you restart your computer, the Windows Memory Diagnostic Tool window will open. The tool will automatically run a memory test, which by default runs in two passes. The verification process will take a few minutes.
The utility window displays the general status of the test and shows the percentage of test completion. This contains information about the current state of troubleshooting. You must wait for the operation to complete.

The user has the option to change the default settings for testing RAM. To do this, while the tool is running, you need to press the “F1” keyboard key.
The “Windows Diagnostic Tool – Options” window will open, in which you need to select the desired settings:
- Test set: Normal (selected by default), Basic, Wide. The window below provides a description for each test type.
- Cache: Default, Enabled, Disabled.
- Number of passes (0-15): By default, the memory test runs in two passes. You can increase the number of passes of the entire test set from 2 to 15 repetitions. With a significant increase in the number of passes, the verification will take a long time.

To apply the settings, press certain keyboard keys:
- To return to the Windows Memory Diagnostics Tool window without changing the default settings, press the Tab key.
- To apply changes to memory test settings, press the “F10” key.
- To exit the Windows Memory Checker, press the Esc key.
After the RAM check is completed, the computer will restart. Next, the Windows 10 operating system will start, and a message about the result of the memory test will appear in the notification area for a short period of time.
In this case, the following information is displayed: “Windows Memory Checker. No memory errors detected. Windows Diagnostics.
The user can view detailed information about the memory test result. To do this, enter the expression “event viewer” (without quotes) in the “Search in Windows” field and launch the desktop application.
In the “Event Viewer” window, go to “Event Viewer (Local Computer)”, then “Windows Logs”, click on “System”.
In the “System” area, click on “MemoryDiagnostics-Results”. Information about the event will be displayed below. This information can be obtained from the Actions area, in the lower right corner of the Event Viewer window.

The “General” tab displays general information about the scan result.

The “Details” tab contains more detailed information about checking the computer’s memory.

If problems are detected in the computer's RAM, it is necessary to replace the faulty RAM module. The new RAM stick must be supported by the motherboard and match the characteristics of other memory modules (if there are several memory sticks installed on your PC or laptop).
You can obtain detailed information about the RAM modules installed on your computer using the programs:, AIDA64, etc.
Conclusions of the article
In the event of problems with the computer, failures in the Windows operating system, or unstable operation of programs, it is necessary to identify the cause of the malfunction. Checking your RAM for errors in Windows 10 using the Windows Memory Checker will help you determine whether memory errors are causing problems on your computer or make sure your RAM is working properly.
Good day everyone and all sorts of other differences.
It’s been a while since we wrote anything on the topic of hardware diagnostics, although we already have enough materials on this topic, because we’ve already talked about: and about; and about ; and about stability tests.. and .
- Base: the fastest option for simple diagnostics of RAM, - MATS+, INVC, SCHCKR;
- Ordinary: suggests LRAND, Stride6, SCHCKR3, WMATS+ And WINVC, - a slightly longer and more thorough set of tests;
- Wide: the longest and most thorough option, involves: MATS+, Stride38, WSCHCKR, WSride-6, CHCKR4, WCHCKR3, ERAND, Stride6 And CHCKR8.
Which one to choose, in fact, depends on the availability of free time and the level of the problem (to begin with, I recommend running a basic test for a couple of runs, which may immediately identify the problem and will not require you to spend several hours on a wide range of tests).
On key press TAB you can switch to the section for switching the use of the Cache in tests and select the number of passes (sometimes a few are enough for diagnostics).

If no problems are found, the system will notify you about this after the boot test. If there are errors related to RAM, then, if my memory serves me correctly, you will learn about the problems during the tests.
Actually, something like this.
Afterword
Testing (especially on a small number of runs and basic test sets) does not guarantee accuracy, but in most cases it can identify the most common failures.
Let me remind you that memory is one of the common causes of many other problems (such as program crashes), and therefore, by the way, it is highly desirable that the sticks installed in the computer are completely identical.
In particular, the problem may lie in one of the sticks (try starting the computer alternately with one or the other), and not with all the memory at once, and it may also be related to failures of the slots where they are installed (try other slots, if any ) and dust (some clean the slats with an eraser, they say it helps).
If nothing helps and is not diagnosed, but there are still suspicions about memory, then it makes sense to take an additional walk memtest"ohm (the link to the article is at the very beginning of this material) or run tests for a large number of runs.
That's probably all for now.
As always, if you have any questions, additions, thoughts, etc., please feel free to comment on this post.
The cause of many critical errors (BSOD) and subsequent reboots, freezes, and malfunctions is faulty RAM.
The easiest way to identify a faulty module is to use the standard utility included in Windows 7 - "" (Windows Memory Diagnostic Tool). This checker appeared in Windows Vista, but many never used it, and in earlier operating systems it was not included in Windows at all, although it could be downloaded separately. When using the "Windows Memory Checker" you will not have to create additional bootable disks to record the utility; you will only need to restart your computer or boot from an existing Windows 7 installation disk.
A lot of time has passed since Windows Memory Diagnostic lived a life separate from Windows, and the utility has undergone some changes, the range of tests used has expanded, constant monitoring has appeared, and the interface has been simplified as much as possible for use by the end user.
Typically, the system can automatically detect obvious problems with the computer's memory and prompt you to run a diagnostic tool, but this is only if the OS is installed and booting.
It is necessary to promptly identify and replace faulty memory before blue screens and other symptoms become constant companions of your work.
If changes were made to the BIOS (overclocking, voltage changes, etc., etc.), you need to return everything to its original state and check operation in this mode.
Running from a running OS
Follow: Start ---> Control Panel ---> Administration ---> Windows Memory Checker.
Or: Start---> in the search bar type " mdsched"without quotes and click" Enter".
Or: Start---> in the search bar type " remember" without quotes and select this item:
The following window will appear:

Launch when computer boots
When booting, press the key F8 on the keyboard, the “Additional boot options” selection menu will appear:
Click " Esc" to go to the Windows Boot Manager menu, then " Tab", then " Enter".
Running from a Windows 7 installation disc or system repair disc
You must press any key while this prompt is on the screen.

If you use installation disk, in the first window click " Further":
Select " System Restore":
The next 3 steps are identical.
Select the first option and click again " Further":
Click " Windows Memory Diagnostics":
We choose the first option:
Working with the utility
After launch, the test will begin immediately (with standard parameters):
To change parameters, click " F1":
You can select different "Test Suites":
The "Basic Set" includes only 3 tests, use it for a quick check:
The "Regular Suite" is used to perform standard tests:
To select the next parameter, press the " Tab".
Enabling/disabling the cache for various tests serves to identify different types of errors.
When the cache is disabled, the utility accesses the RAM directly, this ensures the most accurate testing of the modules themselves.

We set the number of passes; the more passes, the greater the likelihood of detecting defects.
We start testing with the specified parameters using the " F10".
When the test is completed, the computer will automatically restart.
Information about testing and problems found/not found is always on the screen; in addition, if errors are detected, information about them will be displayed after Windows loads (if the test was run from the OS).
Scheduled launch
It is very convenient to schedule the utility to run on a schedule, for example, once a week. To do this, set the parameters similar to the screenshots below:
Launch the task scheduler ( Start ---> All programs ---> Standard ---> Service ---> Task Scheduler), press " Create a task":
Go to the "Triggers" tab, click " Create":
Go to the "Actions" tab, click " Create", in the "Program or script" field write:
In the "Add arguments" field we type:
/bootsequence (memdiag) /addlast

Go to the "Parameters" tab:
Now once a week, the utility will be automatically added to the Windows bootloader and launched at the next reboot after adding. A reboot, however, can also be scheduled.
Troubleshooting possible problems related to the operation of the utility
If you encounter the fact that the utility runs every time you start Windows 7 (or the scan gets stuck in a loop and doesn’t stop in the usual way), it’s very easy to fix the situation. You must manually remove the utility startup entry from the Windows boot loader.
Conclusion
In this article, I told you how to check RAM using a standard utility included in Windows 7 - " Windows Memory Checker".
If a faulty memory module is detected, you must replace it with a new one; do not forget to check the new module immediately, because Low-quality memory sticks often end up on sale.


