Creating a theme for windows 10. Creating your own version
The new operating system from Microsoft offers the user a powerful set of tools for personalizing the OS. But to make your computer truly unique, read how to install a theme on Windows 10 and customize it (also see "").
Where are they stored and how to configure them?
To enable and customize a pre-installed theme, use the Settings app.
RMB on the desktop → Personalization → the “Personalization” section will open in the Settings application.
Here you can configure the desktop image, the color of windows and the Start menu, and the transparency of interface elements.
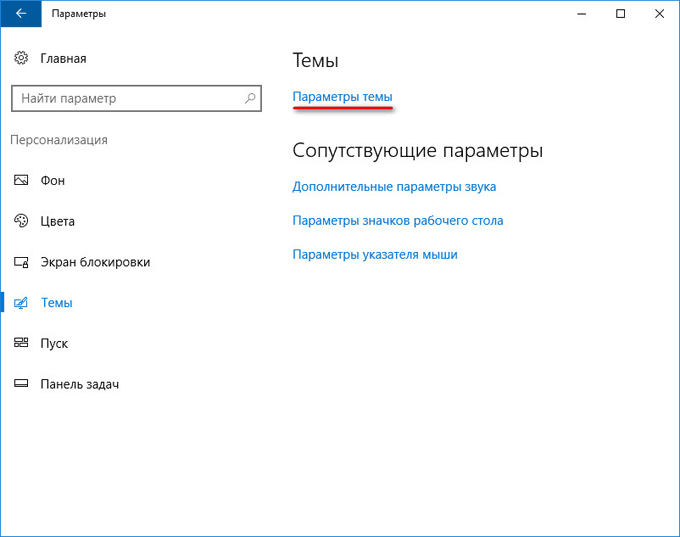
Go to “Themes” → Theme Options → the “Personalization” window familiar to older operating systems will open, in which you enable and configure the themes offered by the system by default. 
Removal
If you are going to remove window treatments that are not used on your computer, you can do this in .

Important! Themes pre-installed in Windows 10 cannot be deleted - they are protected.
Installation
If you don’t like any of the proposed interface design options, download and install new themes.
From the official website

From third party portals
Installing third party themes on Windows 10 is done using the UxStyle patch.
- Download and install the utility.
- Find a suitable OS design from a third-party creator and download it to your computer.
Good to know! All extraneous topics are in archives, so for each of them it is better to create a separate folder with the appropriate name.
- Unpack the archive into a folder and move all the files that appear to the Themes directory, where standard Windows 10 themes are stored.
- You can enable the new OS design option in the same window where the standard themes are located.
How to activate black theme?
Windows 10 does not have a black theme by default, so users who are used to using it are immediately upset. But you can independently enable the dark interface of the OS design.

The video shows the process more clearly.
Video
The video will allow you to clearly see how to perform each step correctly.
Conclusion
The user has the opportunity to customize the Windows 10 interface at his own discretion. It can activate standard themes, download new ones from the official Microsoft website or third-party developers, or use a dark design option. Changes are made in the Personalization window.
In the Windows 10 operating system, you can enable a dark theme. By default, Windows 10 runs in a light theme for the operating system interface.
Previously, the dark theme in Window 10 was only available after making changes to the operating system registry. After the Windows 10 Anniversary Update, dark theme is enabled directly in the settings of Windows 10 version 1607 and higher.
Now there is no need to make changes to the system registry, because you can activate the dark theme of Windows 10 in the operating system settings. After applying the changes, the colors of the Windows 10 settings window and the windows of some applications built into the system will change.
To apply more dramatic changes, there is another way: enabling a contrasting black theme. In this case, all elements of the Windows operating system will change color.
Separately, you can enable dark themes in programs: the Microsoft Edge browser or the Microsoft Office office suite.
In this article, we will look at all these options for changing the color scheme of Windows 10.
How to make a dark theme in Windows 10
Right-click on an empty area of the monitor screen. Select "Personalization" from the context menu. In the Personalization Options window, open the Colors tab.
In the “Select application mode” settings section, activate the mode: “Dark”. Dark theme is installed.
After this, the settings windows, the Windows Store window, and some other operating system applications will change colors to a dark color.

Users of earlier versions of Windows 10 (up to version 1607) can download ready-made registry files to enable the dark theme in the OS from here.
For users who are dissatisfied with the changes that have occurred, there is a radical way to switch to a dark theme for the entire Windows 10 operating system and installed applications.
Black theme in Windows 10
In the operating system settings, there is an option to enable the black theme in Windows 10. After enabling the appropriate theme mode, Explorer, Desktop, and included programs will change the default colors to dark (black).
Right-click on an empty space on your computer screen. In the “Options” window, go to the “Themes” tab, click on the “Theme Options” link.
In the "Personalization" window, go to the "High Contrast Themes" section, select the theme: "Contrast Black Theme".
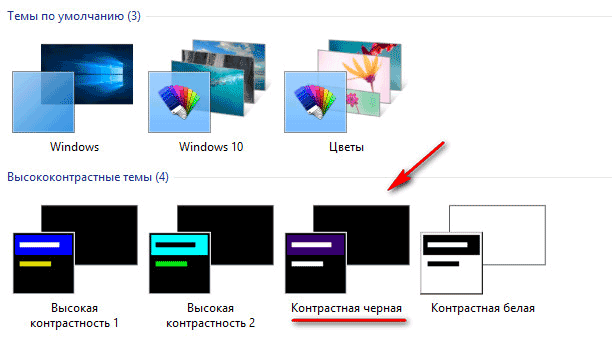
After applying the settings, you will immediately see the changes caused by the black system theme.

This is, for example, what Explorer looks like after turning on the contrasting dark (black) theme in Windows 10. Agree, the look is not entirely ordinary.

It is clear that such customization of the theme display is not for everyone. Therefore, not all users will like this look that works in all applications. For some apps, you can change the theme color to affect only those apps.
How to enable dark theme in Edge
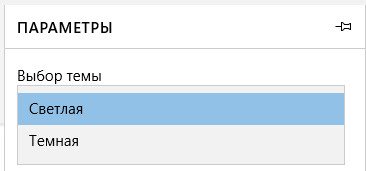
To change the theme color, go to the Microsoft Edge browser settings and click on the “Options” context menu item. In the “Select Theme” settings, select “Dark”.
After this, the Edge browser window will change its color to dark.
How to enable dark theme in Microsoft Office
In applications included in Microsoft Office, it is possible to change the color scheme of the office suite theme. I will talk about how to change the theme color in Word, using Word 2007 and Word 2016 as an example (in other versions of the program, changes to the theme are made in the same way).
In Microsoft Word 2007, click the Office button and then the Word Options button. In the “Word Options” window, in the “Basic” tab, in the “Color Scheme” settings, select “Black”, and then click on the “OK” button.

After this, the Word test editor window will change color to dark.
In Microsoft Word 2016, go to the "File" menu, click on "Options". In the "Word Options" window, in the "General" tab, in the "Personalize Microsoft Office" section, in the "Office Theme" item, select the "Dark Gray" option, and then click on the "OK" button.

The Microsoft Word window will change to a dark color.
Conclusions of the article
In Windows 10, you can enable a dark theme to change the color scheme of the operating system. Dark theme is activated separately in the Microsoft Edge browser or in Microsoft Office. To change all color parameters in Windows 10, the operating system has the ability to enable a black theme.
Themes for Windows are already a fairly old part of the Microsoft operating system. But with the arrival of the Windows 10 Creators Update, developers have made it much easier to work with themes for Windows. There is now a separate section in the store with themes, as well as a separate segment in the personalization settings. Here you will find some tips for working with themes for Windows 10.
Where to download and how to install themes for Windows 10
The theme settings section is located in the personalization options.
Open Settings, or simply click Win+I for faster transition. Open Personalization and go to the tab Themes. This is where you will customize the theme of your computer.
Themes for Windows 10 consist of four components: a background image (wallpaper), sounds, an accent color, and mouse cursors. Each of them can be configured in separate sections, or in a single place - in themes.


If the theme contains multiple background images, then you will be interested in the slideshow options. To do this, click on Background and the system will take you to the section with desktop background image settings. There you can change the time after which the wallpaper will change automatically. You can select 1 minute, 10 minutes, 30 minutes, 1 hour, 6 hours or 1 day.

The important thing is that in Windows 7/8, managing themes was a little more convenient, since the operating system allowed you to choose which wallpaper from the theme would be used. You could also choose one specific picture. There is no such option in Windows 10 Settings, since Microsoft cut out the old personalization section that dates back to Windows 8/7. It’s a shame.
Bonus: You can download themes for Windows 10 not only from the store. Themes for Windows 7/8 are also perfect. You just need to find a site with themes and download them in the format .themepack.

Double click on the downloaded file and wait for the system to install it. After this, the topic will be available in the section. The same is true for themes downloaded from the Windows Store. All other features of Windows 10 themes apply to themes downloaded from outside the Windows Store. So your favorite theme from Windows 7 can be installed on new operating systems.
How to remove themes for Windows 10
Themes in Windows 10 are uninstalled in the same way as regular applications. To do this you need to open Settings - Apps & Features. In the list you need to find the downloaded theme, click on it, and then select Delete. Windows 10 will then cut out the selected theme.

Another option: open Settings - Personalization - Themes. Find the installed theme and right-click on it. Select Delete.
How to create a theme for Windows 10
- Set a background image. Go to Options – Personalization – Background. On the menu Background select Image and press Review. Indicate the desired picture. Alternatively, just in Explorer, click Set as desktop background image.
- Next, go to the section Options - Personalization - Colors. Here you can set automatic color selection (it will be obtained depending on the color of your wallpaper), select a ready-made color, or set any custom one.
- Then open Settings – Personalization – Themes – Sounds. Specify which set of sounds should be used for the theme.
- At the end in the same section Themes select mouse cursors.
- Once setup is complete, click Save topic. Name the file and it will then appear in the list of installed themes a little lower. To save it as a separate file, right-click on your topic and select Save topic for sharing.
This is all that beginners need to know about how to download, install, uninstall, or create a theme for Windows 10.
It often happens that a user wants to somehow update or diversify the internal working appearance of his OS. It's not that difficult to do. The default look of Windows 10 can be changed in different ways. One of them is installing a new theme.
Changing Theme
The entire Windows design installed by default is a standard theme. By installing another one, you will change the appearance of windows, the cursor, system applications, and also add new wallpapers, system sounds and design colors.
There are several ways to install a new theme: download it from the official store, create it yourself, or download it using third-party programs. Please note that versions of Windows prior to build 1703 Creators Update did not have this feature, so make sure you have this or a later version of the system installed.
Through the official store
To change the theme using the official Microsoft Store, follow these steps:
- Expand system settings.
Open System Settings
- Go to the “Personalization” block.
Open the “Personalization” block
- Select the "Themes" sub-item. Once in it, you will see a list of already available themes. Select one of them and evaluate the changes made. If you don’t like the theme, you can always change it to a standard one in the same way.
Click on the theme you want to install and evaluate the changes made
- If there is no option suitable for you in the list of standard themes, proceed to search for new offers by clicking on the “Other themes in the Store” button.
Click on the "More Themes in the Store" button
- The official Microsoft store will open. It has a huge selection of free themes. Find among them the one that attracted you and install it, and then return to the “Themes” sub-item, select and save it.
Select a theme from the store and install it
- After installing some themes, the “Themes” sub-item is transformed: a list of things that can be configured appears in it. For example, you can choose from several cursors or alert sounds.
After installing themes from the store, the “Themes” tab is transformed: a list of additional settings appears in it
Via the official website
A large number of topics are presented on the official Microsoft website. Open the desired page, select the theme you like and download it, then open the downloaded file and confirm the installation. Done, the new theme will be applied automatically and will appear in the list along with the previously received themes.
The official Microsoft website offers a large selection of additional themes
Video: how to change the Windows 10 theme through the official Microsoft website
Via patch
If you want to install themes from third-party resources, that is, not from the official website or store, you will have to first install an additional UltraUXThemePatcher patch, which adds the desired function to the system:
- Download the patch installation file from the official website and run it, click on the “Next” button and wait for the automatic installation to complete.
Run the installation file and click Next
- Reboot your system.
Restart your computer
- Download the theme from any third-party site and move it to the C:\Windows\Resources\Themes folder.
Copy the theme to the C:\Windows\Resources\Themes folder
- When all the files have been successfully copied, go to personalize your computer and install the theme that appears in exactly the same way that official themes are installed, that is, click on it and wait for the system to complete its transformation.
Select a third-party theme from the list of themes and wait for the system to complete its transformation
Video: how to change the Windows 10 theme using UltraUXThemePatcher
Through third party programs
For more detailed and convenient customization of your own theme or installation of someone else’s, you can resort to the help of third-party programs. For example, try WindowBlinds 10.
- Select the color and size of the window in the Style tab. The application has a large range of colors available. The palette will help you achieve exactly the shade you need.
Select window color and size
- In the Wallpaper section, from the proposed set of beautiful pictures and photographs, select those with which you want to decorate your desktop.
Set your desktop picture
- In the Settings section, pay attention to additional settings: playing sounds and showing system icons.
In the Settings section there are more detailed theme settings
If the theme installation process seems too long for you, you can install the Windows Themes Installer program. It allows you to specify the path to several topics at once and quickly switch between them as needed.
Windows Themes Installer allows you to select multiple themes at once and switch between them as needed
Create your own theme
Creating a theme is personalizing the system to your taste and then saving the established parameters. It is worth saving the theme if you are going to change system settings in the future or install a new theme, but at the same time be able to return to the earlier configuration. You can also share your themes with other people using your Microsoft account.

Deleting a topic
Right-click on the topic and select the “Delete” function
Please note that you can only get rid of topics that you added. Standard themes cannot be recycled.
Video: How to remove a theme in Windows 10
What to do if the theme does not install
If you are faced with the fact that the new theme does not work, that is, the system design does not change in any way after installing it, then first of all restart your computer. Perhaps this will help fix the problem. If it does not disappear after a restart, then the problem is most likely in the topic itself. Uninstall it and try installing either another one or the same one, but download it from another site and install it in a different way.
A similar problem sometimes occurs due to the fact that the account name is written in Russian characters. The only way to rename the folder responsible for the username is to create a new account with the correct name, and then transfer all the necessary data to it.
You can install a theme in different ways: download from the official store or website, download through a third-party website and program after installing a patch, or create it yourself. But remember that you need to select a theme so that its colors and settings do not hurt the eyes, do not spoil the appearance of the system and do not reduce its level of comfort.
Creating an installation image and burning it to a flash drive or disk is not that difficult. Moreover, this can be done (in some cases) even using standard operating system capabilities. Of course, you can use third-party software, but Windows will cope with this task much better, since the OS itself knows how to correctly record the image so that there are no installation problems in the future.
There are several ways to create an image of Windows 10. Some of them are even approved by Microsoft itself. However, to install the OS in the official way, you will need a license key.
Ways to create an image
The vast majority of users are accustomed to downloading various OS builds from torrent trackers and writing them to a drive or disk using third-party programs. But this method is by no means the only one.
- Using Windows 10 Installation Media Creation Tool. This is an official utility from Microsoft that helps you create bootable media with “ten” on board. The company's specialists recommend using this method.
- Simple copying (if there is UEFI mode in the BIOS). This option is suitable for new PCs and laptops. If there is UEFI mode and the partition table is of GPT type, then the user will not need any special utilities to create the installation image
- Use of third party programs. Today, many utilities can create the “correct” flash drives or disks with Windows installation images. As a rule, this option is much simpler than all previous ones
- Creating an image using the Archive Wizard. This utility helps to create an image of an already running operating system and write it to media. A sort of “life preserver” in case the OS suddenly refuses to boot
You can also simply update your version of Windows to the latest one. But it is worth considering that in this case system failures are possible. They can be so severe that the user may lose all of their data. Therefore, it is better to perform the installation from scratch.
1. Use a utility from Microsoft
This is the “official” method approved by Microsoft. Its essence is that the user downloads the operating system image itself and a utility for creating bootable media from the company’s official website.
It is worth noting that the download speed from the company’s servers is quite decent, so the whole process happens quite quickly. To complete the process, the user will need a USB drive with 8 or 10 gigabytes of free space. It's impossible to do less.
1. So, launch the browser and enter “https://www.microsoft.com/ru-ru/software-download/windows10” into the address bar. A page will appear with information about installing “tens”. Here we find the button that says “Download the tool now” and click on it.
2. After the download process is complete, open Windows Explorer, go to the download directory and run the “MediaCreationToolexe” file.
3. The installation wizard will immediately launch and ask you to accept the terms of the license agreement. Click on the “Accept” button.
4. At the next stage, check the “Create installation media” option and click the “Next” button.
5. Now select the OS language, edition and architecture (32 bit or 64). After that, click on the “Next” button.
6. At the next stage, it is proposed to create a bootable drive immediately or create an ISO image for subsequent recording on a flash drive or DVD. It is better to choose the first option, since the installation image will require at least 8 gigabytes of space. And this is already a two-layer DVD. So select the first option and click “Next”. But before that, you need to insert the USB flash drive into the appropriate port.
8. The recording process will begin immediately. It is worth considering that the wizard downloads the necessary files from Microsoft servers and writes them to the drive. Therefore, the operation can take quite a long time. Will have to wait. Progress will be displayed as a percentage.
9. Once the media creation process is complete, the wizard will run an image integrity check. You must wait until it completes.
10. As soon as the verification is completed, the program will display a corresponding message indicating that image creation is complete. All that remains is to click the “Done” button.
This method allows you to be sure that the installation process will go as expected. Creating an image of Windows 10 using the official utility from Microsoft is the most preferable option.
Before starting the image creation process using the official utility, you need to close all programs. Otherwise, recording may be interrupted due to an unknown error. Some utilities may block the Image Creation Wizard. So it's better not to take risks.
2. Copy the necessary data to the flash drive
As mentioned above, this method is available to owners of new PCs and laptops that have UEFI mode enabled and the partition table on the hard drive is GPT. Other users should not even try this method.
A similar method is sometimes used in Linux operating systems. There you can simply unpack the image and copy all the files to the flash drive, having previously made it bootable in the partition editor. However, on Windows the latter is not required.
1. Let's assume that the official Windows 10 image has already been downloaded from Microsoft servers. Now you need to mount the image using some program. Utilities such as Daemon Tools or Alcohol 120% are capable of this. But even regular Total Commander can open ISO. We will use it. Let's open the program, find the desired image and simply click on it 2 times.
2. Now in the second panel we will switch to the flash drive.
3. Now select all the files located in the Windows 10 image and press the copy button (or press “F5”).
The copying process will begin immediately. Once it is completed, you can restart your computer or laptop and select bootable media in UEFI. Everything should work. But only in UEFI on a GPT table.
3. We use third-party programs
There are now many utilities that allow you to efficiently burn a Windows 10 image to a USB drive or DVD. As a rule, these programs are easy to use and have a Russian language in the interface. Let's look at the most popular ones.
Rufus
A small utility from independent developers. It is completely free and does not require installation. You can download it on the official website. And it's very easy to use. The program easily copes with recording Windows and Linux distributions.
1. Go to the directory with the downloaded program and run the executable file with EXE resolution.
2. The main program window will open immediately. If a USB drive is already inserted into the port, the utility will detect it. Next, you need to select the desired image to record by clicking on the “Select” button.
3. Now select the previously downloaded Windows 10 image and click “Open”.
4. The next step is to select recording parameters. You must set the UEFI or BIOS options, and also select the partition table type (MBR or GPT).
5. Everything is ready. All that remains is to press the “Start” button and wait for the operation to complete.
The image is now written to the USB drive. You can restart your PC or laptop and begin installing the operating system on your hard drive. It's worth noting that the latest version of Rufus is required to write "ten" correctly.
Windows 7 USB/DVD Download Tool
Another very popular program for burning an image to a USB drive. Initially, it was created for recording to a Windows 7 flash drive. But the utility copes well with the “ten”. And you can download it on the official Microsoft website.
1. Download and install the application. Then we launch it using the appropriate shortcut and get to the main window. First you need to select an image using the “Browse” button.
2. Select the desired ISO image and click “Open”.
3. Now click the “Next” button.
4. Now the wizard will ask you to choose where to write the image. If you planned to record to a flash drive, then click “USB device”. If you need to write to disk, then select “DVD”.
5. Select the desired flash drive and click the “Begin copying” button.
The recording process will begin immediately. Once it is completed successfully, the program will display a corresponding message. This method is good because it is somewhat reminiscent of the first. In addition, it is also officially approved by Microsoft.
Ultra ISO
This is a more serious program designed to work with images of any type. Its functionality is rich, but now the most important thing is that it is also capable of recording a Windows 10 image to a flash drive or disk. However, the utility is not free.
1. Download the program from the developer’s official website, install it and launch it using the appropriate shortcut. In the main window, select the desired image (in the lower left window).
2. Now select the “Boot” item at the top and click on the inscription “Burn disk image”.
3. In the next window, select the desired drive and click “Burn”.
Upon completion of the recording process, the program will check the integrity of the files on the flash drive, and if everything is in order, it will display a corresponding message. Now you can restart your computer and begin installing the operating system.
WinSetupFromUSB
A small free utility from free developers that can write any Windows distribution to a USB drive. The program can even cope with Windows XP, not to mention the modern “top ten”. There is no need to install the utility. Just download and unpack.
1. So, go to the directory with the unpacked program, select the executable file with the required bit depth and double-click on it.
2. In the main window, select the desired USB drive and the recording option (the desired distribution).
3. Now press the image selection button and click on the desired ISO.
4. All that remains is to press the “GO” button and wait for the recording process to complete.
This completes the creation of bootable media. You should restart your PC or laptop and set the boot priority in the BIOS settings. You can start installing the operating system from scratch.
4. Create an OS image using the Archive Wizard
Strictly speaking, this method allows you to create an image of an already configured system with installed drivers. If the operating system crashes, you can quickly deploy this image on your hard drive and not spend a lot of time on a complete OS installation.


