Create your own application. Hello Kitty - Creating the first Android application
Do you doubt whether it is worth investing in mobile application development? You can do it yourself and absolutely free. You may end up with a test version that can be used to conveniently evaluate the effectiveness of your mobile strategy. And if you try, you will make a decent mobile application that will become the main tool for online interaction with owners of smartphones and tablets.
Is it worth making your own mobile app?
Costs. If you don't take my word for it, here are some facts:
- According to Flurry Analytics and comScore, owners of smartphones and tablets use the browser only 14% of the total time spent working with the device. And they spend 86% of their time on different applications.
- The installed application is your direct channel of communication with the consumer. Just think: you don’t need to spend money on advertising or wait for a person to find you using Yandex. All that remains is to support the functionality the user needs and provide him with relevant content.
- The number of purchases made using tablets and smartphones is growing both on the Internet in general and on the RuNet. According to marketing agency Criteo, already in 2016, more than half of online transactions in RuNet will be made using mobile devices.
If you want, the application is a mobile browser in which only your website opens. In what case would a user install such an Internet browser? Only if he is interested in your product or information. Therefore, remember: the client who installed the application is a loyal and ready-to-buy representative of the target audience.
In this case, is it worth taking the risk and offering DIY applications to loyal customers rather than custom programs made by professionals for Android and iOS? Let's figure it out.
When can you create an application yourself?
Do you remember what website visitors need? They come because of the content or functionality of the resource. People want to get information, buy something, look at and comment on friends' photos, and so on. Mobile app users need the same. They are looking for information or making some kind of transaction.
Do you remember when a business could make a website on its own? It’s right when you don’t yet have money to collaborate with professionals, but you still have the time and desire to figure out WordPress or Joomla. The same situation is with applications. Self-created programs for iOS and Android can be roughly compared to websites built on open source engines.
You don't have to register to start working. Click the Create Now button on the main page or select the Create App menu in the upper right corner on any page of the service.

Select the appropriate application template. If we are talking about a content project, you may be interested in the following options:
- Manual. This template allows you to create a guide program.
- Blog. The application will help your blog audience read new notes from the screen of a smartphone or tablet.
- Website. The template converts a website into an application.
- Pages. With this template you can convert any content into an application with simple functionality.
- News. The template allows you to create an application that is an aggregator of industry or regional news.
- Page. The template converts offline content, such as an e-book, into the application.
- VK Page and Facebook Page. Create an application that allows you to monitor updates of open groups on VKontakte and Facebook.
- YouTube. Use the template to promote your YouTube channel.
How to Create a Blog App
Use the Blog template. In the appropriate field, enter the URL of your blog or RSS feed. Select a note title color.

Enter the name of the application.

Add a description.

Choose a standard one or add a custom icon. The appropriate image size is 512 by 512 pixels.

To create a download file, click the Create App button. After this, you need to register in the system. Confirm your registration and go to your personal account. Here you can install the application on your mobile device, publish it on Google Play and Amazon App Store. The system also offers a monetization option. If you use this feature, advertisements will be displayed in the application.

Check how the application works on your mobile device. On a tablet, the program should display a list of blog posts in title and announcement format.


In your AppsGeyser personal account, you can monitor the number of installations, create push notifications, publish the application in stores, monetize the program using advertising, and edit the application.
Use the editor to add text, images, videos or links. To add a photo to the program, upload it to Imgur hosting and paste the link into the appropriate field.

After editing the content, specify the name of the application, add a description and an icon. Click the Create App button. After creating the download file, install it on your mobile device and check its functionality.

Please note that most mobile devices block the installation of applications from unknown sources by default. If a user downloads a program from your site or an app builder site, they will see a security warning when they try to install it. Some clients will probably refuse to install the program.

8 constructors similar to AppsGeyser
If the universal AppsGeyser constructor is not suitable for you, pay attention to similar services:
- AppsMakerStore. Using the service, you can create applications of various types: from programs for Ecommerce to solutions for content projects. The designer makes applications for iOS and Android. The service interface is Russified. For beginners, there is an informative guide to using the constructor. The service is paid. . Free Android app builder. You can publish the created programs on Google Play and monetize with advertising.
- Appery. Paid constructor for creating universal applications. You can evaluate its functionality by taking advantage of a free trial period of access.
- Good Barber. Using this service you can develop Android and iOS applications. The constructor is paid, the cost of use is 16 USD per month.
Most of the services offered have an English-language interface. If you are uncomfortable working with constructors in English, choose platforms with Russian-language content.
Application designers: a stone ax or a thin modern tool?
Don't go from one extreme to another. With the help of the proposed services, you can really create functional functional applications. The resulting programs can be used to solve various problems: from facilitating online trading to distributing content and educating audiences. Applications created in the designer can be published on Google Play and the App Store, edited, and monetized using advertising or paid installations.
Remember that simply creating an application is not enough. It is necessary to invest a lot of effort in its promotion. Contact us if you want to entrust this work to professionals who know exactly what needs to be done to attract new users.
Do not overestimate the services offered. Their obvious drawback remains their stereotyped nature. We are talking about both the design and functionality of the programs. In addition, access to platforms with decent functionality is paid. What is better: to pay the developers for their work once or to pay the owners of the designer for many years? Do the math for yourself.
And one more thing: if you don’t have time to create a mobile application yourself, contact our company. We develop mobile applications and .
Contact us Shall we discuss? Order a free consultation
In fact, bringing this idea to life is not as difficult and not as expensive as it might seem at first glance. You just need to have a good idea of what exactly you expect from a mobile application and determine how to achieve your goals.
Do you enjoy developing mobile apps for your business, blog, product or service, or are you just looking for a new source of income? Are you wondering how to do this and calculate future expenses? In fact, bringing this idea to life is not as difficult and not as expensive as it might seem at first glance. You just need to have a good idea of what exactly you expect from an application for a mobile phone or tablet and determine how to achieve your goals.PREPARATORY STAGE
Before creating a mobile application, you should decide on the following points:
- Do I have a specific vision of what the finished product will be and what its functionality will be?
- What problems is the program designed to solve and what will be the benefit for a specific user?
- What platforms will the finished software product work on (iOS, Android, Windows Phone)?
- Will daily monitoring of its functioning be required?
- How much am I willing to spend?
- Will I create an application myself or will I turn to professional developers?
Also keep in mind that the creation of mobile programs for businesses, for example, for a cafe, pizzeria or fitness club, should be approached especially seriously. After all, the presence of such a modern tool in a company is a serious image factor that will contribute to greater customer loyalty to the brand and a significant increase in the number of repeat visits.
METHODS AND COSTS OF CREATING AN APPLICATION
There are two ways to create applications for mobile devices. The first involves the independent creation of programs for electronic devices based on Android or IOS according to a template type using special design sites. The second way, which is more expensive, but ultimately allows you to get serious and functional products, is to seek help from individuals or companies involved in writing software. The second option is suitable if we are talking about creating serious software products with specific characteristics that go beyond the ready-made kits available on design sites. It should also be taken into account that professional development for iOS or Android requires significant expenses. What is the cost of creating an application for Android and IOS platforms on the Russian market? The price range is quite wide - from several hundred to tens of thousands of dollars - it all depends on the type of software and its functionality. However, such serious investments more than pay off in the long term. When planning the final cost, it is also worth taking into account the costs of placing a new product in the AppStore and Android Market. If you are limited by a small budget and have no time at all, then you can try to design an application for electronic devices yourself. You don't need to be a programmer to do this. Read on to find out how easy it is to do this.
HOW TO CREATE AN APP FOR FREE
Today, there are enough domestic and foreign platforms available on the Internet that allow you to independently construct an application according to a ready-made type for free. Designer sites contain hundreds of ready-made application options, sorted into various categories: small business, education, entertainment, sports, blogs, and the like. On such resources, programs with a standard and limited set of functions are created free of charge. Limitations relate to the number of installations and views of your application, the number of items in the catalog, the possibility of publication in stores, the presence of a payment acceptance system, the presence of third-party advertising and the possibility of modifying the functionality to suit your needs. To remove restrictions on sites, you can choose a specific package with a fixed monthly fee, the size of which is determined depending on the number of included options. Examples of website constructors for shareware mobile applications for Android, iPhone, iPad.
- Appsgeyser.com (appsgeyser.ru - Russian version).
Now let’s look at how a mobile application can be developed in a few minutes using the example of the ibuildapp website. We chose this particular platform because it is very simple and easy to use. By the way, the iBuidApp resource also has a Russian-language version, which makes using the constructor even easier. Before starting work, register on the site. Next, on the main page, click the “Create” tab and select the template that suits us.
SELECTING A TEMPLATE AND CATEGORY
This site offers a fairly large selection of standard options, which can be found in the category catalog in the left menu of the site page. For example, we chose the “Photography” category and the “Photo Studio” template. After choosing a design and the appropriate category, we begin editing menu items. 
EDITING CONTENT
The administrative panel of the designer opens up ample opportunities for editing menu elements. You can change the background, add a logo, configure the navigation of the main and lower menus on the screen of an electronic device, and edit the contents of internal pages. By the way, on the right side of the screen you can see how the changes made will look on the screen of the electronic device. The builder also allows you to test your application on a tablet or smartphone. The finished program can also be published on the Appstore or Google Play, but this function is only available for paid versions. The site offers 3 paid packages costing 490 rubles, 2400 rubles, 3700 rubles. per month. 
PAID PACKAGES
If you are not satisfied with the appearance of the templates available on the site, you can create your own design by clicking the “My Templates” tab in your account. The capabilities of an individual designer are quite limited; they allow you to provide the software product with only the most necessary elements. 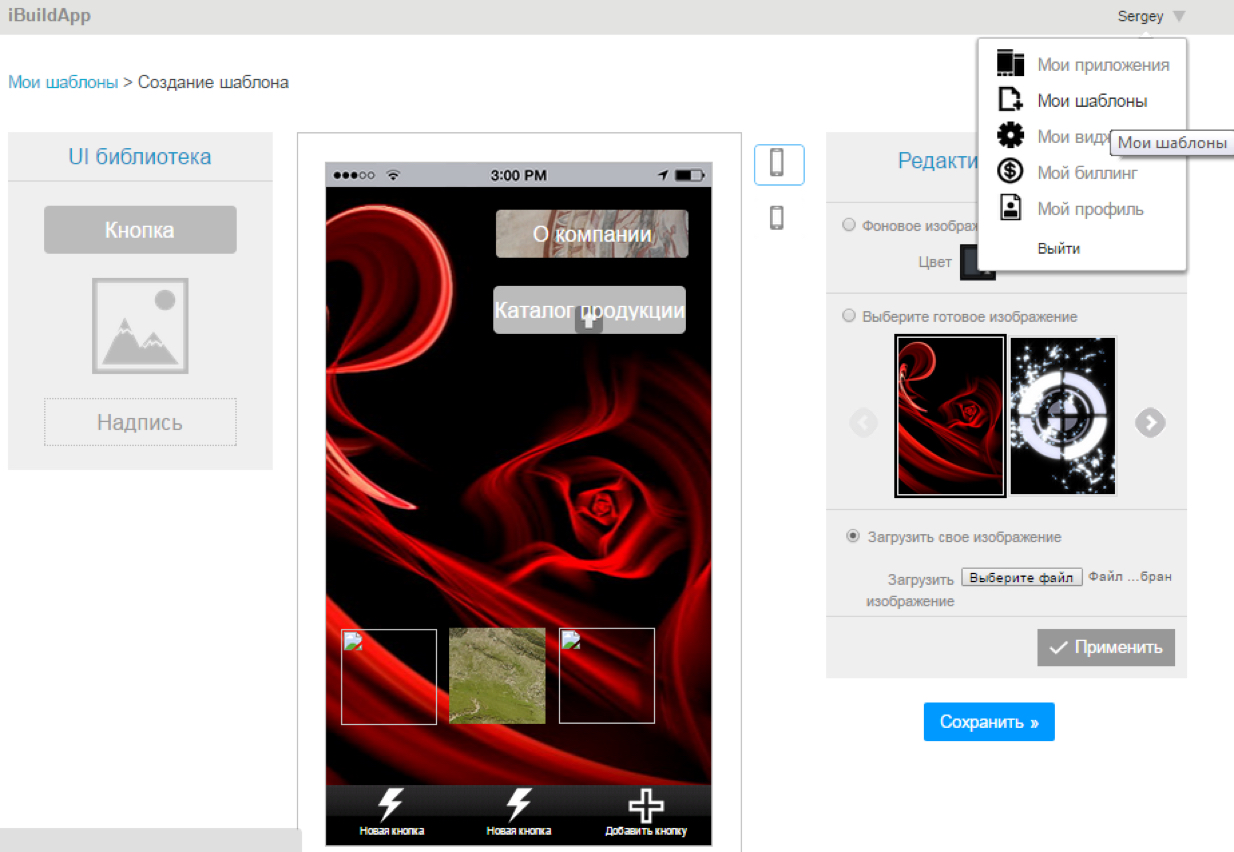 Now it’s your turn to start creating applications and install it on your smartphone. Try it, it's quite simple!
Please note that the studio is constantly being updated, so the appearance of windows and other details may differ from this example. Most of the lessons on the site now use version 2.3. On October 25, 2017, version 3.0 was released, in which a lot has changed. In this article I tried to replace all the pictures with the new version.
Java is used as the programming language for Android. XML is used to create the user interface.
Here we should make a small digression. Android Studio 3.0 adds full support for the new Kotlin language, developed by Kotans. Google has announced its plans to make the new "cat" language the main one. But you must understand that a huge number of examples have been written in Java over the previous years. If you are new to programming, then it is better to completely focus on Java during the first period of training; it will be easier for you to find answers to questions. Kotlin will not escape you, it will be easier to switch to it later, but the reverse process will be more difficult. When you get a little familiar with Java, you can simultaneously study examples in Kotlin. Google is now actively rewriting the documentation for Kotlin, but the complete transition is still far away, even less than 50%. A little later I will also do lessons using Kotlin, but this will not be soon.
According to a tradition established in the last century, every programmer had to write “Hello World!” (Hello World!) as the first program. Times are changing, and the Hello World! is already built into the Android development environment for compatibility purposes, and modern programmers must write a program Hello Kitty!(Hi kitty!). Agree that greeting a kitten makes more common sense than saying hello to any other world.
Therefore, we will divide the problem into two parts. First, let's run the finished program without writing any code to make sure that all the tools are installed correctly and we can create and debug programs. And then we’ll write our first program.
Creating a new project
Launch Studio and select File | New | New Project.... A wizard dialog box will appear.
Field Application name- a friendly name for the application that will be displayed in the application title. By default you may already have My Application. Let's replace it with . Basically you could write here and Hello world!, but Android has a wonderful ability to output the desired strings on phones with different languages. Let's say that an American's phone will have an inscription in English, and a Russian's will have an inscription in Russian. Therefore, the initial settings always use English variants, and prepare localized strings later. It is necessary to immediately develop the habit of correct code.
Field Company Domain serves to indicate your site. By default, your name as the computer user may appear there. If you have a website, you can enter its address, or come up with some name. The entered name is remembered and will be automatically substituted in the next new projects. Savings, however.
Third field Project location allows you to select a disk location for the created project. You can create a separate folder on your disk for your projects and store your programs in it. The studio remembers the last folder and will automatically suggest saving in it. If necessary, you can set a different location for an individual project using the three-dot button.
Field Package name generates a special Java package based on your name from the previous field. Java uses an inverted version for naming packages, so it goes first ru, and then the name of the site. The package serves to uniquely identify your application when you distribute it. If a hundred people write a hundred applications with the name "Cat", then it will be unclear where the application written by the developer Vasily Kotov is. And the application with the package name ru.vaskakotov.cat easier to find. Please note that Google uses the package in its documentation com.example for demonstration purposes. If you simply copy examples from the documentation and try to post them in this form on Google Play, then nothing will work - this name is reserved and prohibited for use in the application store. Button Edit allows you to edit the prepared version. For example, you are writing a custom application and you need to use the package name approved by the customer, and not your default.
Below are two options for writing programs in C++ and Kotlin. We are not considering these options yet. When you write in Kotlin, check the appropriate box. However, you can convert the project from Java to Kotlin and later using studio tools.
Click on the button Next and move on to the next window. Here we select the types of devices for which we will develop our application. In most cases, we will write for smartphones and tablets, so we leave the checkbox next to the first item. You can also write apps for Android TV, Android Wear, Android Auto and Android Things.

In addition to selecting the type of device, you must select the minimum version of the system under which the application will work. Choose your option. At the moment, Google supports versions starting with API 7, releasing special compatibility libraries for older devices. But you can choose a more modern option. I have a phone with a minimum version of Android 4.4, so I'm setting this option.
java
Folder java contains three subfolders - working and for tests. The working folder has the name of your package and contains the class files. Now there is one class MainActivity. You can leave the test folders alone. If you know how packages work in Java, you can create new folders and subfolders.
res
Folder res contains resource files divided into separate subfolders.
- drawable- graphic resources are stored in these folders - pictures and xml files describing colors and shapes.
- layout- this folder contains xml files that describe the appearance of forms and various form elements. After creating the project there is already a file there activity_main.xml, which is responsible for the appearance of the main application window.
- mipmap- application icons for different screen resolutions are stored here
- values- string resources, color resources, themes, styles and dimensions that we can use in our project are located here. Here you can see the files colors.xml, strings.xml, styles.xml. In old projects there was also a file dimensions.xml, it has now been abandoned
Over time, you will be able to navigate these folders freely, as long as you don’t bother yourself.
Working with the project - Hello, World!
As already mentioned, the program Hello, World! is already built into any new project, so you don't even need to write anything. You just need to launch the project and get a ready-made program!
To study you need to open two files - MainActivity(most likely it is already open) and activity_main.xml (res/layout) in the central part of the Studio. If the files are not open, then open them yourself by double-clicking to edit (or view). In this way you can open any file you need.
Let’s not study the code for now, but just click on the green triangle Run(Shift+F10) on the toolbar at the top of the studio to launch the application.
If you haven't configured the emulator, it means you haven't read the previous tutorial. Set up the emulator first and run the project again. Or connect a real device.
If everything was done correctly, your program will load in the emulator or on the device. Congratulations!
So, if the program has started, you will see an application window with the inscription. The title of the program will also be . All these lines can be found in the file res/values/strings.xml and edit if desired.

Now let's look at the code. Let's study first activity_main.xml.
You can watch it in two modes - Design And Text.
Open in mode Text.
This is a new template code that was released in Android Studio 2.3 in March 2017. Previously, a different code was used with RelativeLayout(and even earlier, another code with LinearLayout). If you come across old examples, the studio has a context menu that will help you convert the old code into new one.
A little about XML code. There is a special container ConstraintLayout, which contains the component TextView, intended for text output.
Now let's look at the Java code ( MainActivity.java)
Package ru.alexanderklimov.helloworld; import android.support.v7.app.AppCompatActivity; import android.os.Bundle; public class MainActivity extends AppCompatActivity ( @Override protected void onCreate(Bundle savedInstanceState) ( super.onCreate(savedInstanceState); setContentView(R.layout.activity_main); ) )
You have a class file open in front of you, where the class name is MainActivity matches the file name with the extension java(this is a rule set by the Java language). The first line contains the name of the package - we specified it when creating the project ( Package Name). Next are the lines for importing the necessary classes for the project. To save space, they are collapsed into one group. Unfold it. If one day you see that the class names are grayed out, then they are not used in the project (hint Unused import statement) and you can safely delete the extra lines. They can also be deleted automatically (configurable).
Next comes the declaration of the class itself, which is inherited ( extends) from an abstract class Activity. This is the base class for all application screens. It is possible that you will have AppCompatActivity, if when creating the project you left support for older devices (checkbox Backwards Compatibilty (App Compat)). Old versions did not have the goodies that appeared after Android 4, so a special compatibility library was created for them, which allows you to use new items from new versions of Android in old programs. Class AppCompatActivity This is exactly what the compatibility library is about. Consider her a poor relative of the base Activity. It has all the necessary methods and helper classes, but the names may vary slightly. And you can't mix names. If you are using a class from the compatibility library, then take the appropriate methods.
At different stages, different activity class names were used, which you may encounter in older projects. For example, it was first used FragmentActivity, then ActionBarActivity, and on April 22, 2015, a new version of the compatibility library was released and a new class is currently used AppCompatActivity.
In the class itself we see a method onCreate()– it is called when the application creates and displays activity markup. The method is marked as protected and is accompanied by annotation @Override(overridden from base class). The summary may be useful to you. If you make a typo in a method name, the compiler can warn you that the parent class does not have such a method Activity.
Let's look at the method code.
Line super.onCreate(savedInstanceState); is a constructor of the parent class that performs the necessary operations for the activity to work. You don't have to touch this line, leave it unchanged.
Second line setContentView(R.layout.activity_main); is of greater interest. Method setContentView(int) includes content from a markup file. As an argument we specify the file name without extension from the folder res/layout. By default, the project creates a file in it activity_main.xml. You can rename the file or create your own file with the name cat.xml and connect it to your activity. Then the code will look like this:
SetContentView(R.layout.cat);
To keep your code neat, try to adhere to standards. If you are creating markup for an activity, use the prefix activity_ for the file name. For example, the markup for the second activity might be named activity_second.xml.
There are two ways to create a program for Android. The first, which is used by serious developers, requires an understanding of the Java language and installation of a special development environment. Users without special knowledge looking for information on how to create an application for Android can be advised to use one of the dozens of existing online editors, which in some cases allow them to generate simple mobile utilities in minutes. Let us next consider the process of creating a program using several specialized constructors.
Defining Application Functionality
This is the first stage of creating any mobile program. In our case, no time is wasted on steps such as, for example, creating icons, buttons, or planning the design of the utility. Internet editors use ready-made solutions, so all that remains is to choose an existing layout, filling it with original content, which can be, for example, informational or gaming.
And for this you need to decide on the functionality. For example, for an online store it could be as follows:
- Convenient navigation. The presence of categories and subcategories where the client could find the desired product using given templates.
- Using a user-friendly ordering block with a payment system and status tracking.
- Personal account for the client with sections “Favorites”, “Purchase History”, etc.
- Availability of an information section with news reviews.
In this way, you can formulate tasks and determine the functionality of any type of Android application being created, be it forms, any services, content projects. Next, we’ll tell you how to become a developer of your own Android utility.
A utility with the functionality defined at the previous stage can now be written from scratch using various Internet services tailored for the creation of multifunctional or highly specialized applications. Since the minimum list of online store capabilities for Android was previously defined, let’s look at how to create a program of this type using MobiCart.

This service is designed specifically for commercial utilities. An Android application written using MobiCart can effectively replace an existing network platform. Features of the designer in question:
- Russian interface support;
- Payment is accepted by cash or PayPal;
- Availability of a non-commercial tariff with limited functionality in the form of the ability to add a dozen items to the storefront.
To create your own utility, register with the service. After this, you can use your account, where as the first step you need to select Create Application. Further:
- By selecting Upload logo, upload the logo of your future program and specify the design color.

- Below you will need to select the tabs that users will see on the device screen. This section also specifies the pages that the designer will need to generate for your store.

- After saving the changes, go to the settings of the application being created. This feature is available in the Store Settings section.

- The name of the store being created and your email address are written on the Store tab. You can select the currency to use from the drop-down menu.
- The service, if necessary, displays Google Maps in the utility, for which the registered API key is indicated in a special field.
- If you expect free delivery, here you can activate the above option and specify its conditions. In the Cash On Delivery line, you can specify the surcharge (in the form of a decimal fraction) that the client will have to pay for cash on delivery. For example, the number 1.06 would mean that the purchase price will increase by 6%.
- Specify the region in Shipping in the drop-down list. You can specify the delivery price for a single (Single order) or a package (Multiple orders) of goods.

- Select the line Prices to include tax by going to the Tax section. This means that the price of the product will be indicated including VAT, which is typical for all domestic retailers.

- Payment systems through which clients will transfer funds to you are indicated in Payments Gateway. Popular systems like Qiwi or Yandex.Money are not supported in MobiCart, so be sure to activate the ability to use cash on delivery.
- The language is configured in the Languges section. Since Russian is not supported here, the text of messages must be entered manually, and then be sure to save the information.

- Go to App Vital, where you need to specify the name of the utility you are creating, as well as the countries in which the application can be used.
- The icons that the user will see on the screen of his gadget in the store can be uploaded to Images. Upload the image for the main screen to the Home Gallery.
- Descriptions for products can be placed in Store Builder in several ways:

- News content for the site can be created in the News section. Write the content of the message and click on Publish News.

Next, all that remains is to create an installation file for the practically created mobile online store utility. For this purpose, go to Create Application, open the Submit Apps tab in it, click Continue. Here you will need to accept the license agreement, after which the system will generate an installation file for the mobile application based on the settings you have made.

If you choose a non-commercial tariff, you will have to place the created file in the Google Play store yourself - the appropriate instructions will be sent by email. If you choose a paid plan, MobiCart will independently publish your development on Google Play. You can verify that the program is working by installing the latter on your own gadget and checking that product cards and news are displayed correctly.
Creating a themed mobile utility with AppsGeyser
To start using this Android constructor, you need to register, for which click Create Now.

AppsGeyser has become a multifunctional service that allows you to develop any type of mobile utility. The following available templates are suitable for the information resource:
- Manual for creating a small guide utility;
- Blog for reading your blog pages on the gadget screen;
- Website to convert a website into a mobile application;
- News, which creates an aggregator of news, for example, some thematic or regional;
- Page, capable of converting an e-book or other similar content into an Android application.
Use a Blog template:

If you have already registered with AppsGeyser, the system will redirect you to your personal account, where you can install the created Android program on your own device and publish it on Google Play. The utility can be monetized here. When this option is selected, users will see advertisements. Information about the number of installations of your program is also available in your personal account, and here you can edit it.
Other Android app builders
For one reason or another, neither MobiCart nor AppsGeyser may be suitable for you. And they cannot solve such a problem as creating a game on Android without programming, for example. However, there are many similar constructors on the Internet today, with which you can write a program in a similar way. Here are some:
- AppsMakerStore. Creates Android applications of almost any type - from commercial to thematic ones. It has a Russified interface and a comprehensive manual. There is a fee for use.
- Mobincube. Allows you to write and monetize generated utilities on various topics. Basic functionality is free.
- Monomobi. A commercial tool for quickly creating Android programs with a Russified interface. You can try the service for free during the trial period.
- Appsbar. Free Android editor for creating simple applications for phones.
Most of these editors are paid, especially if the utilities created in them can be monetized for profit without the ability to “code.” You can learn from free constructors and try to make something of your own, but the quality and functionality of the program will be low. And it’s also unlikely to be possible to create a high-quality game on Android without programming.
Remember that when making a program using such a constructor, you often become dependent on a service that, if desired, can “cover” your project. Therefore, to create serious projects, it is better to learn the basic fundamentals of programming and develop the necessary applications without network assistants.
Report content
Copyright infringement Spam Incorrect content Broken links
This tutorial will teach you the basics of how to write an Android application using the Android Studio development environment. Android devices are becoming more and more common, and the demand for new applications is only increasing all the time. Android Studio is a free, easy-to-use development environment.
For this tutorial, it's best if you have at least a passing knowledge of Java since that's the language used by Android. There won't be too much code in this tutorial since I'm assuming you have some knowledge of Java or are ready to find something you don't already know. Creating an application will take 30-60 minutes, depending on how quickly you download and install all the necessary programs. After following this tutorial on how to create your first Android app, you may find yourself a fun new hobby or even start a career as a budding mobile app developer.
Stage 1: Install Android Studio


- You need to install the JDK ( Java Development Kit) and JRE (Java Runtime Environment). You can download it from this link. Select the version for your OS there, accept the license agreement, download and install.
- Now go here http://developer.android.com/sdk/index.html and download (be careful, you will have to download about 3 gigabytes).
- We start the installation and follow the instructions.
Stage 2: Create a new project


- Open Android Studio.
- On the menu " Quick Start", select " Start a new Android Studio project».
- In the window " Create New Project"(the window that opened), name your project " HelloWorld».
- Company name optional.*
- Click " Next».
- Make sure the checkbox is only on " Phone and Tablet».
- If you are planning to test your first application on your phone, then make sure that the correct version of Android is selected (not older than the one on the phone).
- Click " Next».
- Select " Blank Activity».
- Click " Next».
- Leave all other fields as they are.
- Click " Finish».
*Typical company name for Android projects is “example.name.here.com”.
Stage 3: Editing the greeting


- Go to the tab activity_main.xml, most likely it is already active.
- Make sure the tab at the bottom of the screen is active Design(most likely this is true).
- Drag the phrase " Hello, World! » from the top left corner of the phone to the center of the screen.
- On the left side of the screen there is a folder tree. Open the folder called " values».
- In this folder, double click on the file " strings.xml».
- In this file, find the line containing the text “ Hello world!" and add to this text " Welcometomyapp! ».
- Return to the " activity_main.xml».
- Make sure your text is centered on your phone screen and contains the text " Helloworld! Welcometomyapp! ».
Step 4: Add a Button

- On the " activity_main.xml" select the tab " Design».
- In the column to the left of the window where the phone is located, find a folder called " Widgets" There are various buttons there.
- Grab the " Button» and drag it onto your phone screen. It should be centered on the screen right below your text.
- Make sure the button is still selected (blue frame around it).
- In the lower right corner there is a window with the properties of the selected object. Scroll down and find the line called " text».
- Change the text " New Button" on " Next Page».
Stage 5: Create a Second Activity

- At the top of the project's file system tree, right-click on the folder called " app».
- Select New > Activity > Blank Activity.
- In the window that appears, in the top line, enter “ SecondActivity».
- Click " Finish».
- Go to the " activity_second.xml" and make sure the " tab is selected at the bottom Design».
- Move the text from the top left corner of the phone to the center of the screen as we did in the previous steps.
- Make sure the text block is still selected (blue frame) and in the lower right corner of the object properties, look for the line " id" and enter there " text2 ».
- In the upper left corner (in the project tree), double-click " strings.xml».
- Below the line
Hello world! Welcome to my app! add the following line
Welcome to the second page! - Return to the " activity_second.xml».
- Select the text block again.
- In the lower right corner of the object properties, find the line “ text" and enter there «@ string/second_page».
- Make sure the text box now says " Welcometothesecondpage! ” and the blog is located in the center of the screen.
Stage 6: Write the action for the button


Stage 7: Testing the application

- In the toolbar at the top of the Android Studio window, click on the green play symbol.
- In the window " ChooseDevice» select the item « Launchemulator» and select the device.
- Click on the button OK».
- When the emulator starts (this may take a long time), the application will automatically open on the virtual device.
- Make sure that all text is displayed correctly and that clicking the button takes you to the next page.
Attention: If you receive the message " HAX kernel module is not installed!", then there are two possible options. The fact is that only modern Intel processors support this virtualization and you only need to enable it in the BIOS. If you have a processor that does not support this function, you will have to test the application on a real phone or use a third-party emulator rather than the built-in one.
How to get .apk file in Android Studio
In my opinion, this issue is well covered in this article, so I will not repeat it. I found it easiest for the first lesson Manual method.
Once you receive the file, you can copy it to your phone and install the app.
Stage 8: Result

Congratulations! You've just finished writing your first Android application with some basic functionality. The finished application should have a user welcome page and a button that will take the user to the second page.
You have briefly become acquainted with the development of applications for Android and may have awakened in yourself the desire to learn everything that is necessary in order to further develop in this direction.


