The smartphone does not see the wifi router. WiFi authentication failed. Third party software
Modern life is quite difficult to imagine without phones and the Internet. Therefore, modern smartphones provide the ability to work with the Internet. At the same time, most people use Internet access using WiFi. This is due to the fact that it is much more convenient, and a large amount of money is not spent.
Reasons for lack of Wi-Fi on your phone
It can often happen that the phone connects to Wi-Fi but does not connect to the Internet, this may be due to various reasons, let’s look at them in more detail:
- The first thing you might think about when connecting to the network is whether the Internet itself is paid for. But this rarely happens;
- therefore, the problem is quite solvable;
- It may be that the Internet is connected, but it is written: without access to the network. This happens quite often;
- The phone does not connect to Wi-Fi, it says obtaining an IP address. It turns out that you connect to the Internet, the connection is shown, but at the same time the connection itself does not occur;
- authentication error. This is also a fairly common reason why the Internet will never connect;
- error type: “Saved, WPAWPA2 protection.”
This may not be all the problems that may occur when connecting to the Internet from mobile devices. But at the same time, they are the most common.
Many people, not knowing what to do, immediately try to call the operator and find out why they do not have Internet, although, in many ways, the problem may not be on their part.
Video: How to connect the Internet to your phone?
Cause Solutions

It is logical to assume that it is necessary to solve these problems, therefore, we will tell you how this can be done.

Therefore, in addition to the usual tips in terms of rebooting the router, there are a number of really useful and more
Restarting the router
Many people wonder why I can't connect to the Internet and what can I do to solve it. There is one procedure that every person can do, and that is restarting the router. This can help with many problems where your phone won't connect to your home Wi-Fi because it can help you set up your router again.

Rebooting can be done in several ways:. This is really quite simple, but I would like to note that the first method is the highest quality, and at the same time gentle on the device itself.
Removing the old connection
Also, one of the solutions to Wi-Fi connection problems may be to delete the connection strictly. At the same time, you get the opportunity to reconnect to Wi-Fi and enter a password, this will give you the opportunity to reconnect to all parameters, and possibly solve the problem with connecting your phone to the network.
The problem is solved mainly because when you delete the old connection, all Wi-Fi settings are deleted, allowing you to reconnect with new settings.
All this suggests that you will be able to work with the network. But this does not mean that you can solve any problem in this way. This is just one of all options.
Video: How to remove unnecessary network connections
Changing the channel in the router
You should change the channel in the router when you start having constant problems with your Internet connection.
Because it may happen that two routers operate on the same channel, and then this is precisely why such interference occurs. If you have often had similar connection problems, then this is exactly what needs to be done.
Also, there is a possibility that for the same reason there may be such a problem: Wi-Fi works within only one room, and then it catches, but the Internet does not load sites. This may just be due to interference that occurs from other devices. Therefore, it’s worth changing the channel, especially since nothing bad will definitely come from it.
Connection password

Probably everyone understands what a connection password is and why it is needed. It is with the help of it that you can connect to Wi-Fi of any network. Using the Internet also depends on the correctness of this password.
Many people advise changing the password if necessary to solve connection problems, because this may be the problem.
Checking MAC and IP addresses An IP address is what is assigned to a device after connecting to the Internet.
It is necessary to check the MAC and IP address, because this may be the main problem of the lack of Internet in the device.
Checking the IP address is not that difficult to do; just go to the network settings. The correctness of this address gives you the opportunity to work with the Internet without problems or interference.
One of the reasons for the lack of Internet or the inability to connect to it is the wrong type of encryption, which plays a rather large role for devices. There are devices that work and support only one type of Internet connection, and sometimes connecting to the Internet is impossible precisely because the parameters do not match.
If such a problem occurs, then simply check the encryption type and change it if necessary. Then you can reconnect Wi-Fi and check its operation. Basically, the type of encryption is the last step in troubleshooting connection problems.
Why doesn't my phone connect to Wi-Fi - authentication error
Connecting your phone to the Internet via Wi-Fi always happens without any problems, but there are times when you need to take additional steps in order for the connection to happen.

The most common cause is an authentication error. As in all cases, it is advised to go through many steps that can help solve the problem.
It is quite difficult to solve such a problem since you do not have access to the router settings. But you can simply check the password, and that's the only thing you can do. An incorrectly entered password also leads to authentication problems. Therefore, to prevent this from happening, you just need to be careful.
Error Saved, WPA protection Also, most people ask questions like:

Why doesn't my phone see the network? This problem is quite logical. The first thing that could be, of course, is a problem in the router, or an error Saved, WPA protection, this problem is completely solvable. It occurs quite often, and mainly due to the fact that there was some failure in the router settings. And in such cases, the phone sees Wi-Fi but does not connect.
As a result, we can say that no matter what problem you have, the first thing you should do is reboot the router. Because it is quite safe, does not require a lot of time, and besides, anyone can do it. Then you can begin other actions, which will be more complex, but at the same time, you can cope with them.
Doesn't detect, turns off, doesn't pick up wi-fi. Many users encounter a problem when phone or
The Android tablet starts acting up. It seems that it didn’t fall anywhere and wasn’t “watered” with anything, but it doesn’t work as it should. For example, the device has problems with reception with wi-fi
. The reason for this may be: Software glitch- i.e. the problem is a software glitch
2nd: Hardware failure- i.e. the problem is in the hardware (i.e., replacement or restoration of spare parts for the gadget is required)
However, do not rush to get upset - in 90% of cases there are problems wi-fi smartphone or Android tablet is to blame software glitch which you can easily fix on your own.
Fixing a software glitch:
Method 1. Quite simple - go to "settings", find there "backup and reset", in which you choose full reset settings with deletion of all data. Be careful, using this method is often effective, but it entails deleting all photos, contacts, passwords, music, games, videos and, in general, all information stored on your smartphone e or tablet e. Therefore, first save everything you need by connecting the gadget to your computer. If this method does not suit you, or if after this the problem is not resolved, see Method 2.
Method 2.
Based on solving problems with communication and network reception phone number and tablets based on Android by introducing additional software. Utilities that control all processes inside gadgets. Today, there are quite a lot of them, however, the fewer functions an application contains, the more effective it is, as a rule. The best way to control system functions is a small, easy-to-use, free utility for Android devices. You can download the application from Google Play and see its additional options in the description. After installing the application, all that remains is to launch it. Further, in principle, nothing more is required from you. The application will take full control of the device's functions. (By the way, among other things, the gadget will begin to charge 20% faster, and its performance will also increase significantly, which will affect the loading speed and operation of all applications, games, and the system as a whole. On average, after scanning, the system runs at 50% faster.)
- Also, to achieve maximum data exchange speed over the Internet, it is recommended to install a high-speed browser on your Android device Yandex Browser You can download it from Google Play.
Method 3.
Changing the device software, or as it is also called "re firmware ". This method, as a rule, requires certain skills and can be solved by contacting the Service Center. To carry out this task yourself, you need to contact the website of the manufacturer of your device, download the utilities necessary for flashing the firmware and the firmware itself, and then reinstall it on your gadget.
If none of the methods brings results, unfortunately, you will have to contact the Service Center for repairing your tablet a or smartphone a.
Problems with WI-FI on an Android smartphone or tablet./ The phone or tablet does not detect, turns off, does not pick up wi-fi.
In this article we will look at why your Android device does not see WiFi ctmn in the list of available networks, although you are sure that it should be there.
This article is suitable for phones and tablets of all Android device manufacturers: Samsung, LG, Sony, Huawei, Xiaomi, HTC, ZTE, Fly, Alcatel and others. We are not responsible for your actions.
In this article, we will look at solving a problem in which an Android tablet or smartphone suddenly stopped detecting Wi-Fi networks or one particular network. For example, let's take a smartphone that runs Android. So he connected perfectly to the home network, but at one point he simply stops seeing this Wi-Fi network.
This network is not in the list of categories available for connection. Other devices see and also connect to this network without problems. There may also be situations when no products see the wireless network at all. In such situations, you should check the router, then reboot it and see if the Wi-Fi indicator on it is blinking.
Similarly, there are cases when in public places (shop, cafe, restaurant) other devices see and join a certain (often open) network, but your tablet or smartphone simply does not find it.
Increase
It doesn’t matter here whether you use a smartphone, tablet or even a TV set-top box. Let's consider the situation specifically for devices on the Android system. There is a possibility that if your gadget has stopped seeing the Wi-Fi network that it previously connected to without problems, then there may be a problem with the router (access point). If this is not your network (there is no access to the router), then it is unlikely that you will be able to do anything.
To avoid confusion, you should first find out the following:
- When a gadget does not see any Wi-Fi networks at all, but there are wireless networks in a given radius and other devices see them, then the problem lies only in the device itself. In this situation, you can do the following: turn off and turn on Wi-Fi again, reboot the gadget, remove the case. In extreme situations, you can reset the gadget settings to factory settings or flash the firmware. If even after resetting the settings the device does not see any available wireless networks, then most likely the problem is related to hardware. The device must be taken to a service center.
- The second case is more popular, which we will consider in detail. We are talking about a situation when Android does not see one specific Wi-Fi network, but other devices find it and connect without problems.
Troubleshooting
First, let's look at the simplest solutions that should be done first:

There are very few options for a solution on the device. Rebooting, resetting settings, turning off, turning on the Wi-Fi network - this is the maximum that can be done directly on the Android device. There is another option - changing the wireless network settings on the router.
Changing settings on the Wi-Fi router
You can experiment with changing the Wi-Fi network channel, check the network operation mode, change the channel width. Of course, these settings may vary depending on the router you have. Often they are located on one page in the router’s control panel menu: “Wireless”, “Wireless mode”, “Wi-Fi”.
In the settings, you can, for example, set the 6th static channel or specify “Auto” if a static channel was already installed previously. Then we save the settings and reboot the router. We take the gadget and check the visibility of the Wi-Fi network.
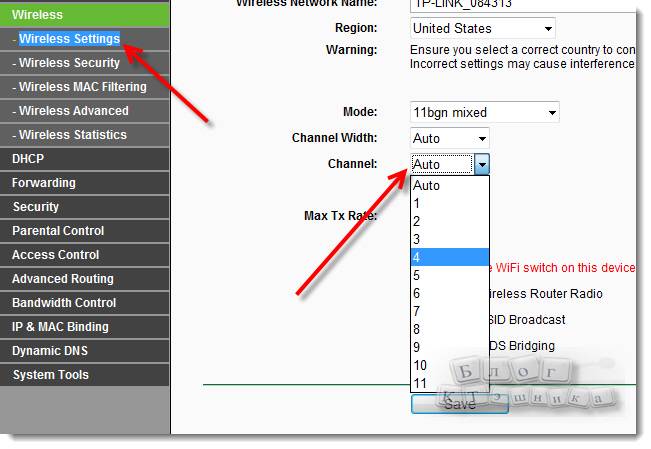
In the settings you can immediately check that the “11bgn mixed” mode is specified. You can change the "Channel Width". You should also check whether the region is specified correctly if the router has such a setting. The screenshot below shows an example on a TP-Link router.

Increase
If after the first change of settings the gadget does not see the wireless network, then you can do it again. We set other settings. For example, a different operating mode (only n), channel. If there are no results, then it is better to return to the factory settings that were set before changing the parameters. You also need to return all the settings back when problems arise when connecting on other devices.
Setting up a virtual access point on a laptop to determine the network
There are also questions about why Android does not detect the Wi-Fi network that is created on the laptop. This is because creating a virtual access point is not enough. After this, you need to enable discovery and open access to it.
It's easy to do. First, you should request to go to the Network Control Center. To open this center, you need to find the network icon in the tray (at the bottom right corner of the desktop). Right-click on it, then a window will open, and in the menu that appears, select the required item.

Increase
A menu will open where you need to enter the “Change advanced sharing settings” section. There you just need to enable network discovery and give permission to share. At the bottom of the menu, you should disable network access with password protection. You can also use Virtual Router Plus software to create a wireless network on a laptop.

Increase

If you have a tablet running Android OS, then most likely it will have a built-in Wi-Fi module. I have never seen a tablet without Wi-Fi; even the cheapest Chinese models are equipped with this type of wireless connection.
The instructions will be presented in two parts, first setting up the modem/router, then connecting the tablet to a Wi-Fi access point. If you have been using this technology for a long time, but just don’t know how to set up Wi-Fi on your tablet, you can skip the first part and proceed straight to the second.
Part 1. Enable Wi-Fi on your modem or router
I assume that you have no idea what this “Wi-Fi” is, how to turn it on and how to use it. If I’m right, then you did the right thing by starting to read the article from here, from the first part. I repeat, if you have everything set up for a long time, you use Wi-Fi on your laptop, then read part 2.
Before you can use Wi-Fi at home on your tablet, you need to enable it on your modem. I hope your modem can create Wi-Fi networks. To make sure of this, read the instructions for the modem or look at its characteristics on the website. Look there for words like “802.11” or “Wi-Fi”. The easiest way to find out is to look for a light bulb on the modem that says “WLAN”. If it is there, then there is Wi-Fi.
If you don’t know what to write here, try to find out this information from the person who set up the Internet for you or from the person who sold you the modem. Alternatively, you can contact your Internet provider.
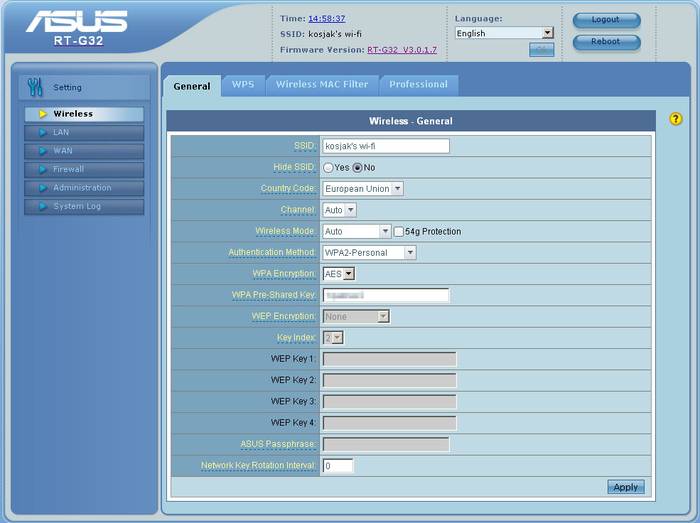
Further actions depend on your modem model. You need to find a menu item with a name like “WLAN” or “Wireless Lan”. Look on the left in the menu. Check the box next to “Active Wireless LAN” or “Enable”. Set the network security type to “WPA2-PSK”. Enter the name of your Wi-Fi network in the “SSID” field and enter the password of your network in the “Pre-Shared Key” field. Click the "Apply" or "Submit" button to save the settings.
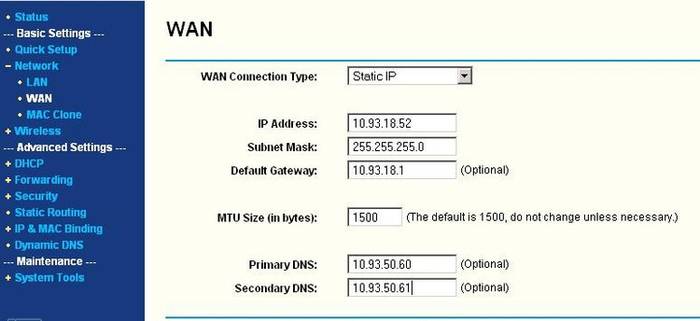
But that is not all. We go to the DHCP settings (this thing somehow distributes IP addresses to everyone who connects to the network). Depending on the modem model, these settings may be in a variety of places. The screenshot shows the possible location of such settings. Although in my Zyxel modem they are hidden along the path Network -> LAN -> DHCP Setup. Enable DHCP if it is disabled by switching the checkbox to Enable. If DHCP is enabled, read the next paragraph. If there are no checkboxes, but there is a list, select the Server item opposite the DHCP item. After turning on, reboot the modem (this can be done either in the modem settings interface, which is where you are now, or simply with a button on the modem.
Part 2. Connecting the tablet via Wi-Fi
All that remains is to connect the tablet to the newly created network. The actions will depend on the version of Android on your tablet. If you have version 4 and higher, the first Wi-Fi item is right in the settings. Turn it on. If you have Android version 3, you also need to go to the wireless connections settings item. And there already turn on Wi-Fi.
After the device thinks, it will show you a list of found networks. Select the network that you created in part 1 (this network will be called the same as you named it in the “SSID” field), or which you already have and to which you have been connecting your laptop for a long time. Next, you will be asked to enter a password for it. Again, enter the password that you specified in the “Pre-Shared Key” field. After all the steps, the tablet should connect to the network, which you will know by the antenna icon that appears next to the clock.
Part 3. Endlessly obtaining an IP address...
The most common problem that users have when connecting a tablet via Wi-Fi is the constant message “Obtaining an IP address.” It doesn't connect any further. There are several solutions to this problem:
— Rename the Wi-Fi network to English. As suggested in the comments, sometimes tablets do not connect to networks whose names contain Russian letters.
— Enabling the DHCP server. How to enable it, read above, in the 1st part of this article at the very end.
— Changing the Wi-Fi network encryption type. You can change the type of protection in the Wi-Fi security settings (this is the same place where you set the password and network name). Try setting some other value in the highlighted items. Don't be afraid, you won't damage the modem with your experiments. For the changes to take effect, reboot the modem.
— Manually enter IP addresses and DNS servers in the connection settings on the tablet. When connecting to a Wi-Fi network, in the window where you are asked to enter a password, open the additional settings menu. And there select IP Settings -> Custom. In the IP address field, enter your address, it looks like 192.168.1.*** (for example, 192.168.1.128). In the Gateway field, enter 192.168.1.1 or 192.168.0.1 (check with your legal provider). All that remains is to enter DNS, which is different for everyone, but which you can also find out from your Internet provider.


