Download geometric shapes for Photoshop. Custom shapes in Photoshop. How to install additional shape sets
Hello, dear readers of my blog. The easier the task, the more difficult it is to solve in Photoshop. There are a thousand articles about or creating the effect of black eyes, but how to draw a circle, square or diamond - go figure it out! Today I will solve this injustice.
You will find a comprehensive article about geometric shapes for Photoshop - how to draw them yourself, what additional tools you can download for a more impressive result, as well as a lot of other equally interesting and useful information.
We draw ourselves
Adobe Photoshop has several tools that allow you to draw shapes. Just some of them hide some secrets. Now I will tell you about them. So, I If you want to learn how to do it like in my drawing, then I recommend the article, there is nothing easier than making the same one.
So, in the toolbar on the left you can find a rectangle, ellipse, polygon, line or any shape. You may not see additional tools, but you found one of them, just hold down the left mouse button for a split second or click once on the right mouse button. A menu with additional shapes will immediately appear.

To start, I'll select a rectangle. As soon as I finish drawing, an additional menu will pop up on the left. Here you can select the size by width and height if you need to maintain exact dimensions. Just below is a menu with a fill for the shape itself - you can choose no fill, a solid color, a gradient or a pattern.

A little to the right is the stroke menu - you need to determine its width and whether it will be present at all; if you want, make it monochromatic, fill it with a gradient or, again, with a pattern.

To turn a rectangle into a square you need to hold down the Shift button while drawing the shape.

Pressing the Shift button turns an ellipse into a circle.

Also in the list there is such a figure as a polygon. You decide the number of sides yourself. You can enter any value - 3 to make a triangle, 7, 10 and so on.

I won’t pay much attention to the lines; this thing is not difficult to figure out on your own. The only thing worth warning is that holding Shift makes the line strictly vertical or horizontal.
Free figure
We are left with an arbitrary figure. What it is?

On the very right side of the top menu you can see ready-made shapes. Various arrows, squares, lightning bolts and so on.

To use the keyboard shortcut Ctrl+T.

How to add new ones
Adding new shapes is not difficult. A lot of free figures can be downloaded from the site photoshop-master.ru . There are about 400 sets with figures - people, patterns, spiders, abstraction, cars, chairs, fire, flowers and much more.

I’ll show you how to install them using “Media” as an example; they will be useful to me in the future. So, I download the file.
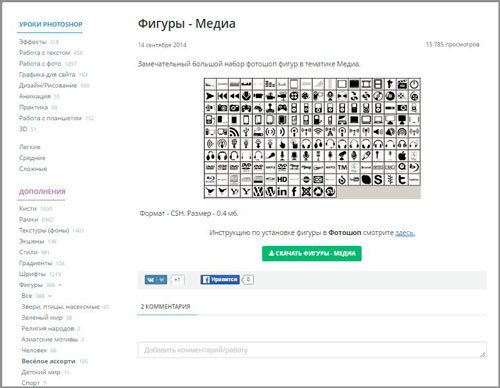
Just wait 15 seconds. No pre-registration is required.

Now open the archive and drop the file in CSH format somewhere where it can be easily found.

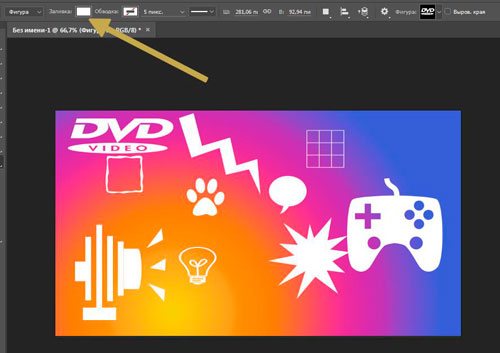
Now open the shapes in Photoshop and click on the nut on the right side. In the list that opens, select “Load Shapes.”

Now find the file that you unzipped not long ago. By the way, after you're done, the file can be deleted from your computer. You won't need it anymore. Everything was copied to the desired folder.

You can use shapes. Don't forget about the fill, thanks to which you can change the color of the shapes, as well as the stroke.
In addition to shapes, you may also need brushes. They can also be downloaded from the website Photoshop-master .

You can load the required set in the same way as when working with shapes. Open your brushes.

Click on the nut and select “Load”.

Work with them yourself. There is nothing complicated here. They are slightly different from the figures.

Google to the rescue
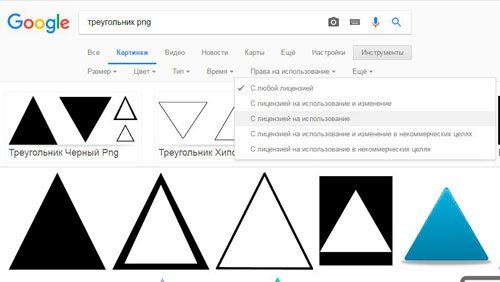
Another way to draw a figure is to use the work of others. You'll need Google and its Images section. You will find out why exactly he is very soon. In order for the figure to have a transparent background and fit harmoniously into your composition, it is required. This is what you need to look for: png triangle, circle, oval, and so on.

If you are doing work for yourself, then, in principle, you could use Yandex, but if the project is being created for commercial purposes, then Google will be very useful. Open “Tools”, then “Use Rights” and select the desired type - use or use and change.
Next, open the picture after you have found something suitable. This is an important condition. The drawing should be located on this square-checkered background. If it's just white, then it's not a png. You will understand the difference when you download. In principle, there is nothing wrong with learning from your mistakes.

This is what the PNG will look like. The checkerboard filled with my background.

If you want to learn more about the program, I can recommend the course to you « Photoshop from scratch in video format » . It is suitable for complete beginners. There is a lot of useful information here about the tools and when each is suitable.

The Internet is full of lessons that you can learn from, but it is one thing to blindly repeat after the author and quite another to meaningfully achieve a goal, knowing what you will have to use for this. This is a completely different level.
Photoshop is a raster image editor, but its functionality also includes the ability to create vector shapes. Vector shapes consist of primitives (points and segments) and fill. In fact, this is a vector path filled with some color.
Saving such images is possible only in raster formats, but, if required, the working document can be exported to a vector editor, for example.
The tools for creating vector shapes are located in the same place as all other tools - on the toolbar. If you want to become a real professional, then the hotkey for calling any of these tools is U.

This includes Rectangle, Rounded Rectangle, Ellipse, Polygon, Free Shape, and Line. All these tools perform one function: they create a work path consisting of anchor points and fill it with the main color.
As you can see, there are quite a lot of tools. Let's talk about everyone briefly.
- Rectangle.
Using this tool we can draw a rectangle or square (with the SHIFT).
- Rectangle with rounded corners.
This tool, as the name suggests, helps to draw the same figure, but with rounded corners.
The fillet radius is preset in the options bar.

- Ellipse.
Using a tool "Ellipse" circles and ovals are created.
- Polygon.
Tool "Polygon" allows us to draw polygons with a given number of angles.
The number of corners is also adjustable in the options bar. Please note that the setting contains the parameter "Parties". Don't let this fact mislead you.

- Line.
With this tool we can draw a straight line in any direction. Key SHIFT in this case, it allows you to draw lines at 90 or 45 degrees relative to the canvas.
The line thickness is adjusted in the same place - in the parameters panel.

- Any figure.
Tool "Free figure" gives us the ability to create free-form shapes contained in a set of shapes.
The standard Photoshop set containing arbitrary shapes can also be found in the top tool settings panel.

You can add figures downloaded from the Internet to this set.
General Tool Settings
As we already know, most of the shape settings are found in the top options bar. The settings below apply equally to all instruments in the group.

The following settings allow you to perform various, rather complex, manipulations with figures, so let's talk about them in more detail.
Shape Manipulation
These manipulations are possible only if at least one shape is already present on the canvas (layer). Below it will become clear why this happens.

This item allows, after performing one or more previous operations, to combine all the contours into one solid figure.
Practice
The practical part of today's lesson will be a set of chaotic actions aimed only at seeing how the tool settings work in action. This will already be enough to understand the principles of working with figures.
So, practice.
1. First, let's create a regular square. To do this, select a tool "Rectangle", hold down the key SHIFT and pull from the center of the canvas. You can use guides for ease of use.

2. Then select a tool "Ellipse" and settings item "Subtract front figure". Now we will cut out a circle in our square.

3. Click once on any place on the canvas and, in the dialog box that opens, enter the dimensions of the future “hole”, and also check the box next to the item "From the center". The circle will be created exactly in the center of the canvas.

4. Click OK and we see the following:

The hole is ready.
5. Next we need to combine all the components, creating a solid figure. To do this, select the appropriate item in the settings. In this case, this is not necessary, but if the circle extended beyond the boundaries of the square, our figure would consist of two working contours.
6. Change the color of the figure. From the lesson we know which setting is responsible for filling. There is another, faster and more practical way to change colors. You need to double-click on the thumbnail of the layer with the shape and, in the color settings window, select the desired shade. In this way you can fill the shape with any solid color.

Accordingly, if a gradient fill or pattern is required, then we use the parameters panel.
7. Let's set the stroke. To do this, let's look at the block "Hatch" in the options panel. Here we select the stroke type "Dotted line" and use the slider to change its size.

8. Set the color of the dotted line by clicking on the adjacent color box.

9. Now, if you completely turn off the shape fill,

Then you can see the following picture:

Thus, we went through almost all the settings of the instruments from the group "Figure". Be sure to practice simulating various situations to understand what laws raster objects in Photoshop obey.
The figures are notable for the fact that, unlike their raster counterparts, they do not lose quality and do not acquire torn edges when scaled. However, they have the same properties and can be processed. You can apply styles to shapes, fill them in any way, and create new shapes by combining and subtracting.
Skills in working with shapes are indispensable when creating logos, various elements for websites and printing. Using these tools, you can convert raster elements into vector ones and then export them to the appropriate editor.
Figures can be downloaded from the Internet, or you can create your own. Using shapes you can draw huge posters and signs. In general, the usefulness of these tools is very difficult to overestimate, so pay special attention to studying this functionality of Photoshop, and they will help you with this.
There is an interesting tool in Photoshop - "Free figure". In practice, this tool is rarely used, but it still has a number of interesting features. In this lesson you will get acquainted with arbitrary shapes, and also learn how to independently add your own sets of such shapes in Photoshop.
There is a group of similar tools on the toolbar (shortcut U). These include: rectangle, rounded rectangle, ellipse, polygon, line and arbitrary figure.
There is a window on the attributes panel where you can select a shape from among the standard ones. To do this, click on the small arrow to the right of the thumbnail. Look at the screenshots:

What is a free figure?
It is a vector image, which means it has no size restrictions. Therefore, it can be stretched as much as you like without losing quality.
The shape does not have its own color (other than the one we choose before creating), volume, shadows, border strokes, or anything else. In this way, it resembles a brush, where you set the color yourself, everything else will have to be painted on your own.

How to use?
To draw a custom shape, select it from the drop-down list, then left-click in your open document and move the mouse to the side. You will see that the outline of the future figure has appeared. By moving the mouse in different angles and directions, you adjust its size and shape, i.e. it can be wide or narrow. Don't forget to first choose the color you want and then paint.
Hold down the Shift key to draw the figure perfectly straight, without distortion in any direction.
How to install your shapes in Photoshop?
You can install a set of figures into your program yourself. The same principles apply here as, for example, with or. To install them, first, download a set of figures to your computer. Such sets have the extension csh.
After that, open the shapes menu. You will see these 4 commands:

Selecting "Load...", a dialog box will open in which you need to specify the path to the file with the extension csh, for example like this:

This set will automatically be added to the end of the list of all shapes. Let's say you had a set with animals on the list, and you loaded arrows. The result is a list consisting of animals and arrows.
Selecting "Replace...", everything will be the same, except that new figures will not appear at the end of the list, but will completely replace those that already exist. For example, you initially had sets with animals and arrows loaded in the list, and you decided to open with a replacement set of ornaments. As a result, only ornaments will be on the list.
And if you have loaded several sets, delete any individual figures using the command "Delete…", in general, if you have made a set for yourself, you can save it with the command "Save custom...". In the future it will be possible to download it in the same form or transfer it to someone via the Internet.
Last command "Restore arbitrary..." allows you to return everything to default.
Please note that in the same menu there is a huge list: Animals, Arrows, Nature, Objects, etc. These are standard sets that were kindly provided to us by the Photoshop developers.
Second installation method with additional benefit
Arbitrary shapes can still be installed directly into Photoshop system files.
This is a little more difficult to do, but the main advantage of this method is that your set will appear in the list that I described above (Animals, Arrows, Nature, Objects, etc.). If you intend to use this tool often, then this installation method will reduce time, and you will be able to select the desired set in two clicks.
To do this, you need to copy the file with the extension csh to the photoshop system folder "Custom Shapes", usually her address is like this: C:\Program Files\Adobe\Adobe Photoshop CS5\Presets\Custom Shapes.
If you notice an error in the text, select it and press Ctrl + Enter. Thank you!
Today I will tell you how to make a custom shape in Photoshop. Be prepared that there is quite a lot of useful material in the lesson. Take a couple of free hours to study the information in this lesson.
You have a lot to learn in order to know how to make a freeform figure and what you can do with it in the future. You will literally feel like a genius when you understand how Photoshop works and learn how to build various arbitrary shapes yourself.
At first it may seem that making arbitrary shapes is difficult, but in fact you can create such shapes yourself and for free using the almighty Photoshop.
Creating figures is quite a fun process. It’s even more interesting if you create different shapes and you can also combine them into a separate set. At first everything may seem difficult, but then you will enjoy it and get involved in this process.
When you learn how to create different arbitrary shapes, you can use them as decoration when designing pictures and drawings. After this lesson, it will be easy for you to create your own large collage with arbitrary figures that you yourself drew using your acquired skills.
So, to get started in Photoshop, you need to familiarize yourself with the tools that we will need to create a figure. Don't start creating shapes if you don't know the basics of the program.
The most important tool with which we will create a figure is Feather (P), for those who already understand the program and its essence well, you can try using tools such as "Ellipse", "Rectangle".
But these tools will not work if you need to create a certain shape, in such a situation, choose Feather (P).
If you have the talent to draw any shape neatly and evenly by hand, then you are in luck and don't need to trace shapes from photographs. And those who do not know how to draw will have to learn to trace a figure from photographs.
Let's first try to create the figure of a gingerbread man.

1. To begin, select the tool you will use - the Pen (P).

It was already said above that to create an arbitrary figure you can use Ellipse or Rectangle.
It is logical to note that such tools are not suitable for drawing a gingerbread man. Select from the toolbar Feather(P). You can also press only the P key on the keyboard to speed up the process.
2.
Parameter "Shape Layer".
When you have already chosen the tool you will use, pay attention to the top panel of the program.
To draw a figure, you need to select the drop-down menu item called Figure. When using a pen, this parameter should be used by the program by default, so usually you won’t have to change anything at the initial stage.

3.
Drawing a figure
After choosing the appropriate tool and setting the parameters, you can begin to outline your future masterpiece. You need to start with the most complex element - the head of the drawing.
Click on the left mouse button several times to set anchor points around the head. Then drag the lines of the future head while holding down the key CTRL to bend them in the appropriate direction.

The Photoshop program itself does not know what you need to get as a result of all your actions, so by default it paints the contours of the figure with the color of the background you choose. This prompts you to take the next step - reduce the opacity of the contours.
4. Reduces the opacity of the outline.
Users who know the basics of Photoshop know where the layers panel is, beginners will have to look.
In the Layers panel, set the outline opacity reduction for the layer you created. There are two choices in the Layers panel - the bottom layer is where the original photo is located, and the top layer is where the shape you created is visible.
Reduce the element's opacity to 50% to see the figure you have built.

After these manipulations, the head becomes visible and the work can be continued in a more convenient manner.
It is more convenient to work when the original photo is visible through the fill. Now our future gingerbread has a head, but is there something missing?
You need to add eyes and a mouth. Now you are faced with a difficult task. How to add these elements to a drawing? We will look at this in the next step.

5. We'll need a tool "Ellipse"

The best option here is to start with the easiest thing, in this case with the eyes. If you can draw a clear and even circle with your mouse, you can try using a pen. But there is an easier way - to use the ellipse tool, which draws a circle (with the key pressed SHIFT).

6. Parameter "Subtract front figure"
You can find Subtract from shape area in the Tool Options panel. This option will help you create impacts with shapes. As the name itself suggests, you can subtract an area from a figure, intersecting the areas of many figures at once.

7. Removing drawings from the finished silhouette.
Remember that you need to add small details to your future masterpiece that will decorate it and make the picture complete and decoratively beautiful. In order to start adding details, you first need to select the “Subtract Front Shape” option. Take action from easiest to most difficult.
The pen is the most versatile tool because you can draw any shape with it, but precision and accuracy are needed here, otherwise drawing can only ruin all your efforts. Unlike a Rectangle or Ellipse, you can draw a detail of any shape and size with a pen.
If the Subtract Front Shape feature is disabled, re-enable it because we're still working on it. Our handsome little man still doesn't have a mouth, so draw a smile on him to make him happy.

The lesson shows an example of highlighting only the head of a man with a pen; you select the entire figure and cut out buttons, a butterfly and other elements.
Like that:

Homework: highlight the decorations on the hands and feet of the little man yourself.
Here we can say that the figure is almost ready. All that remains is to do a few final steps and you can admire your achievement.
8. Increase the opacity of the shape to 100%
After all the steps taken, you can see the entire figure, which means that we no longer need the source code.
So return the shape's opacity to 100%. The original image no longer bothers you and is not needed, so you can hide it by clicking on the eye icon to the left of the layer. This way, only the figure you drew yourself will become visible.

If you think this is the end, you are wrong. In this lesson, we learned not just to draw a figure from the source code, but an arbitrary figure, so we need to perform a few more actions so that the resulting little man becomes an arbitrary figure.
Be patient and continue to follow the directions.
9. Determine the shape of a man into an arbitrary figure
Before you start working on the picture, select the layer with the shape, and not the original picture – the template.
When you select the layer you made, a white frame will appear and the outline of the figure will be outlined around the figure.
After selecting the layer you need at this stage, go to the menu and select “Editing – Define a custom shape”.

Then a tab will open where you will be asked to name your little man. Call it by any name that makes sense to you.
Confirm your actions by clicking OK.

Now you have a custom shape that you have created. Photoshop can be closed, the steps to create a custom shape are completed. But after this you should have a question: “Where can I find the figure itself and how to apply it in practice?”
This will be described in subsequent steps.
10. "Free figure"


11. Change settings.
Tool Free figure will open the settings panel for you, carefully study all the parameters and find a triangle there, which contains a list of arbitrary shapes. After which a window will pop up in which arbitrary shapes are available.
The shape you created will be the last one in this list. Select it to use in the future and see what happens in practice.
12. Let's create a figure.
Hold down the right mouse button and then move the mouse to create the shape. To maintain proportions, hold down the key SHIFT. It is also useful to know that if you press ALT, the figure will move to the center, this is convenient.
You can change the location of the figure using the space bar. Move the figure to where it is convenient for you and hold down the spacebar. When you release it, the piece locks in place where you placed it. Do not be alarmed that during the work the arbitrary figure will not be completely visible. Only a thin outline should be visible.

By default, Photoshop paints an arbitrary shape with a background color; it all depends on what color you set. There are a couple of steps left where you will understand how to change the size and color of an arbitrary shape.
13. Gingerbread color change
To change the main color of the shape, double-click on the layer thumbnail. A color palette will open, from where you can select any color to paint the figurine. Since we have a gingerbread man, it is advisable to paint it beige, but here you can show your imagination. Confirm your actions and the figure will immediately change color. You can change it whenever you want, be creative and use your imagination!

14. Change of location.
Another question that worries many Photoshop users. How to name the size and location of an arbitrary shape.
If you want to use freeform shapes to create large collages, it is important that the shapes are not layered on top of each other, otherwise the fine details you worked so hard on earlier will not be visible. The image quality does not suffer when resizing, so you don’t have to worry about this.
To change the size of an arbitrary shape, go to the layers panel and click CTRL+T. The transformation frame will open, after which by clicking on any corner you can change the size of the figure as you need. To save the selected proportions, press SHIFT. While pressing the key ALT the size of the figure will change from the center.

To rotate a shape, drag the shape outside the transformation frame and place the cursor in the desired direction. To save your work, you just need to click ENTER and the figure will remain the size you chose. If you want to move it later or reduce the size, do these steps again.
In Photoshop, you can create multiple copies of an arbitrary shape that you have created as many times as you want. You can constantly adjust the position, size, color, and shapes, just don’t forget to save your actions. Each figure always has clear contours and angles; the image does not lose its quality when changing any parameters.
Thank you for reading the lesson, I hope that here you learned all the manipulations with arbitrary shapes. Good luck in further mastering such an interesting and useful Photoshop program.


