HDD health check. Hard drive error: causes, checking and correcting errors and bad sectors
All modern homes have a desktop computer or laptop. Some people need it for games, others for work or study. In any case, photographs, some important records, contact details of people, necessary addresses, etc. are stored on the computer. And the place where all this information is stored is a hard drive.
It is not without reason that experienced programmers say that in a situation where a computer has a hard drive error, formatting it is a real disaster. After all, formatting is fraught with the loss of all information. But this is the case if appropriate measures are not taken. But if you notice some errors and malfunctions in the disk in time and correct them, then you can avoid this global catastrophe
The main causes of HDD problems are “bad” sectors – sections of disk space that are somehow damaged.
They are divided into physical and logical. The latter appear due to software errors and can be corrected, while physical ones cannot be corrected. In the latter case, you will have to replace the hard drive.
Such damaged areas can appear on both magnetic and standard SSD drives.
Causes of bad sectors and errors
Hard drive failures depend on the type of damaged areas:
- brain teaser“broken” - displayed when there is malware or viruses, as well as when there is a sudden loss of power or power cable during recording;
- physical“broken” - found on a completely new product. Then you need to contact the manufacturer with a request to replace the product.
In magnetic drives, “broken” sectors can appear as a result of wear of the moving parts of the device, when foreign bodies get into the disk mechanism, or from a simple fall on the floor. In the latter case, the magnetic head of the disk is scratched, which leads to errors.
SSD drives give errors because they have tried to write any information to them many times.
Checking the hard drive for bad sectors is quite possible. Windows has an application called "chkdsk" (check disks). You need to open the folder on your desktop or in the Start menu "My computer" by clicking on the drive to be scanned. Using the context menu, select “Properties” - “Service”. Under the phrase “Check” there will be a button, by clicking on which you will be able to see the number of “broken” sectors.
During the test, the computer will eliminate errors in logical “broken” sectors, as well as mark areas with physical damage.
Attention! You can run the scan system manually, but if Windows independently detects “bad” sectors, the utility will launch itself when the system starts.
Checking utilities
Some software does not have built-in verification. For such cases, there are special programs that help identify “broken” sectors and errors and, if possible, correct them.
"Victoria"
It is a popular software for searching damaged areas. In addition to various methods of analyzing and reassigning problem areas, it has a function for searching for damaged contacts in a cable, as well as a function for assessing the performance of the hard drive. The only “disadvantage” of the program is the lack of official assemblies. Therefore, experts recommend using it separately from the OS.
"HDD Regenerator"
This utility uses its own methods to restore “bad” sectors (a combination of high and low signals) and supports any drive connection interfaces.
The downside is the high cost of the license ($90).
One of the best and multifunctional utilities for checking a device for damaged areas. Has the following functionality:
- restores and reconfigures sectors;
- fixes partition tables;
- restores files and creates backup copies;
- selects files in the table;
- copies data from remote partitions;
- creates backup copies of data.
This utility uses several methods to identify problems, as well as the ability to monitor SMART attributes and clean up the hard drive.
Important! The program supports all versions of Windows, but it does not scan/test the drive where the OS is installed.
With it you can scan one or several hard drives at the same time.
"Seagate Seatools" for Windows
The application supports all modern Windows systems. It can be used to do both basic and advanced testing. Simpler than "Seagate Seatools" for DOS, but less powerful.
– one of the most unreliable computer components. With active use, modern hard drives last an average of 3 years. Therefore, in order not to lose your data, it is very important to regularly check the status of the drive (and do not forget to make backup copies). In this article we will look at several ways to check your hard drive for functionality.
Checking the health of the hard drive using S.M.A.R.T.
If you want to check your hard drive for performance, then you should start with data from the S.M.A.R.T. system, which can be viewed in the CrystalDiskInfo program. This program is completely free, and you can.
The CrystalDiskInfo program receives hard drive data from the S.M.A.R.T. system and provides an assessment of its technical condition. If the hard drive is in good condition, you will see a rating of " Good condition e". If there are any problems with the device, you will receive a rating of " Anxiety ". Well, in case of serious problems, you will receive a technical condition rating of “Bad”.
If you wish, you can independently analyze the information from the “S.M.A.R.T.” system. To do this, examine the list of options that is located at the bottom of the CrystalDiskInfo window. As a cheat sheet on the parameters “S.M.A.R.T.” can be used .
Checking the performance of the hard drive under load
If "S.M.A.R.T." does not show any problems, then the hard drive needs to be checked under load. To do this, just try to copy a large number of small files (weighing 2-5 megabytes) to it. For example, you might try to save a large folder of photos to your hard drive. If it is faulty, the following symptoms should appear when copying files:
- A sharp decrease in copying speed;
- Intermittent copying speed;
- The copying process freezes;
- Computer or Windows Explorer freezes;
- Unpleasant sounds (crackling, grinding, squeaking);
- Disabling the drive;
If such a manual check does not reveal any obvious problems, then you can resort to more serious methods of testing the drive.
Checking your hard drive using HD Tune
The next option is to check the disk's performance using HD Tune. This program is free and you can use it. Just don’t confuse it with the paid HD Tune Pro, a link to which is on the same page.
Launch the HD Tune program on your computer and go to the “Error Scan” tab. On this tab you need to start the test using the “Start” button and wait for it to finish.

If a large number of errors were found during the scanning process, this means that your hard drive is in poor condition. Perhaps it will fail soon.
Checking the hard drive in Victoria 3.5
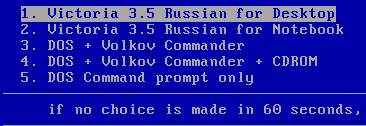
For the most accurate check, you need to use the program, it can be downloaded as an iso file, for example, (here is version 3.5, it is optimal for checking the HDD outside the operating system). The resulting iso file must be written to a CD (or flash drive) and the computer booted from it. After loading from the CD, you will need to select one of the options for launching the Victoria program. If you have a desktop PC, then select “Victoria for Desktop”, for a laptop “Victoria for Notebook” is suitable, the remaining items launch DOS and the Volkov Commander program.
To run a scan of the entire HDD surface, press the F4 key. As a result, a menu will open in which you need to select “Ignore Bad Blocks” and "Linear Reading". Please note that you do not need to use the “Write (erase)”, “Write from file”, or “BB = Erase 256 sect” options, since they delete information from the drive.

In order for scanning to begin, you need to press the F4 key again. After this, you need to wait until the program finishes checking the hard drive. At the end of testing, if the HDD does not have any problems, then you will see this result.

If the drive has any problem areas, orange and red spots will appear in the scanning window. The more such spots, the worse the condition of the drive. If the number of red spots is especially large, then most likely the hard drive is inoperative and it’s time to throw it away. Detailed information about problems will be displayed in the “Defects” block on the right side of the window.
Checking the hard drive in Victoria 4.46 (for Windows)
You can also check the hard drive for functionality using the Victoria 4.46 program from the Windows operating system. In this case, you do not need to burn iso images and you do not need to boot from them. Everything is done right in the Windows environment.
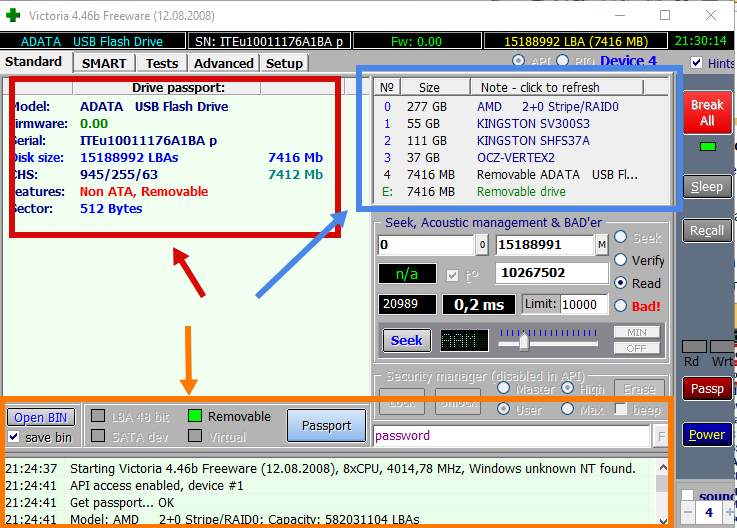
You can download Victoria 4.46 for Windows OS, for example. The downloaded archive will need to be unpacked into any folder and run the program vcr446f.exe. After launch, the main Victoria program window will appear, which looks something like the screenshot below.
First, let's look at the "Standard" tab. Here on the right side of the window are all the drives that Victoria was able to identify, at the top left is information about the currently selected drive (if necessary, you can select another), and at the bottom is a record of all actions, errors and other information.
To test your hard drive, go to the “Tests” tab. Here you first need to click on the “ Passp” button (this will allow you to obtain information about the selected drive), after which you need to start the test using the “ Start” button.


During the scanning process, the program will detect faulty and problematic sectors, the number of which can be seen in the column on the right, as well as at the bottom of the screen.
If the HDD makes strange sounds or there are problems with writing and reading information, you should use one of the programs to check the hard drive for errors. Depending on the task (checking the disk surface for damage, searching for bad sectors, correcting errors, etc.), different software may be useful.
You can quickly check the disk for errors using standard system tools, but to restore the hard drive you will need special third-party programs. Having learned how to check the health of a hard drive using various utilities, a user of any level will be able to cope with any problems that may arise.
CheckDisk System Service is the simplest hard drive diagnostic program that can't find complex errors or fix bad sectors, but is useful for fixing basic problems. It is available on all versions of Windows OS and can be used to check drives of any type. All users need to know how to check a hard drive for errors with this tool.
The graphical interface version of the utility is most convenient for novice users. You can launch it through the disk management menu, which can be accessed in two ways:
- in Windows XP/Vista/7 - select “Manage” in the context menu of “My Computer”, then go to the desired menu;
- in Windows 8/10 - press the Win+X combination and select the appropriate item.
In the window that opens, select the device that needs analysis, right-click on it and select “Properties” from the drop-down menu. By going to the “Service” tab, you need to run the hard drive diagnostic program.
The system will check and automatically correct errors if the disk is not currently busy with read or write processes. Otherwise, the program will offer to test after rebooting the PC. If necessary, in the scan results window you can see detailed information about the status of the HDD.
The GUI version does not always help, since checking the status of the hard drive is sometimes required from safe mode or without starting the operating system at all. In such cases, the console comes to the rescue; you can launch it before the system starts using a boot disk.
Once you open the recovery console, you need to run the chkdsk /f command, which will check all connected drives. In some cases, this will help fix the error. However, in most situations, if a HDD failure has made it impossible to start the system, a more in-depth check of the hard drive’s condition will be required.
To use the console command from inside the system you need to:
- launch the command line (via Win+X or by entering cmd in the “Run” window);
- enter the chkdsk command indicating the letter of the partition being checked and additional flags;
- Confirm the operation by pressing Y.
Checking the HDD via the command line will be a little faster than when using the GUI version of the program; the results will be shown here in the console.
The Linux system also has standard tools - hdparm and smartctl, launched from the console.
Simple programs for quickly checking HDD
If standard utilities are not suitable, hard drive diagnostics can be carried out using simple third-party programs. They allow you to obtain more information about the health status of the HDD, but in case of serious problems they will not be suitable, since they cannot be used to fix the damage.
HDDScan is a free program that performs analysis in two modes:
- according to S.M.A.R.T. indicators;
- linear processing.
The tool evaluates the read and write speed of various sectors, marking the “slow” cells. During the analysis, the program ensures that the tested hard drives do not overheat; at the end of processing, the user is presented with a full report.
HDDScan good versatility. The utility allows you to check disks for errors regardless of the type of device: it can either check an external hard drive or analyze a RAID array, SSD drive or memory card.
Crystal Disk Mark has only one function - it evaluates the read and write speed. Despite this, it is often used, since it is still possible to check the hard drive for serviceability using just two indicators.
The test uses different algorithms, one of which is sequential recording mode. The program gradually fills all the space on the drive with blocks of a size specified by the user, after which it cleans the HDD. The same technique is used by hard drive manufacturers to check product quality. Its disadvantage is that it accelerates the wear of SSD drives.
CrystalDiskInfo And DiskCheckup They are similar in their set of functions, differing only in the interface. They check the status of the hard drive using S.M.A.R.T. algorithms and compile a history of checks, which allows you to track the dynamics of changes. CrystalDiskInfo has more options for visualizing history. For example, you can create a graph, not just get a written report.
Another feature of these programs is a convenient notification system. In-depth hard drive tests usually take a long time. If the user needs to step away from the computer, he can enable notifications of critical HDD errors via E-Mail.
Programs from hard drive manufacturers
Some HDD manufacturers have developed their own utilities for analyzing the status of the hard drive. They are intended for use with devices of the same name; diagnosing a hard drive from another company is possible with their help, but this must be done carefully. Unlike simpler programs, these utilities have versions in different languages, including Russian. Which program is better to analyze the HDD status?
The proprietary program from Seagate exists in two versions: a standard version for running under Windows and a DOS version in ISO image format, from which you can make a bootable USB flash drive. It is recommended to use the second option, since the check in this case will be more accurate and efficient.
SeaTools uses part of the S.M.A.R.T indicators. to test the hard drive without giving away details about each item. Three tests can be performed:
- short self-test of HDD;
- short rapid test;
- a long-term check in which all sectors are read sequentially.
As the scan progresses, the program automatically corrects any errors found.
Owners of hard drives from WD should know how to check the performance of hard drives using proprietary software from this manufacturer. The range of its capabilities is similar to that of the program from Seagate, but is somewhat expanded and allows for more in-depth work with the affected device.
There are two additional functions:
- deep disk formatting - the program writes zeros to all sectors, permanently destroying information;
- blocking access to bad sectors - the program marks bad blocks, preventing the writing of new information to them.
Unlike SeaTools, this HDD diagnostic program can be freely used with devices from any manufacturer to check the hard drive for errors - no problems were identified with this.
Deep testing software
If you need not only checking the hard drive for errors, but also correcting bad sectors, you cannot do without sophisticated software that carries out the most in-depth analysis of the HDD state.
Victoria HDD
According to many users, Victoria HDD is the best software for detecting hard drive problems. The program gained this reputation due to its wide range of functions.
Victoria exists in two versions:
- with a graphical shell for use from inside Windows;
- with a DOS shell to create a boot disk.
It's better to use the second version. Diagnostics of the HDD outside the system allows you to achieve better results, so it is always recommended to follow the principle “if possible, test the disk from the boot disk.” As a last resort, you can use a LiveCD of another OS, for example, a Linux distribution like Ubuntu.
Victoria HDD has a variety of functions:
- quick and complete disk scan;
- reassignment of bad sectors and their restoration;
- checking the status of contacts in the IDE or SATA cable;
- equipment performance analysis;
- viewing S.M.A.R.T. indicators.
When checking, you need to pay attention to the access time to sectors. It should not exceed 200-600 ms. You can also view the temperature of the disk during operation, but this is not so important.
HDD Regenerator
HDD Regenerator is a program for professional hard drive recovery. It not only marks bad sectors as unused, but also tries to revive them. For this, not the standard deep formatting method is used, but a proprietary algorithm based on transmitting signals of different levels to the sector. Despite its professional level, inexperienced users can also use this software, since testing a hard drive with its help is not difficult thanks to its convenient Russian-language interface.
Program features:
- ensuring data safety - it works only in read mode;
- support for different file systems;
- the ability to scan the disk surface;
- real-time monitoring.
The program is not suitable for everyone, since you can check your hard drive for functionality for free, but you will have to pay $90 for the sector recovery function.
If you don't want to pay, you can use TestDisk, a free program that can restore the partition table, boot sectors and MFT. It also detects bad sectors, can recover deleted information and fix file system errors. The only drawback is the lack of a graphical interface; you have to work from the console.
If, after checking the HDD and correcting all problems, the computer does not stop working incorrectly, it is worth checking the registry. Perhaps the failures are caused not by hardware failure, but by internal system errors.
Good afternoon.
In today’s article I want to touch on the heart of the computer - the hard drive (by the way, many people call the processor the heart, but I personally don’t think so. If the processor burns out, buy a new one and there are no problems; if the hard drive burns out, then the information cannot be recovered in 99% of cases).
When do you need to check your hard drive for performance and bad sectors? This is done, firstly, when they buy a new hard drive, and secondly, when the computer is unstable: you have strange noises (); when accessing a file, the computer freezes; long copying of information from one hard drive partition to another; missing files and folders, etc.
In this article, I would like to tell you in simple language how to check a hard drive for problems, to assess its performance in the future, and sort out typical user questions along the way.
So, let's begin…
Updated 07/12/2015. Not long ago, an article appeared on the blog about restoring bad sectors (treating bad blocks) with the HDAT2 program - (I think the link will be relevant for this article). Its main difference from MHDD and Victoria is its support for almost any drive with interfaces: ATA/ATAPI/SATA, SSD, SCSI and USB.
1. What do we need?
Before starting the testing operation, in cases where the hard drive is not stable, I recommend copying all important files from the disk to other media: flash drives, external HDDs, etc. ().
1) You need a special program to test and restore the hard drive. There are a lot of similar programs, I recommend using one of the most popular - Victoria. Below are the download links
2) Next, a multi-colored program window will appear in front of us: go to the “Standard” tab. The upper right part shows the hard drives and CD-Roms that are installed in the system. Select your hard drive that you want to test. Then press the “Passport” button. If everything goes well, you will see how your hard drive model is determined. See picture below.
If the hard disk controller operates in AHCI (Native SATA) mode, SMART attributes may not be received, with the message “Get S.M.A.R.T. command… Error reading S.M.A.R.T!” The impossibility of receiving SMART data is also indicated by the “Non ATA” highlighted in red when initializing a medium whose controller does not allow the use of ATA interface commands, including requesting SMART attributes.
In this case, you need to go into the BIOS and in the Config tab->>Serial ATA (SATA)->>SATA Controller Mode Option->>change from AHCI to Compatibility. After finishing testing with the Victoria program, change the setting as it was before.
You can read more about how to change ACHI to IDE (Compatibility) in my other article:
4) Now go to the “Test” tab and click the “Start” button. In the main window, on the left, rectangles colored in different colors will begin to appear. It's best if they are all gray.
You need to focus your attention on the red and blue rectangles (the so-called bad sectors, more about them at the very bottom). It’s especially bad if there are a lot of blue rectangles on the disk; in this case, it is recommended to run the disk scan again, only with the “Remap” checkbox turned on. In this case, the Victoria program will hide the bad sectors found. In this way, hard drives that have begun to behave unstable are restored.
By the way, after such a restoration, the hard drive will not always work for a long time. If it has already begun to crumble, then I personally would not rely on the program. If there are a large number of blue and red rectangles, it’s time to think about a new hard drive. By the way, blue blocks on the new hard drive are not allowed at all! experienced users call them bad sectors (meaning bad, unreadable). Such unreadable sectors can occur both during the manufacture of the hard drive and during its operation. After all, a hard drive is a mechanical device.
During operation, the magnetic disks in the hard drive case rotate quickly, and the read heads move above them. If there is a shock, impact of the device or a software error, it may happen that the heads hit or fall to the surface. Thus, it is almost certain that a bad sector will appear.
In general, this is not a problem and many disks have such sectors. The disk file system is capable of isolating such sectors from file copying/reading operations. Over time, the number of bad sectors may increase. But, as a rule, a hard drive often becomes unusable for other reasons before bad sectors “kill” it. Bad sectors can also be isolated using special programs, one of which we used in this article. After such a procedure, usually the hard drive begins to work more stable and better, however, how long this stability will last is unknown...
Best…
There is no need to say that a computer hard drive is an ordinary piece of hardware with a limited service life. Everyone knows this. The only question is when exactly it will fail. To prevent this from happening, constant checking of the disk for performance is required. Now we will look at what this process is like in different versions, and will also touch on topics such as data recovery, bad sectors and the hard drive itself in the presence of physical damage.
Why is hard drive diagnostics necessary?
As a rule, not every user of modern computer systems thinks about the state of the hard drive, which stores a huge amount of information. Unfortunately, many users begin to solve this problem only after the hard drive “crumbles” or is, so to speak, on the verge of a foul.
Here, every user should understand that at least a weekly check of the hard drive for functionality will not only increase its service life, but will also prevent the emergence of extremely unpleasant situations related to disruptions in the operation of the operating systems themselves.
System errors are perhaps one of the most common phenomena. Their occurrence may be associated, say, with incorrect shutdown of programs, a power outage at the most inopportune moment, cleaning the inside of the computer, when the connection of the HDD cables to the motherboard is disrupted, etc. What can I say, even an overestimated number of spindle revolutions at An attempt to speed up access to data stored on a hard drive can play a cruel joke. However, this is not about that now. Let's look at the most common and most effective means by which a hard drive is diagnosed.
Standard verification tools
Let's start with the fact that users of absolutely all versions of Windows operating systems have available tools. Although they are quite primitive, they nevertheless allow you to get rid of many problems, most often associated with system errors.
The simplest tool is the built-in hard drive diagnostic utility, called from the properties of the hard drive or logical partition in the context menu from the standard Explorer.

There is a special cleaning button for removing junk or unused files, there is a button for checking the hard drive for errors (on the “General” tab), as well as two buttons in the service menu that allow you to run processes for checking for system errors and optimization.
In addition, in any version of Windows, you can use the command line or the Run menu, where you enter the chkdisk command with different variations. When standard checking for system errors, it is advisable to use the additional automatic correction option. If absolutely necessary, you can also enable checking the surface of the hard drive (the so-called Surface Test).
Now let's take a different look at the question of what hard drive diagnostics are. Windows 7, for example, like any other “operating system” of this “family”, can use not only the standard command for checking system errors on the hard drive. Today, not all users know that the chkdisc line can easily be supplemented with letters and symbols, the use of which as a main command will help perform various actions.
For example, entering the line chkdsk c: /f provides automatic error correction. For an NTFS file system, the chkntfs c: /x command is applicable with the same result. In this case, not only system errors are searched, but the hard drive is also checked for bad sectors. However, in most cases, the same automatic startup starts even when the system itself boots after unexpected failures. Unfortunately, such a hard drive diagnostic program cannot always boast of a positive result. This is why many specialists and experts in this field recommend using more powerful third-party utilities. But more on that later.
Defragmenting your hard drive
Separately, it is worth noting that diagnosing and restoring a hard drive cannot be done without using the defragmentation process. The fact is that at this time the most frequently used files or program components are moved to the fastest areas of the hard drive. If there are bad sectors, this is the first means of restoring application launches.

Basically, nothing special happens - the logical address with the file checksum remains the same. Only its physical location changes. And who knows, maybe there is, say, physical damage in the place where the file was originally stored? No one is immune from this.
Formatting your hard drive
In the most extreme case, the system provides for partial or complete formatting (well, if nothing helps at all). The essence of this process in the first case comes down to clearing the table of contents (MBR file allocation tables), after which the data can be restored using special utilities. In the second option, the situation is much worse. When fully formatted, the data is deleted without any possibility of recovery.

This can be explained with an example. During normal deletion, the file is not erased in terms of its physical presence on the hard drive. It’s just that the capital letter in its name is changed to the “$” symbol. After this, neither the user nor the system itself sees such a file. But it is precisely from this symbol that it is possible to restore it. It is clear that any recovery utility (such as Recuva) first determines the state of the hard drive, after which it identifies deleted files by the first character and finds out the degree of their damage and the possibility of recovery. But this only applies to those cases when certain sectors of the hard drive were not overwritten. If other information was saved in this place on top of the old one, no program for checking the hard drive for errors in order to further restore the information will help.
Removing computer junk
Residual or unused files can also cause system errors to appear on the disk. We are not talking about physical damage now. But in terms of the fact that the system constantly accesses the system registry, which contains keys and entries about absolutely all folders and files located on the hard drive, this is quite a big problem.
Such constant access only leads to the fact that even the loading of the Windows OS itself slows down, not to mention the launch of user programs and applications.

To get rid of all this, you can use utilities for completely removing installed programs or special automatic cleaners, optimizers such as iObit Uninstaller, CCleaner.
Checking for bad sectors
Almost every third-party hard drive diagnostic utility is capable of performing a special test for the presence of bad sectors. As is already clear, errors of this kind are corrected by rewriting the checksums of the files to another location. In essence, the functions of defragmentation and standard scanning are combined here. Among other things, there are quite a lot of software packages that even allow you to avoid repairing or replacing a hard drive if it falls apart.

What to do if the HDD is physically damaged?
The HDD Regenerator software package is a unique program for diagnosing a hard drive that may have been physically damaged or damaged.
It works using a completely non-standard technology. Not only does it check the hard drive for bad sectors, it is also capable of resuscitating the hard drive even if the surface is damaged. The essence of the impact method itself comes down to the use of hard drive magnetization reversal technology.
It was created relatively recently, however, as practice shows, it has managed to prove itself at the highest level. By the way, using it does not even require formatting the hard drive with subsequent deletion of important information and identification of undamaged sectors. And this is one of the most important advantages of the package. What do you think the FBI uses to recover hard drive data from computer hackers and pirates? That's it. In addition, the hard drive is checked for functionality in such a way that the user does not need to interfere with the process itself. Agree, it’s very convenient.
Actually, this is the most powerful program that can be used to diagnose a hard drive. Windows 7, of course, is no exception as a platform for running the resuscitator. The application works perfectly in almost all systems, starting with the “expansion” system.
The most powerful utilities for checking hard drives
As for some standard utilities of this type, you can find quite a lot of them on the Internet.
Among the most interesting are applications and software packages such as Norton Disc Doctor, ScanHDD, Victoria.

A good program that can be used to diagnose a hard drive is Victoria. She deserves special attention. Although it was created by a Belarusian programmer-enthusiast, it occupies one of the first places in the world of modern computer systems and technologies.
It is worth noting that this application is capable of working both in normal mode (when run in a Windows environment) and in DOS emulation mode, which is not supported by many operating systems. What is most interesting is that it is in DOS that the program demonstrates the highest performance.
As for the interface and control system, they are terribly simple. To start the analysis, just click the appropriate button. For most users, checking the hard drive in Russian is provided by default. It is also advisable not to change the basic parameters, especially if you are not a qualified user in this area.
On the other hand, the advanced settings for hard drive checking and error correction parameters provide a fairly flexible configuration. True, in order for an uninitiated user to understand all this, it is necessary to at least carefully study the accompanying technical documentation.
Recovering data from an image
Now let's deal with the issue of data recovery in case of loss or unexpected deletion. If you look at it, diagnosing a hard drive using standard or third-party tools cannot be done without creating a system restore checkpoint.
Few people think about this, but in vain. Thus, even if the result of any utility is incorrect, you can always make a so-called rollback to the initial state without losing data. True, in the case of using Windows operating systems, as stated, the changes do not affect user files. However, the truth is that even a system restore from a checkpoint restores all deleted data.
In this case, it is naturally better to use a system image. Here it will certainly be clear that only the data that was registered in the image itself will be restored.
External media
As is already clear, diagnostics of an external hard drive such as a USB HDD or a regular flash drive is carried out according to the same principle that applies to standard disk drives. The only thing worth paying attention to is the inclusion of the required component in the list of devices being tested.

This applies equally to standard Windows operating system tools and specialized utilities for checking HDDs or recovering data.
BIOS
It is also worth noting the BIOS settings, without which some programs created to check and diagnose the status of hard drives simply will not work.

In particular, this applies to the SATA controller mode, which sometimes needs to be switched from AHCI mode to IDE mode. Only in this case is guaranteed uninterrupted access to the hard drive with all the ensuing consequences.
As a rule, after installing this mode, absolutely all programs can access the hard drive, naturally, using user-controlled parameters. It goes without saying that the BIOS is accessed differently on different devices. In the standard version, this is pressing the Del key before starting the system; sometimes you can use the function keys F2 and F12. It all depends on the BIOS version and the developer. However, when loading, the system itself signals in the status bar what exactly needs to be clicked to enter the main settings.
Instead of an afterword
Now let's try to sum up all of the above. It remains to add that diagnosing a hard drive is the key to the normal functioning of a computer system and data storage. Moreover, this concerns not only Windows performance, but also optimization of access to files and folders.
Everyone chooses for themselves which tool with which to diagnose a hard drive to use for their needs, but with a high degree of probability we can say that better utilities than Victoria and HDD Regenerator have not yet been created. This statement is based not only on calculating the performance of the software packages themselves, but also on the results of the tests that they demonstrate. And, I must say, these indicators are superior to all other programs taken together, not to mention the standard tools of Windows operating systems, which, alas, are not particularly flexible and effective. Even in the top ten, the results are far from encouraging.
Separately, we need to dwell on the issue of simultaneous use of several tools for checking the hard drive in one system. It happens that permanently installed software packages may conflict with each other. This is due to the fact that some of them try to work in the background, like optimization programs that constantly “hang” in the system tray.
If it so happens that there are several applications of this kind on one computer terminal, you should remove one of them, and instead use, say, a portable version that does not install its own files and libraries into the system. This allows you to start the scanning process of a hard drive or removable media even from a regular flash drive. Even if the program’s executable file and additional folders are present on the same flash drive, this does not interfere with the launch of the utility.
Here it is worth paying attention to one more fact. As sad as it sounds, with the transition to Windows 10, with a free update from the official Microsoft website, some utilities of this type flatly refuse to work. The situation is such that the “ten” blocks not only the installation of applications of this kind, considering them as such that they can harm the system, but also does not launch even some portable versions of programs. So here you will have to scour the Internet thoroughly to find something that works more or less normally.


