Step-by-step setup of the Zyxel Keenetic Lite router. Connecting and setting up Zyxel routers
The latest version of the popular router today is the third generation Zyxel Keenetic 4G. Compared to previous models, this Internet station is distinguished by an expanded network coverage area (due to an additional antenna: in the third generation there are two of them). Also, the developers managed to increase the maximum throughput of the router - up to 300 Mbit/s.
What modems and networks does the router support? Zyxel Keenetic works with almost all networks of existing Russian providers, including the increasingly popular Yota. This is confirmed by the logo placed on one side of the package.
First, open the box and carefully remove all the components. Among them, for the third generation, a USB extension cable was included: a special cord, one end of which is connected to the router, and the other to the 4G modem. Using this extender, you can increase the connection speed by adjusting the location of the modem, for example, placing it near a window. One of the ends of the cord is equipped with a special glass mount, so you can get the maximum available speed without moving the Internet station itself.
Next, connect the power supply to the router. Press the power key next to the unit connector. On the side, find the USB port we need and insert your modem or extension cable into it. If you use wired Internet, the network cable must be inserted into the outermost WAN port, highlighted in blue. As soon as the lights on the indicator panel light up, you can proceed to the software setup.
Pre-setting
For the network to work correctly, it is necessary to install (or make sure that it is installed) automatic acquisition of IP and DNS server addresses from the provider. To do this, open the PC and perform the following actions:
- In the tray we find the network connection icon, right-click on it, go to the Control Center;
- On the left there is a vertical menu in which there is an item “Change adapter settings”. Open;
- Right-click on our connection, select “Properties”;
- We find the fourth version of the Internet protocol in the list and also go to properties;
- Set the checkboxes to “Receive... automatically”.

After that, save the changes and connect to the appeared wi-fi network. The name and password are usually listed on the bottom of the router. Afterwards we can change this data...
Next, enter the IP address of our device in the browser (192.168.1.1).
Open the browser, enter http://192.168.1.1 in the address bar

Quick connection setup
After going to the specified address, the Zyxel Keenetic web interface will appear in front of you. All we see is a welcome message and two buttons for choosing a setup method. If you are using a wired connection, the setup algorithm is as follows:
- "Next" button;
- Enter geodata (country and region), Next;
- We look for our provider in the list, select it, click Next;
- In the appropriate fields we indicate the authorization data (they are in your agreement with the Internet provider), and confirm the entered information.
This essentially completes the quick setup. The router has established a connection, and the next step is to update the software version.
Attention! Don't underestimate the importance of installing new firmware. Firstly, it can increase your connection speed. Secondly, you will not encounter errors and shortcomings of older versions. Thirdly, you definitely won’t have a conflict between the drivers of your computer/laptop network card and the router software.
In fact, you will not be given a choice: you need to update anyway. So we confirm the offer, wait until the files are downloaded and unpacked. The router reboots. After the update, Zyxel will offer you to connect to the new Yandex service “Yandex.DNS”. It is designed to protect your devices from malicious sites and code. More information about it can be found on the official Internet resource. But this item is not mandatory, so it’s up to you whether to connect or not.
We always recommend choosing the second option when setting up for the first time, since for the security of your access point you need to change the standard password (admin). This will be prompted immediately after clicking the web configurator button: enter the new network key twice and save.
What changes when you connect to the Internet via a 4G modem?
In fact, Zyxel Keenetic quick setup becomes even faster. You will only need to insert the modem, click “Next” a couple of times and update the firmware. Options for selecting a region and provider will automatically disappear. The connection ends with an offer from the Yandex service. Everything else is standard.
Subtleties of 4G connection
Problems when connecting portable modems and setting up the Internet on them can be associated with three reasons:
- Incorrect configuration of the modem (SIM card) itself;
- Malfunction of the USB connection (“flash drive” into which the SIM card is inserted);
- Problems with modem and router compatibility;
In order to eliminate the first two reasons, you need to do the following:
- Activate the SIM card and insert it into the device (connect);
- Conduct preliminary network setup on your computer according to the provider’s instructions (that is, insert the modem directly into the USB port and set up the connection);
- If everything is done correctly and the Internet is available, take out the modem and insert it into the router;
If the USB modem is equipped with an LED, then when connected, the corresponding green indicator (different for some manufacturers) should light up;
Now there is only one possible cause of failures - device incompatibility. That is, the router simply does not see the connected modem and therefore cannot access the Network.
There are three ways to check if this is true:
- On the main panel of the web interface, at the top left there is a table with data about the current connection. If nothing is listed there, then the tandem is either not configured or does not work at all;
- The last menu item at the top is USB: contains information about devices connected through the port of the same name. It should appear in the table in the middle after going to the section (manufacturer, model, description);
- Internet menu item at the bottom: after going to it, open the 3G/4G section from the menu at the top. The table on the page that opens should also display the connected device.

If for some reason your modem is not in the tables, try, first, to reset the settings to factory settings by holding the Reset button on the back of the case. Secondly, update the firmware: support for your device may have been introduced in later software versions. If neither of these helps, contact your provider's technical department for help, as most likely this is a technical problem rather than a software one.
Manual Internet setup
By selecting the “Web Configurator” button, you (after changing your password) will be taken to the web interface. The bottom of the page contains the main menu in the form of icons: we need the second one - the global network icon. After going through it, do the following:
Select the protocol used in the top menu (the most popular wired is PPoE/VPN). Add a connection, enter the provider data:
- Description – arbitrary, you can simply name it “Megaphone Connection”;
- Connect via – select your network.
- Authorization data from the contract;
- Some providers like Beeline will also require you to select a protocol and specify the server address. All this information is in the contract.
- Applying the changes;
- The setup is complete.

This method is intended mainly for wired Internet. Although, if necessary, you can select the 3G/4G menu tab as the protocol and also make the settings. Here you can also make sure that Zyxel Keenetic 4G sees your USB modem (the corresponding connection information will be displayed).
Firmware update
It is important to note that if you configure it manually, you will need to separately update the firmware version of the Internet station. There are two ways to do this:
Semi-automatic:
- In the bottom menu, select “System” (last icon);
- Top menu – “Update” item;
- If you want to select files for the upgrade, click on “Show components”;
- Scroll down the page and click “Update” in the left corner;
- The Zyxel router is updated and rebooted;
This method requires an already established connection.
- In the web configurator we look at our firmware version (MNDMS, table on the right);
- Open the official Zyxel Keenetic website (on another computer connected to the network);
- We compare and make sure that our version is better than the one published on the site;
- Download the new firmware, unpack the archive on your computer;
- Open the web interface, “System” menu tab;
- Select the “Files” item in the top menu;
- Click on “Firmware” and select the downloaded update file;
- Click “Replace” and confirm;
- The router is updated and rebooted;
How to change Wi-Fi name and password?
We go to the web interface, in it we click on the “Wi-Fi network” icon. On the page that opens, change the network name, just below the key (aka connection password). You can also adjust the propagation range by adjusting the signal power. It is better not to touch the remaining points of the table.
Click “Apply” and wait for the data to update.
Having completed all the above steps, you can calmly and fully use the capabilities of the Internet, because your station is protected, the system is updated, and the wi-fi password is reliable.
Found a typo? Select the text and press Ctrl + Enter
Hello pimp, we’ll talk about one of the best router models, the zyxel keenetic. This model combines all the advantages of inexpensive routers, and therefore its average price is higher than that of other manufacturers. But compared with the advantages, I think that the price is quite adequate. In this article, I will talk about basic settings (connection, Internet settings, Wi-Fi settings). We will also consider using a USB port both for setting up 3g modems and connecting a memory storage device (external hard drive) to it.
Connecting zyxel keenetic to a computer
If you just purchased this model from zyxel, you need to configure it correctly for your provider. To do this, you first need to connect the router to your computer or laptop to configure it. I always advise people who are setting up a router for the first time to connect it to their PC via wire. This will protect you from unnecessary problems.
The picture shows the back of the zyxel keenetic router, after seeing it you probably already guessed what and where to connect, but I will tell you all the steps.
- We connect the power supply to the PAWER connector.
- We connect the wire from your provider (which comes from the corridor, or from the street) into the WAN connector highlighted in blue.
- We insert the short wire (Patchcord) that came with the kit into any of the 4 LAN connectors. And we insert its other end into the network card of your PC.
- Turn the switch to the ON position and plug the power supply into the outlet.
After all these steps, after a couple of seconds, the router will connect to the PC, and you can proceed to configure it. I also advise you to read the article to avoid problems with connecting your router to your PC.
Zyxel Keenetic factory reset
Resetting the router settings to standard is required if you purchased or were given a router that has already been configured. Also, if you made a mistake during the setup process and don’t know where exactly it happened. Then, for convenience, you should reset the settings to factory settings, and reconfigure the router according to my instructions.
To reset, you need to press the Reset button; this can be done with any thin object (a needle, a match, pen paste, etc.). Press the button when power is connected to the router, and hold it for 20-30 seconds. After pressing the button for a couple of minutes, the router will reboot and all settings will return to default (factory settings).
Zyxel Keenetic login to the admin panel (Interface)
Let's enter the router configuration interface (admin panel). To do this, open any browser (Opera, Google Chrome, Yandex browser, Mazila, etc.). In the address bar of the browser enter , 192.168.1.1. An authorization page will open where you will be asked to enter your login and password, on Zyxel Keenetic the default password is 1234, and the Username (Login) is admin.
After entering the data, click on the OK button. The main interface page window will open in front of you.
Setting up the router
.
Setting up the Internet zyxel keenetic
This router model allows you to connect all possible types of Internet connections (PPPoE, PPtP, L2tp, Static ip, Dynamic ip, 3g). Below we will look in detail at how to configure each of these types separately.
Setting up PPPoE connection (Rostelecom, Dom.ru, Megaline, ID-Net).
This type of connection is used by a large number of providers and is one of the most popular. To set it up, you will need to know your unique Login and Password data; you can find them in the contract or call your provider’s technical support.
Now let's go to the settings page, select Internet in the left menu, and select Authorization from the list. Here we will fill in the main fields.
- Internet access protocol – select our type PPPoE.
- Disable the IP address of the WAN interface - you will have to check this point with your provider. Most often the checkbox is checked.
- Username – As I said above, look in the contract or find out from support.
- Password – In the same place as the login.
- MTU - this item is usually left unchanged, but some providers are wise here too. Therefore, if after setting up the Internet does not work, call your provider and clarify this point.
- Click on the “Apply” button to save the settings.
Setting up a PPTP connection Aist Togliatti, UfaNet (UfaNet)
This type of connection differs from PPoE in that it uses a VPN when connecting to the Internet. This should enhance the security of the connection. To set up, you will need unique data, your login and password. They should be in the agreement with the provider or you can find them out from technical support. You will also need the address of the VPN server, you can look it up in the contract, on the Internet, or find it out from those. hold it. I will give a few Stork Tolyatti - server.avtograd.ru, UfaNet (UfaNet) - pptp.ufanet.ru.
- Internet access protocol – select our PPTP type.
- Server address – indicate the address of your provider, it is in the contract. If it is not there, call technical support.
Setting up l2tp connection Beeline (beeline), Kyivstar.
A relatively new type of connection, as providers say, it has improved data transfer speed. It is configured in the same way as PPtP, you need a login, password, and VPN server address. All this data must be in the contract; if not, check with your technical support. Several server addresses of Beeline providers (beeline) - tp.internet.beeline.ru, Kyivstar - tp.kyivstar.ua.
To configure, go to the left menu to the Internet item and select Authorization. Now let's fill in the fields on the page.
- Internet access protocol – select our L2tp type.
- Server address - indicate the address of your provider, I wrote above where to get it
- Username – This name is your provider’s login and is indicated in the contract.
- Password – Just like the login, it must be in the contract.
- Click on the “Apply” button and we will save the data.
Setting up Dynamic IP
This type of connection is the simplest, and by default is immediately configured on the router. But some providers are tied to the device’s MAC address, and if you connect an Internet cable to another device, the Internet will not work. This problem can be fixed in several ways. You can call technical support and ask them to change the binding to a different Mac address. BUT there is an easier way: change the router’s mac address to the one that is associated with the provider.
To change the Mac address, go to the Internet section and select Connection. Here in the Change mac address field, and enter the mac address of the tethered device.
Also, if you are setting up from a computer that was previously connected to the Internet, then by clicking on the list arrow you will see the Mac address of this computer and you can select it. If you don’t know how to look up the Mac address of your computer.
Setting up Static IP
The connection type is static IP, not the most popular among providers. But some of them use this type, so I can’t help but say about it. To configure this type, we need to know a number of parameters: IP address, Network mask, Default gateway, DNS 1, DNS 2. You can see all these parameters in the network card settings. Or they will be in the contract, you can also call technical support.
After receiving the data, you need to enter it on the Ethernet connection page. Which is located in the Internet section in the Connection item. And enter all the data. Then click on the Accept button to save the settings.
Setting up 3g/4g on Zyxel Keenetic
The main direction of this router can be called professional. Since it has a wide variety of ways to connect to the Internet. One of them is connecting external 3g modems via a USB port. To configure a 3g usb modem, you need to go to the System section and select the Operation Mode section. Then, if you have a 4g modem from Yota companies, then select the appropriate item “Via an external USB modem 4g Ytoa”. But this is rare, so we will look at the settings for 3g modems in detail. Select the appropriate item “Via external USB 3g modem” and click on the Accept button.
The Connection via external 3g USB modem window will open.
- In the “Operator” field, select your operator from the list; if it is not in the list, then you should update the firmware; this will be written below.
- In the “Phone number” field, enter the dial-up number, it must be indicated in the contract, or in the modem settings if you connect it to a computer. Well, you can also call technical support.
- You can leave the authorization method as default, but if the Internet doesn’t work, check with your operator’s technical support.
- Username and password - all the data must be specified in the contract.
- If you do not have an unlimited tariff, then I advise you to check the box “Disconnect when idle” and indicate a time convenient for you. Well, when there is an unlimited tariff, we don’t check the box (for convenience). Click on the Connect button and then click on the Accept button.
Setting up Wi-Fi on the Zyxel Keenetic router
It was not for nothing that I started the article with connecting and setting up the Internet, because if something doesn’t work out for you or you make a mistake somewhere. You will have to reset the settings, respectively, the Wi-Fi settings will also be reset, and you will have to reconfigure it. And after everything is configured, you can configure Wi-Fi. To do this, go to the “Wi-Fi Network” section and select “Connection”.
You need to check if the checkbox next to “Enable wireless access point” is checked and fill out the “Network name (SSID)” field - in this field you need to specify the name of your wireless network. It can be anything you like. After this, save the setting by clicking on the “Accept” button.
Now, of course, we need to configure the security of our Wi-Fi network. To do this, go to the “Wi-Fi Network” section and select “Security”
- In the "Authentication" field, the option is "WPA-PSK/WPA2-PSK".
- We also set the protection type to mixed “TKIP/AES”.
- The network key format must be “ASCII”.
- In the “Network key (ASCII)” field, we come up with and enter a password, it must consist of 8 characters.
- After that, save the settings by clicking on the “Accept” button.
Firmware for Zyxel keenetic Software update
To update the software, we first need to download the firmware for Zyxel keenetic from the official website. By following the link https://zyxel.ua/support/download?product=50322, you can download the latest firmware version. In the Firmware section in the right column there will be a link to the file. We download to a location convenient for you.
After downloading the software, go to the “System” section in the router interface and select the “Firmware” item.
Now everything is simple, click on the “Browse” button. We look for and select the file that we downloaded from. After that, click the “Update” button. We all wait a couple of minutes, and go back to the router; the firmware is updated.
How to change the password on a zyxel keenetic router
Let's go to the "System" section and select the "Password" item. Enter your new password in the “New Password” field, and enter the same value in the “Confirm Password” field. After that, save the settings by clicking on the “Apply” button.
Port forwarding zyxel keenetic
Port forwarding, or you can say open a port on the router. Well, on the one hand, everything is simple, but on the other hand, if you go into this issue deeply, for some people it is too much work. Therefore, this issue requires a separate article of about 5-7 thousand words. For this reason, here I have selected a video that explains in detail the principle of opening ports on Windows 7 8 8.1 10.
.
And here is a detailed video on opening ports on zyxel keenetic.
.
To properly configure the router, you need to find out the network connection parameters and, first of all, the Internet access protocol. To do this, open the “Network Connections” window. If, in addition to the standard shortcuts, you see an additional connection icon, then your provider uses the L2TP, PPTP or PPPoE protocol. Which one will be indicated under the connection label.If the connection to the Internet is carried out using the L2TP, PPTP or PPPoE protocol, you will need a login and password assigned by the provider. When connecting via PPTP and L2TP, you must also specify the operator's server or destination IP address. To define them, open the “Properties” of your connection. The data should be rewritten and the shortcut deleted.
Now open the context menu of the Local Area Connection shortcut and select Properties. Click on the line “Internet Protocol Version 4 (TCP/IPv4)” and click on the “Properties” button. In case of a dynamic IP address, the fields will be empty. If the IP is static, then save all the specified parameters. Check the boxes “Obtain an IP address automatically” and “Obtain a DNS server address automatically” and confirm your choice by clicking “OK”.
It remains to find out whether your provider filters by MAC addresses. Open the Local Area Connection shortcut menu again. Select "Status". In the window that opens, go to the “Support” tab and open “Details”. Find the line “Physical Address” and write down the information indicated there.
Turning on and setting up the router
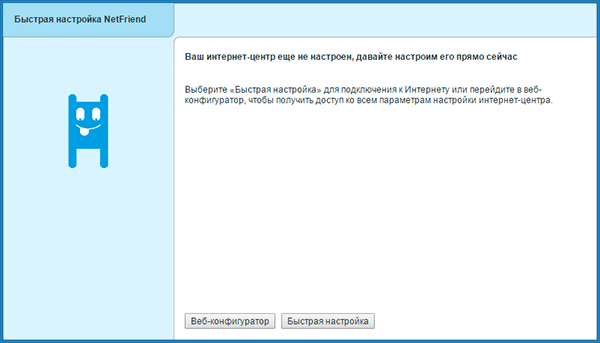
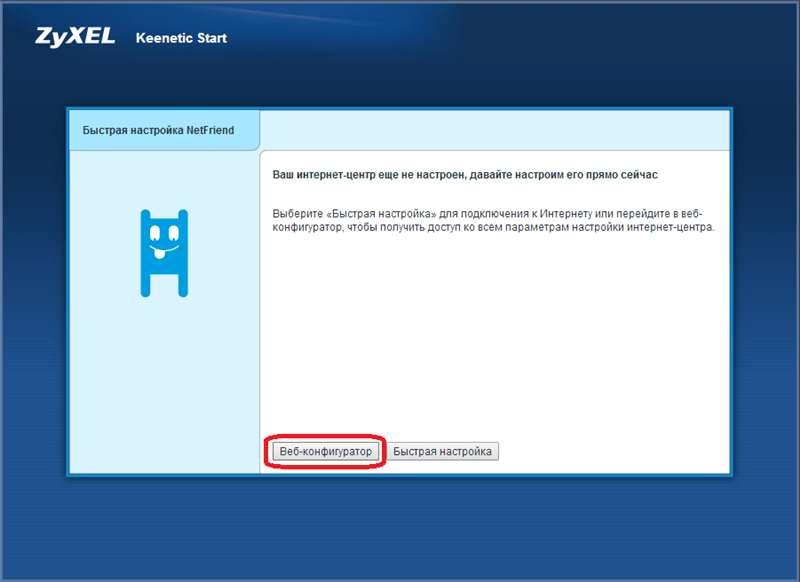
Plug the power adapter into a power outlet. Wait until the power light stops blinking and connect the router to your computer. To do this, connect one of the router’s connectors to the network adapter using an Ethernet cable or set up a Wi-Fi connection. The Wi‑Fi network name and security key are indicated on the router label.Launch your web browser and go to 192.168.1.1. The Internet center web configurator will open. In new models of Zyxel routers, the functions of the NetFriend utility have been transferred to the firmware. Click the "Quick Setup" button. A wizard will launch that will help you configure the connection.
A “Network cable is not connected” warning will appear on the screen. Plug your provider's Ethernet cable into the WAN connector and click Next. In the window that opens, you need to answer the program's question whether your provider registers MAC addresses, and if necessary, specify the registered address.
If using a static IP address, select Manual and enter the IP address, gateway IP address, subnet mask, and DNS server in the appropriate fields. These parameters are assigned by the provider. If your service provider has not assigned you an IP address, select Automatic and click Next. If you need to specify DNS parameters, check the box “Set DNS server addresses manually” and enter the IP address in the “DNS Server” field.
Next, you will be asked to enter your username and password to connect to the Internet. If they are in the contract, fill in the appropriate fields. To connect to a VPN (L2TP or PPTP), you will need to specify the IP address or name of the VPN server. When connecting to PPPoE, you may need the PPPoe service name and PPPoE concentrator name (provided by your ISP).
If all data is entered correctly, a connection to the Internet will be established. The wizard will check for updates. If available, click the “Update” button. After downloading and installing the updates, the device will reboot. The message “The Internet center is configured and has established a connection to the Internet” will appear on the screen. This completes the master's work. More experienced users can go to the web interface and configure additional features.
The budget version of the elite family of Zixel routers, Keenetic Start, which appeared at the beginning of 2013, immediately gained popularity in the new price segment of the market “about 1000 rubles” for the brand. For a relatively low price, the manufacturer has provided the same consistently high quality and reliability of the device. The router was designed to function both with a wired connection and to distribute a Wi-Fi network. Thanks to a high-quality antenna, the maximum transmission speed of this device via radio has reached 150 Mbit/s, and setting up the Zyxel Keenetic Start router has become even faster and more intuitive.
But, no matter how well-developed the process is, many may still have the question of how to connect the router to the Internet and iptv (dedicated video channel for a TV) on their own. It is this algorithm that this article is devoted to.
In order for the router to work for the first time, you need to take a few simple steps:
- Connect the device to the network using the power supply and pressing the power button;
- Connect the router to the external network (provider cable) via the WAN port (highlighted in color on the rear panel);
- Connect the PC via the included cable (inserted into one of five connectors);
- Check the correct execution using the indicators on the front panel: the power light, network connection light and the port indicator with the PC cable inserted should be on;
Afterwards we can open the computer, check the network connection (if there is an “Access Restricted” error) and set an important setting:
- From the tray (the place on the Start panel next to the time and date) open “Network Center...” by right-clicking on the network icon;
- In the window that opens, find the adapter settings tab and open it;
- On a working connection, right-click and select properties;
- In a new window, look for the fourth version of the Internet protocol, using the button under the list, open properties;
- For both selectors we set automatic retrieval (IP and DNS);
This is where the connection to the Wi-Fi network begins for the Rostelecom provider and any other service provider.
Setting up the router
To start setting up Zyxel Keenetic Start, you need to go to the main interface. And to do this, we need to open the browser and enter the number 192.168.1.1 into the address bar - the standard address of the Kinetic family. Immediately after loading the page, we will see an authorization form, into which we will enter the standard data: login - admin and password - 1234. Behind it, a Setup Wizard, unified for the entire line of routers, awaits us.
To enter the settings, open your browser and enter the address: HTTP://192.168.1.1
On the newly opened page we will find only two buttons to choose from: “Quick setup” and going to the “web configurator”. In this case, we are interested in the first option. After clicking on it, we will see three selectors that allow us to specify the relationship of our provider to MAC addresses. Most of the modern service providers do not record address data and for them you should select the first option (selector). But if your company is not Rostelecom, but, say, Dom.ru, you need to look at the contract or call technical support to get your MAC address. Then we indicate the resulting alphanumeric combination in the field next to the “Other” selector and click on the “Next” button.
On the page that opens, set the automatic IP configuration option or indicate your own address, as well as NDS, if the provider gave you this information. Let's move on. We indicate the login and password if they are included in the contract for the supply of Internet services, or check the box that says “I don’t have a password...”. It is important not to confuse this data with the key and name for the Wi-Fi network, which are indicated on the bottom of the router. These are completely different data, because... Rostelecom is a service provider, and Zyxel is an equipment provider.
When we go further, we get to the status page, where connection data is indicated and information about whether we were able to connect to the Internet (wired connection only, not Wi-Fi) or not. In most cases, the setup will be successful and you will have access to the network.
Other setup methods
Let's consider a few more special cases for connecting to the networks of individual Russian providers. Let's start with the companies Rostelecom, Dom.ru and TTK. The work algorithm in this case is as follows:
- Instead of quick setup, we choose to go to the web configurator;
- Set a new password to log into the web interface;
- At the bottom we see a menu with icons, open the “Internet” tab;
- The new page we're on should be the List tab from the top menu;
- Click on the only name of the network interface available in the list;
- Using the “Use connector” checkbox, select the port where the WAN cable (Internet) is inserted;
- Check the checkboxes below in the enable and use fields to access the Internet;
- Leave the IP parameters as default: “Without IP address”;
- We also do not change the MAC address;
- Apply the changes and go to the “Authorization” tab of the top menu;
- Add a connection;
- Let's enable it by checking the corresponding selector;
- Select the PPoE type, assign an arbitrary (custom) description name;
- Assign a connection to access the Internet;
- We enter the authorization data from the service delivery agreement (login/password);
- We select all or the first two security protocols: pap and chap;
- We enter the name of the PPoE server as “Internet”.

Apply the changes made. This completes the connection of the wired connection for Rostelecom. We will look at setting up WiFi and IPTV next. In the meantime, let’s look at how setting up a router for Beeline differs from the description above:
- At the first stage (configuring the network interface), you only need to set the automatic configuration of IP addresses. Otherwise, everything is the same as for the Rostelecom router.
- When adding a connection in the “Authorization” tab, only the protocol type changes (to L2TP), and the link “tp.internet.beeline.ru” is entered in the “Server Address” field;
After setting the necessary parameters, apply the settings and check the connection of the Kinetic Start router to the Internet. If everything functions as it should, we proceed to setting the Wi-Fi transmission parameters.
Wi-Fi setup
To set up WiFi transmission on Zlex Keenetic Start, you need to open the corresponding item in the lower menu. Then, on the web page that opens, set the device’s operating mode to “Access Point”, select a connection to a new radio network, and apply. After that, you need to go to the menu item of the same name at the top (Access Point), where a Wi-Fi network configuration table will appear in front of us:
- Set the desired connection name that users will see when searching for available networks (SSID);
- We set the protection to the maximum level. The key is the password for connecting to your Wi-Fi;
- Without touching anything else, click on Apply.
After the router processes the received data, the wireless network light should light up on the indicator panel. Devices capable of connecting to WiFi communication channels should detect a new available connection. Try logging in using the password you specified earlier and test the connection.
P.S. If several routers/Wi-Fi receivers operate on the same frequency in a room or adjacent area, the signal may be mixed and slow down. To avoid this, you need to change the channel used in the settings above (from Auto to any other unused number). In this case, you need to reboot the device so that it starts broadcasting the Wi-Fi signal at the new frequency.
This completes your WiFi setup! Enjoy the Internet!
IP-TV settings
To set up a video stream, called IPTV today, you must first select a port for it: go back to setting up the existing network interface (from the algorithm above) and check the additional box next to the WAN port on a different connector. You will insert a cord from IPTV into it and you will be able to watch TV channels even on a laptop via Wi-Fi (in the installed viewing program).
Next, you should check the correctness of the settings in the WAN menu, the field for selecting ports for creating a bridge: the same one as above should be specified. Also in the LAN connection settings the corresponding ip must be set: 192.168.2.2 and 192.168.2.1 for the upper and lower fields. The subnet mask should display the value 225.225.225.0 and leave the remaining parameters undefined (default). After saving the changes, we check the IPTV and make sure that everything works.
If something goes wrong (the Wi-Fi signal or the Internet disappears altogether), you can reset the settings to factory settings by pressing the Reset button on the rear panel. Holding it in the clamped position costs 10 seconds or more, after which the login data for the router and all parameters will be reset to the original ones.
Found a typo? Select the text and press Ctrl + Enter
Zyxel offers its customers a range of Internet access solutions, including devices for providers and large offices, as well as regular access points used to build a home wireless network. We will not consider all possible options for accessing the Internet and will focus on a topic that is relevant for ordinary users: how to configure a Zyxel Keenetic router to gain access to the network?
Connecting equipment
The first thing you need to do is connect the router to your computer. Any user can cope with this task:
It is better to choose the LAN port on the router as number one. The rest may be needed in the future to connect a set-top box or other equipment that needs Internet access.
If you did everything correctly, several indicator lights should light up on the router, signaling the presence of power and connection to the computer’s network card.
Checking the network card
The next step after connecting the device is checking the network card parameters:

Router operating parameters
After the hardware connection and checking the network card, you can begin configuring the router settings. First, it is recommended to change the access password to the network device interface so that a limited circle of people can manage its settings:

The next setup step will be checking and updating the firmware.

Wait until the file is downloaded without turning off the computer or restarting the router. After its completion, you must reboot the equipment to apply the new configuration. 
These are the main functions available through the router's web interface. Here you can add the ability to create a local network through a router, see the number of connected devices, and also configure the communication mode with a computer.
Connection setup
When starting to create a new Internet connection, check with your ISP to see what protocol it uses. The order and complexity of creating a connection depends on this.
As an example, we will select two protocols – PPPoE and L2TP. The connection is created in the “Connection” section, which can be found by opening the “Internet” tab. To perform this operation, you will need an agreement with the provider, which contains all the necessary information.


After saving the changes, you should have a new connection through which you can access the Internet.
Creating a Wireless Network
Setting up a Wi-Fi connection in the Zyxel Keenetic router follows the standard procedure:

The wireless network is configured - now you can connect to it from a laptop, tablet or any other device equipped with a Wi-Fi module.
Additional functions
Zyxel Keenetic routers have wide functionality that allows them to be used to perform various tasks. For example, if you want to connect a VPN, you can do this in the “Authorization” section on the “Internet” tab.

After applying the changes and saving the new configuration, you need to check the correctness of the created connection. Click the "Connect" button and make sure that the connection status has changed to "Connected".
Interactive television
Zyxel Keenetic routers provide users with two options for playing interactive television, provided they connect to this service from their provider:
- Through the STB set-top box on the TV.
- Using special software on a computer.
Depending on the chosen method, the procedure for setting up IPTV is slightly different, but its essence remains the same. You will set the parameters on the “Home Network” tab in the “IP Television” section.
If you want to watch interactive television on your computer using programs such as IPTV Player or VLC, then set the “TVport Mode” parameter to “Automatic”. After saving the change, you can customize the channel list in the player. 
A little more steps are required when using an STB set-top box. Firstly, it needs to be connected to one of the LAN ports of the router. Secondly, for the “TVport Mode” parameter, you must select the “Assign LAN connector” value.
In the line “Connector for receiver” you will be able to select the port to which the set-top box is connected. Enter the required value and apply the new configuration.
Zyxel Keenetic network devices also have other useful functions that allow, in particular, setting up port forwarding necessary for working with file sharing services, or adjusting routing parameters for interacting with local networks.
However, these features are specific and are rarely needed by ordinary users. If you are interested in details, you can always clarify them in the comments.


