Step-by-step instructions for reinstalling windows. Step-by-step instructions for reinstalling the operating system
In this article we will look at a detailed step-by-step installation of one of the most modern and popular operating systems for desktop and mobile computers - Windows 7. This brainchild of Microsoft turned out to be so successful that in two years of sales it managed to catch up in popularity with the most used one already for many years, the system in the world is WindowsXP. Therefore, more and more users want to see this particular OS on their home computer, and the question of installing it now is extremely relevant. Our computer portal, naturally, could not ignore this topic and prepared an installation guide for you, trying to make it as clear and understandable as possible even for beginners.
SETTING UP YOUR COMPUTER TO BOOT FROM DISK
When you turn on the computer, as a rule, a short message appears indicating the key with which you can enter the BIOS settings menu. Be careful, as this inscription disappears from the screen quite quickly, especially on laptops. If you couldn’t see it the first time, immediately restart your computer using the “Reset” button and try again. When loading begins, a large graphic image may appear on the screen, obscuring the service inscriptions on the screen. To remove it, press the key.
List of most frequently used keys:
- Desktops - Del (almost always), F1
- Laptops - F1, F2, F3, Del, Ctrl + Alt + Esc. In the case of laptops, keyboard shortcuts can be very varied, depending on its model. You can find this information either online or by calling technical support.
Having found out the key responsible for calling up the BIOS settings menu, restart the computer again and at the very beginning of boot, press it several times (once is enough, but to accurately catch the right moment, pressing it multiple times will not hurt). If everything is done correctly, the settings window should open.
As a rule, the most common two types of BIOS are:
Phoenix AwardBIOS
.jpg)
If your window looks like this, then you need to select a section here Advanced BIOS Features, and in it the paragraph First Boot Device assign the value CDROM. Then press the key and select Yes in the dialog box that appears.
American Megatrends BIOS

Or if your window has a gray background, like in this screenshot, then select the section at the top Boot and in the subsection Boot Device Priority in point 1st Boot Device set the name of your optical drive or, as in the screenshot, just CDROM. Then press the key and select Yes in the dialog box that appears.

For mobile devices (laptops), BIOS programs can vary greatly, and it is not possible to list all possible options within the framework of this article. In any case, you should find in the settings window the item whose name is associated with boot (Boot) and in it set the optical drive (CDROM) as the first device.
STARTINSTALLATIONS
After turning on/rebooting the computer, if any Windows operating system is already installed on your computer at that moment, then after some time you will see the message “Press any key to boot from CD or DVD” on the screen. boot from CD) which is what you should do.

Be careful as you will only have 5 seconds to enter the system installation. If the current operating system starts loading, it means that the opportunity to start the installation was missed and you should restart the computer again for the next attempt.
If you are installing the system on a new computer or a blank hard drive, you will not see the previous window; Windows installation should begin automatically.
So, if the computer starts booting from the installation disk, then the system installation start window should appear in front of you, in which you can see the process of downloading the initially necessary files.

If this window does not appear, but the old operating system starts loading (if it was installed) or messages appear that the boot disk was not found (if installed on a new computer or hard drive), then this means that your computer was unable to boot from the disk and you should return to the previous step for setting up the BIOS.
After downloading the main files, you should see a window for setting up language settings, date and time format, as well as keyboard layout, in which the default settings for Russia will be set.


The system restore option may be useful to you in the future if problems arise with the installed system, for example, due to damage, deletion or unauthorized modification of its system files. As a rule, this leads to Windows becoming unstable or refusing to boot at all. In this case, you can restore the original system files from the installation disk using the above point.
In general, the “System Restore” section in Windows 7 is a fairly powerful tool for fixing various kinds of problems that arise during its operation, and we will definitely devote a separate publication to it, and within the framework of this article, click the “Install” button to proceed directly to installation.
In a few minutes, a window with a license agreement will appear in front of you, the terms of which must be accepted by checking the appropriate box and clicking the “Next” button.

In the next window you will have to select the installation type:

As you can see, here we can choose two options: update and full installation. The “Update” item can be used if you want to update your old operating system to Windows 7, while maintaining all installed programs and settings. True, for this, the installation of the “seven” must be launched directly from your already installed OS. It should also be remembered that this is only possible from Windows Vista, and the update is not applicable to operating systems of older generations, including Windows XP. In general, this type of installation is not the best solution. The fact is that not only the settings of the previous system will migrate to the new Windows, but also all its problems, brakes and glitches. And in general, stable operation of the system and previously installed programs is not guaranteed in this case. Therefore, the preferred type is the full installation, which is what you should choose.
At the next stage of installation, we have to select a partition on the hard drive to install Windows. Here, I would like to make a small digression and provide some useful recommendations for partitioning a hard drive into system partitions:
- Don't allocate all of your hard drive space to one single partition. This is considered bad manners and can cause you a lot of trouble in the future.
- Modern hard drives have quite large capacities for storing data and therefore it is advisable to divide them into several thematic sections.
- It is recommended to set aside a separate section for installing the operating system and necessary software and not fill it with your personal data.
- You should choose the size of the system partition with a margin, taking into account that for Windows to work correctly, 15% of the space of this partition must remain free.
- Don't create too many sections. This will complicate navigation and reduce the efficiency of distributing large files and folders
DEFINITION OF SYSTEM PARTITION
Now, let's get back to the installation. From this point on, the installation can proceed in two ways:
Option 1: You have a new computer and the hard drive has never been allocated. In this case, a window with the following content will appear in front of you:

To partition the hard drive into partitions, you must select the item: “Disk Settings”. In the additional options that appear, select “Create” and enter the required partition size in the window next to it. Please remember that you must specify the size in megabytes. Calculate it based on the fact that 1 gigabyte = 1024 megabytes. As a rule, for Windows7 and related software, 60 - 100 GB is enough, but you have the right to make it larger if necessary.

Having specified the required size of the future system partition, click the “Apply” button. Next, to use all its capabilities, Windows will ask you to create an additional partition for it. Don't be alarmed, it will only take up 100 MB of free disk space and will be invisible to you.
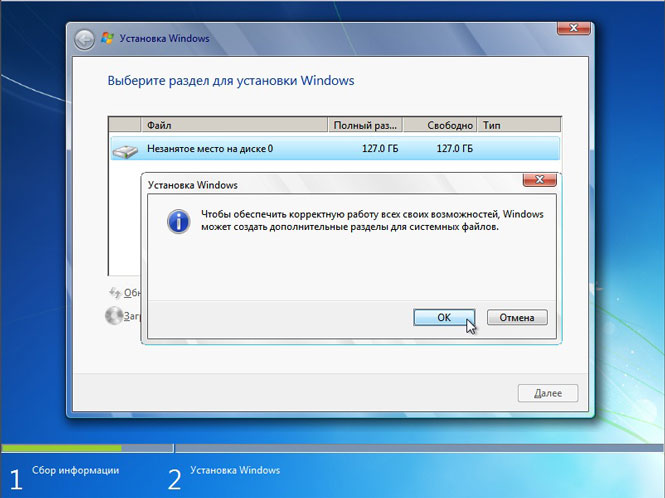
By clicking “OK” we will return to the screen for selecting a partition for installing Windows.

As you can see, there have been changes here. Now we have a partition reserved by the system for its own needs, a newly created partition and the remaining unallocated area. From the unallocated space on the disk, in the same window you can create additional partitions in the same way that we used above, or you can postpone this action until later and finally partition your drive in Windows.
Having made the necessary decision, select the part of the disk on which we plan to install the operating system and click “Next”.
Option 2 - If your computer already has an operating system installed. Then your hard drive is already divided into logical areas, and you will see a window listing all found partitions on it, for example:

Attention! All further manipulations with the found partitions may lead to the loss of your data, so be very careful in your actions.
If the current partition of the hard drive does not suit you, then you can delete existing partitions in whole or in part by selecting the appropriate part of the disk, and then the “Delete” option. You have the right to split the unallocated space on the disk that appears after this at your discretion using the above method, discussed in option 1.
If you are completely satisfied with the current disk layout, then you need to decide in which of the existing partitions you will install Windows 7 and whether you want to save the information available there. In this case, before moving forward, let's first take a look at the possible installation options, after which you can make an informed decision without pointing your finger at the sky.
You have selected the partition on which your old operating system is currently installed, and you plan to save the data stored on it. In this case, after clicking the “Next” button, before starting the installation, you will see a warning window that the previous copy of Windows with all its files and folders will be moved to the “Windows.old” folder. The rest of the information will be untouched. Clicking "OK" in the warning window will begin the installation process.

There is one significant drawback to this setup. As a rule, after using the operating system for a long time, the partition on which it was installed becomes very littered and contains a lot of unnecessary files. Adding to all this a new operating system with accompanying software, you will be faced with, at a minimum, irrational use of hard disk space, file defragmentation, and even possible overflow, which will undoubtedly lead to a decrease in system speed.
If you have selected a hard disk segment that does not contain Windows as the future system partition and want to save all the stored information on it, then the installation will begin immediately after clicking the “Next” button.
If you plan to install Windows 7 on a blank partition (the preferred option of all) and you have either already saved the information on it in another place, or you do not need it, then you should format it before starting the installation. To do this, select “Format”. The installer will issue a warning that this partition may contain data that is important to you and it will be destroyed.

After clicking the “OK” button, the selected part of the disk will be completely cleared of the information stored there and to begin the installation, all you have to do is select “Next”.
INSTALLATION AND INITIAL SETUPWINDOWS
So, after selecting the system partition, the system installation process will begin, during which files will be copied and unpacked, components and updates will be installed.

During installation, your computer will automatically restart several times, and the entire procedure may take from 10 to 20 minutes, depending on its power.


Finally, after the installation is completed and the computer is rebooted again, the first Windows initial setup window will appear in front of you, in which you will have to enter the user name (the name of your account in the system) and the computer (the name under which it will be visible to other users on the network).

On the next screen, you can create a password for your account or postpone this action by leaving the fields blank and clicking the “Next” button.

The next step will be the ability to select settings for automatic Windows updates, designed to regularly check via the Internet for the availability of all kinds of system security patches, critical updates and service packs on the official technical support website. Enabling automatic updates is desirable, but not required at this stage, since you can configure this setting more flexibly after installation from the control panel.

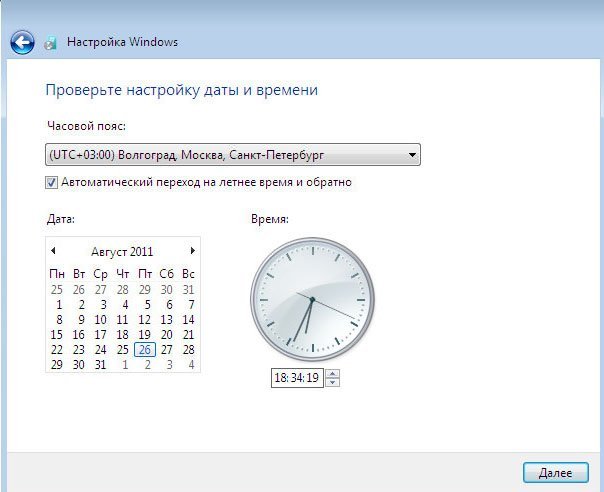
After you select your security options, Windows Initial Setup will prompt you to check your date and time settings. If everything is correct, click “Next”.

If network card drivers were installed during the installation process, you will see a network settings window in which you will need to select the location of your computer.

After you make your selection, a window will appear to connect to the network and apply settings.

At this point, the initial setup of the system can be considered complete. After the final application of the settings, a welcome window will appear in front of you, then the system will prepare the desktop, the appearance of which will mark the completion of the installation of Windows 7.


Immediately after completing the installation of the new operating system, you should install all the necessary drivers for the installed devices, after which you can begin installing the software.
This article describes how to install or reinstall Windows 7.
Before installation begins, you need to complete several preparatory steps. At the beginning of the article we have placed detailed content so that you can quickly view the entire sequence of actions and move on to the necessary part of the instructions.
If you are interested in a specific question (such as installation errors, how to enter and configure the BIOS, etc.), the links in the content will take you directly to it.
If you are a beginner, then simply follow the guide from start to finish: each point is described in as much detail as possible and includes links to supporting instructions.
What should be ready before installation
Review the list below to ensure your computer and system are ready to install or reinstall Windows 7 and follow the steps required to complete the preparations.
What types of installation are there, how to save personal files and programs
There are two types of installation:- A complete reinstallation of the operating system (OS), which completely erases a hard drive partition (or the entire drive), including all your programs, documents and files.
- An OS update that only updates system files.
If you haven't done this yet, read the article on preparing for installation, from it you will learn:
- how to save all important personal data;
- what programs will be needed immediately after installation and where to download them;
- Is it possible to copy installed drivers, where can I find the drivers after installation;
- analysis of some special cases;
How to legally download the original image of Windows 7 x64 or x32 for free.
Download original image can be done legally using the program "Windows ISO Downloader": the file with the Windows image will be downloaded with Microsoft official website.
Program file "Windows ISO Downloader"
with version 5.21
(dated September 20, 2017) is attached to the article (to the right of this text).
How to download the image correctly is shown in the figure below:
 Select the Windows 7 partition, then the desired edition of the Windows 7 image and the “Confirm” button.
Attention!
We strongly we do not recommend use Windows 7 builds - use only original system images.
Microsoft has several aircraft hangars with a variety of equipment designed to test the operation of the operating system on various combinations of devices. Therefore, the official OS image works correctly for the vast majority of users.
The authors of assemblies do not have such testing capabilities, so a certain percentage of users will experience problems during the operation of the assembly, which can only be resolved by completely reinstalling Windows.
Which image version to choose: 32 bit or 64 bit
Everything is very simple: a 64-bit OS is needed in two cases: so that the computer can “see” 4GB or more of RAM and so that you can work with “heavy” programs or games. Attention!
Some new programs and games may not run on 32-bit Windows.
Conclusions:
- If the amount of RAM is 4GB or more, feel free to choose x64 (64 bits).
- If the computer is old and complex programs (for example, audio and video editors, design systems, multimedia packages) are not used, choose x32 (32 bits).
The easiest way to see how much RAM you have is to right-click on the icon "My computer" → select item "Properties" in the context menu.
The window that opens will indicate the amount of RAM, as well as the bit capacity of the system currently installed.
Which version of Windows 7 should I choose: Home, Professional or Ultimate?
There are different versions (editions) of Windows 7, some of which differ greatly in functionality. You can read more about Windows versions.
Most often, when installing, they choose between versions of “ Professional
" And " Ultimate
».
The best choice in terms of image version would be «
Windows
7
Professional
»
.
But don’t worry if you have a different edition of Windows - the installation process will be similar. In the edition " Professional
" Unlike "Ultimate"
there are a number of services that most users will never use.
You probably haven't even heard their names: DirectAccess, Unix Application Launch Subsystem, BranchCache, BitLocker, etc. Accordingly, hard disk space version «
Professional
»
will take less.
How to properly burn an image to a DVD or USB flash drive?
If you have already recorded the image and the installation from it went smoothly, then you can immediately move on to the next chapter. If you don’t know which programs can be used to burn an image to a disk or flash drive, then the following auxiliary articles will help you: Please note that installation from a flash drive is more reliable and also faster. If you have a flash drive with a capacity of 4GB or more, then it is better to install from it.
Windows reinstallation process.
So, preparation for installation is complete: all personal data has been saved, the media with the operating system distribution has been created, and the partition on which the image will be installed has been prepared.
Setting boot device priority in BIOS
- Restart your computer and enter the BIOS.
- on personal computers, buttons are most often used to enter the BIOS « DELETE» (« Del»), « F2", "F1", "Esc»
- on laptops - keys «
F8", "F9", "F12", "Esc»
- After going to the BIOS, you need to find the menu section responsible for installing devices to boot the OS.
The partition may be located in different places (depending on the type of motherboard and BIOS version), so you need to find the menu « FIRST BOOT DEVICE », « BOOT » or « BOOT DEVICE ».
- You need to go to this section of the menu and set the drive to first place DVD or HDD(your Flash drive) depending on what media the image was recorded on.
- After this, you need to exit the BIOS and save the changes.
Most often, to save changes you need to press the key before exiting. « F 10" , and then confirm saving by pressing « Y » or by selecting « Yes » in the dialog box.
In the article you will find instructions with examples:
- how to enter BIOS or UEFI with examples of different BIOS screens.
- how to find the option "BOOT DEVICA PRIORITY".
- table with a list of keys for entering the BIOS on laptops from different manufacturers.
Autorun Windows installation from a DVD or flash drive
If you did everything correctly, then after restarting your computer you will see the following:
- if you are using DVD media, you will see the message “Press any key to load from CD...” (press any key to boot from CD). You must immediately press any key, because after a short amount of time (about 10 seconds) the boot will begin from the next boot device installed in the BIOS.
- if you used a flash drive, the installation will begin immediately
When installing an operating system, you should be careful and careful with functions whose meaning you do not fully understand.
The site administration is not responsible for the results of your actions.
Start installation
Attention!Your computer may have gray and blue USB connectors. If you are installing the OS from a flash drive, be sure to plug the flash drive into the connector USB2.0 (gray), otherwise the installer may not see it.
You can judge that the operating system installer has started working by the line that appears at the bottom of the screen.
 Figure 1. Installer Windows 7 copies files from the media for further installation of the OS.
When preparation for installation is complete, you will see the message "Starting Windows"
.
After this, the Windows 7 installation window will appear.
 Figure 2. Starting installation Windows 7: Select the language, time format and layout to be installed.
We will leave the time format, installed language and keyboard layout unchanged (as shown in Figure 2). Click on the button "Further"
, after which you can start the process by clicking on the button "Install"
.
 Figure 3. Start of installation Windows 7
You should now read and agree to the Microsoft License Agreement and click the button again "Further"
.
 Figure 4. License agreement for installation and subsequent use Windows 7.
Selecting the installation type
- A system update will allow you to reinstall Windows on top of your existing operating system.
- A full installation will allow you to select an existing partition for installation or re-partition the hard drive. The system will be installed completely, so this option is more acceptable (we wrote more about installation types at the beginning of the article).
 Figure 5. Selecting the operating system installation type.
Choose "Full installation (advanced options)", as shown in Figure 5.
 Figure 6. Selecting a hard drive for further installation Windows 7.
Hard disk partitions for system installation
After proceeding to the full installation, we will be presented with a list of hard drives on which we can create or select partitions for installation. At this step there may be several options for the development of events.
- You only have one hard drive in your system.
- You have a separate hard drive (possibly an SSD) where the operating system will be installed, and separate drives for storing data.
- The installer does not see the hard drive or other errors occur (below are links to articles that discuss these problems step by step)
If you have several hard drives, then transfer all important data to the drive where you will store personal files and disconnect it so as not to accidentally mix up the drives when creating partitions or formatting. If you only have one hard drive (or SSD), then it is advisable to split it into parts (if the disk space allows it).
The disk must be divided into parts so that at least 50GB is allocated for the system, possibly even more, because For normal operation of Windows 7, it is desirable that there be at least 15-20% free space on the system partition.
The disk is divided into partitions to make it easier to reinstall the operating system in the future.
For example, you have only 1 hard drive in your computer with a capacity of 500GB.
You split it into 2 parts: 120GB (disk " C:") and 380GB (Disk " D:» )
Now on disk « D:» you store music, movies, photos, program installers, folders with drivers, games, etc., and on the disk « C:» you install programs to work.
Files from the Desktop and My Documents folders are also stored on the disk «
C:».
When in the future you want to reinstall Windows, you just need to transfer (copy) all important files from the desktop and other disk folders «
C:»
to disk «
D:»
, then do a complete reinstallation with disk formatting «
C:»
.
If the disk is not partitioned, then you will have nowhere to transfer data from the disk «
C:»,
and you won't be able to format it.
Creating disk partitions
At this step, you can create partitions on your hard drive if:
- the hard drive is not partitioned (new or all partitions were previously deleted);
- There are no important files on the hard drive, and all information can be deleted.
If you are going to repartition the disk (and all important files have already been transferred from it), then you need to:
- Sequentially delete all partitions of your disk using the button "delete" . Attention! All files on these partitions will be deleted!
- Select the unallocated partition that appears with the mouse, click the button "Create" (See Figure 6).
- Specify the size first for the system partition (which will be the disk « C :» ), then create a partition for the disk « D :» (and other disks if necessary).
Selecting a partition for installation
If disk partitions have been created previously:
- Select the system partition (on which the OS was previously installed).
- Click on the button "Format".
- After formatting, select the erased partition and click on the button "Further".
- Analysis of various types of errors when installing Windows 7 (including by code).
- What to do if the installer does not see the device (drive, hard drive, keyboard or mouse, etc.).
 Figure 7. Creating a partition on the hard drive
In our case, no partition has been created yet, so we need to click on the button "Create" (Figure 7), then indicate the volume of the partition to be created (Figure 8) and click on the button "Apply" .
Figure 8. Selecting the volume for a partition on the hard drive
 Figure 9. Partition creation confirmation window
After this, the operating system installer will inform you that an additional partition will be created to store system files:
 Figure 10. Installing Windows 7.
Click on the button "Further", after which the installation will begin (copying all system files and the process of setting up the OS).
The process of copying files will take 15-30 minutes and will not require any action from you.
 Figure 11. Installation completion window
Once the files are copied and unpacked, the computer will restart.
At this point, you must remove the DVD or Flash drive from the computer, as the installation will continue from the hard drive to which the necessary files were copied.
After the reboot, you will see a window indicating that the installation is complete.
 Figure 12. Entering the username and network name of the computer for the installed system.
The completion process will take a few minutes, after which the initial setup of the operating system will begin.
Completing Windows installation and initial setup
When the setup process comes to an end, you will be prompted to enter a user name to create your account, as well as a computer name for subsequent network identification (under this name your computer will be visible on Windows local networks).
 Figure 13. Setting a password for the account (optional).
Next, you will be prompted to enter a password and a password hint. If you want to protect access to your account with a password, enter it. Or you can skip this step by clicking the button "Further"
.

Instructions
Purchase a licensed version of the operating system. When choosing, rely on the technical characteristics of your personal computer. If you own a latest generation PC, then purchase Windows 7 or Vista. For those with an older model computer, Windows XP is recommended.
Copy all important files from your computer to removable media to avoid losing information.
Insert the operating system disk into the PC drive. Restart your computer. While loading the BIOS, press the key to open its menu. For different personal computers, you need to press different keys, for example, F2 or DELETE.
In the window that appears, select the media loading priority tab. Place the CD/DVD-ROM in the first place, and Hard disc in the second. Save the settings and reboot the system.
The DVD menu will open. disk with the operating system. Select the installation mode: automatic or semi-automatic. Automatic copying of root files to your personal computer will begin.
Once all files have been copied, an automatic reboot will occur. A list of virtual partitions will appear. Select where the operating system will be installed. Press the “F” key to format the partition. You can also remove one of the sections or add an additional one.
Format the system in NTFS format, as it is more adapted to modern computers and operating systems.
During the installation process, provide an account name. If necessary, set a password.
After installing Windows, update all drivers of your personal computer.
Video on the topic
note
Installation may take 40 to 60 minutes.
Helpful advice
Use only licensed versions of Windows. This is a guarantee of quality and technical support.
Most often, computer CD/DVD drives are used to install a new operating system - it is most convenient for manufacturers to distribute OS distributions on such media. The installation procedure usually takes from half an hour to one hour, is not particularly difficult, but requires a little preliminary BIOS setup.
Instructions
Change the device polling order in the BIOS so that the DVD drive is ranked higher in the queue than your computer's hard drive. To do this, you need to initiate a reboot and wait for the invitation to press the Delete key (or f1, f2, f10, Esc, etc.) to enter the BIOS settings (Press DEL to enter Setup) to appear in the lower left part of the screen. By clicking the desired button, find the section where the desired setting is located in your BIOS version - this can be the Boot or Advanced section, and the setting itself can be called Boot Device Select, Boot Sequence or Boot Drive Order. In any case, you need to put the CD/DVD-ROM Drive line first in the list.
Install the DVD with the operating system distribution into the reader, and then exit the BIOS settings panel, answering yes to the question about the need to save the changes made. A new computer reboot cycle will begin and, depending on the BIOS version, a confirmation request to boot from the DVD may appear on the screen - press any button and the process of preparing to install the OS will begin.
Select the partition in which you want to install the new operating system - this question will be asked to you by the installer program. Once you make your choice, you will have the option to format the partition or keep the existing file system. If the selected partition is in NTFS format, then avoiding reformatting will save installation time. When the preparation of the hard drive for OS installation is completed, the installer will restart the computer and begin the installation procedure.
Not every user has a DVD drive; moreover, recently rare PCs have been equipped with them. But you still need to install the system, and for this it is most convenient to use a bootable USB flash drive. Let's figure out how to install Windows 7 from a flash drive - after all, you won't buy a DVD for this purpose.
Before proceeding with the installation, carefully study this article: various difficulties may arise during the process, which can be solved using one of the methods described below.
The installation process itself can be divided into the following stages:
- downloading the installation image;
- computer preparation;
- creating a bootable flash drive;
- setting up PC BIOS;
- Windows 7 installation.
Let's look at each stage in more detail.
Before you burn the image to a flash drive and install the system from it, you need to download it. Today there are a huge number of ready-made operating system builds, which are equipped with many applications and functions.
Very often in such distributions the default theme or sound scheme is changed. But not all users like such innovations. You only need to download original images created by Microsoft. A huge headquarters of the world's leading programmers does their job better than some artisanal modifier.
A little lower you will find a button where you can download a torrent file to download the Russian version of Windows 7 with 32 or 64-bit architecture. The file was taken from the official Microsoft website and is completely original. Proceed with the download, and when the download is complete, move on to the next step.
After the file is downloaded, open it using a torrent client. If you don't know how to work with such programs, follow our step-by-step instructions.
- First, download the torrent client itself. This will be the qBittoorent application.
- Install the program and use it to open the previously downloaded torrent file.

- Select the version of Windows 7 (in our case it is professional 64 bit) and click “OK”.

- After this, the operating system will begin loading at the maximum available speed.

Getting ready to install Windows 7
First of all, we need to copy to a safe place all the information that is important to us, located on drive C. Each user stores data in their own way, so each user has their own choice of folders for backup. Most often these are folders: “Downloads”, “Desktop”, etc.
You can save files to another logical drive (the one on which the system will not be installed) or to an external drive. You can also use cloud storage if there is not too much data. For example, the Mail.ru cloud provides 100 GB of free space.
With an eye to the future, remember: while using your PC, you need to store your data on a disk other than the one on which the system is installed. Divide the physical disk into partitions and store your files on any of them except the system one. To install Windows 7, a comfortable volume of 70–100 GB will be (depending on the type and amount of software used).
Another important point that should be taken into account before the installation begins is the drivers for our network card. If, after installing Windows 7, it turns out that there is no driver for the network card, additional difficulties will arise that will have to be solved using a second computer by transferring files from it via a flash drive.
If you just bought a computer, there is not and cannot be any valuable information on it, feel free to move on to the next section, without copying the data.
Create a bootable USB flash drive
In order to create bootable media and begin the operating system installation procedure, we will need:
- USB flash drive with a capacity of 8 GB or more. Instead of a USB flash drive, you can use a simple memory card with a card reader;
- "Seven" installation distribution with .iso extension;
- a utility with which we will write an image to a flash drive;
Attention! Before you start creating installation media, remember that all data on it will be irretrievably destroyed.
Making installation media using Ultra ISO
A well-known disk imaging program can create bootable media. Let's look at the algorithm for recording Windows 7 to a USB device.
- Download and install the Ultra ISO program from the link.
- Run the resulting file and check the “I accept the license agreement” checkbox. Proceed to the next step by clicking “Next”.

- Using the “Browse” button, select the installation path, then click “Next”.

- We don’t change anything here and just move on.

- The program is being installed, we are waiting for it to finish.

The Ultra ISO installation is complete, you can run it and go straight to creating a flash drive for installing Windows 7.

- The Ultra ISO program can be launched in trial mode, so its functionality will not suffer at all. Click on the button marked in the picture.

- Go to the “File” menu and click on the “Open” item.

- Select the Windows 7 image we downloaded, and then “Open”.

- Go to the “Startup” section and click on the item that we marked in the screenshot.

- We make sure that the media we need is displayed in the devices at the top of the window and click on the “Format” button.
Attention! This will destroy all your data beyond recovery. If you have the files you need on your USB drive, save them first.

- In the next window, simply click “Start”.

- Ultra ISO will once again warn us that all information from the flash drive will be erased. Click "OK".

- After formatting is completed, click on “Burn”.

- The process of recording “Seven” onto a flash drive has begun. It will take about 5-10 minutes depending on the speed of the drive and the selected OS version.

The recording is complete, our media can be used.

Let's look at a few more options for creating bootable media with Windows 7.
Rufus
This is another program that can create a bootable USB flash drive with “Seven”. First, let's download it.
The application, unlike Ultra ISO, does not require installation, so you can run the downloaded file and immediately proceed to the process of burning the OS to a USB device. To do this we do the following:
- Select the recording device. This will be our flash drive, in this case – 16 GB. Then click on the disk icon.

- Select the distribution we downloaded in the PC folder.

- We begin the recording process with the “Start” button.

- Rufus will notify us that all files will be deleted from the flash drive. If you have already created a backup copy or there was no important information on the media, click “OK”.

As a result, Windows 7 will begin recording onto the USB flash drive, after which you will have a full-fledged installation media at your disposal.

Attention! Before you begin the process of writing the system to a flash drive, be sure to save all the data on it - otherwise they will be irretrievably lost.
As you can see, this method turned out to be much simpler than the previous one, but we will not dwell on this and will consider several more options for recording Windows 7 to a USB drive.
Making a bootable USB flash drive using WinSetupFromUSB
Another application focused solely on writing operating system files to an external drive. Let's take a look at the utility and look at the process of working with it.
- Select the path where the program will be unpacked (click on the button with the image of three dots) and click “Extract”.

- We are waiting for all the necessary files to be unzipped.

- We open the directory into which the unpacking was carried out and launch the program depending on the architecture on which your operating system is built. For us it is 64 bit, so we click on the marked file.

- We insert our flash drive into the USB port and make sure that it appears in WinSetupFromUSB. Next, check the box indicated by the number “2” in the screenshot. When the bird is placed, click on the icon with the image of three dots, marked with the number “3”.

- Select the image of our operating system and click on “Open”.

- All that remains is to press the “GO” key and Windows 7 recording will begin.

Windows 7 is being written to an external drive. Once the process is completed, the flash drive can be used to install the system.


We will not stop at WinSetupFromUSB and will tell you how to burn the OS to media via Windows 7 USB/DVD Download Tool from Microsoft.
Windows 7 USB/DVD Download Tool
This is an official application from Microsoft, so it should, in theory, do the best job of writing Windows 7 to a flash drive. Let's get started with the program.
- First, download the utility from the link from the official website. Then we launch it and click on the “Next” button.

- We are waiting for the program to install.

- We complete the installation process by clicking on the “Finish” button.

- Let's move on to working with the program. Initially, we need to specify the file that we will record. To do this, click the “Browse” button.

- After the path to the image file is registered, you can proceed to the next step - click “Next”.

- Here we should select the type of media on which we will install the “Seven”. Since this is a flash drive, we click on “USB device”.

- We make sure that our drive is displayed in the field marked with the number “1” and click on the “Begin copying” button.

- After this, we will be warned that all information from the media will be erased and, after confirmation, the process of transferring Windows 7 to a USB drive will begin.

Upon completion, we will receive a bootable USB flash drive, with which it is easy to install the OS on your computer.
The program requires the Microsoft .NET Framework 2.0 library. If you do not have it, then download the program from the official Microsoft website.
We use the UNetBootin program
The UNetBootin utility is completely free. you can download it without registering or sending SMS. The program does not need to be installed - it works immediately after downloading. An application was created not only for recording to a Windows flash drive, but also for other operating systems, such as Linux or Mac OS.
Let's move on to the instructions for using the application.
- First of all, check the “Disk Image” box and click on the button with the ellipsis. In the window that opens, we need a Windows distribution.

- In the drop-down list indicated by the number “1”, select a USB device, indicate our flash drive and click “OK”.

- The application will warn us that all data that is already on the flash drive will be irretrievably lost. If we don’t need them, click “Yes to All”.

The distribution package is being written to a USB device. Once it is completed, the flash drive can be used to install the OS.

Command line
You can create bootable media with “Seven” without using any programs using the system itself. For this we will use the command line.
The entire process is described in the form of detailed step-by-step instructions, each stage of which is accompanied by a screenshot for clarity.
- Initially, launch the command line. This must be done exclusively as an administrator. We will create bootable media using Windows 10 as an example, but you can get the same result on Windows 7 - 8. Press the Win + R button combination and press the “Browse” key in the window that appears.

- We follow the path indicated in the screenshot with the number “1” and find the cmd application. We right-click on it with our manipulator and select “Run as administrator.”

- We write the command diskpart in the command line and press Enter.

- To start recording to a disk, you must initially select it, and take this choice responsibly, because all data from it will be deleted. You can view a list of disks using the operators: “list disk”, “list volume” or “list partition”. The first two show a list of disks, the third displays the number of partitions and their names. Insert the flash drive into the USB port and enter the “list disk” command in DISKPART. Next press Enter. You will see a list of all drives currently installed in the PC.

- Select the disk that we need. To do this, enter select disk disk_number. The disk number can be viewed in the previous step; for us it is “1” since its size is 14 GB, which corresponds to our flash drive.

- We remove the disk with the clean command. Once again, make sure that you have made the right choice - all data on the media will be completely deleted.

- Now we need to create the main partition for the flash drive, from which we will boot in the future. Enter the command create partition primary and press Enter.

- We set the drive letter using the assign letter=drive_letter operator. Let's do that. We know that our PC has drives C, D and E - therefore, we specify F. The final command will look like this: assign letter=F.

- You can also specify the partition size. If you skip this step, it will take up all the free space. You can set the size of a logical disk using the create partition primary size=disk_size command. The size must be specified in megabytes.

- Select our disk using the select partition 1 command (indicate your disk number) and press Enter.

- Now we need to make our section active. To do this, use the active operator.

- All that remains is to format the flash drive - write a command like this: format fs=fat32 quick.

- Exit DISKPART using the exit command. Now you need to prepare the files for recording. We unpack our Windows 7 image using any archiver (we will use the usual WinRAR) and extract all the files to our flash drive.

The installation media is ready and you can use it.
We use the WinToFlash program
Let's describe the process of working with another program for recording Windows 7 and other operating systems on a USB drive. To get started, download the utility from the link from the official website.
- Install the program and run it. In the window that opens, select the item marked with a red frame.

- At the very top, select “Windows”, then indicate Windows 7 and press the button indicated in the screenshot with the number “3”.

- We indicate the path to the Windows 7 image that we downloaded. To do this, click the “Select” button.

- Click on “Add”.

- We make sure that the flash drive we need is indicated as the target, and click “Run”.

After this, the process of creating bootable media with Windows 7 will begin, after which the device will be ready for use.
Burn a bootable USB flash drive using WinToBootic
This application is one of the simplest tools for recording operating systems to external media. To work with the utility, you do not need to install it, nor do you need administrator rights. You can work with both Windows files and its images. The interface here is simple, and the speed of the program is pleasing.
To burn Windows 7 to a USB flash drive via WinToBootic, do the following:
- First, download the program from the link and launch it. Check the box next to “Quick Format” and click “Do It!”

- We answer the request for formatting in the affirmative.

- We are again notified that all data on the flash drive will be deleted. Don’t forget to save important information from the media, if it is there, and click “OK”.

- The preparation of the flash drive is completed, click “Thanks!”

- Next, select the files that will be written to our flash drive. To do this, click the icon indicated in the screenshot and select the image we need.

- Click the button to start the process again.

Windows 7 will begin recording to the USB flash drive. When it is finished, the device can be used to install the system.

How to boot from a flash drive
To successfully install Windows 7 from a flash drive, it is not enough for us to simply write the operating system onto the media; we also need to force the PC to boot not from the hard drive, but from a USB drive. This can be done in two ways: either by modifying the BIOS, or through a special boot menu.
Regarding the Boot Menu, we can say that it is launched using different keys, depending on the model of the computer or laptop. You can see which button is responsible for this on your device in the instructions for it. We provide a list of combinations for the main brands of computers and laptops:
Launching Boot Menu on PC:

Launching Boot Menu on a laptop:

Below is a list of keys that launch the BIOS on different computers and laptops:

For clarity, we will show the process of installing a flash drive as the first boot device using the example of our PC with an Asus motherboard:
- We turn off or restart the computer and after it starts, press the button to go to the BIOS (for us it’s Del).

- This is what the BIOS itself looks like.

- Go to the Boot tab.

- We install our USB drive as the first device.

The process is similar on different computers, although the names of the tabs and items may differ. To understand how to enter the BIOS of your PC, read the instructions for it.
Installing Windows 7 from a USB flash drive
After the BIOS has been configured, you can proceed directly to installing Windows 7 from a flash drive. Let's get started.
- Immediately after the system starts, you will see the following window (data for installing Windows 7 is being preloaded).

- Set regional parameters. Select your system language, region of residence, and keyboard layout. If desired, all this data can be specified after Windows starts. When the setup is complete, click on “Next”.

- At the next stage, simply click “Install”.

- All you have to do is accept the license agreement and the installation will begin. Check the box as shown in the screenshot and click “Next”.

- We select the full installation mode - this is the so-called clean option, when all old data on the system partition is deleted.

- We are in the section settings menu. Click on the entry outlined in red.

- If your disk is not partitioned, you can do this here (for Windows 7, it would be best to use about 100 GB of free space, the rest will become drive D). Don't forget to format your system partition before installing Windows on it. When the operation is completed, click on the “Next” button.

- Finally the Windows installation began. We are waiting for the process to be completed.

- Next, the system will reboot and we will be greeted with the Windows startup screen

- Initial optimization is underway. The system prepares all the necessary files.

- System services begin to start.

- After which we proceed to complete the Windows installation

- We are again informed that we need to restart the computer.

- The system will check how productive our video card is.

- Now we need to provide our details. We write an arbitrary name and computer name. Then click “Next”.

- If necessary, you can set a password that the system will request upon startup. We skip this step since the computer will be at home.

- If you have a Windows 7 key, you can enter it here, however, you can do this even after the system starts. We are skipping this step.

- We choose the system protection option depending on our personal preferences. We will be installing another antivirus, so the regular one will not be needed.

- Enter the time and time zone. Then click “Next”.

- We decide on the type of network. This is a rather important step, since if we specify a home network, but are connected to a public one, our security will suffer greatly.

- The settings are applied and the network is automatically configured.

- Last minute of optimization before our Windows 7 launches.

As a result, we installed Windows 7 from a flash drive, the creation of which was described above.

Instead of an afterword
We looked at a lot of different programs and Windows tools in order to answer the question: how to install Windows 7 from a flash drive. However, these are not all options. There are a lot of such programs on the Internet. They differ in their convenience and functionality. Some utilities are better suited for ordinary users, while others are better suited for professionals.
Which method to choose and how to write Windows 7 to a flash drive should be determined based on purely personal preferences. Use the option that you like, and if you have any questions, ask us in the comments. We undertake to give a comprehensive answer as soon as possible.
Friends, many letters come with the question of how to properly reinstall or update the Windows 7 operating system and what exactly is the difference between these two concepts.
Letter No. 1. Please bring clarity to a question that is confusing for many, than reinstalling Windows 7 different from the update and which is better to prefer? The operating system 7 I have installed behaves extremely unstable, it takes a long time to load, many programs have stopped installing, sometimes errors like this appear, for example, some system file or dynamic library is missing. Rolling back a significant period of time using a restore point did not help. I don’t want to reinstall again, since I have a lot of programs installed. In your comment you said that you need to restore system files, put things in order in startup, optimize Windows 7, or, as a last resort, update or reinstall Windows 7, but unfortunately I haven’t heard anything about the latter.
I would like to know, firstly:
How to actually carry out this update or reinstallation of the operating system and what will happen to my personal files on the system partition, will they be lost?
Secondly: they say that the update is launched only from a running operating system. Is it so? After all, it was possible to run an update in XP even when the system did not boot at all. Thanks in advance, Pavel.
Reinstalling Windows 7
To make everything clear to you, I will walk you through the process of updating your operating system, and then I will show you how to reinstall Windows 7 in two ways and you will see everything with your own eyes, but first I will still explain to you what an Update is and Reinstalling Windows 7.

What is Windows 7 update?
This is installing a system on top of the old one, that is, you insert a disk with the Windows 7 distribution and start installing the system directly in the running 7, but in the installation menu you select not a full installation, but an update. What does it give?
First of all, damaged system files will be replaced, working system files will not be replaced, nothing will happen to your personal data: installed applications, documents, music, all your programs will run and your entire household on all disks will remain untouched. Also, user accounts will be transferred without changes; all this will be done by the Windows Easy Transfer tool (very important files, it is still better to transfer them manually). I also want to say that you will have to re-enter the product key, select the language, region, set the time, and so on. Warning. If you have a counterfeit Windows 7, after upgrading you will have a window in the lower right corner of your desktop warning you that your copy of Windows is not genuine.
- They also often ask how the Data Transfer Tool works? When updating Windows 7, temporary folders of your data will be created containing information about user accounts and settings, your email, files in the Favorites folder, personal files and user folders - music, images, videos, as well as parameters of installed programs . Once your system is updated, all data will return to its place, and temporary folders will be deleted. When upgrading, the data transfer tool does not allow the user to select files to transfer, but when reinstalling, you can select what you want to transfer (details below).
Will the update solve all your problems related to Windows 7? In most cases, Yes, but unfortunately no one can guarantee a 100% result here. In my opinion, if possible, it is better to delete and reformat the partition with a poorly functioning operating system, having first transferred all important files to other hard drive volumes or a portable USB drive and reinstall the system with all programs.
- Note: Windows XP has the same update mechanism and it can be launched both in a running operating system, and in cases where you cannot log into Windows XP due to problems, then you can boot from the XP installation disk and select setup menu option, . Please be aware that in Windows 7, unfortunately, there is no such option and the update can only be carried out in a running operating system.
What is reinstalling Windows 7?
Reinstallation is a complete replacement of all operating system files, that is, formatting a partition with an unstable system and installing Windows 7 again. Naturally, all your files and the system itself will be deleted from the drive (C:). In order to transfer all your files from the system drive (C:), you will need to use Windows Easy Transfer, but it will no longer work automatically, as in the case of an update, but we will use it ourselves and we will also choose what we need to transfer from the old system to the new one ourselves.
- Now this begs the question: What is the difference between reinstalling the system and installing it again? Friends are just here. When reinstalling Windows 7, you can use File Transfer Tool if you wish, since you already had the system installed once, but when simply installing the system again, install the system on the partition of the new hard drive you created. In short, here it is, I don’t know how to explain it more clearly!
What can I say, let's first update my Windows 7 together, and at the end of the article we will reinstall the system using the file transfer tool, it has also been working with errors for me lately and you will see with your own eyes, and then select what you need.
Windows 7 update
We insert the installation disk with Windows 7 into the drive; if you do not have autorun, click setup.exe.

Before updating, we can connect to the internet and download the latest updates from the official Microsoft website

Select Update

Compatibility check
Copy Windows files

Collecting files, settings, and programs, Unpacking Windows files, Installing features and updates, Transferring settings and program files


The computer restarts.
At this point you need to boot from the hard drive, and not a bootable USB flash drive or boot disk with Win 7.
Update Registry Settings

Enter the key


Setting the time
The update process is completed, the accounts are saved

All my files are in place, all programs run.

Reinstalling Windows 7
Now let's find out what Reinstalling Windows 7 is. According to the rules, we will reinstall Windows 7 on the same disk on which the old operating system is installed. If Windows was previously installed, for example, on the (C:) partition, then you need to reinstall it on the (C:) partition and not on any other partition (otherwise this will be the installation of a second operating system). All your files on the partition (C:) will be replaced with files from the newly installed Windows 7 operating system.
- First of all, we will launch the Data Transfer Tool, which will copy all our personal data from the Windows 7 partition to portable media or another hard drive partition, then we will boot from the Windows 7 installation disk (how to install it in) and install the system again. Immediately after installing Windows 7, let's launch Data Transfer Tool and copy all our files back, as a result we will get a new operating system and all our data: music, documents, personal folders, and so on.
- Note: You may ask: Is it possible to start installing a new system directly from a running Windows 7 and not go into the BIOS. Answer: This method is given at the end and we will also consider it.
Let's now see what the Data Transfer Tool will transfer from our files, let's launch it.
Start, write in the input field Data Transfer Tool

In this window we see detailed information about which files we can transfer from the old operating system to the new one, we will now select.

The data transfer tool suggests us to use:
- Data transfer cable - a cable specially designed for this purpose, which still needs to be purchased, is used to transfer files between two computers; in principle, we do not need this, because we have one computer.
- Network – transferring files over the network is also not our option.
- External drive or USB flash memory device. What we need. If you don't have much data, you can even use an 8GB or 16GB flash drive. By the way, if you don’t have a flash drive or a portable USB drive, you can use another partition of your hard drive for storage, like I did for example.
So you selected an External drive or USB flash memory device, and I selected a partition on the hard drive (D:).

We select This is my source computer, that is, the data needs to be transferred from it.

Data that can be transferred to the new system is analyzed at Usernames and General elements, click Settings, and also if you click Advanced, a full picture of what the Data Transfer Tool will include in the archive will open.

Please note that the archive includes the folders of both operating system users and personal data, this is correct. But we definitely don’t need to transfer data located on all partitions of the hard drive except the system one (C:), since we will be reinstalling Windows 7 located on (C:) and the reinstallation process in our case will only affect the system partition ( WITH:). Uncheck all hard drives.


However, if you decide to transfer data from all partitions, you can leave the checkbox unchecked, just keep in mind that the data transfer file in this case will occupy a very large volume..
What else should not be included in the archive that the data migration tool will create? For example, you may not include the C:\Program Files folder; it would be safer to install all programs again after reinstalling Windows 7.
So click Save, you can assign a password


The file transfer process is in progress. A transfer file with the extension (MIG) is created on disk (D:)


Now it’s time to reinstall Windows 7, insert the installation disk with the seven into the drive and reboot, at the beginning of the installation it’s better to click on the Disk Setup button and select Format partition with the previous Windows 7, and in general the whole process step by step, starting from changing the boot device priority in the BIOS and before installing the operating system itself, described in our article.
I think you’ve done it and installed the system, now let’s use our Data Transfer Tool again.

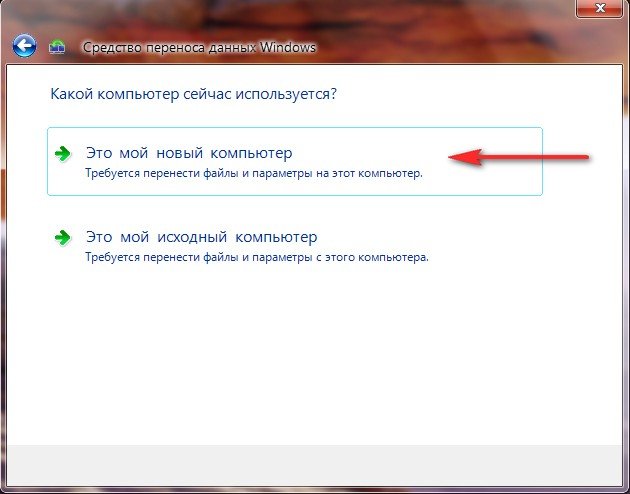
Select This is my new computer (you need to transfer files and settings to this computer)
Your external hard drive with the data transfer file should already be connected.
I, in turn, indicate the hard drive partition (D:), the transfer file is located there.


We can click Settings and select files to transfer to the new system manually, as we have already done, or simply click Transfer.


