Connecting an Android tablet to wifi. How to connect a tablet using wi fi. How to connect a tablet to WiFi: step-by-step instructions
The iPad tablet can connect to the Internet either via a WiFi module or via a 3G module. The 3G module is present in more expensive models, so setting up a connection via WiFi can be simply more profitable.
How to connect a tablet to WiFi (Wi-Fi)? You can use a regular router for this. The router must be connected to your home Internet network. After that, create a unique password for Wi-Fi and set up an Internet connection on the router. The password should consist only of Latin letters and numbers, the number of characters from 6 to 8. After you set up the network, you can connect the router to your provider.
On an iPad tablet, you can set up a WiFi connection in several steps:
- Select Settings
- From the menu you need to select WiFi and switch it to ON
- In the Join a Network list (list of networks), you need to select your wireless network
- If the network is secure, enter your password
After this, the tablet should connect to the Wi-Fi network. The tablet may not support all WiFi standards (11n, 11g) or all encryption standards. You may also have to disable geolocation on your tablet.
How to transfer files between tablet and computer via Wi-Fi
If you need to connect your tablet and computer (laptop) via WiFi only to transfer files between each other, then you can do the following. For example, for an Android tablet you need to download the On Air program from the Android market.
After launching this program, you will be able to select the ftp mode for transferring files. You can download and install a free ftp manager for your computer.

You need to configure this manager (enter your password and login) and then on your computer in the manager window you can see all the tablet files. Before connecting the ftp manager, you need to select the ftp mode in the On Air program on the tablet, then the connection should occur correctly.

This way you can connect your tablet to Wi-Fi to connect to your computer.
Here are the problems of connecting tablets to a Wi-Fi network and methods for solving them. The latter comes down to the correct configuration of the device distributing the wireless network. So, when choosing a WiFi router for your tablet, you can immediately take into account all the features that we will consider here. Then, problems will not arise in principle.
Wireless network diagram
A wireless network is built according to the following principle. There is a head unit (router) that creates a network with a given name. And computers and mobile devices are “subscribers”. Thus, for the network to start working, it needs to be configured in the router. There are a lot of instructions about this, but nowhere is it shown how to set up Wi-Fi for a tablet.
Tablet specific problems
Android tablet and router encryption method
An Android tablet can work with encryption methods such as WPA or WPA2. You don't have to use encryption on your Wi-Fi network, but you can't turn on "auto-select" (that is, WPA/WPA2).
A good router allows you to choose one of the following options:
- No encryption
- Auto WPA/WPA2 selection
Protection options 2 and 3 are fully compatible with Android. The same cannot be said about the 4th. But at least it’s now clear how to choose a router for a tablet running Android.
Let's look at an example setup. In the web interface of the ZyXel router, go to the “Wi-Fi Network” -> “Security” tab:

Setting up Wi-Fi encryption
Here – you need to select “WPA-PSK”, but better “WPA2-PSK” (then you need to click “Apply”). In the next window, specify the encryption algorithm (AES, for example), and set the password value.
Symbian OS tablet and local address range
You can configure a tablet running Symbian OS to “auto” DNS and IP. You can even detect the wireless network created by the router. But you cannot connect to it if the pool of DHCP addresses in the router is set as 100..255.
Let's explain in more detail what this means. Built-in DHCP server – distributes addresses to all subscriber devices. Each device has only one. If addresses are selected from the range N.N.N.100 - N.N.N.200, the tablet with Symbian OS does not “understand” this. It is necessary to reconfigure the range so that the smallest address becomes N.N.N.3.
This leads to an interesting conclusion. Most routers are configured by default to distribute addresses starting with the hundredth (N.N.N.100). This means that setting up a router with only a tablet will not work (you will need another device).
You need to set the DHCP range as follows:

Installing a DHCP pool in a D-Link router
That is, we do not touch the router’s IP address and mask, but only change the address range. Happy setup!
Additionally, it must be said that here a device with Symbian OS meant a Nokia smartphone (running Symbian 9.4). It is possible that with new tablets the indicated problem does not exist.
Any tablet and a list of Wi-Fi channels
In theory, this chapter should have been given at the beginning. We consider connecting any branded device (tablet or smartphone) to the router’s wireless network.
The problem may be the following. Different countries allow different Wi-Fi frequencies, and the list of channels in the subscriber device may differ from the frequencies of the router. But this problem is easily solved.
It is known that in the USA Wi-Fi channels from 1 to 11 are allowed (and in Europe, for example, up to 13 inclusive). You need to select a region with the smallest set of frequencies on your router. There are also Spain and Portugal, where, on the contrary, channels with a lower number (low frequency) are prohibited. But if the tablet is not from Spain, it is enough to set the following region in the router: United States.
Here is an example of configuration for TP-Link routers (with a new interface option). You need to change the region in the Wi-Fi network settings:

Wi-Fi Settings Tab
Go to the “Wireless” -> “Basic Settings” tab. Set the required value (and click “Save”). You can change the region value in any router and access point. Happy routing!
Other combinations
Perhaps our readers will add to this chapter. For devices based on Windows CE (and Linux too), no special problems were identified. Although, this fact does not mean that they cannot exist in reality.
So if you know of a common problem (related to Wi-Fi connection, for example), please report it here. Tell us about how to connect a tablet to a router from a particular company.
We conclude the chapter with a video. An Android tablet can be connected to a Wi-Fi network, as well as to a modem and a phone (which is discussed in the following video):
In most cases, any owner of a tablet or smartphone wants to use absolutely all the capabilities of their device, including an Internet connection. Therefore, many users have to decide how to connect their tablet to WiFi at home or connect to secure or open networks. To do this, you can use several basic options. Let's look at them in more detail.
Connecting the tablet to Wi-Fi: basic methods
It’s probably no secret that absolutely all mobile devices have built-in modules that allow you to connect to wireless networks. If we consider connecting a tablet to Wi-Fi, then for most devices you can use four methods:
Connection via router (router);
Creating a connection via a computer or distributing laptop;
Using an external modem;
Establishing a connection through the services of a mobile operator.
How to connect a tablet to a router?
The simplest option is to connect to wireless networks using a router. However, first you need to check your router settings regarding automatic network configuration. To do this, you need to log into the router’s web interface by entering the combination 192.168.0.1 in the address bar of your Internet browser. Then you need to go to the DHCP configuration section. Automatic configuration is enabled by default, but you never know. The location of the tab or section may vary depending on the router manufacturer. On the desired tab, you simply need to enable DHCP activation.B in this case You don't have to manually configure the configuration on your tablet. An IP address will be automatically assigned to the device. After this, you need to go to the tablet settings and activate the Wi-Fi connection by simply dragging the slider to the on position. A few seconds after activation, the built-in module will automatically detect all wireless networks within range. After this, all that remains is to select the desired connection and enter the security key if necessary. If configuration must be done manually, then you need to use the IP address value setting in the range from 192.168.1.2 to 1.254. For the DNS server, you can use either four eights, or two eights, or two fours. In this case, the standard subnet mask will be used - four values of 255 and a zero at the end.
Connection using a laptop
Let's look now at how to connect your tablet to Wi-Fi via a laptop. To do this, you first need to configure the laptop in such a way that it turns into a distribution device. Of course, this can be done using the Windows operating system, but many users have difficulty entering network command settings in the corresponding console. For this reason, it would be better to install free automated utilities like Virtual Router or Connectify. From the settings you will only need to enter the name of the access password and your network. To connect to the newly created network, the same methodology is used that was given to create a connection session through standard routers.
Establishing a connection using a 3G modem
To figure out how to connect your tablet to Wi-Fi using a 3G modem, you will first have to buy a special OTG cable and a modem compatible with the device. Using a cable, you can connect any peripheral devices to the tablet. It is worth noting that this method is only useful for devices running . Unfortunately, Apple gadgets do not support this technology. Now you need to start the setup procedure. To set the necessary parameters, you need to go to the data transfer section, which is located in the main settings menu. After this, the mobile traffic switch slider must be switched to the on position. Now you need to use additional parameters - the “More” tab. Here you need to select a mobile network and an APN access point. All that remains is to add it and enter the parameters that you received from your Internet provider. If you figure out how else you can connect your tablet, then in this case setting the settings is very similar to the method of establishing a connection via a 3G modem. Here you need to pay attention to the following point: first, you must manually establish a connection for the Wi-Fi module. The requested network may be hidden. For this reason, you must use the SSID value in the settings and then select the security type. Only after this you can connect to the network.
Using the services of mobile operators
There is another method that allows you to solve the problem of how to connect your tablet to Wi-Fi. Many modern devices support the installation of SIM cards linked to the operator that provides communication services. Access to 3G or 4G networks will be provided depending on the package. In this case, the only difference is that you can receive standard settings for Internet access from the operator or apply direct access by activating the data transfer module on your mobile device. There is no need to configure anything here. The connection will be made automatically. You need to pay attention to the traffic limit provided, since if you exceed it, the operator may charge you an additional fee.
Conclusion
From all of the above, we can conclude that none of the methods listed above should cause any particular difficulties in activating the connection. The only exception is setting parameters using Window operating systems. This technique was not specifically considered in this review, so the use of special automated utilities in this regard looks much more attractive and simpler in the eyes of the average user. In terms of preference for the chosen method, everything will depend on the situation. Today, routers are available in almost every cafe, so the easiest way to activate the connection is by launching the built-in Wi-Fi module directly on the tablet. If the user constantly needs communication, he will have to choose a connection through an operator (with support for installing a SIM card) or use an external modem. In this case, you will expect additional costs.
Mobile technologies are becoming more widespread. Android tablets are in great demand among users all over the world. They allow you to solve a wide variety of problems, and you can always take them with you. But, despite such popularity, many users are still confused about the use of such devices. One of these questions is how to connect
It is worth noting that nowadays this type of wireless communication is used everywhere, at home, in offices, public places, parks and so on. Therefore, finding an access point is quite simple. But how to connect a Wi-Fi network to an Android tablet? There is nothing complicated here.
First of all, before connecting to the access point, we need to turn on the wireless module. It is worth noting that different tablet PC models have different versions of the Android operating system. This means that the interface design may vary. However, they all operate on one constant principle.
There are two ways to turn on the Wi-Fi adapter:
- In the system console.
- Through the wireless network settings.
How to connect a WiFi connection on an Android tablet through the system console? Simply unlock the screen and log in to one of the desktops. Now swipe from the top of the screen to the bottom. A menu will appear. At the very top you will see a toolbar. As a rule, the first button is responsible for turning on the wireless module. It has a corresponding icon. Click on it. After this, the system will automatically start searching and offer you a list.
All you have to do is select the desired connection from this list and click on it. If the network is secure, you will have to enter a password and click “Connect”. To see the characters you enter, you can check the “Show password” box.
It’s worth noting that you won’t have to configure anything, since everything is already configured on Android devices. Moreover, the IP address and other network information are automatically sent by the router. Therefore, if you encounter any problems establishing communication, you should first check the router settings.
How to connect WiFi on a tablet: Video
How to connect to Wi-Fi on Android through system settings
How to connect Wi-Fi on an Android tablet through the wireless network settings? To do this we need to enter the device menu. You can get to the menu by pressing a special button on the screen. It is located in the toolbar on the desktop and looks like a square consisting of several small squares. Here we need to find the “Settings” shortcut. As a rule, it looks like a gear.
After entering the system settings, find the “WiFi” item. On some models, in the settings you need to enter the “Wireless networks” item, and only then select “WiFi Settings”. Here you can not only turn on the WiFi adapter, but also manually search for available connections. Here you can also manually add a new network, which, for example, is hidden by security settings. In this case, we will have to manually enter the network name and security password, after which you will be able to connect to it.
In the modern world, mobile technologies are increasingly used. Tablets with a variety of operating platforms are a huge success among users from all over the world. With the help of these devices you can solve various problems and, among other things, they are very convenient and transportable. However, despite the fact that tablets are extremely popular, many of their users, especially beginners, cannot figure out how to properly connect Wi-Fi on a tablet in order to enjoy good and high-speed Internet.
A Wi-Fi network is no surprise these days, and all modern devices have a wireless connection module installed. Wi-Fi can be found everywhere: at home, at work, in recreational areas, at train stations, subways and many other places. The hotspot is very easy to find.
Setting up Wi-Fi on your tablet
To connect your tablet via Wi-Fi to the Internet, you need to perform a list of simple operations:
- First you need to turn on Wi-Fi on the device - this can be done if you have a special widget that will be placed on the gadget’s desktop (sometimes you can open widgets by swiping down on the main screen). You can also activate the module in the settings: just click on “On”.
- After the wireless connection is activated, a list of available connections will appear on the gadget screen.
- Click on the appropriate network.
- If it has a password, you must enter it.
If all steps are completed correctly and the password is entered correctly, the device will be connected to Wi-Fi.
Connecting your tablet to your home network

Before using your home Wi-Fi hotspot, you need to activate and configure it through your router:
- Enter the following numbers in any Internet browser on your PC: 192.168.1.*. (The IP address of your router is indicated on the router itself or the box)
- After this, a window will appear where you need to specify the login and key to open access to the router.
- If the password is unknown, then on the Internet you can find out the standard login/password for any router model.
All further operations for setting up the router will depend on what specific device is used to distribute the Internet via Wi-Fi.
- You need to go to the router settings and find the WLAN section (maybe Wireless Lan).
- Here you need to check the Active Wireless LAN box or activate it (set the value to Enable).
- Determine what type of security the network will have (WPA2-PSK is best).
- In the SSID column you need to enter the name of the wireless access point.
- Please indicate the key below and confirm it if necessary.
- Save settings.
After the router has been set up, all that remains is to connect to the new wireless network.

Quite often, tablet owners encounter the following difficulty: the tablet does not connect to Wi-Fi - the connection to the network continues indefinitely. You can solve this problem by doing the following:
- The Wi-Fi network needs to be renamed (preferably in English letters). As practice shows, some gadgets do not want to connect to wireless networks whose names contain at least one Russian letter.
- The problem may be with the router. Restart it.
- The DHCP server may need to be enabled. To do this, you need to go back to the router settings (DHCP Setup) and check the box next to Enable.
- The gadget may not work with a certain type of Wi-Fi network encryption. To change the type of protection, you need to go to the security settings and try to enter some value. For the new settings to be active, you need to reboot the router.
- Another way is to enter the IP address and DNS server manually. To do this, you need to open the connection settings on the device. They are located in a special window that appears when connected to a Wi-Fi network. You should open the user IP parameters and enter your address in the following form: 192.168.1.***. You also need to fill in the “Gateway” and “DNS” fields with data, which you need to obtain from your Internet provider.
Connecting to a Wi-Fi network in public places

Wi-Fi has faster and better data transmission compared to the cellular network. Using a wireless network allows you to achieve significant savings (if you do not have an unlimited data plan). Additionally, many tablets don't have 3G capability, making Wi-Fi connectivity in public areas a necessity. Most networks are secure and will require a password to connect.
How to connect a Wi-Fi tablet to a wireless network
- The first step is to open the device configuration and go to the wireless connections section.
- You need to make sure that the Wi-Fi function on the tablet is activated. This means that the tablet device will search for available networks in active mode. If such a point is detected, it will be shown here, indicating whether the network is password protected or has open access.
- You must touch the name of the network to which you will connect.

In the tablet settings, you can activate a function that will periodically notify the user about the presence of available networks in the current area. To connect to the network, you need to tap this notification. If you need to deactivate the notification function, you can open the tablet device settings, the “Wi-Fi” section, and uncheck the box next to “Notify when new networks are detected.”
If there is accurate information that there should be wireless networks in the current area, but for some reason they are not displayed on the device, then you need to turn off and then reactivate the Wi-Fi function. To connect to a password-protected network, you need to know the access key. Just enter it in the appropriate field and touch the “Done” icon. To disconnect from a network, you need to touch and hold its name, and then select Remove.
Some points may be hidden and not displayed on the device. In this case, even if the notification function about available networks is active, the access point will not be displayed. To connect to such a connection, you need to select the “Add” function in the Wi-Fi settings, and then specify the network name and password.
When you enter your network name and passkey, be aware that they are case sensitive. You must enter this data very carefully, since the slightest mistake will prevent access to the wireless connection. The function of adding and connecting to an invisible network may not work on some gadgets. This is due to the lack of required software, which must be preinstalled by the gadget manufacturer.
How to activate Wi-Fi without a router, even if there are no other wireless networks? In such a situation, you can resort to the help of other mobile devices, for example, a smartphone. You need to make it become an access point and distribute Wi-Fi itself. The required function is present in many devices as a standard parameter. If there is none, then you can install a third-party application, of which there are a lot.
Summarize
In most cases, connecting to Wi-Fi on a tablet does not cause any difficulties. It is enough to use the standard functions of a tablet device. If you still have any difficulties with how to connect Wi-Fi on your tablet, it is recommended that you carefully read the above instructions and tips. A wireless Internet connection is much more convenient and profitable compared to
In the modern world, mobile technologies are increasingly used. Tablets with a variety of operating platforms are a huge success among users from all over the world. With the help of these devices you can solve various problems and, among other things, they are very convenient and transportable. However, despite the fact that tablets are extremely popular, many of their users, especially beginners, cannot figure out how to properly connect Wi-Fi on a tablet in order to enjoy good and high-speed Internet.
A Wi-Fi network is no surprise these days, and all modern devices have a wireless connection module installed. Wi-Fi can be found everywhere: at home, at work, in recreational areas, at train stations, subways and many other places. The hotspot is very easy to find.
Setting up Wi-Fi on your tablet
To connect your tablet via Wi-Fi to the Internet, you need to perform a list of simple operations:
- First you need to turn on Wi-Fi on the device - this can be done if you have a special widget that will be placed on the gadget’s desktop (sometimes you can open widgets by swiping down on the main screen). You can also activate the module in the settings: just click on “On”.
- After the wireless connection is activated, a list of available connections will appear on the gadget screen.
- Click on the appropriate network.
- If it has a password, you must enter it.
If all steps are completed correctly and the password is entered correctly, the device will be connected to Wi-Fi.
Connecting your tablet to your home network

Before using your home Wi-Fi hotspot, you need to activate and configure it through your router:
- Enter the following numbers in any Internet browser on your PC: 192.168.1.*. (The IP address of your router is indicated on the router itself or the box)
- After this, a window will appear where you need to specify the login and key to open access to the router.
- If the password is unknown, then on the Internet you can find out the standard login/password for any router model.
All further operations for setting up the router will depend on what specific device is used to distribute the Internet via Wi-Fi.
- You need to go to the router settings and find the WLAN section (maybe Wireless Lan).
- Here you need to check the Active Wireless LAN box or activate it (set the value to Enable).
- Determine what type of security the network will have (WPA2-PSK is best).
- In the SSID column you need to enter the name of the wireless access point.
- Please indicate the key below and confirm it if necessary.
- Save settings.
After the router has been set up, all that remains is to connect to the new wireless network.

Quite often, tablet owners encounter the following difficulty: the tablet does not connect to Wi-Fi - the connection to the network continues indefinitely. You can solve this problem by doing the following:
- The Wi-Fi network needs to be renamed (preferably in English letters). As practice shows, some gadgets do not want to connect to wireless networks whose names contain at least one Russian letter.
- The problem may be with the router. Restart it.
- The DHCP server may need to be enabled. To do this, you need to go back to the router settings (DHCP Setup) and check the box next to Enable.
- The gadget may not work with a certain type of Wi-Fi network encryption. To change the type of protection, you need to go to the security settings and try to enter some value. For the new settings to be active, you need to reboot the router.
- Another way is to enter the IP address and DNS server manually. To do this, you need to open the connection settings on the device. They are located in a special window that appears when connected to a Wi-Fi network. You should open the user IP parameters and enter your address in the following form: 192.168.1.***. You also need to fill in the “Gateway” and “DNS” fields with data, which you need to obtain from your Internet provider.
Connecting to a Wi-Fi network in public places

Wi-Fi has faster and better data transmission compared to the cellular network. Using a wireless network allows you to achieve significant savings (if you do not have an unlimited data plan). Additionally, many tablets don't have 3G capability, making Wi-Fi connectivity in public areas a necessity. Most networks are secure and will require a password to connect.
How to connect a Wi-Fi tablet to a wireless network
- The first step is to open the device configuration and go to the wireless connections section.
- You need to make sure that the Wi-Fi function on the tablet is activated. This means that the tablet device will search for available networks in active mode. If such a point is detected, it will be shown here, indicating whether the network is password protected or has open access.
- You must touch the name of the network to which you will connect.

In the tablet settings, you can activate a function that will periodically notify the user about the presence of available networks in the current area. To connect to the network, you need to tap this notification. If you need to deactivate the notification function, you can open the tablet device settings, the “Wi-Fi” section, and uncheck the box next to “Notify when new networks are detected.”
If there is accurate information that there should be wireless networks in the current area, but for some reason they are not displayed on the device, then you need to turn off and then reactivate the Wi-Fi function. To connect to a password-protected network, you need to know the access key. Just enter it in the appropriate field and touch the “Done” icon. To disconnect from a network, you need to touch and hold its name, and then select Remove.
Some points may be hidden and not displayed on the device. In this case, even if the notification function about available networks is active, the access point will not be displayed. To connect to such a connection, you need to select the “Add” function in the Wi-Fi settings, and then specify the network name and password.
When you enter your network name and passkey, be aware that they are case sensitive. You must enter this data very carefully, since the slightest mistake will prevent access to the wireless connection. The function of adding and connecting to an invisible network may not work on some gadgets. This is due to the lack of required software, which must be preinstalled by the gadget manufacturer.
How to activate Wi-Fi without a router, even if there are no other wireless networks? In such a situation, you can resort to the help of other mobile devices, for example, a smartphone. You need to make it become an access point and distribute Wi-Fi itself. The required function is present in many devices as a standard parameter. If there is none, then you can install a third-party application, of which there are a lot.
Summarize
In most cases, connecting to Wi-Fi on a tablet does not cause any difficulties. It is enough to use the standard functions of a tablet device. If you still have any difficulties with how to connect Wi-Fi on your tablet, it is recommended that you carefully read the above instructions and tips. A wireless Internet connection is much more convenient and profitable compared to mobile networks. You can comfortably download movies, play online games, listen to music and watch videos online.
![]()
If you have a tablet running Android OS, then most likely it will have a built-in Wi-Fi module. I have never seen a tablet without Wi-Fi; even the cheapest Chinese models are equipped with this type of wireless connection.
The instructions will be presented in two parts, first setting up the modem/router, then connecting the tablet to a Wi-Fi access point. If you have been using this technology for a long time, but just don’t know how to set up Wi-Fi on your tablet, you can skip the first part and proceed straight to the second.
Part 1. Enable Wi-Fi on your modem or router
I assume that you have no idea what this “Wi-Fi” is, how to turn it on and how to use it. If I’m right, then you did the right thing by starting to read the article from here, from the first part. I repeat, if you have everything set up for a long time, you use Wi-Fi on your laptop, then read part 2.
Before you can use Wi-Fi at home on your tablet, you need to enable it on your modem. I hope your modem can create Wi-Fi networks. To make sure of this, read the instructions for the modem or look at its characteristics on the website. Look there for words like “802.11” or “Wi-Fi”. The easiest way to find out is to look for a light bulb on the modem that says “WLAN.” If it is there, then there is Wi-Fi.
Connect to the Internet, and in your browser (Opera, Chrome, Firefox, Internet Explorer) open the address http://192.168.1.1.


If you don’t know what to write here, try to find out this information from the person who set up the Internet for you or from the person who sold you the modem. Alternatively, you can contact your Internet provider.
Further actions depend on your modem model. You need to find a menu item with a name like “WLAN” or “Wireless Lan”. Look on the left in the menu. Check the box next to “Active Wireless LAN” or “Enable”. Set the network security type to “WPA2-PSK”. Enter the name of your Wi-Fi network in the “SSID” field and enter the password of your network in the “Pre-Shared Key” field. Click the "Apply" or "Submit" button to save the settings.

But that is not all. We go to the DHCP settings (this thing somehow distributes IP addresses to everyone who connects to the network). Depending on the modem model, these settings may be in a variety of places. The screenshot shows the possible location of such settings. Although in my Zyxel modem they are hidden along the path Network -> LAN -> DHCP Setup. Enable DHCP if it is disabled by switching the checkbox to Enable. If DHCP is enabled, read the next paragraph. If there are no checkboxes, but there is a list, select the Server item opposite the DHCP item. After turning on, reboot the modem (this can be done either in the modem settings interface, which is where you are now, or simply with a button on the modem).

Part 2. Connecting the tablet via Wi-Fi
All that remains is to connect the tablet to the newly created network. The actions will depend on the version of Android on your tablet. If you have version 4 and higher, the first Wi-Fi item is right in the settings. Turn it on. If you have Android version 3, you also need to go to the wireless connections settings item. And there already turn on Wi-Fi.

After the device thinks, it will show you a list of found networks. Select the network that you created in part 1 (this network will be called the same as you named it in the “SSID” field), or which you already have and to which you have been connecting your laptop for a long time. Next, you will be asked to enter a password for it. Again, enter the password that you specified in the “Pre-Shared Key” field. After all the steps, the tablet should connect to the network, which you will know by the antenna icon that appears next to the clock.
Part 3. Endlessly obtaining an IP address...
The most common problem that users have when connecting a tablet via Wi-Fi is the constant “Obtaining an IP address” message. It doesn't connect any further. There are several solutions to this problem:
— Rename the Wi-Fi network to English. As suggested in the comments, sometimes tablets do not connect to networks whose names contain Russian letters.
— Enabling the DHCP Server. How to enable it, read above, in the 1st part of this article at the very end.
— Changing the Wi-Fi network encryption type. You can change the type of protection in the Wi-Fi security settings (this is the same place where you set the password and network name). Try setting some other value in the highlighted items. Don't be afraid, you won't damage the modem with your experiments. For the changes to take effect, reboot the modem.

— Manually enter IP addresses and DNS servers in the connection settings on the tablet. When connecting to a Wi-Fi network, in the window where you are asked to enter a password, open the additional settings menu. And there select IP Settings -> Custom. In the IP address field, enter your address, it looks like 192.168.1.*** (for example, 192.168.1.128). In the Gateway field, enter 192.168.1.1 or 192.168.0.1 (check with your legal provider). All that remains is to enter DNS, which is different for everyone, but which you can also find out from your Internet provider.

A simple video on connecting an Android tablet to the Internet via Wi-Fi:
Hi all! We continue to fill out the section about working with computers and software. And today we will learn how to connect a computer, laptop, tablet or printer via wifi using the wireless network created in the last lesson.
How to connect a laptop or computer via wifi?
Most modern devices already have a wifi module installed - this applies to most laptops, netbooks (small laptops designed to work on the Internet), tablets and smartphones. However, if somewhere in the corner of grandma’s room an old computer is stagnant, littered with rags, then it can also be included in our game - grandpa can still give a head start to newfangled units! There is a special device for it in the store - a wireless adapter that will make a stationary PC a full member of the wifi family.
Adapters come in two types - removable or built-in. Embedded, or network, is inserted inside the case into a PCI slot, like a network or video card. The plus is its more stable operation, the minus is that it needs to be inserted inside and forgotten, while a removable one can be installed on another computer if necessary.

Therefore, I use a usb wifi adapter for my computer and, by and large, do not experience any problems with either stability or wifi speed - the main thing is that it matches the characteristics of your router and supports the same communication standards.

I have the Trendnet TEW 624-UB model, oddly enough (judging by my experience of using their routers and IP cameras), but it’s quite a decent option and works flawlessly. Using his example, I will show how to connect a computer to a wifi network.
- Insert the adapter into the USB connector
- Run the installation CD and install drivers and a utility to manage the device
After this, restart the computer and find the “TEW Manager” shortcut on the desktop. We launch the application and go to the “Site Survey” section, that is, in Russian, a list of networks available for connection.

We select yours in it and, depending on the type of encryption you created (WPA or WEP), a new window will open in which we enter our password. After this, the Internet should start working.
Connecting the tablet to the Internet via wifi
This is one of the burning questions that newbies ask me most often. Over the past few years, so-called tablets have become increasingly popular. The pioneer in this area was Apple with its iPad, but now almost every company that produces computer equipment makes tablets. They are controlled by different operating systems, but Android has become the most common and popular today. Using her example, I will tell you how to connect a tablet via a wifi router to the Internet.
Android 2 versions
For devices that are already outdated and running OS version 2.x, the algorithm is as follows. Go to the menu “Settings> Network (or Wireless networks)”. Check the WiFi box.

Make sure that the “Offline mode” or “Airplane mode” checkbox is not checked. Next, click “WiFi Settings” - a list of available networks appears.

After that, we select the network that we created, enter the password and voila - the Internet is connected!

In the same case, if your phone/tablet is connected to the router, but cannot access the Internet, try manually setting the IP and DNS for it.
To do this, when using Android 2.x, go to the “Network > WiFi Settings” section and press the “Menu” button on the tablet, where select the “Advanced” menu item. A window with additional parameters will appear, in which you can manually enter an IP within the range of addresses distributed by the router and which is currently not occupied by anyone.

By the way, manually specifying DNS servers in the TCP/IP settings in the connection properties also helps if Skype (ICQ, M-Agent, etc.) is running on the computer, but the browser does not open the page.

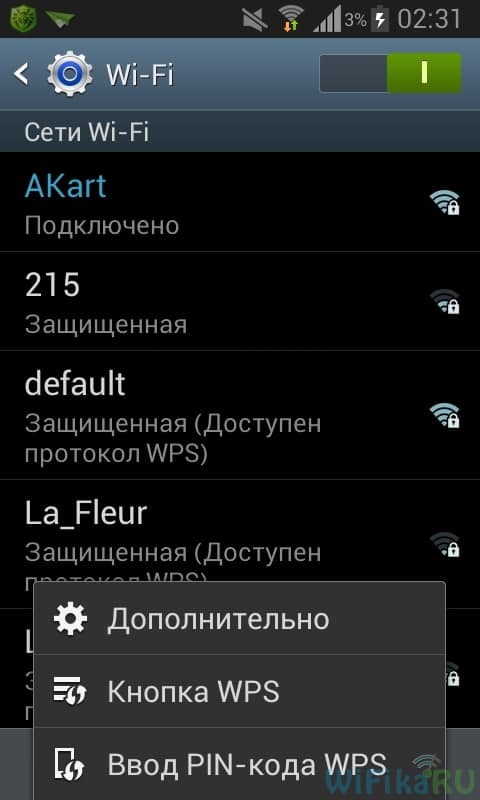
Finally, another option for connecting a tablet with Android OS is to use the automatic connection and WPS configuration service. To implement it, the router must support this function. When connecting to a wireless network, do not enter the password, but select the “WPS PIN code” tab in the menu.

After that, we go to the router, find the corresponding button on its case, press it and wait about a minute or two until the devices recognize each other and everything is configured itself.

WiFi on Android version 4
The interface is designed a little differently in more modern smartphones that have version 4.x installed.
To simply turn it on, go to “Settings” and simply move the slider in the “Wi-Fi” item.

After that, a search for available networks will begin, from which you select the one to which you have access, enter the data and connect.
Additional settings can be called up when you are in the search for available networks section. To call it, click on the “Settings > Wi-Fi” item, then press the “Menu” button on the smartphone panel and select “Advanced”.
Here you can configure notification of available connections and the operating mode of the phone's wireless module. You will also see information about your IP and MAC.

As you probably noticed, when you press the “Menu” button, options also appear for connecting to the router via an automatic WPS connection. If you want to connect to it in this way, click the “WPS button” item, then click a similar button on the router’s body and wait until the devices are configured with each other. For a secure connection, select the “Enter WPS PIN code” item - then you will have to enter the automatically generated password on the router.
If you want to manually register a static IP address for your tablet or change the DNS servers, then for Android versions above 4 this settings menu is called up a little differently than in the second version. Go to “Settings > WiFi” and click on our home network SSID and select “Change network configuration”. In the window that opens, under the password entry field, check the box for “Show additional parameters” and activate the “Static” item in the “IP Settings” section.
After that, scroll down the window and see the sections that need to be filled out.

Specify the IP of the router itself as the gateway. Mask - 255.255.255.0. DNS - either leave it blank or put DNS1 - 8.8.8.8, DNS2 - 8.8.4.4 - these are free DNS from Google. Or you can use the Yandex DNS service, which will also help protect your smartphone from dangerous sites.
Connecting to wifi on tablets and mobile gadgets from Apple works the same way - just a couple of clicks on the built-in utilities and you're done!
How to connect wifi Windows 7
In principle, you don’t need to use this utility if you have Windows 7 / Vista - just drivers for the device are enough. After installing them, a graph icon will appear in the lower toolbar, displaying the signal strength. By clicking on it you will see a list of networks available for connection. Click on ours, enter the key in the same way and you’re done - that is, the answer to the question of how to connect wifi Windows 7: simply Watson!

Home wifi network
But we won’t limit ourselves to connecting a couple of laptops and computers to wifi - after all, there is an even more interesting opportunity: combining different devices into home wifi networks. That is, we will be able to print abstracts directly while lying on the bed and then pick them up from the printer in the kitchen, as well as transfer them to our brother in the next room without using the Internet. Sounds tempting, doesn't it?
Let's implement it! To do this you will need one program. It’s paid, the most advanced version now costs $40, but I had it as an application along with some router, so I’ll show it on it - you can probably find free analogues. It's called Cisco Network Magic. Install and launch.
The main settings window opens. First of all, here you can connect to available networks, as in the previous examples. To do this, go to the “Work wirelessly” section.


Then enter the password for your network and connect.

Now, by going to the network map tab (Map), you can see all the devices that are part of your home wifi network.

By clicking on any of them, you can get to their internal shared folders or gain access to shared devices. In order to manage access to them, return to the previous tab. Now we will be interested in the second column from this menu - “Sharing”.

Click on "Share Folder" and select the folder you want to share on other devices. After this, a message will appear that for access you need to install Network Magic on other devices, but from my experience with Win 7 everything works fine in the Win 7 > NM direction. That is, from a laptop with seven, I can see files in the folders of the computer on which Network Magic is running. Now you just need to go to the “Network” section (or Topology, Map), and you will see all the computers connected to your home Wi-Fi and the open folders inside each of them. But this does not work in the opposite direction - in order to use files on a laptop while logging in from a PC, you also need to install the program on the first one.

Shared Printers
A fairly common situation is when a printer that does not have a wifi module is connected to a computer - via a parallel port or USB. And it’s not convenient when it can only be used from this PC. Remember I promised to type while lying on the bed? So, with this program this is possible, regardless of the range of the wireless network. Open the “Printer Sharing” section, where the printer installed and connected to the computer will be displayed. Select it and click the “Share” button

That’s it, now if you go to the “Devices and Printers” section on another separate computer, you will see it in the list.

Now you can print any documents from any devices included in your home wifi network. However, since it is connected in parallel to one of the computers, this computer must also be turned on.
Shared folders and printer without program
If you do not want to use additional software to organize shared access to folders and files between computers connected to the router, then this can be done using the built-in Windows tools. How? Read the new article about.These are the tools I use to connect to my home network via the computer’s wifi and to share its folders and installed printer. Someone will say that this is all bullshit, that no one does this, etc. - I will tell such “mega-pros” that the tasks of scientific analysis of wireless network technology were not set in this article. Everything described is my PERSONAL experience, I did everything myself, the methods described above work great and this is enough for me to conveniently operate a home wifi network - what else does an ordinary user need?
We reinforce what we read with my visual video lesson, and also subscribe to updates!
If you have a desktop computer or laptop at home, then setting up the router should not pose any problems. Installed, connected, configured, and everything is ready. But what to do if you don’t have a computer and you want to set up a Wi-Fi router yourself. A common situation in our time, now many people access the Internet from tablets, phones and even TVs. A Ved router can work without any problems without connecting to a computer, I wrote about this.
So, if you don’t have a laptop (PC), but you want to install a router yourself and set up a Wi-Fi network at home, then this can be done without any problems from the same tablet or smartphone (phone). The main thing is that the device can connect to the Wi-Fi network. Well, if you decide to get a Wi-Fi router, then you definitely have such a device. Your tablet or smartphone can run on both Android and iOS. That is, iPad and iPhone are also suitable. If possible, it is best to configure it from a tablet, of course. Only because the screen is larger and it will be more convenient.
The process of setting up a router from a tablet is almost no different from setting up from a computer. Except for the connection itself, and a few more nuances, which I’ll talk about now. The main thing you must have is an Internet connection (cable laid into the house) and the Wi-Fi router itself.
Setting up a router without a computer. From a tablet or smartphone
First of all, you need to connect the router and prepare it. Plug the router into a power outlet and connect the Internet to the WAN connector (cable from ADSL modem or Internet provider). You can view . No matter what brand of router you have, turn on the power and connect to the Internet. Also, connect the antennas if they are removable.

Immediately after turning on the router, it will begin broadcasting the Wi-Fi network. If the router is new, the network will have a standard name. Something like: "Asus", "Keenetic-7534", or "TP-LINK_0919". It all depends on what kind of router you have. The network will be without a password.
If the network that your router starts to distribute has some non-standard name, or is protected by a password, then you need to reset the settings and then continue. Resetting the settings can be done by pressing the RESET button on the router itself for 10 seconds. Here are the instructions for .
We take our tablet or phone, go to the settings, go to the Wi-Fi tab, and select your network from the list of available networks. Let's connect to it. It should be without a password. If a password request appears, then we reset the settings (see above). In some cases, the code for connecting to the network is indicated at the bottom of the router.

Next, on your tablet or smartphone, open any browser (Opera, Chrome, Safari), in the address bar we type the address 192.168.1.1 , or 192.168.0.1 and we move along it. You can see the address of your router on a sticker, which is usually located at the bottom of the device itself.
Depending on the router, you may be taken directly to the settings, or a window will appear asking for a username and password. Typically the default is admin And admin. We indicate them and get into the settings. You can look at the universal one.

If you did everything correctly, you will be taken to the settings of your router. I logged into the Tp-Link control panel without any problems.


An important point when setting up a router over a Wi-Fi network
During the setup process, you will change various parameters, including Wi-Fi network settings. Basically, this is the network name and password. So, when you change the name of your Wi-Fi network and set a password, then after saving the settings and rebooting the router, problems may arise with connecting your tablet or smartphone (from which you configure) to your Wi-Fi network.
In any case, you will need to manually reconnect the device to your network. And if this doesn’t work, some errors like “failed to connect” will appear, then you just need to delete the network on your mobile device and connect to it again.
On an iPad or iPhone, simply click on the desired network and select "forget this network".

On Android devices, click on the network we need and select "Delete network".

After this, connect to your network using the configured password.
When you change the wireless network settings in the router settings, you will need to adjust the settings on all connected devices.
You can configure the router from a tablet or smartphone without any problems. It is no more difficult than setting up using a computer. Ask questions and share tips in the comments!


