Intel processor me code update. Updating CPU microcode in AMI BIOS, or an example of working with MMTool. About this update
Hello dear friends, Artyom is with you.
Back in January of this year, reports appeared about new hardware vulnerabilities in Intel and AMD processors.
Not long ago microcode updates for Intel processors (revision 84) were released, and I decided to check how things are in practice.
Although the information has long been known to everyone, I will still tell you a short background story.
The processor hardware vulnerabilities are called Meltdown and Specter, and they were identified by researchers from the Google Project Zero group.
Specter has two attack variants codenamed CVE-2017-5753 and CVE-2017-5715.
Meltdown has one attack variant codenamed CVE-2017-5754.
P. S. CVE is an abbreviation for English " Common Vulnerabilities and Exposures» – a database of well-known information security vulnerabilities.
Seeing these notations for patch descriptions, you will immediately understand what’s what and why.
Moreover, the easiest way to operate in practice is Meltdown, to which all modern Intel processors are susceptible.
In order to get rid of Meltdown, you need to update the processor microcode or patch the operating system kernel.
Specter, on the other hand, is more difficult to implement, but fixing the vulnerability requires individually patching each program you use.
Chips from AMD are less susceptible to Meltdown-type vulnerabilities (although it was initially stated that they were not susceptible at all).
This type of malicious code runs extremely slowly on them, but still works.
Both AMD and Intel processors are susceptible to Specter-type vulnerabilities; there are no options here.
Processors with ARM architecture are also susceptible to the same vulnerabilities, but now we will only talk about computers with processors of the x86-64 family.
P. S. Security research never stops and something else may always appear, including in AMD and Intel processors.

Important note! While the video was being edited and clock material was being written for the site, new research appeared in the field of processor security.
New variants of the Specter vulnerability have been identified, codenamed CVE-2018-3640 (the so-called attack variant 3a) and CVE-2018-3639 (attack variant 4).
Let me remind you that Specter can be fixed by updating the software used, such as browsers and so on.
However, the latest variant of the CVE-2018-3639 attack will also require updating the processor microcode on Intel chips, which may slightly reduce performance.
AMD claims that the company’s chips will not require new microcode from these attacks, and everything will work out with regular Windows patches and other software.
These vulnerabilities have a low priority threat for ordinary home computers.
Since there are no new updates yet, I will focus on the original topic of my video.
We will talk about the microcode of Intel processors, but the microcode is still different and does not correct the Specter 4 attack variant.
If you use Windows operating systems, these links will be useful to you:
Here you can find all the current patches (and their names) that fix the vulnerabilities of this group.
For example, the very first patch for Windows 10 was released on January 3, 2018 under the name KB4056892.
However, there was a problem in that Meltdown software patches reduced the performance of Intel-based systems.
Somehow I still didn’t have the free time to conduct my own small tests.
However, now with the release of new versions of firmware for motherboards, I began to wonder how things are in this area.
I use the ASRock Z370 Gaming K6 motherboard and accordingly I turn to the manufacturer’s official website to download the latest BIOS.
Updated microcode for Intel processors appeared in BIOS version 1.60, which was released on March 2, 2018.
I will install an even more recent version of BIOS version 1.80, which was released on March 26, 2018.

To begin with, I'm interested in testing fixes to the processor microcode without additional software patches.
The operating system is Windows 10 version 16299.371 without additional installed patches for Meltdown and Specter hardware vulnerabilities.
P. S. All conclusions drawn will apply only to new Intel processors, because new BIOS versions are unlikely to appear for old motherboards.
If you are interested, you can do tests with software patches on older Intel processors.
Full configuration of my computer:
CPU: Intel Core i5 8600K.
Cooler processor: Arctic Cooling Liquid Freezer 240.
Maternal pay: ASRock Fatal1ty Z370 Gaming K6.
Operational memory: GoodRam Iridium DDR4 2400 MHz (2×8 GB IR-2400D464L15S/8G).
Video card: Asus Dual GTX 1060 6 GB (DUAL-GTX1060-O6G).
Drives: Sata-3 SSD Plextor M5S and Sata-3 HDD Seagate 1 TB (ST1000DM003).
Frame: Fractal Design Define R5.
Block nutrition: Fractal Design Edison M 750 Watt.
The first test is the performance of CPU caches and RAM inAida 64 Cache & Memory Benchmark.

As you can see, there are no significant differences in the operation of the RAM subsystem and processor caches.
The next test concerns the operation of the disk subsystem.
Unfortunately, I do not have a high-speed M.2 SSD drive, so I will test my Plextor M5S on a regular SATA-3.
As a result, the ATTO Disk Benchmark test produces almost identical results.

The same applies to the performance in the CrystalDiskMark 5.2.1 test.

Performance test in CrystalDiskMark and new Intel processor microcode. Specter and Meltdown
At least for SATA-3, there is no drop in performance during read and write operations.
The next test is 7zip, which will show performance when packing and unpacking archives.

The same picture is observed here; there is no difference in performance when installing a new, corrected BIOS.
Since I create content, I couldn’t leave aside video editing.
I use Vegas Pro 13 as my editing program and regardless of the BIOS version used, the render time has not changed.

Video sources have a resolution of 1080p, a bitrate of 50 Megabit/s and a frame rate of 50 frames per second.
Sony AVC/MVC with a bitrate of 16 Megabit/s was selected as the rendering profile; you can see all other profile settings on your screens.

Now let's talk a little about games.
The tests involved those projects that were installed on my computer at a given time (Assassin’s Creed Origins, FarCry 4 and Crysis 3).
All frame indicators were taken using MSI Afterburner 4.4.2.
In general, the results do not need commenting.

Performance tests in Assassin's Creed Origins games. Specter and Meltdown


If you use the new version of the processor microcode after revision 84, then the difference in performance cannot be noticed - everything works just as quickly and smartly.
The only interesting thing would be to see how M.2 SSD drives with the NVMe interface work.
Perhaps in the future I will conduct a series of tests with software patches for Windows 10 and with the corrected CPU microcode installed at the same time.
I hope you found it interesting. If so, then share my post on social networks with your friends.
This way there will be much more such notes :)
Also, don’t forget to join the VKontakte group and subscribe to the YouTube channel.
Purchased on Aliexpress for an Intel DG965SS motherboard (with LGA775 connector). You can, of course, convert the LGA771 to LGA775 yourself, but at a price of $6.5 dollars per processor it is much easier to buy it from the Chinese.
When using an Intel Xeon 5320, the Windows 10 operating system started working only when the "Core multiplexing" mode was turned off in the BIOS (unlike the perfectly working Ubuntu 17.10). At the same time, the processor worked only in single-threaded mode, so, according to the CPU-Z test, performance in multi-threaded mode was 2 times lower than that of the Intel Core 2 duo E6300, which the Xeon was purchased to replace.
It turned out that the processor microcodes needed to be updated. You can do this in software mode, and in Ubuntu the operation is much simpler than in Windows 10. And in the latter you need to make sure that the microcodes are updated every time you boot. It is also possible to update the microcodes in the BIOS, at least in some BIOS from AWARD, AMI, Phoenix, especially in versions before UEFI.
There are much fewer instructions for Intel motherboards. And no wonder. I had to tinker a lot with the Intel DG965SS.
Before updating the microcode, you need to install the processor that we want to support. If you need to install another processor, the procedure will have to be repeated.
Some instructions suggest creating a bootable floppy disk, because... Not all computers allow you to boot into flash drives. I made a bootable USB flash drive with FreeDOS using the free open source application Rufus (to do this, check the “Create a bootable disk using” checkbox and select “FreeDOS” from the list).
Since the beginning of January, it has been difficult to miss news regarding the Specter and Meltdown hardware vulnerabilities - the topic turned out to be so serious and comprehensive. Although manufacturers have been aware of these problems since last summer, most seem to have begun to respond only after details were made public by Google's Project Zero team.
For example, back in January, among other patches, Intel released microcode updates against Specter for its Broadwell, Haswell, Skylake, Kaby Lake and Coffee Lake processors. But almost immediately it became clear that they lead to failures and. Initially, Intel said that the problem only affected Broadwell and Haswell chips, but later acknowledged the existence of glitches on computers with Skylake, Kaby Lake and Coffee Lake processors and that partners and users would refrain from installing patches for now. Finally, in early February, a corrected version of the microcode, but only for mobile and desktop consumer chips of the Skylake family.
Now, after a month of intensive testing and testing of patches by Intel and its partners, the time has come for other more or less current processors: microcode updates were released for chips based on the Kaby Lake and Coffee Lake architectures, as well as Skylake-based platforms that were not affected by the previous update. We are talking about processors of the 6th, 7th and 8th generations of Intel Core i, as well as the latest Core X, Xeon Scalable and Xeon D families.

The new microcode will be available in most cases through the release of new firmware by OEMs for motherboards and laptops. Intel still encouraged people to continually update their systems to the latest versions, and also published a document in which it outlined the status of similar microcode fixes for its other products, including earlier chips starting with the 45nm Core 2. For some Of these chips, patches are just being planned, for others they are in a state of early testing, for others they already exist in the form of a beta version. Typically, the older the architecture, the later it will receive anti-Spectre firmware. However, microcode updates for more or less current Sandy Bridge, Ivy Bridge, Haswell and Broadwell architectures are already in beta testing. Also, a number of Atom chips and even Xeon Phi accelerators have already received patches.
Intel recalled that there are other methods of combating discovered vulnerabilities in the branch prediction unit in modern processors. For example, Retpoline, developed by Google against Specter CVE-2017-5715 (branch target injection or targeted injection into a branch). For those interested in more information about Retpoline and how it works, the company has published a special technical report.
Intel's anti-Specter microcode updates will begin rolling out in the form of fresh BIOS firmware for various motherboards in the coming days and weeks. I wonder if they will have an additional effect on the performance degradation of end systems?

Actually, the original method, equipment and microcodes can be found (directly the AMI instructions), and in most cases, using this method does not pose any problems and has no pitfalls, but in my practice I regularly encountered the following problem:
Those. there was a banal lack of free space inside the image. When you modify the BIOS for yourself for a specific processor, you can ignore this, because You can always load just one microcode specifically for your processor, or delete some old microcode to free up space, but when you modify with a thread, you need to look for another solution, a compromise.
As a compromise, I chose the following solution - we take the latest versions of microcodes for all processors of the CORE generation in all designs (Celeron E, Pentium E, Core 2 Duo, Core 2 Quad, Xeon *3xxx/*5xxx) and replace with them everything that was before . The set of microcodes turned out to be as follows:

The volume of this set is only 76 kilobytes. This file was obtained by combining these files:
cpu00010676_plat00000001_ver0000060f_date20100929.bin
cpu00010676_plat00000004_ver0000060f_date20100929.bin
cpu00010676_plat00000010_ver0000060f_date20100929.bin
cpu00010676_plat00000040_ver0000060f_date20100929.bin
cpu00010677_plat00000010_ver0000070a_date20100929.bin
cpu0001067a_plat00000011_ver00000a0b_date20100928.bin
cpu0001067a_plat00000044_ver00000a0b_date20100928.bin
cpu000006f2_plat00000001_ver0000005d_date20101002.bin
cpu000006f6_plat00000001_ver000000d0_date20100930.bin
cpu000006f6_plat00000004_ver000000d2_date20101001.bin
cpu000006f7_plat00000010_ver0000006a_date20101002.bin
cpu000006f7_plat00000040_ver0000006b_date20101002.bin
cpu000006fb_plat00000001_ver000000ba_date20101003.bin
cpu000006fb_plat00000004_ver000000bc_date20101003.bin
cpu000006fb_plat00000010_ver000000ba_date20101003.bin
cpu000006fb_plat00000040_ver000000bc_date20101003.bin
cpu000006fd_plat00000001_ver000000a4_date20101002.bin
The modification procedure itself has also changed a little and has become, if not easier, then faster:
Step 1— open the BIOS image in the MMTool program: 

Step 2— to check, go to the last tab (CPU PATCH) and look at the number of microcodes. Here, for example, there are 31 of them: 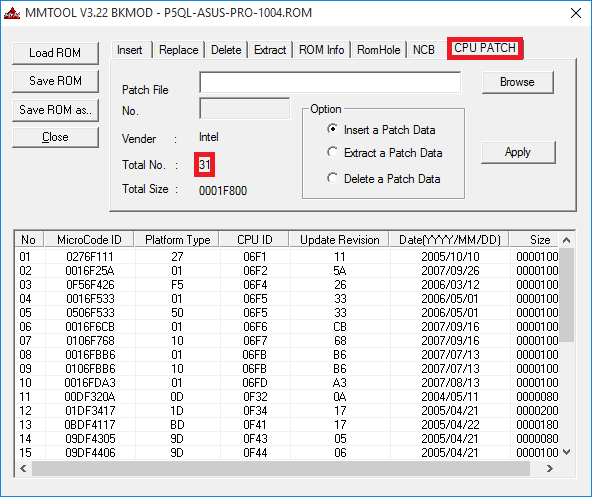
Step 3— go to the Replace tab and look for the “P6 Micro Code” item on it: 
Step 4— having selected the “P6 Micro Code” item, press the Ikshtsyu button, select the ncpucode.bin file described above and replace it with the Replace button: 


Step 5— to check, go to the last tab (CPU PATCH) and look at the number of microcodes. After replacing the microcodes, 17 remained, the latest version: 
There is no fundamental difference with the modification procedure described on delidded.com. In most cases, the output is certainly not the same, but the processor receives the necessary microcode. Of the subjective positive aspects, I would only like to draw attention to the fact that the microcodes for all current processors are guaranteed to be updated, be it “civilian” or “server”, and there is practically no risk of receiving a message about lack of space. Although, in my practice, even for such a set of microcodes there was not enough space a couple of times, this was with the BIOS for the ECS P4M900T-M and ECS P4M900T-M2 boards, which are generally compatible with the Xeon E5450.
By tradition, I publish a link to the archive with tools - (zip, 234KB). The archive contains an executable file MMTOL.exe(version 3.22 BKMOD), file with microcodes for all 45/65nm processors of the core/xeon generation ncpucode.bin, as well as two files 45nm.bin And 65nm.bin with microcodes only for 45nm processors and only for 65nm. The use of these files can be useful in cases where it is necessary to free up additional space in the BIOS, for example, for new firmware of some controller, network, disk, etc.
!NB: Neither the ncpucode.bin file nor the 45nm.bin/65nm.bin files support Pentium 4, Celeron (without letter suffixes), Pentium D, Celeron D and Xeon W processors (Xeon 5080 for example). These are NetBrust generation processors.
I present the donor BioStar A740G M2L+ (AMD 740G / SB710) and the recipient BioStar A740G M2+ (AMD 740G / SB700). The motherboard with the letter “L” is more recent and officially supports AM3 processors, unlike the other one, which is limited to only supporting AM2+ processors. Their BIOSes beg for a comparative analysis.
From the office site we download only the latest BIOS firmware update for each of these motherboards:
- for A740G M2+ latest beta A74GM916.BSS for September 2009
- for A740G M2L+ - file 74GCU511.BSS- for May 2010
Next, arm yourself with the MMTOOL utility (I used versions 3.22, 3.23 and 3.26 - I did not find any differences in operation). To work with MMTOOL, BIOS firmware file extensions must be renamed to *.rom.
Now we launch two MMTOOLs and load the firmware files from two mats into them. plat. We pay attention to the different sizes in the “Source size” column (and in “Size in Rom” too, of course) of module 11 “P6 Micro Code” in each of the firmwares.
Let's go to the CPU PATCH section for a detailed comparison:
The donor file 74GCU511.rom - cpu_list contains 14 lines with support for CPURev.ID + 1 empty (Fig. 1).
The beta version of the recipient A74GM916.rom - cpu_list contains 13 lines with support for CPURev.ID + 1 empty (Fig. 2).
After analyzing the lists of these two BIOSes, it becomes obvious that for the newer motherboard the developers used more recent patches for AMD processors, where the microcode of two lines with CPURev.ID 1043 and 1062 (dated 2009/07/31) and one line with CPURev were corrected .ID 10A0 added (dated 2010/02/17).
Method No. 1 - modification of distinctive lines.
These three distinctive lines are extracted from the donor 74GCU511.rom - the actions “Extract a Patch Data” + “Apply” + 1 last empty line and saved in separate files.First, in the CPU PATCH section of the recipient file A74GM916.rom, two lines with CPURev.ID numbers 1043 and 1062 (whose microcode is older than we will insert further) and the last empty line are deleted - the actions “Delete a Patch Data” + “Apply” ( Fig.3).
After this, the newer microcode from the four previously received patch files for CPURev.ID 1043, 1062, 10A0 and an empty line are inserted one by one (Fig. 4).
Please pay attention to the dimensions (“Source size” and “Size in Rom”) of module 11 “P6 Micro Code” before and after applying these changes to the recipient file.
After application, these dimensions for the recipient (Fig. 6) will become identical to the dimensions of the same module in the donor file 74GCU511.rom (Fig. 5).
It is worth noting that it is not difficult to understand how the module size is formed (each line in the CPU PATCH section takes 2048 bytes).
It is better to save changes under a new file name.
Next, this file is checked so that MMTOOL opens again without errors.
Method No. 2 - modification by replacing the entire module.
Actually, it is precisely this that is described on the Internet (for example, partially).In MMTOOL we load the donor file 74GCU511.rom, go to the “Extract” tab and look for the line “P6 Micro Code”. Then we select it, in the “module file” field we give it the name ncpucode.bin and execute Extract module “in uncompressed form”.
Now load the recipient file A74GM916.rom into MMTOOL, go to the “Replace” tab and again look for the line “P6 Micro Code”. Select it, wait for Browse and select our donor module ncpucode.bin. Click Replace and then agree to replace this module.
Again, pay attention to the dimensions (“Source size” and “Size in Rom”) of module 11 “P6 Micro Code” before and after replacing this module in the recipient file.
After application, these dimensions for the recipient (Fig. 7) will become identical to the dimensions of the same module in the donor file 74GCU511.rom (Fig. 5).
If we compare the results of both methods (Fig. 6 and Fig. 7), then there is a noticeable difference of 10 bytes in the RomLoc address of the “User Defined or Reserved” module next to the updated “P6 Micro Code” module - perhaps these are features of the operation of MMTOOL...
Conclusion and afterword.
In this way, from different BIOS firmwares, different mat. boards on socket AM2+ (and even AM3 for comparison), you can find the latest microcodes for each type of CPURev.ID, both in Award and AMI bios, then combine them into a single ncpucode.bin.Subsequently, it turned out to be 32768 bytes in size from 16 lines (microcodes) with the latest dates from among the studied firmware of various BIOSes: with 15 different types of processor revisions for the AM2+ socket (040A, 0413, 0414, 041B, 0433, 0680, 0C1B, 1000, 1020, 1022, 1040, 1041, 1043, 1062, 10A0) and the 16th line for RevID 0000 (apparently some kind of universal microcode for processor revisions not described in other lines - IMHO, for example, future ones).
By combining your own ncpucode.bin by importing the necessary patches (microcodes) for each required processor revision, you can use absolutely any AMI BIOS firmware with the “P6 Micro Code” module as a laboratory one.
However, when saving the firmware file, an unpleasant feature of MMTOOL was noticed - for some reason the utility added 8 zero bytes to the end of the “P6 Micro Code” module - it turned out to be 32776 bytes in size. When extracting the ncpucode.bin file from the laboratory firmware using the same MMTOOL, the output file also became 32776 bytes in size.
You can edit this with simple editors accessible to everyone. But I also (accidentally) discovered an alternative method: when the universal BIOS_EXT.EXE utility extracted all modules from the laboratory firmware, the ncpucode.bin file was already the correct size of 32768 bytes - the BIOS_EXT.EXE utility itself correctly identified the end of the “P6 Micro Code” module when saving it to file.


