Cloud for transmission. Placing video in cloud data storages (cloud services)
Hello, dear readers of the blog site. Today we will talk about another cloud service, this time from . First, some lyrics. I still have two hard drives in my computer that are twelve to fifteen years old, maybe more. “So what, it happens,” you say. Yes, but...
Over the past few years, I have thrown into the trash about six or seven hard drives that were between two and four years old, but they all failed one by one. Components now (and railways in particular) are extremely unreliable (apparently this is a conspiracy to sell more and more new volumes, because quality does not depend on the manufacturer). Therefore, all important and not so important information has to be backed up. .
Now I'm on Dropbox, but the free gigabytes I received for installing their application on my S3 mobile phone are coming to an end. Due to the devaluation of the ruble, the paid package has almost doubled in price. Therefore, now I am at a crossroads - either strangle the toad, or look for an alternative free cloud.
Option clouds from Mail.ru I was attracted by the large size of the storage area for a free service - 25 GB (on my old Mail.ru account I even got a hundred for undivided use) and its fairly large popularity in RuNet. However, let's take a closer look at the product...
Opportunities of [email protected] in comparison with competitors
Previously, the corporation had a project called Files Mail.ru and provided users with the ability to exchange files. Files had a number of restrictions on the size of transferred objects and much more, but since 2014 this project has been considered closed and everyone is strongly advised to move to the cloud, where all its main functionality has been transferred:

Therefore, today it makes sense to talk exclusively about [email protected]. To begin with, let me remind you that a little earlier I described several popular cloud services in RuNet, each of which is quite competitive (follow the links provided you will find their detailed description):
- - a wonderful service (the founder of other clouds), which stores not only files, but also the history of their changes (this option seriously helped me out once). True, they give only about two gigs for free, although you can get sophisticated in various ways, expanding them to sixteen. On a paid tariff they give you a terabyte, but in exchange they ask for a hundred evergreen pieces of paper per year (some kind of chaos).
- — on a free account there is a limit of 10-20 Gigabits, which again will have to be obtained in various unnatural ways. I mainly use it to transfer some files (folders) by sharing, or to upload some things for downloading from the site (Dropbox in this regard is picky about the amount of traffic generated when downloading).
- — as in Dropbox, the history of document changes can be saved in the cloud, and a huge number of file types can be viewed without downloading them to your computer. By default, it offers fifteen gigs for free (although they will be shared with Google photos). There you will also find an online office (what used to be Google Docs) if you want to create and edit documents online.
- - the brainchild of Microsoft. Mere mortals are provided with seven gigs of joy, and for owners of licensed eights - twenty-five. Among the features, we can note a complete analogy of the online office, which is called Office Web Apps, as well as the ability to gain remote access from the Internet to the computer where you have the cloud application installed.
Kindly skipping ahead and presenting the competitors, I think it’s time to review the capabilities of the web interface of this cloud, its program for installation on a computer and the Mail.Ru Cloud mobile application. The set is generally standard, and the capabilities of this service are somewhat similar to those already described by direct competitors.
However, a year ago there was a promotion in Mile where many were able to get one terabyte of free space in the cloud simply for installing a mobile client and connecting it to their account. Therefore, in RuNet this service is very actively used, including for sharing something useful in narrow circles. In general, I like the corporation’s approach to business, and I noted this when I wrote about them. It’s not for nothing that, in total, all their resources occupy first place in terms of traffic on the RuNet.
Main characteristics of the Mailrush cloud
So what:

As you can see, the history of file changes is not kept here, which means you will not be able to restore the appearance of the file as it was a week ago. On the one hand, this is a minus, but on the other hand, in two years I have used this opportunity in Dropbox only once.
Online version of the file storage [email protected]
Cloud web interface quite simple and concise. There is nothing superfluous or distracting. Personally, I like it more than the competitors’ options (the designers and usability engineers did a great job).

There are two tabs at the top: “Cloud” and “Sharing”. The first tab opens by default, and you will find a description of the second in the video above (there you can share one of the folders with your friends or colleagues and allow each of them to either only view the contents, or give them the ability to edit it). Let's go over interface of the “Cloud” tab:
Mail.Ru Cloud - programs for working with disk
Actually, let’s now take a look at working with the desktop and mobile versions of Mail.Ru Cloud. Let's start with the computer. You can download the program for Windows using the link provided. The installation wizard is completely “typical”. After installing the program [email protected] you will be asked to provide your username and password for your mail account:

If you entered everything correctly, then in the next step you will be offered to change your place of residence if you wish. folders [email protected] , which will subsequently be synchronized with the cloud. Please note that its size will be equal to the size of the files stored on the virtual cloud disk, and can reach 25 Gigabytes (and in my case, up to a hundred).
By default, this folder is proposed to be created on the “C” drive, which is not acceptable for me personally, because I periodically create an image of it with Acronis and the extra gigabytes there are absolutely no problem for me.

Traditionally, after installing a program, its icon will appear in the tray; by clicking on it with the left mouse button you will be taken to this very common folder, which will be synchronized with the cloud. Well, the right-click menu will allow you to perform a number of important and not so important actions.

For example, if you work with the same cloud from Mail from several computers (you are allowed to connect up to five of them), then different users will probably have their own folders that there is no point in synchronizing for everyone else. For this setting, use the menu item "Select folders". In the window that opens, simply uncheck those folders whose contents you do not need to synchronize on this computer. If anything happens, you can play everything back simply by returning the checkboxes to their place.
you no longer need to open the cloud.mail.ru service in your browser, but simply copy it to a folder [email protected] the necessary objects and they will immediately begin synchronizing with the virtual cloud disk. By the way, in the context menu of all your files and folders after installing the program, additional items will appear to help in this difficult task:


Well, it’s like a desktop program and I don’t know what else can be said. Quite simple, visual and understandable. Let's see if things are going well with the application for mobile devices.
Mobile application Cloud Mail.Ru
I installed it on the iPad, so I’ll talk about it. It is installed from (search either by Cloud Mail.Ru or by Mail.ru cloud). Naturally, you will again have to enter your username and password for your account.
After that, you will be asked if you want to automatically upload photos and videos from this gadget to the mailrush cloud.

If you agree, a folder will be automatically created in the root of your virtual disk "Camera Uploads", where all media files will begin to be copied immediately. Actually, this is exactly how I uploaded the screenshots given here to the computer. The thing is convenient.

The mobile application interface is again quite simple and well thought out. At the top right you will find a button for customizing the appearance of the display of files in the window (again, you will be asked to select the notorious tile or list). There, by the way, it will be possible to configure sorting (alphabetically, by date, and in reverse order).

The button with a plus sign located next to it will allow you to add a new folder, as well as perform a couple more actions:

The left button on the top toolbar opens a hidden menu that allows you to perform a number of actions.

I forgot to mention that the mobile application comes naturally, because the first one usually has a bit of a problem with memory. However, some files can be stored on the gadget. The easiest way to do this is to click on the icon with an up arrow when viewing a file, but there is a universal way. In order to mock any file, just click on the letter “i” in the circle and in the window that has already opened, select the action you need (saving, sharing, moving, renaming, etc.).

There you can also configure shared access to the folder:
When viewing files in list mode, you can simply move the line with the object description to the left and access the same settings:
Naturally, files of many formats can be viewed directly in the application window (photos, videos, text documents, etc.). Well, that's all, I guess.
I was left with a very good impression of the usability of the service and applications under the general name [email protected]. If in the near future they also add the ability to collaborate with files, and also (dreams) add the ability to access the history of file changes, then I’ll probably move to this file storage from Dropbox (100 GB received from mailrush will completely satisfy me in size) . However, I would appreciate hearing your feedback. Maybe talk me out of it.
Good luck to you! See you soon on the pages of the blog site
You can watch more videos by going to");">

You might be interested
ProtonMail - email with increased security and interface in Russian  Email on Mail - registration, login and creating a mailbox, as well as setting up folders and filters for inboxes on Mail.ru
  Email mail - registration, choosing an email address, how to enter your mailbox and how to view incoming letters on your page Email - where you can create it, how to register a mailbox and choose the best of the free Email services
Do you want to know how to earn 50 thousand monthly online?
Watch my video interview with Igor Krestinin
=>> .
Working with Cloud Mail ru
The first thing you need to do is go to your mail on Mail.ru. Open the “All projects” tab at the top. In it we find the word “Cloud” and click on it.
By going to the Cloud, we find the upload button and drag the file required for transfer, holding down the left mouse button, or selecting it from the list on your computer.
If you need to send a program with several subfolders, you must first archive it.
After you have downloaded the file, hover over the downloaded file with the left mouse button and a small white square (checkbox) will open on the left. Put a tick in the checkbox and click the “Get link” button.
Click the right mouse button and select “Copy” from the list that appears.
Go to Skype, find the recipient where you want to send the link and in the text field, first click with the left button, then press the right button on the mouse, select the word “Insert” from the pop-up window.
Cloud Mail ru. How to upload a file to Cloud Mail and send a link via Skype. Video
To make it clearer, I made a video for you. Useful viewing.
.
If you don’t understand something, you can leave comments under this article. If the article or video was useful, then share it with your friends.
To keep up to date with the news, you can subscribe to the blog news below.
P.S. Tomorrow I will sum up the results for April. Today you can improve and reach the prizes.
I post the rules and articles summarizing the results of the commentator competition on the page.
1 voteP.S. I am attaching a screenshot of my earnings in affiliate programs. And I remind you that everyone can do it, even a beginner! The main thing is to do it correctly, which means learning from those who are already making money, that is, from Internet business professionals.
Do you want to know what mistakes beginners make?
99% of beginners make these mistakes and fail in business and making money on the Internet! Make sure you don't repeat these mistakes - “3 + 1 ROOKIE MISTAKES THAT KILL RESULTS”.Do you urgently need money?
Download for free: " TOP - 5 ways to make money online" 5 best ways to make money on the Internet, which are guaranteed to bring you results of 1,000 rubles per day or more.


Hello, dear readers of the Start-Luck blog. Tired of choosing which game to get rid of on your phone in order to save a photo and vice versa? Yes, the number of gigabytes in smartphones is constantly increasing, but they are still sorely lacking. Our needs grow along with them.
Don’t want to lose important pictures and documents, but don’t know where to send them more securely? Indeed, VKontakte is a great thing, but hacking an account with each saved photo in a dialogue with oneself raises more and more concerns.
My article today will help you solve many problems. I continue to talk about cloud services. Today Mail.ru came into my field of vision.

I will tell you about the Mile cloud, how to use this storage and how convenient it is. In principle, like many products of this company, the cloud from Mail is not much different from its counterparts: Google Drive, OneDrive from Microsoft and so on, but I won’t bother you with English-language names that are not familiar to everyone. Let's talk about Mail ru.
What is a cloud
I would like to tell you in a nutshell for beginners. I have already devoted a separate article to this issue, but I believe that not everyone has read it. I don't suffer from delusions of grandeur.
So, if you know what it is, then it’s not difficult to guess what a cloud is. Essentially, it's the same thing.
Somewhere far, far away in the Mail offices there are, simply put, large flash drives. You create your personal account (storage) on this flash drive, and then throw your documents there. You can access your personal account from anywhere by logging into the site using your details, as well as from your phone through the application or computer through the program.

If you wish, you can give your document a title, which you can then give to a friend, and he can download the file to his computer. It's not obligatory. Only you, the sole owner of the login and password for your personal account, can have access.
Advantages
What benefits do the clouds provide? You will never lose the necessary files, since they are, as I already said, somewhere far, far away. You have access to the necessary documents from anywhere in the world. You can easily and simply transfer photos to a friend via the Internet without meeting anyone in person.
In general, there are a lot of advantages.

Volume
Each company offers free storage space in different amounts. Yandex Disk - 10 GB, although not so long ago this company held a promotion and I managed to get as much as 35 GB for free for unlimited use for connecting the autoload function. I don’t transfer files from my phone to Yandex Disk, but they are downloaded automatically. It is quite possible that similar promotions will be repeated or held by other companies.
Mail.ru not long ago gave out 25 GB for free use, but now the volume has been reduced to 8. In principle, this may suit you. Or, you will work with Mail as additional storage. Together with Yandex, Google and some other cloud storage systems.
How to use
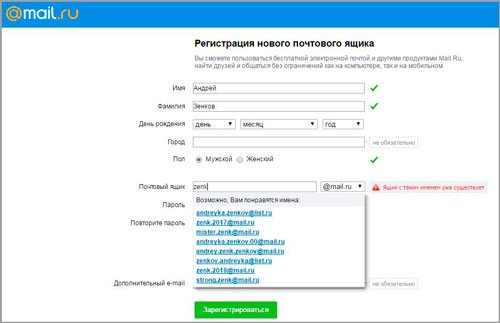
Mile's disk handling technology is no different from the others. First, you need to go to the official website. If you already have mail on mail, then simply click on the login in the upper right corner and enter your login and password. If there is no mailbox, then select “Registration” in the same right corner.

You will be asked to create an email account. To do this, enter your name and birthday.

It’s great that the system itself offers free and suitable ones. Remains only . If you are tired of doing it yourself, then I can offer you a very convenient program RoboForm , She not only comes up with very complex passwords, but also stores them in her memory and enters them every time she sees a familiar interface.
It is not necessary to enter a phone number and additional email.
Ready. You're in the mail. At the top you can see a link-button to the cloud. Click on it.

And here is the welcome inscription. Accept the user agreement.

Computer
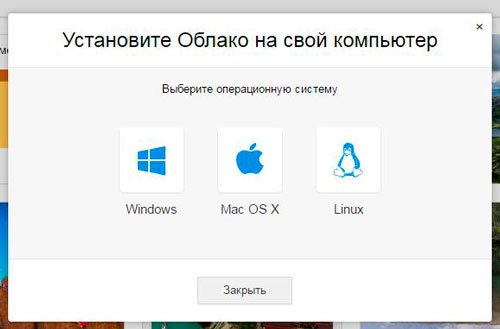
On the left side of your personal account screen you will see an application that can be downloaded to your computer. I highly recommend doing this. Since this greatly simplifies working with Disk.

Select the operating system that you have installed.
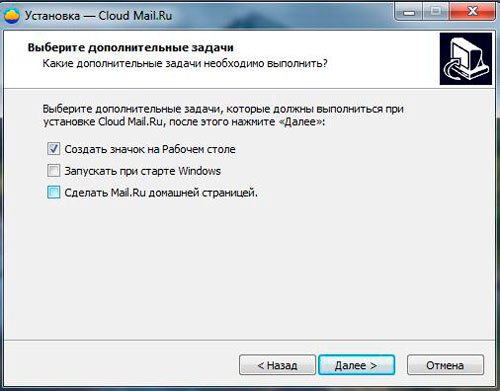
That's it, the installation file is downloaded and you can activate it by double-clicking on the program.

Be careful not to install unnecessary features. For example, I don’t want to change the start page to the email one.
Now you see the shortcut on your desktop. Double-click and enter the username and password you recently created for your cloud.

The great thing is that now, in Explorer, when you open any folder, you can see the Mail cloud shortcut on the right. Click on it and you will be taken to a folder stored on the server. You can upload the necessary documents directly here and they will immediately appear in your personal account. You can see them both from your phone and by going to the official cloud website using your data.

By clicking on the right button on the file, you will open an additional menu in which you can select the item: “Copy public link”. Select this option, pass the link to a friend, and he will be able to get the necessary document if he enters your URL into the search bar of any browser.

Smartphone
As I already said, you can also access all documents from Mail Drive from your phone if you install a special application on it. I use Android and the easiest way for me to find it is through Google Play. I enter the name into the search.
If you use cloud storage, then you probably know that you can upload files of a limited size to the cloud, for example, on mail.ru the limit is up to 2 gigabytes. In this article you will learn how to add a file of any size to various cloud storages.
The cloud can be used in many ways. You can use a special application that is installed on your computer, and with the help of it you upload files to cloud storage.
But the disadvantage of this method is that this application creates a specific folder (cloud storage folder). Everything would be fine, but this folder, in addition to sending files to the cloud, also duplicates them on your computer. Thus, taking up space on your computer’s hard drive.
To prevent this from happening, we have to delete the application and upload files directly to the cloud using a browser. Well, that's what I personally do.
And this is where we run into the file size problem. Cloud mail.ru does not allow you to add files larger than two gigabytes. What to do? What if, for example, our file weighs 3 gigabytes? Now, I will tell you how to deal with this.
We split the file into several archives
It is necessary to split this file or files into several archives. You can use any data archiving program. I use the 7-ZIP program.
- I select the required file.
- I right-click on the file.
- The context menu opens. I point to the “7-ZIP” item and select “Add to archive”.
- The archiving settings window will open. Here you need to find the item “Split into volumes of size (in bytes)”. In this item you need to set a value that allows you to add the file to the cloud. It all depends on which cloud you are going to add the file to. For example, I want to add to mail.ru, they have a limit of no more than 2 GB. So I set the value, say 1900 MB.
- Then click “OK” and archiving begins.

The bottom line is that the file we need will be divided into several archives, and the size of each archive will not exceed 1900 MB. This will give us the opportunity to upload all created archives to the cloud.
How to combine archives to get complete information
Now let's look at how we can get complete information from a file divided into archives.
Let's say you needed a file that you uploaded to the cloud. How to use it?
- Download all created archives (archives of this file).
- After you have downloaded everything, select all the archives that make up your file. This can be done by holding down the left mouse button and scrolling through all the archives. Or, you can left-click on the top archive, hold down the “Shift” button and left-click on the bottom archive. All files will be highlighted.
- Right-click on any of the archives and a context menu will open.
- In this menu, point to “7-ZIP” and select “Extract here”.

That's it, after unpacking, this file will be in this folder, in the form in which you archived it.
Thus, by splitting files into archives, you can add any files, even huge ones, to the cloud. The main thing is that there is enough space on the cloud.
Below is a video in which I showed how this is all done. Oh, by the way, if you don’t have an archiver program, then you can use the free 7-ZIP program. Here is a link to her official website.
I hope this note was useful to you. or to the channel "Instructor PC".
Do you often lose photos or don't have enough space on your computer to store them? Then use the Internet. It provides the opportunity not only to search for information and communicate with friends, but also to save files.
This can be done using the Cloud. This is the name of the service to which you can upload an image. At the same time, you can access it from any gadget. There are many similar systems, but most users prefer the proven Yandex.
How to save photos to the cloud using Yandex
This service provides 10 GB for free. There are no restrictions on storage time. The main advantage over other services is the ability to take and save screenshots on disk, as well as the presence of a photo editor. You can upload files to Yandex.Disk in three ways: when installing the program on a gadget or browser extension, or through the website.
How to save photos to the cloud on a website
- This option for saving photos is suitable for those who do not have an account on the Yandex service. First, go to the main page of the cloud, click the “Start your Disk” button.
- Next, the system will prompt you to register. Fill out all specified fields, then select “Register”.

- In the login form, re-enter the information you provided during registration and click “Login”.

- Or go to your Yandex mail. In the top menu, select the "Disk" button.

- In any case, the service will immediately redirect you to the virtual disk. It is a separate page on the Internet where you can post your files. To save a photo, use two options. There is a “Download” button in the upper right corner or in the central part of the site, find the “Download files” section.

- When you click, an Explorer window will appear in which you select the photo to transfer to the virtual disk. You can simply drag the file onto the site (hold down the right mouse button and drag) or select the “Open” function.


- The service will notify you that the file has been fully downloaded. Using this window, you can post the file directly to social networks or upload several more photos.

- When you close the download window, you will find the image on the site. For convenience, you can create folders, transfer or delete files. It is also possible to open access to the photo so that your friends can see it via the link.


How to save photos to the cloud via an application on your device
- If you need to upload a large volume of photos to the cloud, then download the disk to any gadget. The process of saving files in this way is no different from working with Explorer windows. Go to the main page of the service and select the “Download application” section.

- In the window that opens, you will have the opportunity to select a program for your gadget or receive a download link to your phone.


- If you are installing on a computer, then select the application marked “Windows”. You can also use the installation file for other operating systems.


- Select the downloaded file from the “Downloads” folder or find it in the lower left corner of the browser. Run the file to install the application.

- The installer will appear on the computer monitor, in which click “Run”.


- The Yandex.Disk download and installation will begin immediately.


- Once the installation of the program is complete, a cloud sign will appear in the lower right corner of the screen.

- To start using the service, you need to click on the disk icon, then in the window that appears, select the image of the computer folder.


- As a result of these actions, “Explorer” will open, where you can find the disk icon and its contents.


- Additionally, open another window in which select the image to save. Move it to the cloud folder or copy it (while holding down the Ctrl key). The photo will be automatically saved on the cloud site.

- You can also get to the disk from its context menu. Click the gear-shaped icon. Then select "Open website".


How to save photos to the cloud using a browser extension
- Sometimes you need to save a photo not from a gadget, but from a website or social network. A browser extension will allow you to do this in one click.


- If you use the Google Chrom browser, you can install the program as follows. First, select “Settings” from the program menu.

- On the settings page, select the “Extensions” section, in which find “More extensions” at the bottom of the page.


- In the online store, use the search engine to find the Yandex.Disk extension. Click the “Install” button on it.


- Confirm the steps in the installation window.


- When the extension is installed, a prompt will pop up. To activate the program, click on the disk icon.


- To save an image directly from a page on the Internet or from a search engine, hover your cursor over the image. A cloud icon will appear in the upper left corner.


