The touchpad does not work: how to enable the touchpad (touchpad) on a laptop. Touchpad not working on Samsung laptop
The touchpad is a century-old feature, long ago replacing the alternative mouse controls. With it we can completely control our device, be it a laptop or a hybrid tablet. Many laptops (Acer, Asus, HP, Lenovo, Dell) have problems with the touchpad. What to do if the touchpad on a laptop does not work in Windows 10? Let's look at 5 ways to solve this problem.
1. Re-enable the touchpad using the Fn key
One story happened to me when I turned on WiFi on my laptop and accidentally disabled the touchpad. For a long time I searched for the reason, without immediately realizing what had happened. It turned out to be simple, laptops have an additional functions button called Fn at the bottom left of the keyboard. To enable any function on a laptop, press the combination of the Fn and F1...F12 buttons. On these same buttons F1-F12, pictures or symbols are drawn to apply the parameter. For example, to enable the touchpad, you need to press Fn+F7; on the F7 button itself there will be an image of something like a touchpad. You can press all the buttons in order Fn+F1...F12, but remember that there is a function to turn off the display; press again the buttons on which the screen went dark.
On some HP laptops, the touchpad is turned on and off by double-tapping the edge of the touchpad itself. Asus and acer brands may have a separate button next to the touchpad. If the touchpad still does not work, then move on.

2. Removing Other Mouse Drivers
There are times when you have had a whole bunch of drivers connected from different mouse devices in the past and never removed them. Some drivers from mouse manufacturers automatically disable the Touchpad themselves. Go to device Manager, pressing a combination of buttons Win+R and enter in the line devmgmt.msc.

Find the line indicating mice and other pointing devices, click on the tab to expand the category and remove all mouse drivers in order until the touchpad starts working on your laptop. If it doesn't work, try rebooting the system after removing all drivers. Touchpad not working? Let's move on to the next point.

3. Update or rollback the touchpad driver
Try updating or rolling back the touchpad driver. Go to the same device manager as described above. Find the device Touchpad, usually it is called the same as the brand of laptop (Dell TouchPad, Lenovo TouchPad, Synaptics, HP TouchPad, Acer TouchPad, Asus TouchPad.) Right-click on your driver and select properties. Next, click Update to see if there are any useful updates for your touchpad.
Many people have reported on the Microsoft forums that the Touchpad stopped working after updating Windows 10, for this you need to select roll back driver. If your Rollback button is not highlighted, it means you do not have a previous version of the driver.

In many cases, the device manager does not work to enable TouchPath on a laptop. If your TouchPad still does not work on a laptop in Windows 10, then go to the mouse properties.
- Dial mouse in the windows search bar and go to Mouse Settings.
- Click Additional mouse options in the window that opens go to Device settings tab Touchpad or as in the picture.
- Find your Touchpad and click "enable".

5. Disable touch screen input service for hybrid laptops
If your laptop is a hybrid (laptop and tablet in one with a touch display), there is a chance that the touch screen input service, which controls the functionality of the stylus, is interfering with your touchpad.
To disable the service press win+R then enter services.msc and in the list of services find TabletInputService or Tablet PC Input Service. Right-click on it, then disable it. A very inconvenient solution for those who use a touch screen and touchpads, but you can then be smart and try to remove the drivers, roll back, update and then restart the service.

From time to time, laptop users think about how to disable the touch screen on a laptop. This term usually refers to touchpads - touch-sensitive panels on devices that replace the work of a computer mouse. Only in some laptop models the touch screen is actually a display that responds to “manual” commands. Therefore, let’s take a brief look at disabling them. Let's focus on disabling laptop touchpads.
Methods for solving the problem
How to disable the touch screen on a laptop?
The user can:
- deactivate the touchpad using hot keys;
- disable the control through the OS settings;
- use additional software and drivers to implement the task.
Which is better to choose? There can be no clear answer to this question. For example, not all laptops have touchpad control buttons. And therefore, the first option will not work in the current situation, no matter how convenient it may be considered.
Lenovo and keyboard
How to disable the touch screen on a Lenovo laptop? Devices from this company usually have hot keys.
Most often, users are offered the following combinations of buttons:
- Fn + F5;
- Fn + F6;
- Fn + F8.
Important: if you need to disable the touch screen on Lenovo, and not the touchpad, you can use the combination Fn + F9 or F9.
By the way, the Fn + F5 combination works on most laptops. For example, on Samsung or Toshiba.
Asus and Acer
How to disable the touch screen on a laptop? You can refuse to use the touchpad on Acer and Asus without any problems by using the keyboard.
If we are talking about Acer, you should press Fn, and then, while holding the button pressed, click on F7. The touchpad will be activated in the same way.

How to disable touch screen on Asus laptop? Usually the combination Fn + F9 works flawlessly. Just look at the labels on the buttons. If one of them has a picture with a crossed out touchpad, you can use this key.
HP laptops
Unfortunately, HP laptops do not have separate buttons responsible for disabling touch control, but the user can try to cope with the task like this:
- Double-tap the top left corner of the touchpad.
- Hold down the left corner of the touchpad for about 5 seconds.
Most likely, one of these tricks will work. If not, you will have to use the built-in capabilities of the OS.
Windows 10
How to disable the touch screen on a laptop if the user is running Windows 10? This guide will help:
- Open the "Options" menu item.
- Go to "Devices" and click on "Touchpad".
- Switch the toggle switch to the "Off" state.
That's all.
Additional software to help
Some laptops have Synaptics touchpads. This can work to the user's advantage. Synaptics has a number of separate drivers and a specialized application for configuring sensor parameters.
To disable the touchpad, you need to:
- Go to "Control Panel" - "Mouse". To do this, the “Small icons” option must be selected in the information display settings.
- Look at the "Settings..." section, next to which the Synaptics icon is drawn.
- Select the touchpad and click on the "Disable" button.
Important: in this window, users will be able to configure the operation of the sensor. For example, the ability to disable the panel using individual keys or after connecting a USB mouse.

Mobility Center
How to disable the touch screen on a laptop? The following technique is not suitable for everyone. Some laptops display touchpad and touchscreen settings in Windows Mobility Center.
- Right-click on the battery thumbnail in the system tray.
- Select "Windows Mobility Center".
- Find the blocks allocated for sensor control.
- Set the value to "Disable" in the appropriate sections.
Standard solution
How to disable the touch screen on a laptop? The last trick works for all laptops.
Instructions for disabling the sensor in Windows look like this:
- Open "Device Manager" in any known way.
- Expand the "Mice and Others..." tab.
- Find the touchpad/touch screen.
- Right-click on the corresponding menu item and select the “Disable” command.
A laptop is a mobile device that can be used equally effectively both at a full-time workplace and in traveling conditions, for example in transport. The touchpad is one of those devices that provide mobility. Therefore, it is very important for users to know how to enable the touchpad on a laptop.

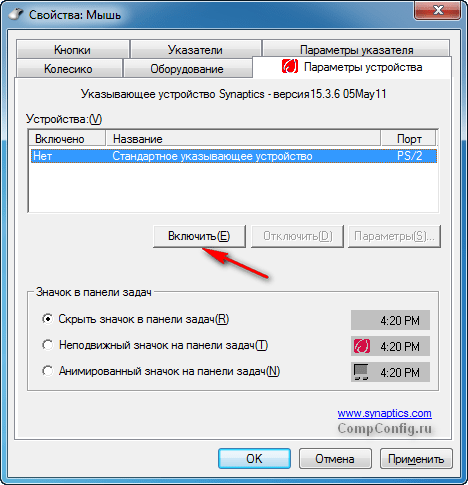
After this, a window with mouse properties will open in front of you. Here you need to go to the “Device Settings” tab (sometimes this tab may have a different name, for example “ELAN”). There should be an Enable button on the Device Settings tab. Click on this button and save the settings by clicking on the “OK” button, which is located at the bottom of the window.

It should be noted that on the “Device Settings” tab, the “Disable when connecting an external mouse” function may be available. If it is active, the touchpad will not work when a regular computer mouse is connected to the computer. If you want to use the touchpad and mouse at the same time, then this function must be disabled.
If you have checked all the listed methods for enabling the touchpad and nothing helped, then your touchpad may be disabled in the BIOS. In this case, in order to enable the touchpad you need to enable a function called “Internal Pointing Device”. As a rule, it is located in the “Advanced” settings section.

If everything is also enabled in the BIOS, then there are only two options left: uninstalled drivers or a broken touchpad.
Hello! Recently I have received several questions about the fact that the touchpad does not work and people are asking for help with this problem. I have already written an article about this, I will provide the link below. The touchpad is a useful thing, but as I understand it, it’s not for everyone. For example, many people ask to disable the touchpad, saying it interferes when working with a laptop, and especially when typing.
There are two ways to disable the touchpad on a laptop. You can do it through the BIOS, so you can turn it off, or you can use a special key combination on the keyboard. Every laptop (probably every one) has a key that disables and enables the touchpad. And if you accidentally press these two keys, or during other actions, the touchpad stops working. And then questions like “the touchpad does not work”, “How to turn on the touchpad”, etc. pour in.
Everything is actually very simple, let's look at the ways in which you can enable or disable the touchpad on a laptop.
Touchpad not working? Solving the problem
1. First, let's look at the function keys for enabling and disabling the touchpad, which I wrote about above. Different laptop manufacturers have their own, and maybe different models. For example, on a Toshiba Satellite L300-11G laptop, these are the FN+F9 keys. The FN key is always used in this combination, plus the key with the touchpad icon.
 Press these keys once, the touchpad turns on, press it again and it turns off, or vice versa. This method is worth trying from the very beginning.
2. The second option is to check whether the touchpad is enabled in the BIOS. I had a case where the touchpad did not work even during the installation of Windows. It turns out that it just needed to be included in the BIOS. I wrote about this case and how to do it all in the article.
3. If the two methods described above did not help, then it is worth checking whether the drivers are installed on the touch panel. I haven’t really encountered such a problem, but they say it can happen. You can see if there is a touchpad in the device manager. It is usually displayed there like this:
 If you don't see him there. It is possible that the driver for it was not installed. But, the driver for the touchpad should be on the disk that comes with the laptop, or on the manufacturer’s website. And if it is displayed there, then look at its properties, perhaps it is disabled there.
4. Well, the fourth method, which has the right to life, is a simple breakdown of the touchpad. This device, like other components, may simply break.
It seems like I wrote everything I wanted. In these ways, you can (if it doesn’t work) and disable if you don't need it. Good luck friends and trouble-free touch panels :)!
P.S. The information that is stored on our computers, or rather on hard drives, I think is very expensive for everyone, and losing it is a big problem. But if this has already happened and you have problems with your hard drive, then HDD recovery should help. Read the information on how to restore a raid 0 array and order the recovery of information from your media.
Also on the site:
The touchpad does not work: how to enable the touchpad (touchpad) on a laptop updated: January 12, 2015 by: admin
The TouchPad (touchpad) can sometimes turn off on laptops for some reason. In some cases, users themselves disable the touchpad, because... it may interfere with active use of the laptop keyboard.
There are several options for enabling the touchpad. But when using them, you need to consider what brand of laptop you have. The fact is that different models use different methods of activating the touchpad.
Let's look at how you can enable the touchpad on a laptop using several methods.
Rebooting the laptop
Regardless of the model and brand of laptop computer, the first tip to solve the problem is to reboot. It doesn’t matter what kind of system you have: Windows 7, Windows 8, Ubuntu or another, it’s possible that a one-time error just occurred and after a reboot everything will fall into place.
Using a keyboard shortcut
Most laptops have a special key combination to enable/disable the touchpad. Only for different brands it will be slightly different.
When using this method, you need to simultaneously press two keys on the laptop keyboard: the “Fn” key and one of the function keys in the top row (F1-F12).
This combination is slightly different for different brands and models of laptop computers. For example, for Asus laptops you need to use the following combination: Fn + F9.

Enabling the touchpad on an Asus laptop
Here is a list of key combinations to enable the touchpad for common brands of laptops:
- Asus – Fn + F9 or Fn + F7
- Acer – Fn + F7
- Lenovo – Fn+F8 and Fn+F5
- Dell – Fn+F5
- Sony – Fn + F1
- Toshiba – Fn + F5
- Samsung – Fn + F5
The HP brand is not on this list because on Hewlett-Packard laptops, the touchpad is activated using a separate key specifically dedicated to this function. If there is no such key, then most likely, to perform this task you need to double-tap (or long press) in the upper left corner of the touchpad (see video below).
Enabling touchpad in BIOS
If your touchpad does not work and the previous tips do not help, it may simply be disabled in the BIOS settings.
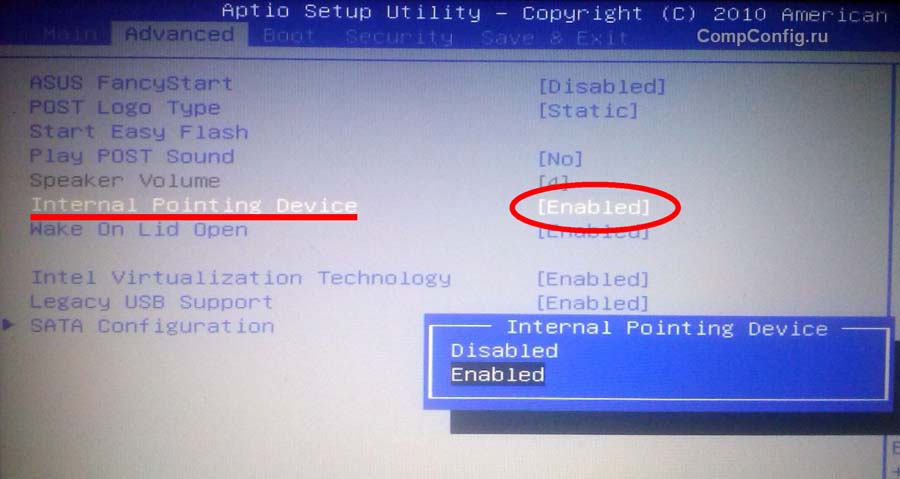 Go to the BIOS and find the “Internal Pointing Device” item. The value of this parameter must be “Enable”, i.e. included.
Installing/reinstalling drivers
Also, the reason for the touchpad not working may be the absence or incorrect operation of device drivers. This situation may well occur if Windows was reinstalled or some kind of failure occurred.
In this case, you need to try installing the touchpad drivers from the disk (if available) or download it from the manufacturer’s official website.
Synaptics TouchPad
Nowadays, Synaptics touch panels are very often used on modern laptops. Your laptop may also have a touchpad from this manufacturer. In this case (if drivers are installed), the touchpad can be disabled using the control panel.
To do this, go to the Windows Control Panel and select “Mouse”.
On the Device Settings tab, you can use the corresponding buttons to enable or disable the touchpad.
Also, for some driver versions, this tab may contain a setting that allows you to disable the touchpad when connecting a USB mouse to the laptop.
TouchPad is faulty
If all of the above recommendations did not help you, the reason may be that the touchpad is physically damaged or the contacts are simply disconnected. In this case, there is only one way out - to disassemble the laptop and check all connections. In extreme cases, you may even need to replace the touchpad. If you are an inexperienced user, then it is better to entrust this work to professionals.


