How to install an ssd disk in the system unit. Disable search and indexing of files. Disabling System Restore
After purchasing a solid state drive (SSD), many people do not think about additional system settings to For optimal SSD operation, you need to do 12 steps to unlock the full potential of your SSD. In this article we will analyze all 12 steps, let's get started!
1. Enable AHCI mode
Advanced Host Controller Interface ( AHCI) is a paramount feature to ensure that the Windows OS will support all the functions of running an SSD on a computer, especially the TRIM function so that the SSD does not directly access affected sectors/pages on the drive.
To turn on AHCI, you need to log into your computer and enable it somewhere in its settings. I can't tell you exactly where, it may be in a different place in each BIOS. Most likely, new computers have this enabled by default. It is recommended to enable this feature before installing the operating system, although you can enable it after you have installed Windows.
2. Enable TRIM
We have said enough in the previous section about TRIM. This command gives a big increase in speed and stability.
Open a command prompt and enter the following command:
Fsutil behavior set disabledeletenotify 0
3. Disable System Restore
This is not necessary, but be aware that your SSD has a write limit and a space limit. System Restore slows down performance and consumes SSD space. Why don't you just get rid of it?
Click the Start menu, right-click “Computer” - “Properties” and click “System Protection”:

Once in the window, click the “Configure” button, for example like this:

Click the "Turn off system protection" button. Click "OK" and you're done!
4. Disable indexing
A significant portion of your SSD speed is consumed in indexing files for Windows Search. This can be useful if you store everything on an SSD; there is a slowdown in performance after re-indexing, which happens every time you add new data to the disk. In order to disable indexing on SSD do the following:
Click the Start menu and select Computer. Right-click on the SSD drive and click Properties. Uncheck "Allow the contents of files on this drive to be indexed in addition to file properties" and click OK. Once you do this, the operating system will apply this to all files and folders on the drive. If you see a dialog box saying that it cannot remove the file from the index, click Ignore All. This will streamline the process and ignore all errors.

5. Disable scheduled defragmentation
An SSD is a solid state hard drive, with no moving mechanical parts, so there is no need for the drive to defragment itself offline. That's why we're going to disable it!
Click on Start, select “All Programs”, “Accessories”, click “System”, “Disk Defragmenter”, and then click the “Schedule Setup” - “Disk Defragmenter” button:

Uncheck the "Run on schedule" checkbox. Click OK.
6. Windows swap file
The Windows page file refers to a file on disk reserved for storing application components that would otherwise fit into physical memory. It's like a form of memory on a hard drive. Disabling the page file on a solid state drive will significantly increase system speed. Don't do this if you only have one SSD drive. If you pair an SSD with an HDD, then you can easily configure the HDD to process the page file. The most ideal solution is if you have two SSDs, run a swap file on the first one, and on the other one to run Windows and store files.
The process for setting up the page file varies depending on the settings, so I'll show you how to get to the configuration window.
Right-click Computer in the Start menu and select Properties. Click the Advanced System Settings button on the top left side of the window and go to the Advanced tab. Click the "Options" button in the "Performance" section: 


Go to the "Advanced" tab and click the "Change" button, uncheck "Automatically select paging file size" and select "No paging file"
7. Disable sleep mode
Sleep mode takes up at least 2 GB. If you want to save this volume, write on the command line:
Powercfg -h off
8. Disable Prefetch and Superfetch
Windows places information in physical memory and virtual memory that belongs to programs that you don't currently use but use very often. This is known as "Prefetch" and "Superfetch." You can disable this through the registry editor:
HKEY_LOCAL_MACHINE\CurrentControlSet\Control\SessionManager\Memory Management\PrefetchParameters
as two values: EnablePrefetcher and EnableSuperfetch. Set both values to zero (0)!
9. Setting up caching
Disk caching can have different effects for many users, check how your computer will work without caching, then with caching, this function is enabled very easily:
To get to the configuration window, right-click Computer in the Start menu and select Properties. Click "Device Manager", expand "Disk Devices", right-click the SSD, and click "Properties". Select Policy. In this tab, you will see an option that says “Enable device write caching.”

Compare your SSD with and without the option.
10. Disabling services for Windows Search and Superfetch
Even with the above registry tweak and index removal, your computer may continue to load your hard drive. Press "Win + R" and see "services.msc" press the "Enter" button. Find both services mentioned in the title of this section and disable them.

11. Disable ClearPageFileAtShutdown and LargeSystemCache
SSD runs on flash memory, making it easy to write data to the disk. This way, files do not have to be erased when the computer is turned off. This will make the Windows shutdown process much faster. LargeSystemCache, on the other hand, exists primarily in Windows server versions, and tells the computer whether to use a large page cache on disk.
Both of these options can be found in the Registry Editor according to
HKEY_LOCAL_MACHINE\CurrentControlSet\Control\SessionManager\Memory Management
Set them to 0.
12. Set the power supply to “High Performance”
Perhaps you notice when, after a long absence from the computer, the system slows down a little, for this you need to set high performance throughout the entire work session.
To toggle the power setting, click the System and Security button, and then click the Power Options button. Select "High Performance" from the list. You may need to click the Show More Diagrams button to find it.

Hello! Decide to prepare an article in which you will talk about how to properly install Windows 7 on an SSD drive, and how to configure Windows 7 on an SSD drive after installation so that it works for a long time and without problems. I recently bought a laptop, took an Asus K56CM and immediately bought an OCZ Vertex 4 128 GB SSD drive for it, I really wanted to experience all the speed that an SSD gives.
In our case, the model of laptop/computer and SSD drive does not matter; my instructions can be said to be universal. I will write what needs to be done immediately after installing an SSD drive into a computer and how to configure the operating system after installation on the SSD.
If this is your first time encountering an SSD, then you are probably wondering why there is such attention to setting up the operating system for these drives compared to conventional hard drives. I will now explain everything in simple words.SSD drives have a limited failure time compared to hard drives. Simply put, they have a certain number of rewrites. Now I won’t say what this number is, it varies and what is true and what is not is difficult to understand. For example, for my OCZ Vertex 4 in the characteristics it was written that the operating time between failures is 2 million hours. And the operating system writes a lot during operation, deletes and writes again various temporary files, etc. Services such as defragmentation, indexing, etc. serve to speed up the system on regular hard drives. And they only harm SSD drives and reduce their service life.
In fact, installing Windows 7 on SSD almost no different from installing on a hard drive. But after installation, you will need to make some adjustments to the operation of Windows 7, but there is nothing complicated there, we will do everything using the utility SSD Mini Tweaker 2.1.
What should you do before installing Windows 7 on an SSD drive?
Well, first you need to install an SSD drive in a laptop or computer, it doesn’t matter. I will not describe this process. There is nothing complicated about this, and this is a topic for another article. Let's say that you have already installed the SSD, or it has already been installed.
If you will use a regular hard drive in your computer next to the SSD drive, then I advise you to disable it while installing Windows 7, this is so that you do not get confused when choosing a partition to install the OS, but this is not necessary.
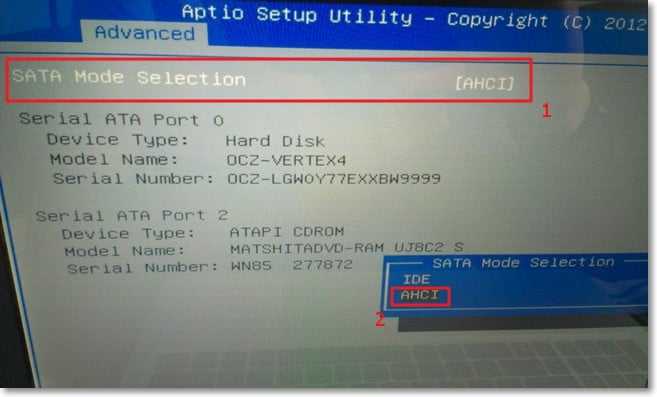
All you need to do before installation is to check whether our solid state drive is working in AHCI. To do this, go to the BIOS; if you don’t know how, read the article. Next, go to the tab "Advanced" and select the item “SATA Configuration”.

Select the item, a window will open in which we select AHCI(if you had another mode enabled). Click F10 to save settings.
Now you can begin installing Windows 7. The installation process on a solid-state drive is no different from installing on a hard drive. I just want to give you one piece of advice:
Try to install the original image of the operating system Windows 7 or Windows 8. I recommend installing only one of these operating systems, because only seven and eight can work with SSD drives. Do not use different assemblies, and if you install an assembly of Windows 7 or Windows 8 downloaded from the Internet, then try to choose an image close to the original one.
We install the operating system. You may find the following articles useful:
Once the operating system is installed, you can proceed to setting up Windows for SSD.
Setting up Windows 7 to work with an SSD drive
More precisely, Windows 7 will work anyway, our task is to make sure that our solid-state drive lasts as long as possible and without various errors.
As I already wrote at the beginning of the article, to optimize Windows for a solid-state drive, we will use the SSD Mini Tweaker utility. You can disable all unnecessary options manually, but in the SSD Mini Tweaker program this can all be done in a few clicks. You will only need to manually disable indexing of files on local drives.
First we need to download SSD Mini Tweaker. Download version 2.1 from the link below:
There is no need to install the program, just extract it from the archive and run it.
Launch the SSD Mini Tweaker utility.
You can tick all the boxes, or rather, it’s not possible, but it’s necessary. I have checked all the boxes, except that you can leave only SuperFetch; disabling this service may increase the startup time of programs. Check the boxes for the required services and press the button “Apply changes”. Almost everything, in the same utility there is a “Manual” item, this means that you need to manually disable services. There are two of them, disk defragmentation on a schedule and indexing the contents of files on the disk.
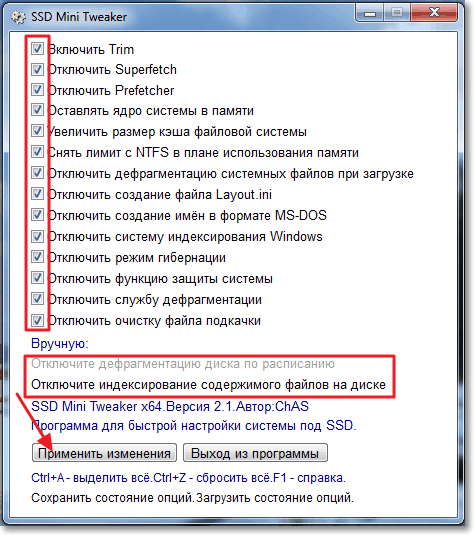
If scheduled defragmentation is disabled automatically after the changes we have made, then indexing of files on the disk must be disabled manually on each local partition.
Let's go to "My computer", and right-click on one of the local drives. Select “Properties”.
A window will open in which you need to uncheck the item “Allow the contents of files on this drive to be indexed in addition to file properties”. Click “Apply”.

Another window will appear, click “Ok”.

We are waiting for the process to complete.
When you do this procedure on drive C, you will most likely receive a message stating that you do not have rights to change system files. I just clicked “Skip all”, I think that if you skip a few files, nothing bad will happen.
That's all, setting up Windows for a solid-state drive is complete. You know, many people say that these are different myths, that nothing needs to be turned off, etc. Maybe so, but if they came up with it, then it means it’s necessary and I think that in any case it won’t hurt.
It seems that I wrote everything I wanted, if you have additions, comments, or something is not clear, then write in the comments, we’ll figure it out. Good luck!
Also on the site:
Updated: February 7, 2018 by: admin
Users have a completely predictable question about how to install an SSD drive. Installing an SSD drive in a desktop computer is no different from. Therefore, if you have already installed, then you should not have any difficulties installing the SSD.
But, you can install an SSD drive even if you have no experience. This is a very simple procedure and anyone can do it. In this material we will look at the entire installation process step by step.
Let's start installing the SSD drive
Step No. 1. Turn off the power from the system unit.
Before you do anything with the system unit, you must disconnect it from power. Especially if you have little experience in computer maintenance.
Step No. 2. Open the side cover of the system unit.
After the power is turned off, you can begin working with the system unit. To make it more convenient to work, place the system unit on its side. Then you can remove the side cover. In some cases, to install an SSD drive, you may need to open both side covers of the system unit.
Step #3. Install an SSD drive
Hello dear friends, today I would like to tell you how to install Windows on an SSD drive and perform the important initial setup.
Solid state drives are becoming more and more popular every day due to their phenomenal operating speeds compared to hard drives.
Half a year ago, I assembled a system unit for myself, with good performance components, but I didn’t buy an ssd, which I now regret!
Then they cost twice as much, but who knew that everything would turn out like this, the fall of the ruble, rising prices and other political clownery, but that’s not about that now.
Well, I couldn’t resist and bought an ssd, I couldn’t resist the temptation. I decided to use this disk as a system disk, that is, the operating system and programs are installed on it. All other data is stored on the hard drive.
Comrades, I’ll tell you, this is the bomb! Booting the system from pressing the power button to loading the desktop takes seven, ten seconds, and on the HDD it was a minute and a half.
Programs open and run much faster. Photoshop with a bunch of plugins opens in a couple of seconds, previously you had to wait about ten. In general, there are a lot of advantages, I recommend it to everyone!
Installing Windows 7 on SSD
First of all, connect the drive to the computer. I won’t tell you how to do this, it’s all simple! The main thing is that your motherboard supports SATA III, to which you need to connect, otherwise on SATA II you will not get maximum performance from this type of drive.
Next, it is necessary to BIOS set the operating mode for our SSD AHCI. Since everyone's BIOS is different, the settings will accordingly differ slightly. For example, I need to go to the tab Configuration, then select SATA Controller working mode, and select from the drop-down list AHCI. Next you should click F10, to save your changes.
Now you can start installing Windows 7 on the SSD. It is the same as the usual installation, which I wrote about in detail in my article.
Setting up an SSD under Windows 7
In principle, after installation, the system will work normally, but we need to extend the life of the solid-state drive and disable some system functions that adversely affect the operation of the SSD itself.
To do this you need to download the program SSD Mini Tweaker 2.4 for x32 and x64 bit systems. Launch the program, and in the window that opens, check all the boxes as in the picture below:

Disabling scheduled defragmentation on SSDs

Click on the button Set up a schedule . A settings window will open where you need to click on the button Select disk:

In the window that appears, uncheck our SSD drive and click OK .

Disable indexing of file contents on an SSD.
Click on the inscription Disable indexing of file contents on disk . In the window that appears, uncheck the box and click OK .

A confirmation window for changing attributes will appear. Check the box as shown below and click OK .

After this, a message may pop up stating that you do not have enough rights to perform this operation for some files. Click Skip for all! Due to a few system files, nothing will happen.
After completing all the above settings, click Apply changes , close the program and restart your computer.

Well that's all, now you know how to install Windows on SSD, as well as perform its initial setup.
If you have any comments, suggestions or questions regarding this article, write in the comments, we will try to figure it out.
If you decide to purchase a solid-state SSD drive, there may be several reasons for this:
- You are not satisfied with the speed of your HDD.
- You need fast operation of Windows and certain types of applications and games.
However, installing an SSD into a computer or laptop and then filling it with information is not enough. It is also necessary to optimize its operation with the operation of your OS.
Let's look at the main methods for optimizing an SSD drive.
AHCI SATA
Technology that allows the TRIM function to be used for various SSDs. It is enabled at the BIOS level of your PC or laptop.
Enabling AHCI SATA:
- Open the command line with the key combination win + R.
- Enter the command: “regedit” (access to the registry).
- Go to the following path: HKEY_LOCAL_MACHINE → SYSTEM → CurrentControlSet → Services → storahci.
- Change the value of the ErrorControl subkey to 0 (default 3) by calling the context menu and clicking the “Modify” option.
- Go to the branch called “StartOverride” and change its value to 0 (default 3).
- Restart your PC (laptop), go to BIOS/UEFI (how to enter BIOS, see separately for the model of your laptop or PC motherboard). In the “storage configuration” section, and in the “SATA port” subsection, set AHCI, or in the “SATA RAID/AHCI Mode” section, set AHCI (For different BIOS versions, their own sections and subsections).
- Check if the function works in Windows. Go to the following path: Control Panel → Device Manager → IDE ATA/ATAPI controllers. The device should appear in the last subsection: “Standard SATA AHCI Controller”.
TRIM function
By default, this feature is enabled on Windows 7 and higher, however, it is better to manually check whether this feature works. The meaning of TRIM is that after deleting files, Windows transmits information to the SSD drive that a certain area of the disk is not used and can be cleared for writing. (the data remains in the HDD and recording is done “on top” of the existing one). Over time, if the function is disabled, the drive's performance will drop.
Checking TRIM on Windows:
- Launch the command prompt by pressing the key combination win + R.
- Enter the command: “fsutil behavior query disabledeletenotify”.
- If after entering the message “DisableDeleteNotify = 0” is displayed, then the TRIM function is enabled, if “DisableDeleteNotify = 1”, then TRIM does not function. If TRIM does not work, enter the command: “fsutil behavior set DisableDeleteNotify 0”, then repeat steps 2 and 3.
Defragmentation
This function helps optimize and speed up the operation of the HDD, but for SSDs, it has a detrimental effect. For SSDs, the “automatic defragmentation” feature is disabled by default. To check if it works:
- Press the combination win + R.
- In the command line window, enter the command: “dfrgui” and click “OK”.
- In the window that opens, select your SSD and look at the “Schedule optimization” item. For our SSD it should be disabled.
Indexing
A Windows feature that helps you quickly search for files on a disk with large amounts of information, however, it increases the write load on the SSD. To disable it:
- Go to the section “This computer”, “My computer”, “Computer” (it’s different for each OS).
- Select your SSD and select “Properties” in the context menu.
- In the window that opens, uncheck the box next to the option: “Allow the contents of files on this disk to be indexed in addition to file properties.”
Search service
Its function creates a file index, thanks to which finding various files and folders is faster. However, the speed of the SSD is quite enough to abandon it. To disable it you must:
- Go to the following address: Control Panel → System and Security → Administrative Tools → Computer Management.
- Go to the tab: “Services”.
- Find the “Windows search” service and select “Disabled” in the “Startup type” tab.
Hibernation
A mode that allows you to save the contents of RAM on the hard drive, so that the next time you turn it on, information and open applications from the previous session are saved.
When using an SSD, the meaning of this function is lost, since the drive starts up quickly anyway. And “Hibernation”, creating “write-overwrite” cycles, reduces the lifespan of an SSD disk.
Disabling hibernation:
- Launch cmd.exe again using the key combination win + R.
- Enter the command: “powercfg -h off”.
Write caching
This feature improves the performance of your SSD. When enabled, NCQ writing and reading technology is used. NCQ - accepts multiple requests simultaneously and then arranges their execution order in such a way as to achieve maximum performance.
To connect you need:
- Open the command line with the combination win + R
- Enter the command: “devmgmt.msc”.
- Open "Disk Devices", select SSD and select "Properties" from the context menu.
- Go to the “Policies” tab.
- Check the box next to the option: “Allow recording caching for this device.”
Prefetch and Superfetch
Prefetch– a technology with which frequently used programs are loaded into memory in advance, thereby speeding up their subsequent launch. In this case, a file of the same name is created on disk space.
Superfetch– a technology similar to Prefetch with the difference that the PC predicts which applications will be launched by loading them into memory in advance.
Both features are of no use when using an SSD. Therefore, it is best to turn them off. For this:
- Open the command line using the key combination win + R.
- Execute the command: “regedit” (go to the registry).
- Follow the path: HKEY_LOCAL_MACHINE → SYSTEM → CurrentControlSet → Control → Session Manager → Memory Management → PrefetchParameters.
- Find several parameters in the registry subkey: “EnablePrefetcher” and “EnableSuperfetch”, set their value to 0 (default 3).
SSD Mini Tweaker utility
All of the above actions can be performed manually, but programmers have created programs called tweakers, the purpose of which is to customize the Windows OS, as well as its individual components, with a few clicks. One such program is SSD Mini Tweaker.
SSD Mini Tweaker– a program, a type of tweaker, that allows you to optimize your SSD without much effort.
Advantages:
- Complete Russification.
- Works on all OS starting from Windows 7.
- Free.
- Clear interface.
- No installation required.
other methods
Manipulations such as transferring browser caches, paging files, temporary Windows folders, system backup from an SSD to an HDD (or disabling this feature) are useless, since although they increase the lifespan of the SSD, they limit the potential of its use.
Thus, by performing the simple manipulations listed above with your OS, you can extend the life of your drive, as well as configure it to maximum performance mode.


