How to change apple id region. How to change the country in the App Store without moving or changing citizenship
Quite often, users of Apple smartphones are faced with the problem of downloading applications or games that are not available for use in the Russian Federation. As a rule, such a problem can be solved by simply changing the rationality or country in the app store. There's nothing complicated about it.
In fact, making changes to the regionality of the Apple Store on an iPhone is quite easy. It’s the same as scrolling to the bottom of the browser page on your phone and selecting the desired language by clicking on the country flag. On an iPhone or iPad, you should carry out the settings one by one, in accordance with the instructions below for changing the language in the App Store on an iPhone.
How to change the country in the App Store?
If you are moving to another city, or simply want to change the city settings in your iTunes Store and App Store, follow these steps:
It is important to know! If you have current subscriptions to Apple Music or iTunes Match that are connected to your local Apple ID account, you should cancel them and re-subscribe after changing the region or language in the Apple Store to the current one.
1. Go to the “Settings” section.
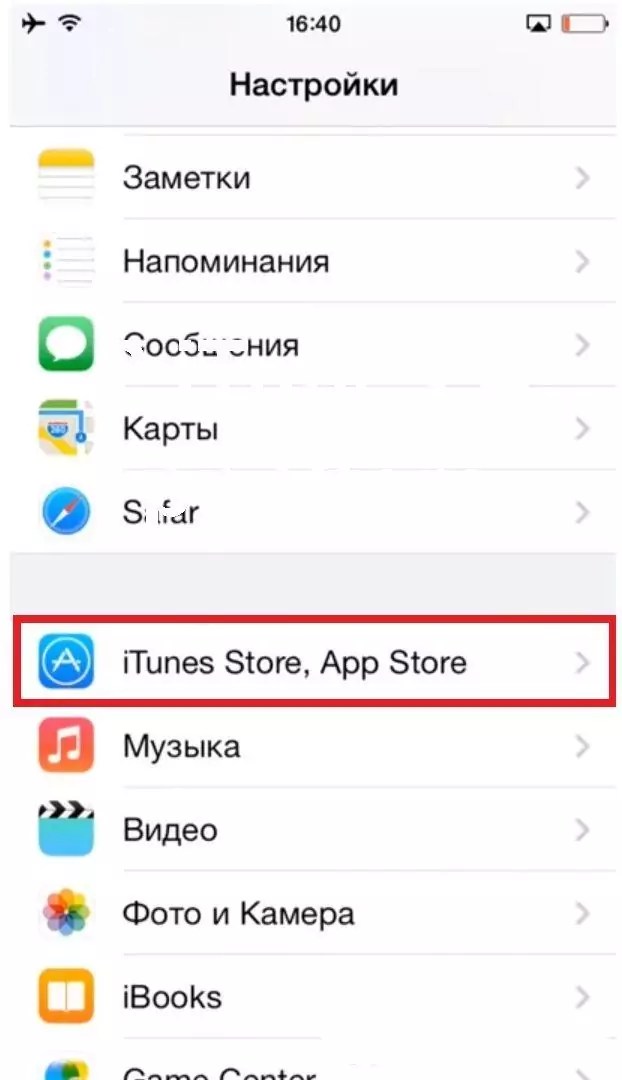
2. Select iTunes & App Store.
3. Click on your Apple ID.
4. Enter a valid account password or use your fingerprint using Touch ID.
5. Go to the “Country and Region” section.
6. Click on “Change Country or Region”.
7. Select the desired location to download games or applications.
9. To change the local country in the Apple Store, you need to confirm the terms of use.
10. Enter payment details.
11. Enter your payment information and click Next.
Now, you have managed to change the language and country in your App Store settings.
How to switch between multiple iTunes & App Store accounts or how to change the store in the app store to Russian?
If you really want to do this, you should sign out of your current iTunes and App Store region. To change the language or region in the app store, follow these steps:
1. Go to the App Store from the home screen without going to Settings.
2. Click on Apple ID.
1. Go to “Settings”.
2. "Basic".
3. Click on "Language and Region" at the bottom of the window.
4. Select the region that is required for you.
5. Create a new account for the desired App Store region and app that is only available in the US store.
Our tips will also help you easily change the language in the app store from English to Russian or vice versa. Choose the most convenient instructions for yourself.
We advise you to read in detail protective glass for iPhone 7 and 7+ from the company Benks. Rounded edges using 3D technology, 360 degree protection. You can read a review of tempered armored glass for iPhone 7 in the article.
Details Created: March 22, 2017 Updated: December 05, 2017Very often, users of Apple products encounter a problem when everything in their favorite application store or iTunes is in English. The reasons for this vary, but there is clearly no need to panic. Below we will describe some of the simplest ways to change the language in the App Store and iTunes to the one you need.
The essence of the problem
Surely, almost everyone has had such a situation when on their favorite iPhone, when entering the application store, the language changed from their usual and native one to some unfamiliar one, for example, English, German, French or even Chinese.
Why this happens and why it happens is still unclear. But the user is faced with the question of how to change the language in the App Store back to what it was before. In fact, there is nothing difficult about this, and anyone can cope with this task.
New Apple ID
The simplest and easiest way to change the language in the App Store is to create a new account (Apple ID), which will indicate the desired country with the required language. You can do this as follows:
- Go to "Settings".
- Find iTunes
- In the menu that opens, click on your Apple ID and select “Sign Out” in the window that appears.
- Now you need to return to the home screen and go to the App Store application.
- Next, go to the tab with free applications and download any of them.

- When you try to download, a pop-up window will appear asking you to log into an existing account or create a new ID. You need to choose the second option.
- After this, the process of registering a new account will begin, where you will immediately be asked to select your country of residence. It is on this point that the language in which the application store will work will depend.
- Well, then everything is simple: all the necessary forms and fields are filled out, a new mailbox is indicated, and the account is activated. Your new Apple ID is ready and you can now sign in.
Changing the language on an existing account
If you don’t want to create a new account, but still need to change the language in the App Store on your iPhone, then you can use this method. It’s completely functional, doesn’t require any special effort or knowledge, and also saves a lot of time. The only thing worth mentioning is that this method does not always work on some earlier and older versions of the iOS operating system. What this is connected with is still unclear, but the fact remains.

So, to change the language on an existing account, you need to do the following:
- The first and most important thing is to go to the Settings menu.
- Next, find the iTunes store, App Store item there.
- In the menu that opens, you will need to click on your account (Apple ID).
- In the window that appears, select the first option - “View account information” or “View Apple ID” (depending on the version of the operating system).
- In the menu that opens there will be a “Country/Region” item that you need to click on.
- After this, it will be possible to change the country and, accordingly, the language as necessary.
- All that remains to be done then is to accept the user agreement.

Well, if for some reason this method did not help, then do not be upset. There is another method that explains how you can change the language in the App Store.
Changing the language through the iTunes application
If the first method of changing the language does not work, and the second simply does not work, then all is not lost - iTunes will help. First, you need to download the program installation file from the official website and install the application on your Windows PC or Mac.
Now directly about how you can change the language in the App Store via iTunes:
- The first thing you need to do is launch the program and in the window that appears, enter the credentials of the account where you want to change the language.
- After logging in, you need to click on the icon with a silhouette of a person, which is located next to the search bar in the upper right side.
- In the drop-down menu, you must select Account info, after which a page with account information will open.
- On this page we should be interested only in the first item - Change Country or Region.
- After clicking on it, you will be able to select the required country from the drop-down list.
- When everything is done, all that remains is to confirm your choice by clicking on the Change button and accept the user agreement.

As was said at the very beginning, there is nothing complicated here, and absolutely anyone can cope with such tasks. Good luck!
The famous Apple store called the App Store is a place where everyone will find something interesting for themselves. It houses several hundred thousand different games and planners. And the best thing about why people love Apple technology so much is that all these programs can be downloaded without viruses. Simple account settings - and you're in the magical App Store. But sometimes there is a need to change some account settings (for example, language, country or region). It's not that difficult to do.
One option: change your place of residence. Logical. But there is another equally important reason. Not every Apple user knows that the company offers different products for countries. That is, the programs that are available for, for example, Spaniards will not always be available to the Japanese. Simply put, the desire to change the country, region (and, as a result, language) is often necessary in order to download some application that is not available in your location.
It is important to know that changing the country in the App Store (iTunes) without changing the Apple ID is impossible, that is, changing the country occurs in the Apple ID.
A few more important points:
Change country
The process for changing settings will differ on different devices. Although this is not particularly convenient, it is very logical, given the different operating systems.
On iPhone, iPod touch and iPad devices
First, you need to click on the gear wheel to open the settings menu for iPhone, iPod touch and iPad
 Then you need to carefully look at the “Settings” menu
 Select the column “iTunes Store and App Store Settings”
 View your Apple ID or sign in to your account
 Select the country and region in the Apple id settings
On a Mac or Windows computer
 First, open iTunes
What to do if you can’t change your country/region in the App Store
If you can't reconfigure your country and region, you may have:
We will also add that by changing the country/region, you will also change the language of the App Store (iTunes). For different versions of iOS, the change method will be the same. Of course, iOS 7 and iOS 10 have different menus, but the sequence of actions and the names of the items you will look for are similar.
Video: how to change the store language in the App Store (iTunes), change the country and region
So, we see that through simple manipulations, we can turn ourselves into the owner of programs, games and applications that are inaccessible to uninitiated people. Go ahead, let everything work out for you.
How to change the country and region in the App Store on iPhone (5, 6, 7, 8, X) and iPad?
If you're having trouble making app/music purchases on your iPhone or iPad, the error may be related to your country's region settings. For example, you might have a bank card with an address in one country, but your iPhone is set up in another country, so the regions will differ.
Please note that the region of your country must match the address specified in your Apple ID profile.
How to change country in the App Store on iPhone or iPad?
Before you go further, make sure that:
● You have an active iTunes Match subscription, you need to cancel it.
●You must cancel your active Apple Music membership, otherwise you will not be able to change your country.
● Even if you have one partial Pass or Multi-Pass, you will not be able to change regions.
● You must pay off your loan so that the balance is at least zero before changing the region.
● If you have a pending refund for the app, you will need to wait a few hours for it to complete.
● You can select “No” if there is no bank card information for a specific country. However, when purchasing any app from the App Store, you will be required to enter payment information.
● Only the organizers (creators) of a family group can change the App Store region.
● Some apps may not appear in your App Store if you change your country.
And so, let's get started, here's how to change the country in the App Store on iPhone:
Step 1: Go to Settings.
Step 2: Scroll down and click on "iTunes & App Store".
Step 3: Tap Apple ID → Tap View Apple ID in the pop-up window, then enter your Apple ID passwords.

Step #4. Click Country.

Step #5. On the next screen, click Change Country/Region.

Step #6. Now select your country from the list. You must select Russia as your country in the following attachment → Click "Done".

Step #7. When the iTunes and App Store User Agreement page appears, click Agree.
Step #8. After that, you will have to write your payment method or phone number and detailed information. Your card address or phone number will be cross-checked with the given region of the country and address. Please ensure that you provide bank account/card details that reflect your selected country. Click Next and you're done.

Read also:
This is all naga in terms of: how to change/change the country in the App Store on iPhone and iPad.
How to change the region in the App Store on iPhone (5, 6, 7, 8 and SE) and iPad?
In order to change the region in the App Store, you need to follow these steps:
1. Go to settings from the main screen.
2. Click General.
5. Select the region you want to select.
6. Click "Done".


However, it is relatively easy to change the region in the App Store. But make sure the country region you select matches the address you entered on your card's billing address or phone number.
Articles
20-09-2015
Changing the language is a necessary condition if even such “smart” technology as an iPhone or iPad offers its owner an unfamiliar language. Often those how to change language in App Store, users who bought the device abroad are interested. Unfamiliar words and phrases cause a lot of inconvenience, but the problem is easy to solve.
How to change the App Store language to Russian
To do this, you can use your computer and the iTunes application installed there. Go to the “Account” menu through the section with quick links and log in with your ID. We are interested in the “Apple ID Overview” because this is where you can find information about the specified country. If you need the Russian language, naturally, “Russia” must be indicated in this column - otherwise it will not be possible to install it. If the user sees a different country, this information must be changed.
To change the language from a smartphone or tablet running iOS, go to the device settings and go to the store menu. Click on your ID and select “View Apple ID.” A window will open where you should select the already familiar “Country/Region” item (it is located under “Apple ID” and “Payment Information”, third from the top). They change the country by accepting the new terms of the user agreement, and also decide on the payment method. Please note that changing your country will disable automatic subscription renewal. Confirm the changes made by clicking “Done”.
So, we figured out how to change the language in the App Store. But what if the account has not yet been created? It’s better to immediately make sure that everything is done correctly. The same applies to the option without “linking” a credit card.
How to initially create an App Store in Russian, so as not to change it, without a map
First, you should take care of a stable Internet connection. Another important condition: before registration begins, you need to download any free application. Open the store application on the device and select “Top Free” - a section that contains the best free programs (you can find it in “Top-25”). Now we are looking for a program that is suitable for our version of iOS. Click the “Free” button, which means “Free”, and confirm the installation by clicking the “Install” button. After this, the authorization window should appear. We choose to create a new identifier and indicate Russia as the country. Otherwise, the registration process is no different from registering with a card - until the user is asked to select a payment method (“payment type” in English). Select “None”, that is, “Not one”.
At the end, all we have to do is follow the link in the email from the support service, thereby confirming the registration. As soon as your email address is confirmed, you can start using the store in Russian. Let us remind you: account, account, identifier and Apple ID are the same thing.
“Has the language of iTunes/AppStore changed?”, “For some reason everything in iTunes/AppStore has become in English?”, “How to return Russian iTunes/AppStore?” – these and other similar questions are often asked by users in our VKontakte group. Below we will tell you how to return everything to its place.
There are many reasons for changing the language in the iTunes/AppStore, but most are the work of the users themselves. Most often this happens due to the desire to download an application or other content that is not in the Russian section of the store.
How to change the store language to Russian:
Changing the country/region occurs in the Apple ID account settings. There are two ways to get to the settings:
- Open the standard Settings application -> iTunes and AppStore -> click on your Apple ID -> View Apple ID
- Open iTunes or AppStore on the main page -> scroll to the very bottom -> click on your Apple ID -> View Apple ID
Next, enter your Apple ID password, if required. Go to the Country/Region tab and click Change Country or Region. Choose Russia (or any other country in which you live). Click Next. Read Apple's Terms and Conditions and Privacy Policy. Click Accept, indicating your agreement with this document. Next, enter the data into the required fields, which differ from similar fields in a store in another country. Don’t forget, if you have a card linked to your Apple ID, then it must have at least one ruble (or other minimum unit of payment in your country) on it to check its solvency. Click Next again. The inscription “Your Apple ID is now ready to use in the iTunes Store” tells us that we have successfully completed the country and language change.
Very often, iPad users encounter a problem that I can’t even call it a problem, considering how easily it can be solved. Suddenly, out of the blue, the App Store language changes to English, Italian, German, Chinese or some other one. The user looks at this matter, panics and does not understand what to do.
This often happens if the user follows a link to a program that is only available in the English/Chinese, etc. App Store. Or just a link on some site leads to a foreign App Store. As a result, the user sees such a picture. Names in English, prices in dollars or some yuan:
Solution!
Scroll down to the App Store. Find the bottom left button (Apple ID). Let's click on it.

In the window that appears, click the button. If the text in the pop-up window is in some other language, then click on the inscription, which is located in the same place as in the screenshot.

Now there will be a button in the lower left corner Sign In(or To come in). Click on it and in the pop-up window click With an existing Apple ID(if the inscription is in another language, then in the place where I pointed with the arrow in the screenshot)

In the window that appears, enter your Russian Apple ID and its password. Since the Apple ID is tied to a specific country, the App Store will be in the language that is the main language for this country - in our case, you will again see the Russian App Store with prices in rubles. You will be notified about this with the following message:

As you can see, returning the Russian language to the App Store is not so difficult. :) Just re-login and the problem will go away by itself.
Please note that this article talks about how to change the country of your account in the App Store (iTunes) and transfer all your purchases. If you just need to download a game or program from another country's App Store, then you just need to create an Apple ID of another country.
If your App Store just became in English, then you need to follow the link from any mobile browser to any free iOS application, available only in the Russian App Store. For example, as suggested in the comments below, Vogue Russia magazine. And now about how to thoroughly change the country of your account in the App Store.
How to change your account country in the App Store (iTunes)
Any mobile device equipped with an operating system will remain unclaimed if it does not have an application store. Would you buy your iPhone if it could only make calls? I think not. The AppStore contains hundreds of thousands of applications, any of which you can easily install on your device. But there are exceptions related to regional differences in store versions, and because of this, many users, including me, registered their first account in the American AppStore.But Apple does not stand still, the company is developing and at the same time improving its influence in other countries. Translation of the AppStore into rubles and low prices for music in the iTunes Store are the main arguments that cancel the need for an American account and push us to move to the Russian segment.
But how can you painlessly switch from an American account to a Russian one, keeping all your applications? This is exactly what this article will discuss.
Preparation
Before you start emigrating from an American to a Russian AppStore account, it’s worth touching on three important aspects:
- All money available in the account Necessarily must be spent, you should end up with an account with absolutely zero credit. And this, as a rule, is a problem, since there may be, say, twenty-five cents left in the account, and therefore you cannot spend them, since the cheapest application in the AppStore costs $0.99. I will write how to get out of this situation later, but for now let’s move on to the second point.
- All services that imply a temporary period, be it iTunes Match or additional space in iCloud, will have to be either deleted or cancelled. Unfortunately, you will not be able to continue using these services in the Russian segment of the AppStore; you will have to reactivate them separately. However, do not be upset, Apple technical support can voluntarily reimburse you for part of the money spent.
- You will need to immediately connect a valid bank card to your updated account. In the case of Russia, this will not be a problem, since any card from most domestic banks, a QIWI wallet, or a ruble iTunes Gift Card will do. This is very logical, because why change the AppStore region if you are not a paying AppStore user.
Go
First, let's consider the case when you have an American AppStore account, want to switch to the Russian segment, and have a problem with the balance in your account.Help and click on Support Contact Support, and then iTunes Store.

Account Management This topic is not listedI need to remove my store credit» and confirm your request.

I need to remove my store credit. Thank you!».
As a result, you will receive a letter stating that your account has been reset. Take a look at iTunes and check your balance; if there is no money left in your account, then you can move on to the next step - changing your account country.

Now we will consider the case if temporary services such as iTunes Match.
The presence of this subscription slightly complicates the procedure for switching to the Russian segment of the AppStore. First, you should download your entire media library from iTunes Match, provided that you do not have a backup copy of your cloud media library on any local media. The following steps are similar to those done when resetting your account.
Launch iTunes on your computer and open the main country of the iTunes Store. At the very bottom, we find the column Help and click on Support. Next, you will be redirected to the iTunes Support page in your browser, where you will need to select the item at the very bottom Contact Support, and then iTunes Store.

Next, you need to select the item on the left Account Management and click on the circle with the inscription This topic is not listed. In the text area that appears, write “ ", so that along with deactivation of the service, your account balance will also be reset. Confirm.

You will see a form in which you need to enter your first and last name, please note that the entered data must completely match those in your account. Next, indicate the email address where you can be contacted and the postal address to which your American account was registered directly. In the drop-down menu, select United States, and below, in the text area, write the following " I need to disable iTunes Match subscription", to disable the service, or " I need to remove my store credit and disable iTunes Match and all other subscriptions", so that along with deactivation of the service, your account balance will also be reset.
After all these procedures, you will be given a unique number to contact Apple support, and a notification about your placement in the queue will be sent to your email address. You will have to wait approximately 12 to 24 hours if you apply on a regular day, and up to three days if you send the application on pre-holiday days.
After some time has passed, you will receive a letter in your mail, in which you will be required to confirm the disabling of the iTunes Match service, to the address from which you received the notification you need to send a message “ I’m sure I need to cancel my subscription and recieve a partial refund. Everything I need from iTunes Match is already downloaded”, in which you acknowledge the suspension of service and also request a refund.
Receiving the next letter notifying you that the iTunes Match service has been suspended, as well as a refund, can range from three hours to... three weeks. Such a long time interval is due to the fact that technical support does not have the right to write a check for a certain amount, so your request must go through a whole filter of various bureaucratic procedures. In turn, you just have to wait for the treasured letter.
Changing the App Store country
All that remains is to cross the finish line - change the country of your AppStore account. Let me remind you that in order to change the “residence” of your account, you need to disable temporary services, such as iTunes Match, and also reset your account. All this is described in detail above. Bye America, hello Russia!
On iTunes. Launch iTunes on your computer and open the main country of the iTunes Store. At the very bottom, find the Manage column and click on Account. We confirm your password, and in the Account Information window that opens, look for the Country/Region line. Click on the Change Country or Region button and then, in the Select a country of region drop-down menu, select Russia. We acknowledge and agree to the Apple License Agreement. Then all you have to do is choose a payment method and that’s it, you’ve successfully changed your American account to a Russian one.
In the App Store on iOS. We go along the following path: Settings -iTunes Store, App Store - Apple ID - view Apple ID - country/region. Select the desired country.
Congratulations!
If you haven’t found an answer to your question or something didn’t work out for you, and there is no suitable solution in the comments below, ask a question through ours. It's fast, simple, convenient and doesn't require registration. You will find answers to your and other questions in the section.
I don’t even remember how many similar applications passed through my hands. They all promise mountains of gold, savings, alerts about various promotions and sales, the latest news and much more. In principle, they cope with their tasks perfectly, allowing me to spend my free time in nature, and not in search of the next discount. Today we will talk about a guide to the Russian AppStore, which is called - AppRus.
Review of the AppRus utility for iPad (iOS).
The first thing to note is that the developers have finally made a version for the iPad, which I have been waiting for for a long time, since this application initially seemed worthy of attention to me. Let's briefly go through the advantages:
1) targeting the Russian segment of the AppStore;
2) translations of descriptions of all applications;
3) news from the world of Apple and program reviews;
4) the ability to create your own collections and track any changes in real time by receiving notifications on the screen of your device or email.
When we open it, by default we get to the list of programs: paid ones are displayed on the left side, and free changes are displayed on the right side (by the way, I would do the opposite). At the top there is a filter system where you can switch to the entire AppStore or view applications with a rating above 3, which is very convenient. If you are only interested in new items or sales in general, no problem - just select the appropriate radio button.
Also, all applications are divided into categories, so navigation will not be difficult. In addition, you can always use the search.

You can see detailed information about each application, as promised, everything is in Russian. If you are interested in something, then feel free to add it to your list (fortunately there is a button for this on any page) and check the “inform me about price reduction” checkbox. Of course, you will need to register for this.

Let's go through the bottom panel and go to the "Best" tab. It displays programs recommended by other users, making it easier to choose if you're just wandering around and haven't decided what you'll download today.

The reviews contain the latest news, from which I was happy to learn that Angry Birds Seasons has become free. After being disappointed with the latest version, I will definitely switch to them now. By the way, they are now in 1st place in the top, while Space is only in 7th.

The only negative, although quite unpleasant, was revealed when the Internet connection failed. Perhaps it really was, but after a second everything was working as before (I checked), but for some reason the program specifically froze and only a few restarts corrected the matter.


Conclusion: if not for this annoying misunderstanding, the application could rightfully be called one of the best. I hope that over time the cause of the error will be eliminated.


