How to make a print screen using the PrtScr key. How to take a screenshot on a computer using the Print Screen key
Hello friends. Are you faced with the need to take a screenshot? Then read this article and I will tell you several ways to take a screenshot.
The Internet has become an integral part of the daily life of each of us. We visit social networks every day, communicate on forums, look for solutions to any problems, and also give advice to other people on solving these problems. And sometimes, when an explanation of a question needs to be supported by visual information, screenshots come to our aid.
The definition of this word is quite simple - it is a screenshot of any electronic device, which includes a computer monitor, smartphone and other modern gadgets. It would seem that what could be simpler than taking a screenshot? But some people face difficulties when it comes to taking a screenshot and turn to search engines for help.
If you are one of those people, then read this article in which I will tell you several ways to take a screenshot of your computer screen.
Print Screen button
The easiest way to take a screenshot is to use the Print Screen button. In order not to bother you with searching for this key, I took a photo in which I highlighted it. On a regular computer keyboard, this button is located here:
If you have a laptop, the Print Screen key is located here:

So, where is it, we figured it out, what next? And then press this key. Perhaps some of you will say that when you pressed the key, nothing happened or will look for where the screenshot was saved. But take your time, since the screenshot is saved only in the memory buffer, and to get it, we need to open the Paint graphic editor.
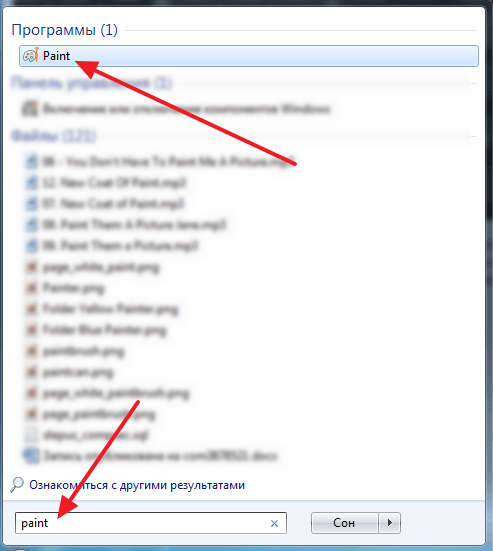
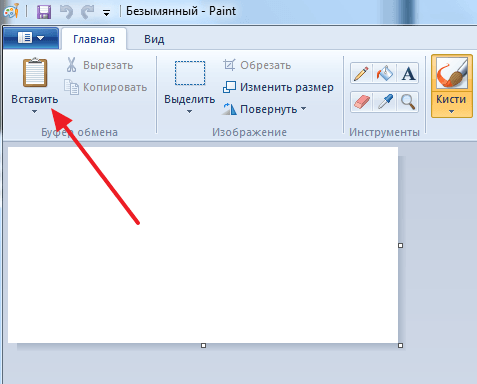
I think each of you is familiar with this editor, but just in case, I’ll still write where you can find it: Start - Programs - Accessories - Paint. Open it and click insert:

After this, a screenshot of your screen will be inserted into the window, which you can edit if you wish:

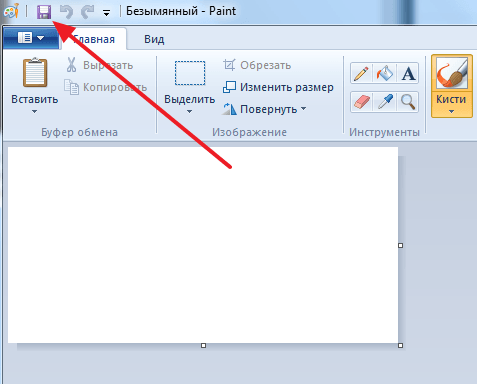
That’s basically it, after that all we have to do is save our snapshot in any convenient folder by clicking on the save icon:

This method is suitable for absolutely everyone, as it works in all versions of Windows.
Snipping Tool
Another way to take a screenshot of your computer screen is to use the Snipping Tool, but if you have Windows XP or earlier, this method will not work for you, since the tool is only available in Windows 7 and 8.
You can find this tool in the same folder as Paint. Opening the scissors:

Click Create and select the area of the screen that you need to capture. After this, a captured screen fragment will appear in front of you, on which you can also perform some minor actions and save it:

Where to upload a screenshot
Each of us has our own reasons why we need to take a screenshot, but, as a rule, most pictures are taken in order to post them on the Internet. Of course, you can post the resulting photo on your website or on a page on a social network, but how to post it on a third-party site?
Especially for this, there are photo hosting sites created just for posting your image there. They work quite simply: you upload your screenshot there, in response you are given a link to your image, which can be placed on any website. Let's take an example of one of these services to see how they work. I'm used to using photo hosting Radical, so I’ll use his example to show you how to upload a screenshot. I open it:

Select an image to upload and click “Upload”. After this, your image will download and you will receive links for posting it on other web resources:

Third-party screenshot programs
How long do you think it will take to take a screenshot of your screen using the methods I described above and upload it to a photo hosting site? I think you will spend no more than two minutes on this. But each of us values our time very much and does not want to waste even these precious minutes looking for easier ways to take a screenshot.
And no matter how funny it may sound, such a method really exists. It allows you to kill two birds with one stone; in our case, take a screenshot and upload it to a photo hosting site in one click. This method means using third-party programs to take a screenshot. There are also a lot of similar programs, but I recommend choosing Lightshot, which you can download here link.
Once you install this program, you just need to click the Print Screen button, after which you will need to select the area in which you need to take a screenshot, and it is ready. You will immediately be asked to edit the resulting screenshot, or save it, either on your computer or upload it to a photo hosting site, after which you will be given a link to your image.
Unfortunately, I can’t take screenshots of working with this program, since when it starts, the desktop becomes inactive, but I think you can figure it out without me, since everything is extremely simple.
Screenshot - literally translated as “screenshot”, saving the current image on the monitor as a picture. For different types of devices and operating systems, a screenshot can be saved in different ways, with its own characteristics. In addition to the built-in functions of the operating system, programs from third-party manufacturers can be used to take a screenshot.
Taking a screenshot is used both for entertainment purposes (saving an interesting moment in a video or game) and for work (sending a screenshot with a message about a problem, creating a report or presentation on a completed task).
How to take a screenshot on PC
By default, the Print Screen keyboard button (often shortened to PrtScr) is used to take a screenshot on personal computers. The button is located on the right half of the keyboard, next to the Scroll Lock and Pause/Break function keys.
Clicking saves the current screen image to the clipboard without compression. To view and save, you need to paste the screenshot into any graphics editor, such as Paint, Photoshop or GIMP.
If you need to immediately save screenshots in series, without being distracted by pasting from the buffer and saving, then third-party software is used for this.
If you need to take a screenshot quickly or there is no way to install applications on the system, you can use online processing services. The most famous and easy to use is http://makescreen.ru/, the rest work on the same principle.
Taking a screenshot using standard Windows tools
To save a screen or its element in OS Windows, two methods are used: Print Screen to save the entire screen and the Alt + Print Screen combination for the active window.
 To save a screen or its element in OS Windows, two methods are used: Print Screen to save the entire screen and the Alt + Print Screen combination for the active window
 To take a screenshot using standard OS tools, you need:
- press the Print Screen key;
- open the MS Paint program (located in the Start menu, Program - Accessories folder) or any other graphics editor;
- paste the screenshot into the work field using the key combination Ctrl + V;
- save the image via the File menu - Save in the required extension.
Important! The image from the buffer disappears when you restart the computer or save another image or text. Save the screenshot to a separate file as quickly as possible to avoid data loss.
Taking a screenshot using Snipping Tool
Since the release of the Windows Vista operating system, an additional “Scissors” application has appeared, which saves a selected area of the screen to a separate file and edits it on the fly.
Open Scissors through the Start menu - All applications. By clicking the Create button, a frame will appear on the screen outlining the boundaries of the screenshot. After selecting the sizes, Scissors offers to save the file in one of the available formats. The functionality of the program is very simple and minimalistic; additional functions include a marker, pen and eraser for editing.
Please note that, unlike Paint, scissors automatically save the user name and creation date in the image properties. In some cases, this may be important: for example, to control employees or maintain anonymity when posting a picture on the Internet.
How to take a screenshot in Windows XP and 7
Windows XP and 7 are no longer supported by Microsoft and no longer receive scheduled updates. For XP users, only two standard ways to take a screenshot are available: using Print Screen with Paint or installing additional programs.
The method using PrtScr → Paint → Ctrl+V has already been described above.
Windows 7 comes standard with Snipping Tool or Snipping Tool. Scissors cut out a portion of the screen of your choice, removing unnecessary information from the screenshot and saving time on editing.
It is possible to install additional software or editors. Users of Win XP and 7 usually cannot boast of modern hardware, so third-party software is recommended Lightshot or one of the many online services.
In addition to Scissors, the standard PitScr+Paint method, as well as installing additional programs, also work for Windows 8/10. In addition, an active key combination Win + Print Screen has been added, which saves the file bypassing the clipboard. The finished screenshot can be found in the Images - Screenshots folder.
 In addition to Scissors, the standard PitScr+Paint method also works for Windows 8/10, as well as installing additional programs
 “Ten” boasts a set of free applications in the internal Windows Store. The best of 36 applications was free Nimbus Screen Capture.
MacBooks are positioned as the best devices for designers, so built-in services for saving and editing photos are given a special place here.
A screenshot of part of the screen (analogue of Scissors) is built into the kernel and is called by pressing the key combination Shift + Command + 4. The result is saved on the desktop by default.
 The entire screen is saved using the combination Shift + Command + 3
 Shift + Command + 4 is also useful if you need to “photograph” a separate window. After the crosshair appears, press the spacebar, this will turn the cursor into a camera. Then click on the window with the left mouse button or trackpad. The same combination works for context menu snapshots.
How to take a screenshot in Linux
For most Linux systems, there is no standard way to take a screenshot. It is understood that the user will install the necessary software himself if necessary. The most commonly used applications are:
- Gnome-Screenshot;
- ImageMagick;
- Shutter;
- GIMP.
Find details on installing and using these programs for various systems on the Internet. The picture below shows the window for saving a screenshot for the Gnome-Screenshot application after pressing the PrtScr key.
 Window for saving a screenshot for the Gnome-Screenshot application after pressing the PrtScr key
 Special programs for creating screenshots on PC
Programs for saving images from the screen include:
- LightShot is a universal program for OS Windows, which can also work as a plugin in all popular browsers. Among the main features are a quick screenshot, the ability to share a public link to a taken screenshot in the cloud, on-the-fly changes in the built-in editor, and search by image fragment.
- PicPick – semi-professional free image editor. Features include excellent work with cloud services, one-click reposting on FB and Twiitter, and screenshot redirection by email. Capturing multiple windows is useful, allowing you to save a long site page as a whole.
- Greenshot is a free and open source application that works on all major operating systems. Its operating principle and capabilities are similar to PicPick, one of the best applications for Unix systems.
- Fraps– a small utility for capturing video and taking screenshots, distributed using a shareware model. Most often used for taking screenshots in games, it stands out for its simple settings and low load on the system.
- Joxi is a Russian cloud-based tool for taking screenshots and working with them online. All functionality of the program is designed for shared use with frequent exchange of images; the program is popular among web developers and testers. There is a plugin for Google Chrome for saving website pages without installing the main Joxi, and there is a convenient image editor.
In addition to these five programs, there are dozens, if not hundreds of similar applications on the Internet. When choosing, first of all focus on ease of use, available functionality and price.
Taking a screenshot on a mobile device
Saving a screenshot on mobile phones and tablets is implemented using a system for both Android OS and iOS.
To take a screenshot for an Android phone, you need to:
- Open the screen from which you want to save the image.
- Hold down the power and volume + buttons.
- When the click sound is heard and the save icon appears, release the buttons.
- A “Screenshot saved” message will appear on the notification screen.
 Hold down the power and + volume buttons and everything will work out
 The saving order for Apple products is as follows:
- Open the desired screen.
- Hold down the Power and Home buttons.
- After a click and a white flash on the screen, release the buttons.
- The image can be found in the device gallery.
 Retention Procedures for Apple Products
Special services for taking screenshots in the browser work according to the already familiar principle of PrtScr → editor → Ctrl+V, replacing the second step. In addition to actually editing and saving the file, many sites offer convenient one-click reposting on a social network or saving your screenshots to the cloud.
The simplest and one of the most popular editors – PasteNow. Created for quickly sharing screenshots, after inserting and editing it provides the user with a short link and the file itself for downloading. Screenshots are stored for 6 months after the last viewing.
 The simplest and one of the most popular editors
 Snaggy – a foreign analogue and the most used site on the Internet for creating screenshots. The principle is the same: copy the entire screen or the active window using Alt + PrtScr, paste it into the service, edit, save. Working with an album of images is possible after registering an account; screenshots are stored for six months.
 The most used site on the Internet for taking screenshots
There is no standard way to take a screenshot for games. Of course, you can save the screen with the PrtScr key, pause the game and insert a picture into the editor, but this is too long and the wrong approach to the issue. A computer is needed to simplify a person’s life, and not complicate it with unnecessary actions.
 There is no standard way to take a screenshot for games
 Some games understand pressing the Print Screen button and save the screenshot to the installation folder or “My Documents”. This is not very convenient: each time you have to search and copy the files to another location so that after deleting the game the screenshots do not disappear. Win + PrtScr on the latest versions of OS Windows is also not very convenient: if you often use this combination, chaos in the “Pictures” folder is guaranteed.
The most popular software for capturing game videos and screen images is Fraps. Fraps works in the quality you need, saving a screenshot with a time stamp and the name of the game in which it was taken. The program uses very few computer resources and performs its tasks perfectly.
 For Steam users, screenshots are taken using the F12 function button
 For service users Steam Screenshots are taken with the F12 function button. You can find them in the program installation folder or through the settings menu.
Screenshots are saved only when the overlay is active - if when you press Shift+Tab over the game the Steam menu does not appear, then screenshots cannot be taken.
Recently, many users of personal computers have been interested in the question: how to take a screenshot on a computer? The answer is both simple and complex at the same time. Let's start with the Windows operating system. Fortunately, the developers of this system took care of this. They've attached a screenshot feature to the "print screen" key, which is located in the top right corner of your keyboard (Figure 1).
How to take a standard photo?
Interesting fact: If you have a multimedia keyboard, then most likely the key can mean quickly sending a document to the printer.Tip: Consult your keyboard's documentation. Basically, a special disk is supplied with the keyboard which will help you reconfigure the keyboard keys.
Although this is one of the oldest methods, it is also the most reliable. When you press this key, a screenshot of your screen is saved in temporary memory (clipboard). Also, when you press the key combination “Alt” + “print screen”, a screenshot is taken in the window on which the focus is located, or, more simply put, which is currently open.
Once you have copied a screenshot of your screen to the clipboard, you need to save it as a graphic file. To do this, we will need any graphic editor, in our case it will be “Paint”. Despite the fact that this is a very simple graphic editor, it is quite suitable for our purposes. In order to open it, you will need to go to the “Start” menu, click on the “All Programs” tab, find the “Accessories” tab, and then click on the “Paint” icon (Figure 2).

A working window of the graphic editor will open in front of you. Now you need to go to the “Home” menu and click on the “Insert” tab or press the key combination “Ctrl” + “V”. You will see that the screenshot taken will appear in the graphic editor window (Figure 3).

Next, you will need to save this screenshot in graphic format. To do this, click on the menu tab and select the “Save” tab. You will be offered several formats for saving the graphic file, select one of them. Give your file a name and save it (Figure 4).

Cutting the screen with scissors
This stage of saving the screenshot has come to an end. But what if you only need to save a certain part of the screen? If you have the operating system Windows 7 or Windows 8, you can use the “Scissors” tool. This program is located at “Start” - “All Programs” - “Accessories” - “Snivers” (Figure 5).

When you run this program, the entire screen will become light and you will need to select the area of the screen that you want to save. Hold down the left mouse button and move smoothly to select a fragment of the screen. When you release the button, the cut fragment will open in a new window (Figure 6).


I would like to draw your attention to the fact that a rectangular selection of the screen is used as standard. If you click on the arrow to the right of the “Create” tab, you will be offered four options for selecting the screen.
- Freeform is any shape you want to apply when drawing with your cursor.
- Rectangular shape is the standard screen highlight shape.
- Window - screenshot under the cursor, highlighted in red.
- Whole screen – respectively, a snapshot of the entire screen except the cursor.
Also, the Scissors program can take a screenshot of a drop-down menu. To do this, you need to hold down the key combination “Ctrl” + “Print Screen”. The program will take a screenshot which you will need to save.
Working with screenshots - programs that will help you
Now it's time for programs to work with screenshots. One of the main programs that I would like to describe is Lightshot. This is an easy and accessible program that will help you take a beautiful screenshot. You can download it on the Internet, and the features of the program will be described below.
After installing and launching the program, the Lightshot icon will appear in the lower right corner next to the clock (Figure 9).

First, let’s get acquainted with the settings of this program; to do this, right-click on the Lightshot icon and select “Settings” (Fig. 10).

The settings window will open and you will be presented with four options:
- Basic – standard program settings, in which you don’t need to change anything.
- Hotkeys – You can change the keystrokes to save a screenshot.
- Formats – allows you to change the graphic format of the screenshot.
- Proxy – allows you to run a proxy server (an unnecessary function in this program).
We've sorted out the settings, now let's move on to the best part - working in the program itself.
To take a screenshot, press the well-known “Print Screen” key. Your computer screen will darken a little, now you must select the area of the screen you are interested in and save it by clicking on the floppy disk icon in the program (Figure 11).

Pay attention to the small menu on the side; it displays additional features of the program (Figure 12).

These include the following:
- Pencil – allows you to draw or highlight randomly on a screenshot.
- Line – allows you to draw a line, it is very convenient to mark certain areas of the screenshot.
- The arrow is a very convenient feature that allows you to point in a screenshot.
- Rectangle – allows you to mark the places you need in the screenshot with a rectangle.
- Marker – you can highlight any area of the screenshot with a marker.
- Text – as the name suggests, can sign your screenshot.
- Color – selects a color from the palette to mark the top items.
The bottom menu allows you to send or save your screenshot (Figure 13).

The bottom menu has the following items:
As you can see, the Lightshot program has all the necessary capabilities for creating screenshots.
Description of some programs for taking screenshots
There are a lot of programs for creating screenshots. And each user likes this or that program according to his tastes. A small list and descriptions of these programs are given below.
FastStone Capture
A very good program for taking screenshots (Figure 14).

Its features include:
- Setting up hot keys. You can choose the keys yourself instead of the “Print Screen” key
- Built-in graphic editor. After taking a screenshot, you can easily edit the image in the editor
- Supports all known graphic formats.
Snagit
One of the most popular programs on the Internet (Fig. 15).

The amazing features of this program are described below:
- The ability to create high-resolution screenshots, in other words, several pages long.
- Built-in graphics format converter.
- A graphic editor that allows you to finely edit screenshots.
- Timer for the frequency of taking screenshots. You can set a time period for taking a screenshot.
- Russian language support.
Floomby
A very simple and effective program (Figure 16).

The main advantages of this program:
- Take a snapshot of your screen with one click.
- Ability to send a screenshot to your server for further work.
- Doesn't take up much memory.
Looking for “print screen” or how to take screenshots on Macos
Now it’s the turn for Apple connoisseurs. What should those users do who do not have the “Print Screen” key and have a completely different operating system? Let's take a closer look at the steps needed to take a screenshot on the Macos operating system. The main keys that replace “Print Screen” on this system are:
- "Cmd" + "Shift" + "3" - a screenshot that is saved on the desktop
- “Cmd” + “Shift” + “4” - A specific area marked by the user and saved to the desktop
- “Cmd” + “Shift” + “4” + “Space” - Select a specific window with the ability to take a screenshot
But several unpleasant situations arise:
- Screenshots are saved only in png format.
- All screenshots are saved on the desktop.
- A small shadow along the entire outline of the screenshot.
In order to fix these problems, you should use the Terminal program and its commands. To do this, you must go to the “Go” menu, then click on the “Utilites” tab and find the “Terminal” program (Figure 17).

After the console (terminal) has opened, you need to enter the commands. To change the graphic format, enter the commands:
- defaults write com.apple.screencapture type format…
- killallSystemUIServer
After the word format we put one of the graphic format options (Jpeg, tiff, etc.).
If you need to remove a shadow from a screenshot, then to do this, enter the commands:
- defaults write com.apple.screencapture disable-shadow -bool true
- ekillall SystemUIServer
And finally, the solution to the third problem, file location. Accordingly, enter the following commands:
- defaults write com.apple.screencapture location ~/Dokuments (or any other folder)
- killall SystemUIServer
Programs for taking screenshots in Macos
Naturally, there are programs for taking screenshots for this famous operating system. Let's take a closer look at them:
Skitch
One of the best developments for Macos (Figure 18).

The possibilities of this program are endless:
- Cutting out any part of the screen.
- Inscriptions of any type and format.
- History of your saves.
- Free, which is rare for the family of these operating systems.
LittleSnapper
Very beautiful program. (Figure 19)

The advantages are not so great, but they are:
- Built-in browser for creating screenshots for websites.
- Converting graphic formats.
- Grouping screenshots in iPhoto.
Of course, the list of programs does not end there, but the remaining programs simply copy the functionality of the ones described above and there is no point in dwelling on them. This is where I would like to end this review. I hope that you were pleasantly surprised and that you learned a lot about taking screenshots on your personal computer.
This is a screenshot, a picture that shows everything that is on your screen. The need to take a screenshot arises quite often. Therefore, this function was built directly into the operating system. In this material you will learn about which key to take a screenshot on a computer with the Windows operating system.
In the Windows operating system, the PRINT SCREEN key is used to take screenshots (on some keyboards PRT SCN). This key is located in the upper left part of the keyboard, next to the NUM LOCK, CAPS LOCK and SCROLL LOCK indicators. In order to take a screenshot you just need to press this key.
After pressing the PRINT SCREEN key, the screenshot will be placed on the clipboard. In order to save this screenshot as a picture, you need to open any graphics editor, paste the screenshot into it and save it as a file. For example, you can open the built-in graphics editor Paint. To do this, open the Start menu and search for “Paint.” After this, the system will find this program and you can open it.
After opening the Paint program, click on the “Paste” button or use the keyboard shortcut CTRL-V. After this, your screenshot will appear in Paint.
After saving the picture, you will receive the screenshot you need as a file.
A little trick:
When taking a screenshot, you can use the PRINT SCREEN key together with the ALT key.
In this case, the system will create a screenshot of only the active window. This way, you can create screenshots only of the program you are currently working with.
This approach saves a lot of time. Since the resulting screenshot does not contain unnecessary information and does not need to be cropped in a graphics editor.
Jan 18 2014
Hello. Congratulations to all visitors to the computer help blog on the past Christmas holidays. Recently, in connection with one of the articles, Lyudmila asked the following question: “If it’s not a secret, what program do you take screenshots with? Sharpness is good. The pictures on my website are not of such high quality.”
Therefore, the topic of our issue is to take a screenshot of a website or how to take a screenshot. In the last issue I told and showed.
Mainly for my hobby, blogging, I use two, in my opinion, practical and user-friendly programs, these are FastStone Capture and Snagit 11, I very rarely use scissors in Windows 7.
Today we will look at 5 different options for how you can take a screenshot of a computer screen using the magic print screen button, the scissors application, two good programs FastStone Capture and Snagit 11, and we will also use the useful Floomby service to publish screenshots directly on the Internet.
Magic Print Screen Button

If you want to take a screenshot, but you don’t have special programs for this, then you can use the magic Print Screen button, which is found on all keyboards.

Open the desired picture, image or text, click the Print Screen button, go to the Paint image editor, insert our screenshot and click the Insert button.


You can also select the appropriate format (file type) from the eight options offered. Don't forget to click the Save button at the end.

This is how you can take a screenshot of a website using the magic Print Screen/Sys Rq keyboard button. The only disadvantage of this method is that it takes a snapshot of the entire monitor. If you want to take a photo or cut out a small area of the screen, then I recommend using Scissors.
How to take a screenshot of a website using the print screen button | website
How to take a screenshot with scissors
The scissors function is available in the Windows 7 operating system; unfortunately, Windows XP does not have such a useful option.
In order to launch the scissors application, you must also go to the Start menu >>> All Programs >>> Accessories >>> Scissors.

Everything is easy and simple here. Select the desired area of the screen with the mouse cursor and in a second it will appear before your eyes.


Select where to save, give a name, indicate the file type and click Save.

Here are two easy ways to take a screenshot without using third-party programs. If you want to edit your screenshots, add text, other images, and so on, then you need special programs, which I will discuss below.
How to take a screenshot with scissors in Windows 7 | website
ScreenShooter: screenshot maker with editor and cloud
Almost all modern computers support taking screenshots and copying them to the clipboard, however, editing and sending them is a rather complex and time-consuming process. The free Carambis ScreenShooter program can solve this problem. The screenshot works as an addition to the standard Windows OS key Print Screen.

It helps to create snapshots not only of the entire screen, but also of an arbitrary area of it, as well as a specific window. To edit screenshots, there is a built-in editor that allows you to blur unnecessary areas, add arrows, text and other graphic elements.
The main feature of the ScreenShooter program is the presence of internal functions that allow you to send the resulting screenshot by email or save it in the YandexDisk or Cloud Mail.ru cloud storage. The screenshot also has its own cloud storage for screenshots - sending pictures there occurs instantly.

ScreenShooter is a universal and free program for creating and editing screenshots.
Screenshots with FastStone Capture
FastStone Capture is one of the first programs I used for image editing in my blogging hobby. Sometimes I still resort to her help in order to reduce the size of the image. It has much more capabilities, which I will tell you about now.
After you have downloaded and installed the program, a small window appears with a navigation bar.

Let's take a closer look at all the control panel buttons.

There are 6 buttons in different screenshots, I will describe them in turn from left to right:
- Capture active window
- Capture a window or object
- Capture a rectangular area
- Capturing an area by hand
- Capture the entire screen
- Capture a scrolling window
It is possible to record a video of your screen. The output products can be saved to file, word, excel, printed, sent by mail, transferred via FTP, and so on.

In the settings, you can go to the help section if you don’t understand something (although everything is in English), open the desired file for editing, convert the image to PDF format, change the color of the program in the Skin tab, and so on.

I'll take a photo of a rectangular area of the screen by clicking the third button from the left in the navigation bar. You can use any other button to take a screenshot.


Click on the diskette Save as - save the image and then use it at your discretion.

Unfortunately, the program menu is in English.

In the picture below I will show the main buttons with which you can edit captured images.

- Save As - save the image as...
- Rectangle - selecting the desired area
- Zoom in - enlarge the image
- Zoom out - reduce the image
- Magnifying glass 100% – image size in percentage, can be enlarged
- Draw - text and graphics editor, similar to Paint
- Caption - add a title or caption
- Edge - image edge editor
- Resize - change the image in pixels
- Paint - graphical image editor
- Crop - crop the image
- Cut - cut with scissors
- Copy - copy content
- Paste - paste content
- Email – send by mail
- Print - print on a printer
- Word, Excell - send to Word, Excel, Power Point or via FTP
- Close - close or exit.
FastStone Capture is a convenient and useful program for working with screenshots, screenshots, with which you can also record video from your screen.
Take a screenshot of a website - FastStone Captur | website
Snagit - high-quality screenshots
I started using the Snagit program not so long ago, but I have already managed to feel all the subtleties and delights of this utility for working with screenshots of my screen.
I’m writing this article about how to take a screenshot, I use the Snagit program and post images with illustrations for each method for clarity and ease of understanding the information.
After launching the program, the welcome message Welcome to Snagit appears.

A quick launch of the program may appear at the top of the screen.

Open the desired page, image or picture and press the Print Screen/Sys Rq button. A cursor appears with which you can take a photo of any part of the screen, down to a small window. See below for an example of this.

You can also access the program from the shortcut that will appear after installing Snagit.

We go to the Snagit 11 shortcut, an initial window appears in front of us where you can select the profile you want to work with.

- Image - image collection,
- Video - video recording,
- Text - text extraction
There are other profiles, but I have never used them.
Select the Image profile - collection of images, take a photo and click on the red button with the camera.

We take a screenshot of the desired area of the desktop, I’ll make it arbitrary, you can make it yours.

The Snagit program has a lot of different menu settings for editing pictures and images. There are six main tabs: Drawing, Image, Hotspots, Tags, View, and Output.

I'll go through the main ones that I use most often.
On the Drawing tab there are options: copy all, clipboard, cut, copy, paste; adding highlight, footnotes, arrows, stamps or graphics, pencil, highlight area, scale, adding text to images, lines, shapes, fill, eraser and so on.

On the Image tab, you can edit the captured images as you please: trim, crop, change the size and color of the canvas, add effects around the edges, add a watermark, and so on.

If you did something wrong, you can go back or forward a few steps.

There are convenient left and right arrows for this, they are located in the upper left corner of the Snagit 11 program editor program.

Now we have made all the changes and edited our screenshot, now we need to save it. To do this, go to the file tab in the top left of the screen, hover the mouse cursor over Save As and select the desired format:
- Snagit (Snag)
- Standard format
- Adobe PDF
- Adobe SWF

I prefer the standard format, which has the following to choose from: BMP, CUR, GIF, ICO, JPG, MHT, PDF, PNG, SNAG, SWF and TIF. Of all the ones listed above, I like JPG and PNG the most, you can choose others. At the end, don't forget to click on the Save button.

This was a short tutorial about the Snagit 11 program, which can take a screenshot of a website, then edit the image.
How to take a screenshot with Snagit 11 | website
Taking screenshots together with Floomby
If you need to take a screenshot and send it to someone over the Internet, then there is a service called Floomby specifically for this. Using it, you can take a screenshot, look at it and send a link with the image on the Internet. All this can be done in 5 - 10 seconds.
To do this, you need to go to the website https://floomby.ru/.

Click on the green Download button (2.7 Mb), download and install the floomby agent installer on your computer.


Enter your name, email address, password, repeat the password and complete the registration procedure.

Then log in to the site, enter your email and password, and click Login. You can also check or uncheck the box - Remember me next time.

A small navigation panel appears in front of us, on which there are 6 large buttons with different actions: fragment, screen, files, history, settings and exit, and 4 small auxiliary ones.

Click the Fragment button, select the desired area of the desktop and click Send.

Then, under the word Send, three action options appear: to Floomby.ru, to the Clipboard, or save to your computer.

If we select Floomby.ru, sending to the site will begin and a small window will open with a choice of actions: Add to Gallery, Open or Copy.

Click Open and a browser tab will open in front of us, in which our screenshot will be displayed, and below is a link to the image, which you can copy and send to anyone on the Internet. The person who receives the link will follow it and see your photographed image.

This is how you can take a screenshot in a few seconds, send a link with it to your friend, relative, and so on.
Video lesson - take a screenshot of a website with Floomby | website
Finally
Today we learned how to take a screenshot of a website or how to take a screenshot using tools such as the magic print screen button, the scissors application, the FastStone Capture program, Snagit 11 and the Floomby service. I don’t know which of these five options you will choose, each is good in its own way, so the choice is yours.
You may have questions related to how to take a screenshot. You can ask them below in the comments to this article, and also use the form with me.
Thank you for reading me on


