How to make an image larger. How to reduce or increase the size of an image in Photoshop
I love to do graphics: draw on a graphics tablet, process pictures and photographs in Photoshop and create collages. Sometimes there is a need to enlarge a ready-made, but small picture. Typically, after such manipulations, the graphics look blurry due to the fact that pixels are lost. Now we’ll talk about how to enlarge an image without losing quality.
I tried many different programs to enlarge images without losing quality, but all of them had very poor quality images after enlargement. And then one day, completely desperate to find what I needed, I came across a foreign website where the program was offered SmillaEnlarger beta versions.
Most likely, I would have left there anyway, because... I don’t speak foreign languages, but thanks to the fact that I have a Google Chrome browser, I was offered a translation of this page and in the description I read that
SmillaEnlarger is a small graphical tool (based on Qt) for resizing, especially enlarging high quality bitmaps. (The algorithm used is my own invention)
And I decided to try it too.
You can download the program from the official
Working with the SmillaEnlarger program
Go to the website page with this program and click the big green button “ Download"(if your page is without translation, then the button is called " Download»).

The program is packaged in an archive that must first be unpacked.
As a result, you should have a folder SmillaEnlarger-0.9.0. Open it and go to the folder SmillaEnlarger.

We find the file in it SmillaEnlarger.exe, and launch it.

As you can see, there is no need to install the program. You can simply run it from this folder.
A program will open in which a picture with a dog is shown as an example.

Upload your picture


Set the necessary parameters:
In the window OutputHeight set the height size of the enlarged image.

In the window WriteResultto You can write your preferred name for the enlarged file or leave the same name it had, only the program itself will add the letter “e” at the end of the name through a lower hyphen. The file will be saved in the same folder where it was before.

If you want to save the file to another folder, you need to uncheck the box next to the entry UseSourceFolder. Then the button is activated ChangeFolder, by clicking on which you can select another folder on your computer.
Now you can click on the Enlarge & Save button below and in a couple of seconds you will have an enlarged image file in the specified folder. And the file quality is quite tolerable.
If you want the file’s performance to be even better, you can try to select other parameters.
Smilla Enlarger Options

- OutputDimensions(Finished picture size)
Specifyzoomfactor(Specify scaling factor)
Specify width of result(Specify the width of the result)
Specify height of result(Specify the height of the result)
Fitinsideboundary(Set internal border)
Stretch to fit(Stretch)
Crop to fit(The harvest is picking up)
Fit inside, add bars(Paste inside, add bars)
- Window OutputHeight(Height of the displayed image)
- Enlarger Parameter(Increased parameter)
Default(Default)
Sharp(Enhanced)
Painted(Tinted)
Sharp &noisy(amplified with noise)
- ThumbnailPreview(Thumbnail Preview)
- Size(Size)
- Write Result to(Write the result)
- In Folder(in folder)
- UseSourceFolder(Use source folder)
- ButtonChange Folder(Change folder)
- Enlarge &Save(Zoom and Save)
- Cropping Format(Crop Format)

- Cropping(Format)
- Parameter(Parameter)
- Jobs(Job)
- Log(Magazine)
- Help(Help)
The default parameters are enough for me for now.
Video on how to enlarge an image without losing quality using the Smilla Enlarger program:
If you use another program or know of a program that enlarges the image better, then share with us in the comments below.
Sometimes it happens that you need to resize an image. The reason for this could be many factors. Firstly, the higher the resolution of a photo, the larger its size, and such files can be problematic to store on your device. Secondly, if you need to upload a photo via the Internet, problems may arise, because some file hosting services have a maximum permissible photo size limit.
That’s why in this article we’ll talk about how to change the resolution of a photo. This may come in handy when working on a computer, so let's get started.
What is permission
First of all, let's understand what permission is. And the term is basically simple: resolution is the number of pixels vertically and horizontally in an image.
As you know, the more pixels a photo has, the larger its size. However, nowadays there are an innumerable number of programs that can reduce the size of an image, thereby reducing its size without losing quality. Well, now let’s talk in more detail about how to change the resolution of a photo.
I would also like to say that if the number of pixels is reduced relative to the original value, the photo will not lose quality, but if the same value is increased, the difference will become noticeable.
Method number 1. Paint
Everyone is probably familiar with the Paint program. But despite its small number of functions, it can help in changing the resolution of a photo.
So, let's say you have a photo with a resolution of 3,000 by 4,000, and you want to reduce that number by half. To do this, open Paint. You can use the search by calling it using the Win + Q keys. There, immediately click on “File” and select “Open”. In the explorer that appears, indicate the path to the required photo and click “Open”.
You now have your photo in front of you. To change its resolution, click “Resize”. This button is located on the top panel next to “Select”.
Now a small window has opened, in which you first need to select in what quantities the size will be changed. There are two options to choose from: pixels and percentages. Let's choose the first one. Now you need to check the “Maintain proportions” checkbox, this will prevent the photo from becoming narrowed or flattened.
Now you can start resizing. Since we initially wanted to reduce the photo by half, we entered the value 2,000 in the “Horizontal” field. You probably noticed that the “Vertical” field filled in by itself, this is due to the fact that the “Keep proportions” checkbox is checked "

Now click OK and we can safely save the photo in a new size: “File - Save”.
This was the first way to change the resolution of a photo - in Paint, now let's move on to the second.
Method number 2. Adobe PhotoShop
Now we move from small to large, more precisely from Paint to PhotoShop. Of course, these are two but they are not similar to each other, however, this approach will not be radically different from the previous one.
So, let's start figuring out how to change the resolution of a photo in PhotoShop. First you need to open it. Immediately after that, click "File" and then "Open" and navigate to your photo.
Now click on the “Image” item on the same toolbar. In the list, select the line “Image size...”. Or you can simply press the key combination Alt + Ctrl + I.
In the window that appears, immediately check the box next to “Keep proportions.” And in the “Dimension” column, select “Pix.” from the drop-down list. Now feel free to resize the photo.

Now you know how to change the resolution of a photo without losing quality using PhotoShop.
Conclusion
As you may have noticed, you don't need to know much to change a photo. Anyone can perform the above manipulations, and in the end you will get what you want: the photo will change, but the quality will remain the same, and the file size will be noticeably reduced. We hope the article gave you the answer to the question of how to change the resolution of a photo.
The desire to resize a photo appears when there are unsuccessful shots (when unnecessary and superfluous details are captured), placement of an avatar (on a personal page on a social network, in a forum on a website, in an online store), creating various photo portfolios and under other circumstances. There are special tools for this.
You can resize a photo in three ways: using standard programs in the Windows operating system, using third-party programs, and online via the Internet. Let's look at each method in more detail.
Three easy ways to resize a photo
How to resize a photo in paint
All versions of Windows have a Paint program. Launch it and click the “menu” button in the upper left corner. Select “Open” and find the photo you want to edit. We load it into the work area. Next, if you need to trim it, select the appropriate item in the top panel of the program. Using the cursor, we determine the area of the photo that needs to be left. We crop and save the result.
The second option is to select the “Select” function. Select the desired area of the photo and press the key combination Ctrl+X (cut). Next, open the Paint program again. The work area in it is empty, point the cursor there and press the key combination Ctrl+V. The photo fragment is inserted into a new Paint document. If the white background of the working area is larger than the inserted photo, you can reduce it using the same cursor. We successfully save the result.
There is a third option - when you need to reduce the photo to certain pixels. Select the “resize” item at the top of the program.

Windows 7 has a Picture Manager program. It is very similar to Paint. Launch it and select “File” in the upper left corner. Click on “Find drawing”. We find a photo. Next, select the “Drawing” item, there are two processing options - “Crop” and “Resize”. You need to use them in the same way as with the functions of the Paint program. We change the image and save it safely on the computer.
How to resize a photo using programs
There are many quality programs from third party developers. Particularly worth highlighting:
— Image Resizer,
— Movavi photo editor,
- Adobe Photoshop CC,
- PIXresizer
— Fotosizer,
— BImage Studio, etc.
Most of them are free and freely available on the Internet. The download and installation process will take from 5 to 30 minutes. As an example, consider the Image Resizer program.
We find it using a search engine, download it, install it on the computer, and launch it. A program window opens in which you need to click on the Add files menu. Then select the desired photo and go to the Settings section.
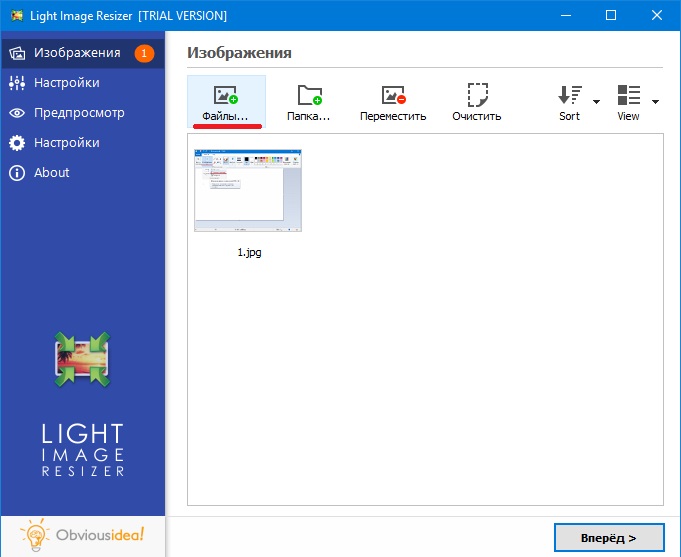
In the settings, enter the desired size and click Run. The photo with the new dimensions is saved to the desktop in a folder specially created by the program. Ready!

Download Image Resizer— https://light-image-resizer.ru.uptodown.com/windows
How to resize a photo using online services
As well as third-party programs, there are many online services on the Internet that offer to crop a photo or change its size by entering pixels. The most popular and frequently used of them are:
- imgonline.com.ua,
- resizepiconline.com,
— croper.ru,
-resizenow.com
- inettools.net,
- optimizilla.com.ru,
- reduction-image.com,
- pichold.ru.
Let's take a closer look at the imgonline.com.ua service. Go to the website and click on the Resize tab.

Next, click the “Select file” button. Find a photo on your computer and upload it. Next, enter the desired width and height in pixels. Select the type of resizing. If necessary, make additional settings, select the format of the future image and click “OK”.

A new page with information about the photo will open. There are two options - either open the photo for viewing (if you don’t like something, you can “Go Back”), or download it. Ready! The photograph has received new dimensions.

In general, the use of the listed methods is very simple. The main thing is to follow the prompts and enter data in the required fields. The output will always be a high-quality image with the required pixel parameters.
At some point you may have a question about how to enlarge a photo without loss for printing. After all, when you enlarge an image, resolution is lost, which will affect printing. I might suggest increasing the size of a cropped image using a product called Genuine Fractals 6. Since I have had experience with Genuine Fractals in the past and have used it for some projects, I decided to write a short article about professional photo enlargement for printing, and in addition do a comparison between Photoshop and Genuine Fractals 6 Pro enlargement tools.
1. What size is suitable for printing?
One of the most asked questions by photographers who don't have very much experience with the printing process is how large can they print images from their DSLR digital camera. Traditionally, the rule is to divide the image's pixel width by 300 to get the best quality printable size in inches. For example, if you are shooting with a Nikon D90, the image resolution will be 4.288 (width) x 2.848 (height). Literally, this means that it has 4,288 horizontal pixels and 2,848 vertical pixels on the image sensor. If you multiply these numbers, you get 12,212,224 pixels or 12.2 megapixels - the total number of pixels available on the sensor. So in the above case of the D90, dividing 4.288 and 2.848 by 300 gives a print size of 14.3 x 9.5 inches. Why do we divide by 300 and what does this number mean? This number represents "DPI" (dots per inch) or "PPI" (pixels per inch), and means how many dots/pixels per inch the printer will print on paper. The higher the number of "dots" per square inch, the more tightly and closely spaced the dots will be, resulting in a smoother transition and less space between dots and, ultimately, less "grain". 300 dpi produces magazine-quality prints, while lower values below 150 produce grainy and fuzzy printed images.
Given the above information, how large can your Nikon D90 print be? Now that you know what DPI means, the first question to ask is how good the quality of the print will be.
Take a look at the following table:
Nikon D90 12.2Mp 300 DPI(highest quality) – 14.3″ x 9.5″
Nikon D90 12.2Mp 240 DPI(good quality) – 17.9″ x 11.9″
Nikon D90 12.2Mp 200 DPI(medium quality) – 21.4″ x 14.2″
Nikon D90 12.2Mp 150 DPI(low quality) – 28.6″ x 19″
If you want the highest quality photo for magazine publication at 300 DPI, you could easily print a full size standard 8″ x 10″ and can even afford to crop it to fit the page perfectly, or print a custom size to 14.3″ x 9.5. ″. Some professional photographers print at 240 DPI and find it sufficient for the work they are selling, so you might want to go a little lower. However, quality below 240 DPI is unacceptable for photographers due to loss of quality and "softness" or "blurriness" (if the image is not resized correctly).
So does this mean you're limited to those small prints taken with a DSLR? What if you want to hang your beautiful photo in a 24″ x 36″ frame? This is where proper image resizing can help you achieve great results.
Printing a photograph in the days of film was quite easy - photographers already knew the print size of 35mm or medium format film and it was easy to know what size the printed photograph would be without much loss of detail or sharpness. With the invention of digital photography, things are now different, sometimes more complex with all this DPI/PPI language and resizing options with different algorithms. New advances in digital processing now make it possible to produce much larger prints with minimal loss of quality and detail. Let's take a look at the two most commonly used image enlargement methods used by professionals.
2. Enlarge images usingAdobe Photoshop
Adobe Photoshop is the most popular graphics program used to enlarge images. The tool for enlarging images in Photoshop is called Image Size and is available in the top navigation menu Image -> Image Size. When you open your photo and go to Image Size, you'll see something like this:
The original width and height indicate the size of the image loaded into Photoshop. In the example above, I took a 1024 x 768 photo and quadrupled it by changing the width to 4096 (the height changes automatically since I selected the "Keep Aspect Ratio" option). Since I increased the size, the middle section indicates that if I print this photo at 240 DPI, I will end up with a size of 17.067″ x 12.8″. If I change the 240 to 300 DPI, the print settings drop to 13.653″ x 10.24″ while maintaining the same image size.
Let's move on to a real-life example and see what happens when you enlarge a photo using Photoshop. I chose a photo of a bird that I took a little earlier this year:

Camera settings NIKON D3S @ 300mm, ISO 1400, 1/1600, f/7.1
It has a lot of detail and is very sharp, so it's a great example to test. This is what the image looks like at 400% scale:

As you can see, it's "pixelated", which means it has a lot of squares. This happens because the original image is made up of pixels and when the size is increased, the only thing the computer can do is increase the number of pixels that represent one pixel. In the example above, approximately 4 pixels now represent a single pixel because the image is viewed at 400% scale, hence "pixelated". If you did the same for print, it wouldn't look good with all those squares. To deal with this problem, Adobe has come up with several image interpolation algorithms that convert square pixels and provide a smooth transition for both increasing and decreasing image size. However, Adobe strongly recommends not increasing the size of the photo, as the extra pixels are created by analyzing adjacent pixels and choosing a middle color for a smooth transition, which results in blurred details. Take a look at the following image, which was enlarged using Photoshop and the Bicubic interpolation algorithm (smooth gradients):

As you can see, the pixel boundaries have disappeared and have a smooth transition. However, the edges are too smooth and the image has lost the sharpness that was present in the original image. This is not very noticeable if you look at photos from far away, but if you look very close, the lack of sharpness will be obvious. After increasing the size, you can manually add some sharpening, but do this very carefully, as this manipulation can make the image unnatural.
3. Enlarge images usingGenuine Fractals 6
A fairly popular tool for enlarging images among photographers is OnOne Software's Genuine Fractals 6 Professional - advanced software for professional photographers, designed specifically for enlarging photos to very large and gigantic sizes. Compared to Photoshop, it has a more sophisticated algorithm that not only analyzes nearby pixels but also does a decent job of preserving the sharpness and details of the image. This is what it looks like:

Using Genuine Fractals 6 is very simple - all you have to do is enter new dimensions for the image or select dimensions from the Document Size panel, and the program will automatically enlarge it and crop it to the specified dimensions. For more control over transitions, the program allows you to select the image type using the Texture Control panel:

As you can see, I chose "Lots of Detail" because I wanted to maintain as much detail as possible for the feathers and other areas. Here's how Genuine Fractals transformed the image after I clicked Apply:

NIKON D3S @ 300mm, ISO 1400, 1/1600, f/7.1
Now compare the enlarged image in Photoshop and in Genuine Fractals 6 Pro:

Note the abundance of blur in Photoshop (right) and the relatively well-preserved detail in Genuine Fractals (left). And this without using additional sharpening in Genuine Fractals!
4. Enlarge images usingBenVista PhotoZoom Pro
Another software package that is very similar in functionality to Genuine Fractals is Benvista PhotoZoom Pro. This is what this product looks like:

And here is the same image processed in PhotoZoom:

NIKON D3S @ 300mm, ISO 1400, 1/1600, f/7.1
Compared to Genuine Fractals:

BenVista PhotoZoom seems to maintain sharpness a little better than Genuine Fractals, especially where the feathers are. I used the proprietary "S-Spline Max" algorithm to get the above result and selected the "Photo Detail" preset.
5. Conclusions
If you're thinking about printing your images in large format, you don't have to be limited by the number of pixels on your camera's sensor. As I showed above, you can enlarge images to the desired size using tools and algorithms provided by different manufacturers. I'm sure there are other products on the market that can provide similar results, so definitely give them a chance and see what works best for you. If you want professional-quality prints, you may want to consider investing in some great tools like Genuine Fractals 6 Pro or BenVista PhotoZoom, which will allow you to do large format printing and at the same time preserve the details as much as possible.


