How to set the BIOS to boot from a disk or USB flash drive? How to set boot priorities in BIOS
Instructions
Turn on your computer. Insert the operating system boot disk into your computer's optical drive. After rebooting the PC, continuously press the F5 key (depending on the motherboard model, alternative keys may be F8 or F12).
A menu for selecting a computer startup option will appear. Select your optical drive (CD/DVD) as the startup source and press Enter. Wait a few seconds until the disk in the drive spins up. Then the screen will display the message “Press any key to start the disk” (press ani key boot from cd). Accordingly, press any key on the keyboard.
After this, the disk will start and the process of loading files into the computer’s RAM will begin. Wait for the first dialog box, in which select “System Restore”. Windows will be scanned for errors and missing files will be restored. After this, the computer will reboot and start in normal mode.
If after you selected your drive as the system boot source, nothing happened, you need to select the computer boot device. To do this, turn on the PC, and immediately after turning on, press the DEL key. After this you will be taken to the BIOS menu. In it, select First primary device. At this point you can enter the startup order of computer devices. Select your optical drive as the first boot source for your PC. To do this, simply press Enter next to the number “1”, after which a list of devices will appear. From this list, select your optical drive (CD/DVD) and press Enter.
Then exit the BIOS menu. To do this, press the Enter key on the Exit line. A window will appear asking you to save the settings. In this window, select Save And Exit. The computer will reboot and the system will start from the boot disk. The further procedure is the same as in the previous paragraph.
Sources:
- how to start windows disk
Before installing the operating system, you must change the startup options computer. The problem is that initially the boot occurs from the hard drive. disk. This makes it impossible to run Windows Setup.
You will need
- - Access to the BIOS menu.
Instructions
If you're using a desktop computer, you can quickly change the device's boot settings. Turn on your PC and hold down the Delete key. In some models of modern motherboards, you need to press a different button. Wait a while for the BIOS menu to load.
Find the menu responsible for device boot options. It is usually called Boot Options or Boot Device. Sometimes this menu may be located in the Advanced Setup tab. Go to First Boot Device, highlight the Internal DVD-Rom device and press Enter.
Press the Escape key several times to return to the main BIOS menu window. Highlight Save and press Enter. Open the drive tray. Insert the operating system installation disk into it. Close the BIOS menu or simply restart your computer by pressing the Reset button.
The world does not stand still. Once upon a time, the height of popularity was to store information on a disk or floppy disk. Now preference is given to more convenient and capacious flash drives.
To boot into BIOS via a flash drive, you need to take into account several features:
- It is recommended to connect the removable disk to the connector located on the back of the system unit. It is he who is located on the motherboard;
- Connect the storage device before turning on or restarting the computer.
Regardless of the BIOS manufacturer, to boot Windows from a flash drive, you must take the following steps:
- Open BIOS. To do this you need to click Delete or Esc. The service call keys may differ in different versions of the program. They are usually written at the bottom of the screen immediately before the operating system boots.
- Next you need to enable the USB controller.
- After this, the flash drive must be moved to the first place in the list of devices from which to boot.
- Save your changes.
Running from a flash drive in Award Bios
This version of the program is called by the button DEL or keyboard shortcut Ctrl+Alt+Esc(in older versions).
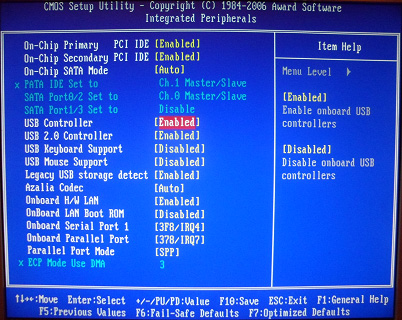
Go to the tab "Integrated Peripherals" to enable the USB controller. Near the inscription "USB Controller" And "USB Controller 2.0" set value "Enable". To do this, use the button Enter. Go back one step by clicking Esc.
Now we need to directly configure booting from a flash drive in bios. To do this, go to the tab "Advanced BIOS Features". Choose a section "Hard Disk Boot Priority". Here the first line should indicate the name of the memory card. By default, this position is occupied by the hard drive. Using the key «+» , move the required line to the first place. Return to the previous menu.
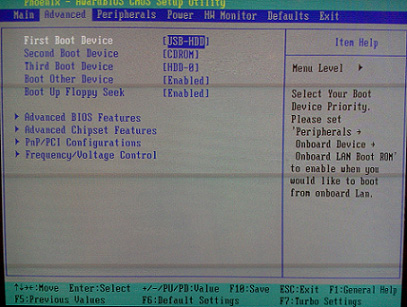
Pay attention to the line "First Boot Device". Next to this inscription there should be "USB-HDD", which means booting from a flash drive or external hard drive. Sometimes the installation process may not proceed. In this case, you should select the external floppy drive indicator - "USB FDD".
Hard Disk should be indicated next to Second Boot Device.
After making changes, you can exit the BIOS while saving the changes. Press Esc to exit to the main menu. Then click "Save & Exit Setup".
Installing boot from flash drive in AMI Bios
Exit to “AMI BIOS” is carried out by pressing keys DEL or F2.

USB controller settings are located in the tab "Advanced", In chapter "USB Configuration". Index "Enable" should be near "USB Function" And "USB 2.0 Controller".
Return to the previous menu (Esc) and go to the tab "Boot", chapter "Hard Disk Drives". The name of the flash drive should come first. Click "Enter" on the first line and in the new window, select the desired item.
In the previous menu, go to "Boot Device Priority". There should be a flash card at the top.
After this, you can return to the main menu and exit the BIOS, saving the settings.
Set boot from flash drive in Phoenix-Award Bios
Clicking F1 or F2 you can open the BIOS version “Phoenix-Award” .

The USB controller section can be found in the tab "Peripherals". Index "USB-HDD" must be placed in line "First Boot Device", tab "Advanced". Don't forget to save your settings.
Configure booting from a flash drive in Bios UEFI
New laptops released no earlier than 2013 have a special BIOS version. One of its features is the presence of protection against installing operating systems from any media other than a licensed disk. To install booting from a flash drive in this version of bios, you must first disable this protection and set the compatibility mode with other operating systems.
After entering the BIOS, go to the tab "Security", chapter "Secure Boot" and set the value there "Disabled".

In chapter "Boot", in line "Boot Mode" value should be set "Legacy Support". In line "Boot Priority" should stand "Legacy First".
Being a special type of computer diagnostics, safe mode involves starting the operating system with the exclusion of virtually all unnecessary components. This mode is very common during the restoration of the user’s computer after the occurrence of certain breakdowns and malfunctions of various types. Problems with the system occur quite often, so proper knowledge of the procedure for starting safe mode will be a significant advantage for the computer owner.
How to start Windows 7 safe mode
There are two commonly used options for opening safe mode in Windows 7. The first involves logging in during system startup, the second is enabled while it is running. The first option will work even in cases of serious computer malfunctions, because there is no need to fully load the OS, the user enters safe mode and carries out the required repair and recovery operations. A prerequisite for the second option will be a running and active OS, therefore this method is not applicable in all situations, let's look at how to start Windows 7 safe mode:
- When the computer is turned on, you should restart it (if the PC is turned off, you need to turn it on).
- Before the operating system starts, information about the BIOS version is displayed on the display; it is at this moment that you need to press the F8 key several times (pressing more than two or three times is recommended).
- A screen will open with a window for selecting additional OS boot options.
- Using the arrow keys, select the “Safe Mode” section and press the “Enter” button.
When, instead of a special window with a choice of system startup options, the message “Windows 7” appears, indicating a normal OS boot, the user should try to enter security mode again. It should be noted that the F1-F12 keys may have been disabled previously, in which case the F8 button should be pressed while holding the Fn key (often happens on laptops).
Consider the option of launching during the active OS environment:
With the OS running, press the key combination “Win+R” and enter the query “msconfig”.
The above settings will present the user with an interface in which it will be prompted to restart the PC. The computer owner can enter safe mode by clicking “Restart”.  If you select “Exit without rebooting,” the required mode will be entered after turning off/on the PC or after its first restart.
1. Features of Windows 10, how to enter safe mode?
The innovative modification of Windows 10 did not include the outdated method of opening safe mode by using the F8 key. There are three ways to activate it, the first pair of which are used during OS boot. The latter option involves the system refusing to start in the user’s usual operating mode.
Starting safe mode using the "msconfig" configuration:

Safe mode can also be started using the command line:

If your PC refuses to boot, you can activate safe mode as follows:
- You must have a boot disk or flash drive with Windows 10.
- Boot from this disk or flash drive, select the required interface language and other parameters.
- In the window that appears, which will prompt you to install the OS, you need to press the “System Restore” button located at the bottom of the window.
- Go to the “Diagnostics” section and in the “Advanced options” subsection, launch the command line.
- In the window that opens, enter “bcdedit /set (globalsettings) advancedoptions true.”
- Wait for a message that the operation was successful and deactivate the command line, then click “Continue”.
- After restarting the PC, a menu with available operating modes will be displayed, select “Safe Mode”. (It can be disabled using the command “bcdedit /deletevalue (globalsettings) advancedoptions”).
2. Windows 8, how to enter safe mode in order to correctly troubleshoot problems?
The specifics of the Windows 8 interface suggest that the method of launching safe mode is not the most familiar compared to other systems. Let's look at the main options for entering this mode.
The first option is to enter using the F8 button.
However, this method may not work on all modifications of computers; its sequence is as follows:

How to start Windows 8 safe mode by changing boot options?
The method is considered quite effective; the following series of actions are used to implement it:
- Press the “Win+R” key combination and enter the “msconfig” command.
- Go to the section called "Download". In the “Boot Options” item, check the box next to “Safe Mode”.
- Place the selector next to the “Minimum” entry, and then click “OK.”
- A window opens in which the user needs to confirm restarting the OS.
- After rebooting, Safe Mode will become active. After solving and troubleshooting, it is important to uncheck the previously selected “Safe Mode” option in the boot settings.
Another common way to activate Safe Mode in Windows 8 involves the following steps:

Using bootable media.
Of course, including the possibility of a complete failure of the operating system, there is the option of entering safe mode using a boot disk or flash drive:
- Insert the bootable USB flash drive into the PC and run from it.
- Select date, time and other parameters.
- In the installation window that appears, click on “System Restore”.
- Go to “Diagnostics” and select the section called “Advanced Settings”.
- In the “Command Prompt” section, enter the task “bcdedit /set (globalsettings) advancedoptions true”, then press “Enter”.
- Close the Command Prompt, and then click Continue.
- After rebooting the OS, press the F4 button in the window that opens.
- Login in safe mode. To prevent the window with possible system startup options from appearing after each subsequent shutdown/on or restart of the PC, you must enter the following into the command line: “bcdedit /deletevalue (globalsettings) advancedoptions.”
3. How to enter safe mode in Windows XP?
Considering the version of Windows XP, which is outdated but still relevant for many users, let’s consider the process of launching safe mode on it:

How to start Windows XP safe mode from the system? In some cases, this option may be an alternative to the above. Consider the sequence:

Today I will tell you how to enable booting from a flash drive in the BIOS of various manufacturers. No matter what version you have, the order of body movements will be as follows:
1. We insert our bootable USB flash drive into the USB connector of your computer. I recommend inserting it into a port located directly on the motherboard, i.e. from the back of the system unit.
2. Turn on the computer and press the key Delete(or F2) to get into the BIOS. Depending on the manufacturer and BIOS version, other keys (Esc, F1, Tab) may be used, so you need to carefully read the prompts on the screen.
In Bios, we can only navigate between tabs using the keyboard.
Below I will describe this process in detail using the most commonly used BIOS versions as an example.
Attention! Keep in mind that if you are installing the operating system from a flash drive or CD and have selected the boot device in the BIOS rather than in the boot menu, then after the first automatic reboot of Windows you will need to enter the BIOS again and return booting from the hard drive. If this is not done, autoboot from a flash drive or CD will work again, and Windows will begin the first stage of the procedure again installations.
Setting up Award Bios to boot from a flash drive
Award Bios:
First, let's check if the USB controller is enabled. Let's go to “Integrated Peripherals”. Use the arrow on the keyboard to move down to the “USB Controller” item. Press the “Enter” key and select “Enable” in the window that appears (also using “Enter”). Opposite “USB Controller 2.0” there should also be “Enable”.
 Exit this tab by pressing “Esc”.
Then we go to “Advanced BIOS Features” – “Hard Disk Boot Priority”.Now in my example the hard drive comes first, but the flash drive should be there.
 We stand on the line with the name of our flash drive (Patriot Memory) and raise it to the very top using the “+” key on the keyboard.
 We leave here by pressing “Esc”.
Setting up AMI Bios to boot from a flash drive
If, after entering Bios, you see such a screen, it means you have AMI Bios:
 First, let's check if the USB controller is enabled. Go to the “Advanced” – “USB Configuration” tab.
 Opposite the items “USB Function” and “USB 2.0 Controller” should be “Enabled”.
 If this is not the case, go to this line and press the “Enter” key. From the list that appears, select “Enabled” (also using “Enter”).
Then exit this tab by pressing “Esc”.
Let's go to the tab “Boot” – “Hard Disk Drives”.
 Now my hard drive is in first place, but I need to put a flash drive here. We go to the first line, press “Enter” and in the window that appears, select our Patriot Memory flash drive.
 It should be like this:
 We leave here via “Esc”.
Select “Boot Device Priority”. Here, the first boot device must be a flash drive.
 Press Esc.
Then we exit the Bios, saving all the settings made. To do this, go to “Exit” – “Exit & Save Changes” – “OK”.

Setting up Phoenix-Award Bios to boot from a flash drive
If, after entering Bios, you see such a screen, it means you have Phoenix-Award BIOS :
 First, let's check if the USB controller is enabled. Go to the “Peripherals” tab – opposite the “USB Controller” and “USB 2.0 Controller” items there should be “Enabled”.
 Then go to the “Advanced” tab and opposite “First Boot Device” set “USB-HDD”.
 After that, exit the Bios, saving the changes. To do this, go to “Exit” – “Save & Exit Setup” – press the “Y” – “Enter” key
 That's practically everything you need to know in order to boot from a flash drive. In my article, I described the process of setting up the BIOS of the most popular versions: Award And AMI. The third example presents Phoenix-Award Bios, which is much less common.
The described procedure may differ slightly in different BIOS versions. But the main thing is that you understand the principle of setting itself.
By the way, I would also like to add: in order to choose which device to boot your computer from, it is not necessary to change the settings in the BIOS. You can immediately call up a special menu after turning on the computer to select boot devices (this can be done by pressing the F8, F10, F11, F12 or Esc key). In order not to guess with the keys, look carefully at the monitor immediately after turning it on. We need to have time to see an inscription like this: “Press Esc to selest boot device.” In my case, it was necessary to press “Esc”.
In the previous article, I showed how to log in from BIOS on different computers and laptops. But why do they go there? In 90% of cases, in order to change the default boot disk and boot a portable operating system or start a new Windows installation. In fact, the principle is the same everywhere, all you need is a little care and logic. And to better understand this, I will show you several videos shot on different computers.
Two ways to boot your computer
There are two options. The first is to set the default boot device in the BIOS (aka SETUP). This will mean that every time you turn on the computer will boot from the specified device. If it turns out to be inaccessible or not bootable, then it will try to boot from the second device in the list, which you can also specify. If it doesn’t work, then the computer will move further down the list.
The second method is supported by almost all modern computers and laptops. When you start your computer, you need to call up the boot device selection menu. This way you can choose what to boot from one time, it’s very convenient.
To select a boot device in the BIOS, the first way is to go into it and look at its interface. If these are blue windows, then most likely it’s an Award, if they’re gray, then it’s AMI, if it’s a graphical interface, then it’s UEFI. There are other options. In general, just look at the screenshots or videos and compare it with what you see.
How to boot from a device without entering BIOS
To do this, just press a button when you start your computer or laptop. For example, this BIOS Award suggests pressing "F9" to bring up the boot menu:

It will say something similar to “Press F9 to Select Booting Device after POST”, i.e. press "F9" to select boot device. Click and see the following:

This is a list of discovered devices. Select a flash drive, CD/DVD disk or something else and press “Enter”. In AMI BIOS it may be different:

It says "Press F8 for BBS POPUP". This means that you need to press “F8” so that the selection menu appears. On laptops this may be the “F12” key, and the menu will be like this:

We just choose what we want and wait for it to load. Here's a video of that moment:
Booting into UEFI BIOS
And this is a clear example of an EFI BIOS (UEFI) with a graphical interface and even a working mouse! If you have a computer with UEFI, then when you get into the BIOS you will see the following picture:

At the bottom of the screen there is a section Boot Priority, where you can use the mouse (by dragging) to set the desired boot order. You can also:
- Click the “Exit/Advanced mode” button in the upper right corner
- select Advanced mode in the window that appears
- go to the “Boot” tab
- in the Boot Option Priorities section in the “Boot Option #1” field, set the default boot device to a flash drive, DVD-ROM, hard drive or other available device.

Owners of Hewlett-Packard computers will probably find the following picture in the BIOS:

In the “Storage –> Boot order” menu, select the desired device, press “Enter”, then move it to the very top and press “Enter” again. Save the settings in the menu “File -> Save and Exit”.
Consider the option with Award BIOS
How to choose what to boot from in AMI BIOS
AMI BIOSes look different than Award ones. After entering SETUP, go to the “Boot” section using the “right” button. There you will find two important points:

Hard Disk Drives - will be needed to boot from a flash drive or hard drive. We go there and select our USB device (flash drive) in the line “1st Drive” (may be called “First Drive”) and go to the previous menu with the “ESC” button


Please note that if we had selected a hard drive in the previous step, then in this list instead of a flash drive there would only be a hard drive!
To boot from a CD/DVD disk, you need to select “ATAPI CD-ROM” (or simply “CDROM”) in this menu; there is no need to go to the “Hard Disk Drives” menu. Now we save the results with the “F10” button or go to the BIOS “Exit” section and select “Exit Saving Changes”

We answer the question “OK.” And here is an example of an AMI BIOS that looks like Award. Here everything is the same by analogy, you need to go to the “Hard Disk Drives” submenu

and select your flash drive in the “1st Drive” item, and then select it in the “1st Boot Device” line in the previous screenshot instead of the hard drive

On computers and laptops everything is approximately the same. For example, on a regular Lenovo laptop, all devices are listed at once in the “Boot” section, which is very convenient. There is no confusion with priority and no additional menu items. You just need to set the boot order of devices using the “F5/F6” buttons. That is, to boot from USB you just need to move the flash drive to the very top:

Just in case, I'll give you a transcript:
- USB HDD: flash drive or external hard drive
- ATAPI CD: this is a CD or DVD-ROM
- ATA HDD or simply HDD: hard drive
- USB FDD: external floppy drive
- USB CD: external disk drive
Watch the video on how to enter the AMI BIOS and set the boot device https://www.youtube.com/watch?v=WojKPDi6a74
On some laptop models, such as the Lenovo G500, you need to press the OneKey Recovery key when the laptop is turned off.
Problems booting from USB devices
Where would we be without them? What to do if the computer does not boot from a flash drive? Let's look at the main problems. First, check if the USB controller is disabled in the BIOS. In Award, this can be checked in the “Advanced Chipset Features” or “Integrated Peripherals” section. Look for the “USB Controller” option, it should be in the “Enabled” state

In AMI, in the “Advanced” section, the “USB 2.0 Controller” option should be “Enabled” and “USB 2.0 Controller Mode” should be in the “HiSpeed” state

There may also be problems with the sockets on the front panel of the system unit - try connecting to USB at the back of the computer.
If you have SETUP as in the photo, then on the “Startup” tab switch the “UEFI/Legacy Boot” value to the “Legacy Only” position

Then the reason may be in the flash drive itself or in the disk. They must definitely be bootable! You can check this on another computer where everything works.
On very old computers there is no way to boot from USB flash drives at all. If there is no newer BIOS available, then the PLOP project will help you. You need to download the latest version of Plop Boot Manager and unpack the archive. There are files there: plpbt.img - an image for a floppy disk, and plpbt.iso - an image for a CD.
Accordingly, if you have a floppy disk, then write the image for the floppy disk onto it, and if you have a CD-R/RW disk, then write the image for the disk. You can’t just copy the file onto the media; you need to use special programs. Next, boot from this disk and in the menu that appears you need to select your USB device. This way you can boot from flash drives even on very old computers.


