How to use Filezilla: a detailed overview of working with an FTP client
In this tutorial we will look at the program - FTP client FileZilla. It should be noted that this program is necessary for remote work with a web server located on the hosting. When working with your website, let’s say Joomla, we will often need to edit something in our CMS files, upload pictures, documents, etc. And to gain access to the folders and files of the site we need FTP manager FileZila. On Denver (Denver) we had direct access through the WebServers folder located on drive C:
Download FileZilla as always, I recommend it from the official website of the program developer at this address: http://filezilla.ru/ absolutely free and in Russian. On the same site, in the “Documentation” tab, it is described in detail how to install the program, configure and use this FTP client. Therefore, I will simply describe the basic operations when working with the FileZilla FTP client and our website.
These are the operations:
- - setting up an FTP client connection with our hosting
- - downloading and uploading files (folders) from hosting to computer and vice versa
- - how to change access rights to files and folders
- - how to link the program with notepad++ to edit files correctly
- - how to create, delete and rename objects
So, let's begin:
Setting up a connection between the FileZilla FTP client and hosting
To set up a connection FileZilla FTP client To our hosting you need to open the “site manager” and create a new connection:
In the connection settings window that opens, you need to enter data from your hosting FTP. Hosting, after registering your site with it, usually by letter, tells you everything you need to access via FTP to the hosting server (your site). Or take the data from your website hosting control panel.

- Click “New site”;
- Instead of “new site”, enter any name (for example, a domain name);
- In the “host” field we write the hosting IP or hosting address (see this in the letter or in the control panel on the server);
- Select “normal” login type, enter the data from the letter or control panel on the hosting in the “user” and “password” fields;
- Click on “OK”
This completes the first and basic settings of the FTP manager. Now you can connect via FTP to the server in a few clicks. Let's see how.

Now, in order to connect to the server (hosting), just click on the arrow next to the “site manager” button and select the host we need (if you have several sites). The program will open the contents of your computer on the left side, and the contents of your server (hosting) on the right side.

Downloading and uploading files (folders) from hosting to computer and vice versa using the FileZilla FTP client
Everything is simple here too. We select, while holding Shift or Ctrl, the necessary files (folders) on the computer or on the host (website), and then right-click on them and select “Download” from the drop-down list (if we are downloading from the host to the computer) or “Upload to server” (if files are uploaded via Filezilla to the host from a computer).

The selected objects will be copied to a folder opened on the opposite side of the free FTP client program window. Let me remind you that files and folders on your computer are open in the left half of the FTP manager program window, and remote server objects are open in the right half of the program window.
You can also download and upload files to a server or computer by simply dragging the mouse, the so-called drag-and-drop method (literally, drag and drop). Press the left mouse button on the required file or folder or group of files and folders, drag it to the desired location, and release the left mouse button.
How to change access rights to site files and folders using the FileZilla FTP client
Here we need to explain a little that for each folder and file on the remote server certain rights are assigned. This is what you can do with this file (folder) - read, write or run.
If a command is applied to it that is not allowed in its rights, the server will refuse to execute this command.
As an example, the following can be given. If a file has read-only access rights, you will not be able to make changes to it. You need to know and use this to ensure site security, protecting those files that should not be changed.
To change access rights to files and folders on a site using the Filezilla program, you need to right-click on a file or folder on the server and select “File Access Rights”.

In the window that opens, you can enter a numeric value or place the corresponding checkboxes in the desired order, and then click “OK.” Full access is granted by rights with the number “777”.
Separately, it is necessary to say about granting access rights to folders. If the folder whose access rights you want to change contains files or subfolders, then you need to decide whether you need to redirect the access rights you set to them (it is possible to assign new access rights only to the selected folder or also to files with folders , which are inside this selected directory).
If you check the “Redirect to subdirectories” checkbox in the FileZil manager window, then the access rights value that you set will be applied to everything that will be in this directory and to the directory itself too.
It is imperative that after making changes, you need to return the rights to their original state in order to ensure the security of your site.
How to link FileZilla with notepad++ to edit files correctly
Files with the extension php, css, html, js, as we have already decided, are best edited in notepad++ editor .
Why might you need editing?.. Yes, at least to correct the configuration.php file when uploading a site to hosting. Point it to the paths to the logs and tmp folders or make changes to the index.php file.
To FileZilla program open a file for editing, select the desired object and right-click and select “View/Edit”
After clicking, the file will be opened by the program that is responsible for this extension on the computer by default (Windows Notepad), but we need the file to be opened in the notepad++ editor. To do this, you need to do a little configuration, so to speak, link FileZilla with notepad++. Let's go to " Editing – settings – editing files" Next, enable “Use the following editor,” then click browse and select the Notepad++ program (default: C:\Program Files\Notepad++\notepad++.exe). Click "OK". Now when editing files, notepad++ will open by default.

After editing the file and saving it in Notepad++, FileZilla will offer to upload it back to the server (replace the file). We agree and the updated file will be reuploaded to the server.
How to create, delete and rename objects via FTP using FileZilla
 To create a new folder on your server, you need to right-click in the remote site window and select “ Create directory" Give the directory name only in Latin letters (English letters without spaces, you can use a hyphen or underscore to separate words).
To rename a file or folder, you need to select the desired object, right-click, select " Rename».
To delete unnecessary files or folders, select “ Delete».
Well, in principle, we figured out in general terms with FileZilla FTP client program. You are unlikely to need the remaining settings of this program when working with site files.
Welcome to my blog!
I have been promising to write a post about Filezilla for a very long time, and now this day has come.
Filezilla is an FTP client that allows you to connect to your hosting to work with blog files. Previously, the blog published articles about other options for connecting to the server. Read more about additional functions and the well-known.
And now we will figure out what FileZilla is for and how to use it.
The Filezilla interface is specific: for many webmasters it is more convenient and understandable, but for others it is the opposite. Today we’ll talk about how to install Filezilla, set up a connection, and how to work with this program. Using it, you can confirm ownership of the blog, install a favicon on the site (icon), download and edit any files, etc. The program is distributed free of charge.
You just need to understand how to use Filezilla once and then you will be able to easily do some things that may seem difficult at first glance. With it you can do everything much faster than using a browser and hosting control panel.
How to install Filezilla?
Installing this FTP client takes only a couple of minutes. You can download the updated version at https://filezilla.ru/get/. Then you need to run the exe file and follow the installation instructions.
Once you've downloaded and installed an FTP client, the first thing you need to know when working with Filezilla is how to connect to the server. All the data you need to connect was sent to you by email when you registered.
Now you need this data, namely: password, login and host address to enter in the program. Open the program and click on the “ File" in the upper left corner, then click " Site Manager" Then click on the “ New site" and enter your site name. Select the input type " Request password" and enter all your other data. When everything is done, feel free to click on the “ Connect" and enter the password.
Attention! Never save your password in the program, because... it will be stored unencrypted and will be easily accessible to attackers. Take care of .

Another way is a fast connection. Enter your details and click " Fast connection».

We enter the data in the same way as the previous method. We set the port to 21, by default. Thus, the Filezilla Ftp Client is configured. You are now connected to your hosting and have access to all the files on your site. This window will open after connecting to the server.

On the right are the files located on the hosting, and on the left are the files on your computer.
Now you can make any changes, download or . Further work with Filezilla is very simple and does not require much effort. By simply dragging and dropping, you can upload edited files.
How to use Filezilla?
Now that Filezilla Ftp Client has been configured, let's try, for example, installing plugins. To do this, find the directory wp-content/plugins: in the root directory, find the folder wp-content, then folder plugins.
There you will see all your installed plugins. Now drag the folder with the required plugin, which you downloaded in advance, from the left window to the right. You can transfer the plugin in another way by right-clicking on it and selecting “ Download».
Next, you can go to the administrative panel of your site, find a new plugin there and activate it. As you can see, there is absolutely nothing complicated about how to install plugins through Filezilla. This way you can upload any files you need for the site. I hope this simple Filezilla Client tutorial will help you blog more efficiently.
Now you know how to use the Filezilla ftp client, what it is for and how it is useful. This program is quick and, most importantly, convenient to work with your files on the site. There are no extraneous or complex functions in it. Everything is aimed only at fulfilling a clearly defined task.
To use the FileZilla program, you need to set it up by following the following steps, illustrated with pictures.
1. Launch the FileZilla program, then in the top menu click File Site Manager.
New site.

Host- FTP server address.
Server type- FTP - File Transfer Protocol.
Input type- normal.
User- Username.
Password- password.
Encryption- Use plain FTP.

4.Go to the tab Transfer settings, select passive transmission mode, check the box Limiting simultaneous connections and install Maximum number of connections equal to two. Click the button Connect.

Important: The content of your site should be placed in a folder /home/login/Your_domain/docs/.

FAR
To use the FAR program, you need to configure it by following the following steps, illustrated with images.
1. Launch the FAR program. Determine in which panel you want to make an FTP connection. Let's say on the right. Then press Alt F2 and select the FTP line in the window that appears.

2. Press Shift+F4, a window for entering connection parameters will appear.

3. Fill in the required fields. In field Descripton you can give any name to the custom ftp connection, mark the position Passive mode.

4. After that, click the button Save.

5. On the panel of the FAR program you selected, for us it is the right one, a line will appear with the newly created name of the ftp connection. While on this line, press Enter.

6. A connection to the server will occur and you can work in the usual mode of a two-panel file manager.

Total Commander
You can download Total Commander at http://www.ghisler.com.
1. Launch the Total Commander program, then in the top menu click Net, in the menu that opens, select Connect to FTP server.

2. In the window that opens, click on the button Add.

3. In accordance with the instructions, obtain and specify the parameters for connection:
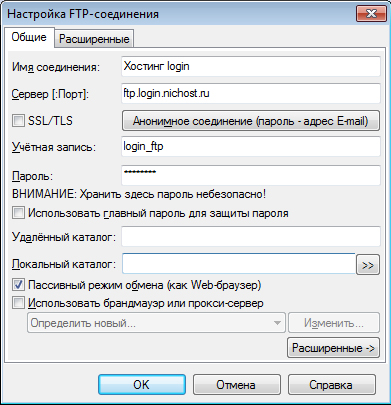
Connection name- come up with a name, for example, “Hosting login”.
Server- FTP server address.
Account- Username.
Password- user password.
Set the flag Passive sharing mode (like a Web browser).
After that, click the button OK.
4.Select the created connection and click the button Connect.

5. A connection to the server will occur, after which you can work in the usual mode of a two-panel file manager.
Important: The content of your site should be placed in a folder /home/login/Your_domain/docs/.

Total Commander (version 6.53)
Russified version
1. Launch the TotalCommander program, then, in the top menu, click Configuration and select the line Setting: FTP

2. In the next window, you need to check for a checkmark in the line Default to use passive mode and if it is not there, install it.

After which, click OK and the window will disappear.
3. In the top menu, click FTP and select the line Connect to FTP server.

4. In the window that appears, click on the button Add.

5. A new window will appear in which you need to set the necessary parameters and check the box Passive exchange mode.

After which, press the button OK.
6. In the remaining window, click on the button Connect.

7. A connection to the server will occur and you can work in the usual mode of a two-panel file manager.

iWeb
After creating the site, the iWeb program window will appear on the screen with the contents of your site.

On the left side of the window, click on the name of the site you want to publish. In this example, the site is called My site.

On the page that opens, enter the parameters required for publication.
In chapter Publication:
Publish to: FTP
Site Name: The name of your site
Email for communication: your email

In chapter Options FTP servers :
Server address: ftp.your_login.nichost.ru
User: username (usually your ftp_login)
Password: your_password
Directory/path: your_site/docs
Protocol: FTP
Port: 21

For the URL, enter the address of your website.


If unsuccessful, check again that the entered parameters are correct.
After testing is successfully completed, click the button on the bottom panel Publish a website.

If the publication is successful, a message will appear: “Your site has been published.”

Important: By default, iWeb uses UTF-8 text encoding. Our hosting uses Windows-1251 encoding by default. To display your site correctly, you need to go to the section Web server → Websites → your website and select from the list Site encoding encoding UTF-8.
CuteFTP (version 7.0)
1. Launch the CuteFTP program, then in the top menu click Tools

2. Select a line Site Manager.

3. In the window that appears, select the line Display Site Manager.

4. In the new window, click on the button New.

5. Two submenu lines will appear at the bottom. Select line FTP Site.

6. A window will appear:

7. Fill in the fields in this window.

8. Then, without leaving this window, click the button Type.

9. In the new window, in the section Data Connection Type select line Use PASV- This is a passive data transfer mode.

10. Then, in the bottom row of buttons, click on the button Connect.

11. A connection to the server will occur and you can work in the usual mode of a two-panel file manager.

FlashFXP
You can download the trial version here: http://www.inicom.net/pages/en.ffxp-download.php
After installation, there are several ways to connect to the server: By recording through Site Manager and Quick Connect.

Fast connection.
1. To quickly connect, you need to click on the lightning icon and select Quick Connect or press the F8 button.

2. After which, in the form that opens:

3. Fill in the fields Server or Url, User Name, Password.

4. After this, your FTP account will open.

5. After which you will need to go to the folder with the name of your site and in it to the Docs Folder. After that, on the left side, go to the folder with the files necessary for the site,
Site Manager.
1. In order to enter the Site Manager you need to go to the bookmark Sites→ Site Manager or press the F4 button


4. Enter the name of the site and click on the button OK. Next fill in the fields IP Address, User name, Password

5. Replace test111 with your hosting ID. Then press the button Apply. Then, by clicking on the lightning button in the drop-down menu, select the name of your connection.

6. Clicking on it will take you to your ftp account.

Macromedia Dreamweaver 8
1. When you launch the application, the following window will open:


3. A site manager window will open.


6. If everything goes well, you should see a list of files on the right:
How to use the FileZilla program - detailed instructions for setting up and using an FTP client - 5.0 out of 5 based on 2 votes
Almost all webmasters and website owners need various kinds of FTP clients that allow them to copy files to the server and back. In this article we will discuss in detail how to use FileZilla, a program that makes it very easy to copy, delete, edit and other useful operations that can be useful when working with site files and moving them to the server and back.
If your site is still on a local server, then this program is not of interest to you yet, but it will be useful in the future. But for those whose website is located on a real server, this FTP client will be a very useful program.
The Russian-language version of FileZilla can be found at http://filezilla.ru/, where it is available absolutely free. Or from our file archive: .
First, let's look at how to set up a FileZilla FTP client connection to our hosting. Next, we will focus on the operations of downloading and uploading files or folders from hosting to a PC and vice versa.
The third point, which is discussed in this article, will be the use of the program in conjunction with the notepad++ notepad, which will allow us to open files for editing directly from this FTP client.
We will look at how to change access rights to folders and files in the fourth step. Lastly, we will turn our attention to the operations of creating, deleting, and assigning new names to objects.
Setting up an FTP connection
To connect to the server via FTP, you can use several methods:
- It is possible to configure the connection directly from the main program window.
- In addition, you can add a new connection in the site manager; the convenience of this method is that passwords and logins for access, as well as other settings, are saved. Let's look at each method in detail.
Using the FileZilla Main Window to Set Up a Connection
When you plan to connect to the server once, there is no need to save settings and passwords, so it is faster and easier to do this directly from the main window of the FTP client. For these purposes, special fields are provided, located just below the program menu.
- In the "Host" field - you need to specify the FTP server address;
- Username - account name (login) for access via FTP;
- Password - the password for this account, required for authorization on the server;
- Port - port 21 is used as standard.
When the data is entered, click the "Quick Connect" button. The result of these actions will be the appearance of the directory tree of the connected server in the right FileZilla window.
Using Site Manager to Add a New Connection
If you often need to connect to a specific site, and you want to save the settings for this connection so that you don’t have to re-enter the data each time, you can set up a connection in one click.
The site manager will help you do this; to enter it you need to select “File” >> “Site Manager”. It is also available by clicking the corresponding button in the quick launch panel.
In the window that opens, you need to click on the “New site” button, then enter the name of this connection, after which you can proceed with the settings.

- In the "Host" field - indicate the FTP server address;
- Protocol - do not touch the field, leave FTP;
- Encryption - leave as is;
- From the “Input type” drop-down list, you need to select “Normal”;
- User - enter the login for the FTP connection;
- Password - a password is required.
All necessary information can be found by contacting:
- to the contents of the letter sent by the hosting provider after ordering hosting;
- to the hosting control panel;
- to the hosting support service.
Having now learned how to connect to a server using FileZilla, let’s pay attention to some more useful functions available in other tabs.
Advanced Tab
On this tab we can specify the server type and synchronize folders between the server and the local PC. Let's consider synchronization. To do this, you need to select the folder on your computer that you want to synchronize in the “Default local directory” line. Then you need to specify the full path to the folder with the site on the server in the "Default remote directory" field. You can get it from the letter sent by the hoster or by contacting technical support.
After we check the "Use synchronized browsing" checkbox, the data will be synchronized. After completing these steps, if you move to another folder on the server, FileZilla will also move to this folder on the local PC, automatically. If you do not check the box, folders will be synchronized only when connected. In the future, you can navigate through the catalogs as you please.

"Transfer Settings" tab.
This tab allows you to set a limit on the number of simultaneous connections and configure the mode specifically for the selected connection. If there are problems with the FTP connection, then in some cases switching the transfer mode can solve this problem.
"Encoding" tab.
We can turn to this section of the program if problems suddenly arise with encoding after transferring files. If this happens, you should manually change the encoding; usually the UTF-8 format is used.
So, we are done with creating a new connection. By clicking "Ok", the result will be saved. Now we can enter the “Site Manager” and to establish a connection, just select the required site from the list and click on “Connect”. You can also use the button in the quick launch menu of the FTP client.
If all steps were performed correctly, the program will connect to the site, and the hosting folders will appear in the lower right column.

Rules for working with folders and files, copying and deleting them
1. To upload information to the hosting (server) or download data from it to your PC, simply drag and drop the target file (Drag-and-drop option). Namely, hold down the left mouse button on the target file (folder), and without releasing it, move the cursor to the desired folder, and then release the button. If you need to select several files, you can hold down "Shift" or "ctrl" and left-click on the files and folders.
2. You can also download or upload data using the program’s context menu. To do this, point to the required file and press the right mouse button, in the drop-down menu click “Download” if we are transferring data from the server to the PC or “Upload to server” if you need to upload it from the PC to the server. These files will be copied to the adjacent window in FileZilla. Remember that the hosting data is displayed on the right side, and the computer on the left.

3. If you need to create a new folder on the server, right-click in the remote site field and select “Create directory” from the drop-down menu. You can enter the directory name only in Latin characters.

4. To rename a folder or file, right-click on the target object and select “Rename”.
5. To delete a folder or file, select “delete” in the same menu.
In general, standard actions for a PC.
Opening a file for editing
Typically, changes are made to files in html, css, php, js formats. In this example, I will show how to configure them to open for editing using the notepad++ editor. If you are using another editor, such as Dreamweaver, do everything the same way.
So, in order to open a file for editing in FileZilla, you need to select it and right-click, then click on “View/Edit”. When you do this, the file will open in the program that is installed on the PC by default for this extension.
Since we want to work with text files in the notepad++ editor, we'll do a little setup.
To do this, in FileZilla open “Editing” >> “Settings” >> “Editing Files”. Click on "Use the following editor", click on "Browse" and specify the location of the editor's startup file (usually C:\Program Files\Notepad++\notepad++.exe). Click "Ok". Now all edited files in filezilla will open in notepad++.

When you save the edited file in Notepad++ and then return to FileZilla, the program immediately gives you a window informing you that the file has been changed and offers to replace it on the server. Click “Yes”, and the updated file will be uploaded to the server.
Setting access rights to site folders and files
To change rights using the FileZilla FTP manager, you need to select a folder or file and right-click and select "File Access Rights". You can change the rights here by checking the required boxes, or by entering a numeric value.

You will also need to decide whether to apply the changed settings to subdirectories. If this is necessary, check the corresponding box, and you can choose to assign new rights for all nested directories and files, only for directories, only for files.
The default is 755 (for directories) or 644 (for files). When you set the settings, confirm your choice by clicking "Ok".
Selecting the default folder on the server to open
When connecting to the server, Filezilla shows us the root directory. If you most often work with a specific directory, you can configure the FTP client so that when launched, it immediately shows the desired directory on a specific site. To do this, we perform a number of actions.
1. Go to the desired directory on the desired site and copy the path to it in the “Remote site” field.
2. In the "File" menu, select "Site Manager" >> "Advanced" and in the "Default remote directory" item, paste the copied address of the target folder.

After confirming your choice using the "Ok" button, you will immediately be taken to the desired directory the next time you start Filezilla, thereby saving time.
So, now you know how to use FileZilla. We have reviewed all the necessary program functions to successfully start using the well-known FTP client.
Hello, dear readers of the blog site. Today I want to talk about a free ftp client, which I have repeatedly mentioned in many of my previous publications and will mention in many subsequent ones.
When you work with your website, you will definitely need to upload something to it (updates, pictures, videos, etc.), edit it in the engine files, or, finally, . This is where you come FileZilla will come in handy, which will allow you to work with files on your server in the same way as if they were on your computer. No, really, really...
And it’s doubly nice that this same FTP client (in fact, it’s a regular program) can be download for free, because at the initial stage of the development of a website it is not always possible to find extra funds (I, for example, because it was not clear whether something would burn out from the blog or not).
Failzilla can be considered the best option, satisfying the needs of almost all categories of webmasters (from beginners to gurus), because, firstly, it is distributed free of charge and under a free license, and, secondly, even a completely untrained person can start using FileZilla. Let's take a closer look at it.
Where to download Filezilla and why you should use it
The fact that this FTP client program is distributed free of charge does not mean that it is not being developed and does not meet all the requirements for safe operation (although you should definitely read this article to the end to learn how to make this program even more secure in terms of storing passwords - believe me, this is very important).
The fact is that filezilla is constantly being updated and improved, its latest version is always available download from the official developer website(or download from its Russian “mirror” filezilla.ru), which work for the idea of free distribution of programs.
I repeat that you can download the latest current version of this popular FTP client or update an existing one completely free of charge.
Using the link provided you will find the Russian version, you can also go to the global developer resource, where you will be offered to download not only the client version ( FileZilla Client), but also a version of a free FTP server (Server), which you can install on your computer running Windows. Please note that we will be considering the manager (Client), so you need to download it.
Why you should use specialized software, and in particular Filezilla, to access via FTP, I tried to explain more or less clearly in the publication “”, which you will find at the link provided. So let's immediately begin installing and configuring the program, which, in my opinion, is one of the best of its kind.
Although no, first you still need to say a few words about what is FTP? This is a file transfer protocol (in English - File Transfer Protocol) that will allow you to connect to your hosting server. Why do you need to connect to it through an FTP client program?
And then, after connecting (via FileZilla or any other similar software) we will get the opportunity perform various actions with the files and folders of our website stored by the hoster:
- Download and upload objects or directories, both from the hosting server to our computer and vice versa
- Edit files located on the server by simply opening them in the editor installed on your computer
- Rename objects on the hosting server (files, folders)
- Delete objects
- Assign different access rights for them, or, scientifically speaking, CHMOD (I’ll explain what this is a little later, but it’s a very important thing in terms of security and protecting sites from viruses and hacks)
At the same time, working with files on a server is not much different from working with the same files and folders on a computer. But it is precisely to connect via the FTP protocol (a protocol for working with files) that you need a special program - a client. Most popular example of an FTP client, which almost everyone is familiar with, can serve as an ordinary browser. To access the server, you will need to enter the following line in the address bar of your browser: ftp://server name.
But the browser as a client program is not very suitable for us, because... with its help, you can only view and download objects to your computer, but the browser will not be able to upload them to the FTP server. You also won’t be able to delete anything, and I’m not even talking about changing access rights to objects. In general, the browser is suitable for this purpose, like a microscope for driving nails.
Therefore, to fully work with a website via the FTP protocol, it is better to use utilities specially designed for this, which are usually called either clients or managers. Well, one of the best, and also free, is Filezilla, the installation and configuration of which, as well as an explanation of how to use it, will be the subject of today’s article.
Installation and connection to the site via the FileZilla ftp client
Installing the client program on your computer is quite simple and quick. If you don't have a distribution yet, you should download. Having agreed to the license agreement, all you have to do is click the “Next” button several times.
After installation, the program shortcut will live in the Start menu: “Start” - “All Programs” - “FTP Client” - “FileZilla”. This software is already translated into Russian, its interface is intuitive, attractive and at the same time does not contain anything superfluous, only the most necessary. But still, we will consider in detail how to use it. This may not be entirely clear to those new to webmastering. Go.
Using Filezila usually starts right away trying to connect to the web server by entering its address (sometimes also the port), login and access password. The owner of your hosting, after purchasing the required tariff from him, should have informed you (usually by letter) everything that is needed to access the hosting server via the FTP protocol. There are two ways to do this (connect):
- You can enter the necessary data (server name or IP address, login and password) directly in the top panel of the program window, and then click the “Quick connection” button
- You can add a new item to the so-called “Site Manager” (you can get to it by clicking on the button on the far left of the top panel of FileZilla), and therefore to create a new connection it will be enough to simply select the desired site from the drop-down list of this button (or press on the keyboard Ctrl+S).

Initially, it seems that the second option of creating a connection to the server (site via the FTP protocol), taking into account the fact that you will have to work with the site constantly, is preferable - you entered the password once, the program remembers it and you can forget about it.
But the problem is that passwords in the "Site Manager" fileszilla stored unencrypted(although they can be transmitted to the server using the encrypted TLS protocol - set in the settings shown in the screenshot below). If no one could ever gain access to your computer, then this would not matter, but there is such a thing as viruses (in particular, Trojans), which are precisely aimed at stealing such things. And no computer is safe from them.
Personally, I suffered from such carelessness and a number of my sites were hacked, most likely after the passwords were stolen from this FTP client (in any case, everything said so). Then I dealt with the consequences for about six months and even wrote an article about this - “”. After this bitter experience, I became more careful and now use FileZilla as before, but I store passwords in a special program. Moreover, the conveniences during work have not become less. Read below on how to implement this.
So for now I advise you use a fast connection, simply by entering the data received from the hoster to access the site via FTP into the form located at the top of the program window, and then click on the button of the same name.
If you still decide (at your own peril and risk) to use site manager at Filezilla, then everything is simple. To create a new connection, click on the “New Site” button and come up with a name for this connection (it is possible that you will have many websites, and the name of the connection entered in the FTP manager should be unique and unambiguous so that you don’t get confused later).

In the “Host” field, enter the server address, which can be in the form of an IP address (for example, 31.211.107.116 - read about that) or in the form of a URL (for example, http:/webss.hoster.ru). In the “Server Type” field we leave everything unchanged. From the “Login Type” drop-down list, select “Normal” and fill in the “User” and “Password” fields with the data received from your hoster.
Don’t be confused by the encryption field in the connection settings through the site manager (where, by the way, you can enable or disable TLS encryption in Filezilla, because it sometimes causes problems). Here we are not talking about encrypting a list of your passwords on your computer, but about them encryption when transmitted over the network. This is also certainly useful, but unfortunately it will not save you from a Trojan, so read the material at the bottom of this article about safe and convenient work with this FTP client.

By the way, to disable TLS encryption in Filezil, just select the “Use regular FTP” option from the drop-down list.
Now, to connect to the newly configured host, click on the arrow next to the “Open Site Manager” button and select the host we need from the drop-down list.

On the left side of the program window that opens, in the “Local Site” area, you will see the contents of your computer.

On the right side of the client window, in the “ Remote site"You will see the folder tree of the remote server (your hosting), and below it - the contents of the currently selected folder. A little lower there will be a wide area where the process of uploading or downloading files from your site will be displayed.
How to use FileZilla when working with a website
In Filesile to move objects Between your computer and the host (site), you can use the probably well-known drag-and-drop method (literally, drag and drop). Grab the object with the mouse and drag it to the other side of the program window. Although, in my opinion, it is more convenient to do this through the context menu of the selected object (file or directory):

If needed copy more than one file or directory, then while holding Shift or Ctrl, select the necessary objects on the computer or on the host (remote server - essentially, your website), and then move the cursor to the selected (blue background) area and right-click, then select “Download” from the drop-down list "(in case we download from the host to the computer) or "Upload to server" (in case the objects are downloaded from the computer).

Objects selected in FileZilla will be copied to a directory opened on the opposite side of the window of this FTP manager. Let me remind you once again that your computer's files and folders are open in the left half of the window, and the remote server objects are open in the right half.
In order to open file for editing(most often you need to make changes to objects with php, css, html, js extensions), which is located on the hosting, you need to right-click on it and select “View/Edit” from the context menu.

In this case, the file will be opened in a program that was configured on your computer by default to work with these types of extensions (which utility will open a particular file on your computer when you double-click on it will depend on its extension and settings , made by you in the OS).
If you are still not satisfied with the utility that opens these extensions by default, then you can use Explorer (or any other file manager on your computer) to move the mouse cursor to a file with the same extension, but which is already on your computer , and select “Properties” from the context menu. Then you need to click the "Edit" button and select the program with which you would like to edit all files with the same extension. Windows ABC.
Highly recommend do not use a regular notepad for editing included with the operating system (to avoid ). It would be better to spend time downloading and installing the advanced notepad Notepad ++ (read my review), which I talked about working with in the above publication. Working with code in it is a pleasure:

Ultimately, Notepad++ will prevent you from many problems associated with editing code, because it allows you to go back as many steps as you need.
After finishing editing the file you save it in Notepad++ (or any other code editor you prefer), and then go to the free FileZilla client program and see a sign saying that this object has been modified.

In this sign you click on the “Yes” button. That's it, the contents of the object on the server will be changed using our favorite Filezilla.

As you can see from the above screenshot displaying the context menu of any object opened in FileZilla, you can also create a new directory or file on the host, you can delete any object or rename it, update the contents of an open directory (the same can be done by pressing F5 on the keyboard) , as well as copy to the clipboard and, finally, change the access rights (CHMOD) to any object on the host.
Let's dwell on the last point in more detail, because... the meaning of all other items in the context menu of this manager is clear from their names.
How to set access rights to a file or folder in FileZill
I have already described it in some detail, but why do you need to somehow configure access rights? The thing is that almost all hosters use operating systems from the Unix family on their servers, in which they use precisely this concept - access rights to files and folders. I probably won’t be able to explain the essence of CHMOD in a nutshell, so that it is clear, so, if you wish, you can read about it in the article above.
As for changing access rights using FileZilla, everything is quite simple. It is enough to select the necessary objects in the manager window with the mouse, and then select the “File access rights” item from the context menu.

In the window that opens, you can enter a numeric value for CHMOD or place the corresponding checkboxes in the desired order, and then click “OK”.

True, if there are objects in the folder whose access rights you want to change, then you will have to decide whether you need to redirect the set access rights to them (it is possible to assign new access rights only to the selected folder or also to objects that are located inside this selected directory).
If you nevertheless check the “Redirect to subdirectories” checkbox in the window of this FTP client, then you will also have to choose whether the modified rights will apply only to files, only to folders, or to both combined. If you leave the first checkbox in the CHMOD settings, then the access rights value that you set will be applied to everything that will be in this directory and to the directory itself too.
Sometimes it is not possible to change access rights through Filezilla. In this case it will be possible. This method should have a higher probability of working.
By the way, many people still use the FTP client built into the file manager (here is a manual for this useful program), but I believe that it is better to use each software for its direct purpose, and not for an additional purpose). Moreover, Total, again, is not doing so well with the safety of the passwords you enter (they are not encrypted). Therefore, I use Commander to work with files on my computer, and FileZilla to work with website files.
Encrypting passwords for Filezilla using Kipas
Do you already have Filezilla on your computer? Now follow this path (the “AppData” folder is a system folder, so to see it, you will need to enable their display in the “folder properties” of Explorer, or select show hidden files in the Total Commander menu):
C:\Users\[account name]\AppData\Roaming\FileZilla\sitemanager.xml
Or this, in the case of old XP:
C:\Documents and Settings\[account name]\Application Data\FileZilla\sitemanager.xml
This file can be opened, for example, in my favorite text editor with syntax highlighting, Notepad++. So what do we have?

And we have a full a set of passwords saved in this program, which are absolutely in no way protected from theft - the file is not encrypted, and its location is the same for 99.99% of computers. And a little earlier I scolded my favorite file manager Total (formerly Windows) Commander for this. It turned out that everything was not without sin.
However, there is a solution to this problem (and it has been tested by me personally) and is considered absolutely reliable. Moreover, it is even used as a basic solution to improve security recommended on the official website This is an FTP client.
For this, an additional one is used. It, like FileZilla, is free and distributed under a free license, which means that it cannot have “bookmarks” or “back doors” to access your passwords stored there. I advise you to read the above publication on working with Kipas, and I, omitting the issues of installing and configuring it, will go straight to the point - organizing password protection for your sites stored in Filezilla.
Great, but now let's get back to where I started all this - possibility of safe and convenient work with websites through the FileZilla client program, but with storing passwords for sites in Kipas. As we saw just above, the password manager built into the FTP client is no good in terms of security, because they are not encrypted.
Therefore, open the Kipas program (read about working with it at the link given just above), add the FTP folder in its left column and create the first profile for logging into one of your sites using the FTP protocol.

There are several nuances in filling it out. In the first field we enter the address of your hoster’s FTP server (IP or type http:/webss.hoster.ru), then enter the login and password given to you by the hoster to access the site via the file protocol, but in the “Link” field we insert the command to open the Filezilla program, which is quite convenient.
For regular Windows it will be:
Cmd://"C:\Program Files\FileZilla FTP Client\filezilla.exe"
And for 64-bit:
Cmd://"C:\Program Files (x86)\FileZilla FTP Client\filezilla.exe"
In the comment field It would be best to write the name of this compound, because... The FTP server address may not be very informative.
Next, open the FileZilla program, and without entering any passwords into it (just so that the program is launched), go to the “Auto-dialer” tab of the KeePass program to link this profile to our FTP client (we make a link, so to speak):

Click the “Add” button, select FileZilla’s “Target window” from the drop-down list (it should be open at this point and there should be nothing in the authorization fields), and then click OK.

The checkbox in the screenshot is in the “Use autodial from group” field, because I registered the necessary operants for the entire group (FTP folders) by selecting the “Change group” item from its context menu and going to the “Auto dial” tab:

You are free to change the checkbox in the “Use the following sequence” field and for each FTP connection enter a set of operants in the field located just below:
(TITLE)(TAB)(USERNAME)(TAB)(PASSWORD)(ENTER)
This doesn't change the essence.
How can I now insert passwords to access a website from Kipas into FileZilla?
Now To check, open FileZilla, place the cursor in the first line of the quick authorization field and press the three magic keys (Ctrl+Alt+A):
If you have created several password profiles for different FTP connections using the algorithm described just above, then when you press the magic keys you will be asked where you still want to log in (which site to connect to?):

Can use a different login algorithm. Open your program for storing passwords (kipas), go to the FTP folder, click once on the line with the desired FTP account and click Ctrl+U on keyboard.
The focus is transferred to the Filezilla program that opens (that’s why the link cmd://"C:\Program Files\FileZilla FTP Client\filezilla.exe" was added), but without going anywhere else you return to KeePass and press the key combination Ctrl+V. As a result, the authorization fields in FileZilla will be filled in automatically and you will have access to your site. Which method of automatically entering a password is more convenient is up to you to decide.
And finally, you can simply copy your login and password to the clipboard, double-clicking on them in turn in the Kipas window (name and password in the columns). Double-clicking on the title of an entry will open a window for editing it, and double-clicking in the “Link” column will activate the transition to it. Or you can simply select the necessary items from the context menu of the connection profile stored in Kipas:

The period for storing passwords in the clipboard is set in the settings (Tools - Settings - Security - Auto clear buffer) and by default is 12 seconds.
How to remove all traces of passwords entered into FileZilla from KeePass?
So, and a couple more steps that will allow you to remove all traces of passwords entered in Filezilla from KeePass. The fact is that this FTP client stores the history of entered passwords for some time and a certain number. To eliminate this incident, you will have to do a number of simple manipulations.
First, delete the sitemanager.xml already mentioned above (see its storage folder above). Secondly, you will need to slightly change the program settings.
To do this, find the file fzdefaults.xml.example in the c:\Program Files (x86)\FileZilla FTP Client\docs\ directory and rename it, removing the ending in fzdefaults.xml . Transfer this file to the folder with FileZilla (c:\Program Files (x86)\FileZilla FTP Client) and, opening it for editing in Notepad++, delete all its contents, replacing it with this:
Save the changes, then go to the folder C:\Users\[account name]\AppData\Roaming\FileZilla\ and delete the recentservers.xml and filezilla.xml files there. That’s it, your FileZilla will now not tell anyone what passwords were entered into it automatically from the KeePass manager. This is what needed to be implemented.
Good luck to you! See you soon on the pages of the blog site
You can watch more videos by going to");">

You might be interested
 Hosting and everything connected with it, working with cPanel
  KeePass is a complex password manager and generator, as well as the best program for storing and conveniently using passwords
  How to make a backup and restore from a backup, as well as the nuances of transferring a site (Joomla, WordPress) to a new hosting


