How to find a free Wi-Fi channel and change the channel on the router? Wifi Analyzer - Features of using the program
A very popular question among Internet users, in particular wireless ones, is the question of choosing and changing the Wi-Fi channel. These steps can be carried out by looking at the settings of your router. The fact that this problem occurs very often is not at all surprising.
The reason for this is the occurrence of many interruptions in the operation of the Internet due to interference on the channel. This is what users complain about most often: low data transfer speeds, the Internet works in jerks (that is, access, then there is no access), sometimes the Wi-Fi connection is interrupted for a long time. All these problems have one root cause - the congestion of your channel.
Another negative consequence of increased load is the following problem: your computer stops seeing this particular Wi-Fi network, even though it sees others.
We will tell you later in the article how to find another channel, make the transition from the old one to the new one, and how to do all this. We will review the solution based on the parameters of the most popular router models. Among them you can find such as Tp-Link, Asus, D-Link, Zyxel, as well as Tenda
The essence of a Wi-Fi channel. The need to change it.
Let's start the debriefing with the most basic. A little theory about wireless connection channels. Currently, most routers are set to the frequency 2.4 GHz. So this indicator is considered standard. There are more numbers - for example, 5 GHz, but they are found in recently released models, so there are still fewer of them.
The 2.4 GHz frequency suggests the possibility of using the following range of channels: from the first to the thirteenth. It is easy to conclude that any Wi-Fi router operates on one of these thirteen channels. This applies to countries such as Russia and Ukraine. In America, things are different: they can only use 11 channels. Take note of this feature, because when purchasing any American device, you can easily encounter the fact that it will not see Wi-Fi channels 12 or 13.
Problems with channel overload occur when several networks are connected to it at once. How does this happen?
- You install, for example, channel 5.
- The neighbor next door also decides to opt for Channel 5.
- Thus, several networks have already used Channel 5. Imagine when there are several such neighbors.
- The channel is overloaded.
This problem is very common in apartment buildings, but less common in private buildings, since the distance to neighbors is large.
The initial settings are as follows: when you turn on the router, any channel is automatically selected (the one that is less loaded). When you turn off and turn on the router again, a different channel is selected.
Of course, you can set this setting - when turned on, the router will connect to a specific channel, for example, the second. This will always happen. But one day this channel may become very busy, and you will encounter the problems that we talked about at the beginning of the article. Therefore, automatic channel selection has an advantage. You can always reboot the device, and it will find another option, a freer one.
A useful thing is special programs that are designed to track which channels are busy and which are free. We will talk about them further.
But still, the easiest and most affordable way to deal with wireless connection problems is this. If after the first time you cannot solve the problems, then do it again. You can also experiment with the settings:
— if you chose to install a static, that is, permanent, channel, go to automatic selection;
- if, on the contrary, the router automatically selected the channel, set its specific number - first try 1,6 and 11.
Such manipulations help to cope with problems that have arisen.
If your attempts are unsuccessful, you can turn to special programs. They're called inSSIDer,WiFiInfoView. Helpful assistants will tell you information about available channels that you can connect to.
However, interruptions in the Internet are not always associated solely with the congestion of a particular channel. Sometimes problems are detected with the power system, interference coming from other gadgets, or breakdowns of individual parts.
How to work with special programs?
When your device (be it a laptop, smartphone or something else) shows that there are many different networks in a nearby radius, use special programs that will indicate to you the availability of a free channel.
The most famous program for this purpose is rightfully considered inSSIDer. Its main advantage is free access, that is, it is absolutely free. There is no menu in Russian; English will not be difficult to understand.
A good alternative is the WiFiInfoView program (I recommend using it).
Searching for a channel in the inSSIDer program
The algorithm of actions within the framework of this program will be as follows:
- First you need to download it. Home version 3.0.3.53 (currently) for Windows 7 and Windows 8.
- Next comes the installation. Run the installer and follow the recommendations suggested in the instructions.
- Launch it by clicking on the appropriate shortcut (the shortcut will be on the desktop).
- The program can be easily installed not only on computers, but also on phones (based on Android/iOS).
- Turn on Wi-Fi.
- After starting the program, go to the tab NETWORKS. You will see a list of available Wi-Fi networks that are nearby, including yours. You can find out about connecting to the latter if there is an asterisk next to it.
- We pay attention to Channel, namely, to what is displayed under this tab (information about busy channels).
- We make a choice in favor of one or the other.
A small recommendation: when you analyze busy channels, pay attention to channels such as 1, 6, 11. If other networks have not selected them, then first try setting up the router on them. This is due to the fact that these three channels never intersect, which cannot be said about others, for example, about 10 . When the network is configured for it, then 2 before and 2 after are busy, that is, channels from 8 to 10. For example: 8,9,10,11,12.
Selecting a channel using WiFiInfoView
This program is even easier to learn than the previous one. You don't even have to install it. Yes, it will give you less information, but it will be enough.
- Opening the downloaded file. Launch WifiInfoView.exe.
- Column Channel contains information about which channel is being used by the network.
- We analyze busy people and make a choice in favor of the most free one. We set the number in the settings of our router. Next we will tell you how to do this.
Changing the channel on the Tp-Link router
If your router is Tp-Link, follow the following instructions if you want to change the channel:
- We establish a connection to the router (wireless or wired - it doesn’t matter);
- Enter the following numbers in the browser line - 192.168.1.1 or 192.168.1.1 .
- A window will pop up asking you to enter data. Standard values are admin, admin. In your case they may be different - maybe you changed them.
The further path is as follows: Wireless — Wireless Settings(Wireless - Wireless Settings) - Channel(Channel)—select a channel.
Before doing this, you should check that the specified region is correct. To do this, look at the tab Region- she is right here.
Changes are saved when clicked Save. Next, you should reboot the router and check how well the Internet works. Find a little more information on Wi-Fi passwords and changing system logins in the article: “ “.
D-Link: changing channel parameters
For routers of this brand, the algorithm will be basically the same: Connect to the network – enter settings – enter address 192.168.0.1 and data ( admin And admin). Are there any difficulties? Use this one.
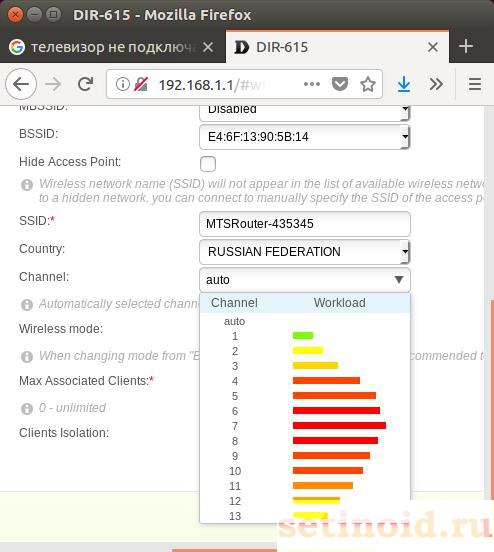
D-Link has a great tip in the settings. You can see at the same time which channel you are using and the load scales of other numbers. A visual diagram allows you to make a more correct choice. You don’t even have to install the special programs that we talked about earlier.
What about Asus?
Working with Asus routers is no different from the options discussed above. We also connect Wi-Fi, enter the settings (the address is the same - 192.168.1.1 , both name and password – admin, admin). More detailed steps can be found if you open this.
Tab Wireless network, indicating the channel number, Apply- ready. The router will reboot automatically.
What are the steps for the Zyxel Keenetic router?
Establishing an Internet connection. Open the settings page, which is located at the standard address 192.168.1.1 . Enter the required data. Here the standard password is not admin, but 1234.
In the settings window, go to the tab called Wi-Fi network, edit the region (if necessary), and then install the desired channel. For the specified parameters to take effect, you need to click Apply.
Setting a specific channel on Tenda routers
To get to the settings page, you must specify the address 192.168.0.1 . The standard fields – login and password – will be as follows: login – admin, password is an empty cell. Let's go to the tab Wireless settings. In the Channel line we enter the selected number. Let's save the changes - Ok.
conclusions
If your situation has not changed in any way after all the methods that were proposed in this article, there is only one solution left - buy a more powerful router, exactly the one we talked about at the beginning - with a frequency of 5 GHz. There have been such cases in practice, and no manipulation of changing channels helped solve the problem with interruptions.
Also remember that sometimes problems can be of a technical nature - some element in the router may break. Then no action to change the settings will be useful.
The article turned out to be very informative and useful for all users of the World Wide Web. In it, we tried to analyze the easiest and most accessible ways to resolve the most common problems with the Internet and wireless Wi-Fi connections.
Diagnostics of Wi-Fi networks and detection of free channels
In this article we will talk about how to detect a free channel WiFi network for more accurate (reliable) configuration of an access point or other wireless equipment. Wi-Fi diagnostics networks is performed by specialized utilities. Among them there are both paid and free versions, the most popular are presented below:
Let's focus on the utility inSSIDer, as it is a powerful tool for diagnosing wireless networks. This program will help you measure signal strength and evaluate the performance of your Wi-Fi equipment in different locations. You can clearly see and check how walls, stairs, doors, and in general the layout and materials of your premises affect the coverage area of the wireless network being served. Moreover, the Home version is completely free.
Currently, in any modern city, every home or office is literally teeming with an abundance of Wi-Fi networks. At the same time, when several wireless networks overlap the channel on which they operate (i.e. several AP In a building, a Wi-Fi network is distributed over one channel), a situation arises when the operation of all Wi-Fi networks on this channel slows down. Scanner inSSIDer will help you discover the best channel for your Wi-Fi.
Features of this software:
- inSSIDer uses your current wireless card software and Wi-Fi connection
- works with Microsoft Windows Vista, 7 and 8.1 (32 and 64 bit)
- tracks the strength of received signals in dBm over time
- Sorting by MAC address, SSID, channel number, RSSI, and time is available
Installing the utility does not cause any difficulties. It is worth noting - if you use several wireless adapters, then in the menu Network connection select the desired wireless adapter - it will be used to scan. Next, the program will automatically scan wireless networks and display information about the airwaves. Below is a screenshot of the inSSIDer working window:

Working window of the inSSIDer program
Let's take a closer look at the information provided:
SSID– name of the wireless network.
Channel– channel number on which the wireless network operates. It is recommended to use a wireless channel that has the least number of other networks.
RSSI– power level of the received signal. The higher the RSSI number, or the less negative it is, the stronger the signal. Try not to share the Channel number with access points that are close to your network in terms of signal strength.
Security– type of security. In some versions of the utility, the security type WPA2-TKIP denoted as RSNA, A WPA2-AES How CCMP.
MaxRate– the maximum speed of the device at the physical level (maximum theoretical speed) provided by the access point.
Vendor– access point manufacturer.
In Russia, 13 wireless channels are allowed for use, three of which are non-overlapping (these are channels 1, 6 and 11).
If the wireless adapter installed on your computer/laptop/tablet/smartphone is intended for use in the US, it will only be able to use channels 1 through 11. Therefore, if you set the channel number to 12 or 13 (or if one of them was selected by the automatic channel selection algorithm), the wireless client will not see the access point. In this case, you must manually set the channel number from the range 1 to 11.
So, we got acquainted with one of the utilities used for Wi-Fi diagnostics - inSSIDER. In the next article we will talk in more detail about the reasons for the unstable operation of wireless networks - stay tuned to the blog site.
Today there is a router in almost every home. But such an abundance of Wi-Fi routers could not but affect the quality of the signal. Very often networks overlap one another and interruptions in the Internet signal occur. And this despite the fact that he is strong and nothing visible should interfere with him.

The reason may just be the overlap of several access points on one channel. For apartment buildings this problem is especially relevant. Only the user should distinguish between problems with the signal and the router. This is how a smartphone on the Android platform completely freezes at the stage of downloading torrent files. Here the reason is different.
Wi-Fi breaks can occur as follows:
- A tablet or smartphone behaves as it wants - when it connects normally to the network signal, when it doesn’t connect at all;
- A sharp drop in download speed without good reason (and low speed is also observed on internal resources);
- Communication is lost in a certain place in the apartment, where there are no barriers.
The reason for all these troubles is precisely the use of the same communication channel by many points of wireless routers. Subsequently, congestion of this channel leads to low speed and connection interruptions.
To quickly solve a problem means changing the channel. Most users don’t even know how to analyze this situation and how to change the “Auto” setting on their router.
You can read about how to change the communication channel on different types of routers at this link.
Changing automatic network channel selection on an Asus router
Analyzer programs for computers running Windows 7, 8 and 10
Free programs that can be easily downloaded on the Internet will help you analyze the state of your wireless network for:
- smartphones with different platforms;
- laptops and PCs.
There are thirteen channels in total for signal transmission in Russia. So, of these 13, the first, sixth and eleventh channels do not intersect. But not all countries use 13; in the USA, for example, only 12 are allowed. Different versions of the operating system have their own characteristics regarding the use of certain channels.
Schematic representation of overlapping channels
So Windows 10 does not see channel 13, and in the router settings it is impossible to change the region to Europe in order to correct access to this channel.
Version 7 of the OS also does not see channels larger than 12. Therefore, when choosing another unloaded channel, this must be taken into account.
This is exactly what analyzer programs are needed to identify free channels, configure the router on them and work calmly.
If the user has a problem connecting to any channel or the signal lags due to channel congestion, then the answers to your questions can be asked to the technical support of the official Windows website.
The most convenient and simple programs that analyze the occupancy of communication channels are the following:
- inSSIDer 4 - download;
- Free Wi-Fi Scanner - download;
These programs will help you learn other useful information about networks. You can recognize the type of security and signal speed. Convenient graphs help you analyze the signal. The figure below shows how different users overlap on the channels and which access point has the highest frequency signal.
Wireless network channel analysis with overlay graphs
An example of network analysis using InnSider
When downloading the program from the official website, the user should pay attention to the terms of use. Very often today they offer only demo versions of programs with a period of use of no more than a month. after that you need to buy the program.
Analysis of channel fullness
As can be seen from the picture, after analysis it is clearly seen that the most crowded channel is 6. That is, you should disconnect from it and select free 2, 3, or 4, or any other except the first and eleventh, which are also already occupied.
Network analyzer for Android
Most convenient for smartphone on the Android platform, use the Wi-Fi Analyzer program. No problems searching or downloading. The user goes to the Google Play service through his phone and finds this application through a search and downloads it. When the smartphone is turned on, you can download the application via a PC.
Downloading a program from Google Play
After installation, you can go into the program and analyze communication channels. It will be immediately clear at what frequency the router operates and on what channel. All this will be indicated on the available charts. Just select channels and properties in the settings.
Asta operates on frequency 50 and the signal is received on channels 8-10
That is, in the illustrative example there is no need to change anything, because the signal does not intersect with almost anyone. In the same program, you can select the “channels” tab in the properties and see which channel has the highest and best signal. The rating is indicated by stars.
The example shows that the best signal without interference is on channels 12, 13 and 14. The program installs quickly and erases quickly. Therefore, users should not be afraid that the application will take up a lot of memory on the device.
There is another convenient tab in the same application that will show the signal frequency. With such a pointer, you can move around the apartment and choose exactly the place where the signal will be the strongest.
Signal Strength Measurement Indicator
How to change automatic channel selection on a D-Link router?
There are a huge number of routers on the market today. But according to statistics, the most frequently purchased model is the D-Link model. How can I disable auto channel selection on it?
To do this, type in the Internet address bar address 192.168.0.1. In the window that opens, type admin in both the login and password. Unless the user himself changed them. The standard login and password are always written on the back cover of the router box.
Changing Wireless Network Settings
A window appears, in which you select “advanced settings”, and then the basic ones, as in the figure above. After selecting the basic properties of the wireless network, you should find the “channel” line in the window that appears and select from it the free channel that any program for analyzing communication channels showed.
Selecting and saving a new communication channel
After this, the connection may be interrupted briefly and restarted again. If this does not happen, you need to check the router settings again and if there is a dialog box in the upper right corner asking you to save changes, you need to click and save it. After this, the data transfer and download speed should increase.
With the help of such simple manipulations, any user today can correct minor errors in the wireless network in their apartment without calling a technician or paying for their services.
So, how to choose this very high-speed and high-frequency wireless communication channel?
- Launch the analyzer program;
- Determine a free channel;
- Find the place in the apartment with the highest reception frequency
- Check non-overlapping channels (1,6,11 - if they are free) at this frequency, for example, reception speed and jumps;
- Install the selected free channel with a high reception frequency - reconfigure the router, accept the changes.
Thus, fixing problems with lost signal and lost speed turned out to be very simple, you just need to strictly follow the above steps.
A modern router is capable of scanning, checking whether the channel is free, or detecting excess signal. You can easily find a free window. Often the router firmware needs to be updated. Be careful! A power loss will interrupt the update process - instead of a Wi-Fi channel scanner, you will get a pile of scrap metal. The wireless access point can only be restored by an official service center or a technically savvy Kulibin.
Reasons for use
External interference reduces the speed of information flow. The bitrate drops noticeably. Try placing the router next to a working microwave oven - miracles will begin immediately. Interference is created by telephones, the sun, industrial and military facilities. Even the USB 3 interface is a little foul.
The channel scanner shows a list of available SSIDs, ignoring extraneous factors. Therefore, even a visually free niche sometimes works poorly. Consider software features when building a home network.
If you notice a significant decrease in speed, use shielding and install directional antennas. Avoid crossing the beam line with your body. Microwave radiation is extremely harmful and is perfectly absorbed by the aqueous media of the body. Memory, intelligence, blood counts deteriorate, and sleep is disturbed. Immunity declines.
Router admin panel
Even the TP-Link 300 series can recognize network congestion. The updated firmware works wonders. The hardware itself begins to look for free channels, selecting (even automatically) free bands. The screen will show amazing things: neighbors literally occupied the same rooms. The smart device will monitor and show the status of networks for the user to check.
The screen clearly demonstrates the above. If the neighbors had bothered to regularly update the firmware, a check with an analyzer would have shown a fundamentally different picture.
Updating the router firmware
TP-Link firmware update option is the best. You immediately receive a ready-made tool for monitoring frequencies. Of course, the router is only capable of testing its own operating range (2.4; 5; 60 GHz).
- Always take the firmware from the official website.
- Make sure the following settings match:
- Version.
- Model.
The range of information varies greatly. Select a file by carefully studying the label. If the latter is missing, don't despair. Hardware and firmware versions are often indicated by the admin panel. Avoid being arbitrary: an experimental test can kill your equipment.
The software update procedure will require access. We believe that setting up the router itself is as simple as possible. As a last resort, perform a hard reset of the equipment by pressing the appropriate button.
- Download the firmware file.
- Record to PC.
- Update the software via the cable by selecting the appropriate item in the router's admin panel.
- The program requires a cable connection. Otherwise, a fatal crash is possible. Also take the trouble to ensure uninterrupted power supply.

inSSIDer
Software that can determine the load density of Wi-Fi channels is widely known. The strange name inSSIDer implies the device’s ability to catch SSIDs traveling on the air. The replacement for the aging NetStumbler will please mainly Windows users.
- Visit the official project website metageek.com/products/.
- Find the product you need.
- Get ready to pay for the license.
The utility will provide the user with:
- Workload.
- Achievable speed.
- Writes available SSIDs (access point names).
- Will display specific parameters, such as RSSI, allowing you to analyze the signal.
- The program can catch MAC addresses.
Attention! The utility is powerless to track interference from household appliances, radio broadcasts, mobile phones, and Bluetooth.
Free option
Considering what was said, Android users breathed a sigh of relief: they will have to definitely go through the channel numbers manually. However, there is another option. Yes! Acrylic WiFi (acrylicwifi.com/). The new product is free for now, please download it.

The utility collects:
- SSID
- BSSID
- Channel congestion.
- Security type and much more.
- Free Wi-Fi Scanner.
- WirelessNetView.
Android
Download the appropriate software:
- WiFiAnalyzer
- Wi-Fi Visualizer.
- iMapper Wi-Fi Pro.
- Wi-Fi Analyzer and Surveyor.
- WiTuners Mobile.
Note! In December 2017, Kaspersky released a number of applications (official stores) that pose a threat. Therefore, it is better to use router firmware.

Linux
- LinSSID.
- iwScanner.
Mac
- iStumbler.
- AirRadar.
- WiFi Explorer.
- WiFi Scanner.
iOS
Use Fing – Network Scanner. iOS owners just need to visit the AppStore.
The article discusses free software running Microsoft Windows, which allows for a preliminary analysis of the radio coverage of the territory for the presence of third-party equipment operating in the Wi-Fi range 2.4/5 GHz. A comparison was made of the technical features of the software under consideration.
Introduction
In wireless networks, the communication channel between the transmitter and the receiver is open, which greatly complicates the analysis of radio signal propagation in the territory of the designed network. What's even worse is that neighboring wireless equipment can have a negative impact on your network through this "open" channel. Therefore, radio survey of the territory plays a very important role in the design of a Wi-Fi network. Some experts claim that radio inspection is a completely unnecessary stage, citing the fact that surrounding networks are also constantly appearing, developing, modernizing, moving, etc. But you must agree, it’s better to know in advance that there is a gigantic network of points living near you access of a neighboring office, and take appropriate measures (for example, move to other non-overlapping frequency channels), rather than later encounter problems with radio wave interference and, as a consequence, low throughput of your “open” communication channel.
Today there is a sufficient amount of software that allows you to assess the level of the surrounding electromagnetic background in the 2.4/5 GHz ranges. This article discusses programs that run under Windows OS.
1. Acrylic Wi-Fi
Acrylic Wi-Fi is the newest free network scanner that displays available wireless networks, their technical characteristics (protocol, channel, maximum speed, etc.) as well as information about their level of protection. The program even provides a list of Wi-Fi passwords that are used by default access points.
Acrylic has a paid professional version with advanced capabilities to detect wireless security issues. Also in this version, the program performs a radio survey of the territory and offers to select the optimal channels on the network to ensure the most correct operation. The appearance of the program is shown in Figure 1:
Figure 1 - Appearance of the Acrylic Wi-Fi program
In the free version of the program, its capabilities remain rather meager, limited to the output of the information shown in the screenshot above (Figure 1), namely: transmitted by the access point - SSID; its MAC address; RSSI - signal strength; Chan - number of the channel used for transmission; 802.11x - Wi-Fi transmission standard; Max Speed - maximum speed; WEP/WPA/PWA2 - encryption type. An excellent feature is that the program shows which access points have WPS 1.0/2.0 mode enabled, because it’s no secret that this WPS 1.0 has long been a kind of “back door” for any network. It also displays related information about the manufacturer (Vendor) and the type of network in which the access point operates (Type), or in other words: does it have access to the Internet, or there is no point in breaking it (just kidding). For added drama, a graph is displayed showing changes in signal strength from various access points over time (bottom right in Figure 1).
In general, the free version of Acrylic Wi-Fi is limited to the listed set of functions. Quite meager, considering that long before this program, software appeared that was capable of more.
It’s hard to find fault with the professional version of the program; quite a lot of useful functions have been crammed into it, for example, the program itself will indicate access points that negatively affect your network. Acrylic allows you to generate reports on the status of Wi-Fi networks with detailed characteristics of access points and transfer them to a communicator or administrator’s computer.
Resume on Acrylic Wi-Fi: When working with this program, I got the feeling that it was made entirely on the Kali Linux platform, with the only difference being that the graphical shell was added for working under Windows. The paid version is complemented by the fact that it allows you to generate reports in HTML format and helps the user make decisions about setting up the network without going into technical nuances. Thus, I would rate the free version of the program three points on a five-point scale; it can be classified as software for “beginners”; the paid version of the program deserves a slightly higher rating of three plus (due to the generation of reports). However, overall the program remains weak in its technical capabilities. In addition, it contains a bunch of distracting links leading to the developer’s website and profiles on google+, Facebook, twitter, etc. Which overall creates the impression not of a technical application, but of a program for entertainment, when, out of nothing to do, I decided to “monitor” my neighbors’ Wi-Fi access points.
2. Wi-Fi Scanner
This software can show detailed information about 802.11 a/b/g/n/ac networks near you, as well as access point parameters and signal strength. The program also has a paid and free version, unlike the previous software, they do not differ in functionality. After installing the program, you can use it for 30 days, after which you need to register it - free for personal use, or buy it in case of commercial use of the software. The appearance of the program is shown in Figure 2.

Figure 2 - Appearance of the Wi-Fi Scanner program
As in the previous software, the main column displays information about available networks, but the information is more extensive. Availability of additional columns: Achievable rate - actually achievable data transfer rate, Channel Width - used channel width, Spatial stream - spatial streams (here we are talking about MIMO technology), Channel Utilization - how loaded the data transmission channel is, and more extensive information about the security protocols used , and specifically the encryption type: CCMP/TKIP/WEP/ or a combination thereof.
The free version of this program includes all the features listed in the professional version of Acrylic Wi-Fi. In particular: Figure 3 shows a graph of the signal level from available Wi-Fi networks. Very convenient and intuitive.

Figure 3
Figure 4 provides extended information about one of the surrounding networks. In this case, this network is of the same name Rostelecom.

Figure 4
Resume on WiFi Scanner: In my opinion, the design of this program is quite “easy” in terms of perception of the displayed information, and the location of all buttons and tabs is intuitive. This program is an excellent solution for private use, and for commercial use the prices are reasonable. The program deserves an excellent rating.
3.Homedale
Belongs to the "weak" class. From a technical point of view, the program has glitches and shortcomings, but it works on the latest versions of Windows. The program is easy to use, but it only allows you to evaluate the signal level coming from the access point and some information already listed in previous software products. The program does not see equipment manufacturers and does not always determine the model of the access point whose network it has detected. Moreover, the signal strength from the access point is also not always able to be determined. The appearance of the main program window is shown in Figure 5.

Figure 5
The program does not provide filters in any way, therefore, for example, on the graph of the power distribution of available access points by channel, it is impossible to remove connections that are “uninteresting” for us, so it simply shows such uninformative stuffing (Figure 6):

Figure 6
Considering the incomplete performance of this program, it is rated, to put it mildly, “unsatisfactory.” The program is quite weak compared to other similar free software distributed throughout the Internet.
4. Outdated monitoring programs
The list of outdated programs includes those that either do not support “modern” Wi-Fi standards - IEEE 802.11n/ac, or no longer work under Windows 7/8/8.1/10. And the appearance of these programs is quite depressing, which is not pleasing to the eye.
Network Stumbler is a lightweight wireless network monitoring tool for Windows. Its development stopped at supporting 802.11 a/b/g standards, that is, it monitors the network only in the 2.4 band, excluding five gigahertz. The software works on Microsoft Windows systems up to and including XP.
WirelessNetView was once an excellent tool for monitoring Wi-Fi networks, but is now somewhat outdated.
Wireless Network Watcher - originally created for detecting and analyzing Wi-Fi networks. I used it myself once; the utility scanned local networks, including wireless ones. The program displays a list of all devices currently connected to the scanned network. The device information output table displays information such as: IP, MAC address, device name and adapter manufacturer. The list can be exported to HTML. On the issue of analyzing Wi-Fi networks, her attitude is rather mediocre, because in order to get information about a Wi-Fi network, you need to connect to it. In fact, it was included in this review simply because of its specific name.
Instead of a conclusion
The Acrylic Wi-Fi and Wi-Fi Scanner programs listed above belong to the class of those free programs that keep up with the times and are capable of monitoring access points running on the relatively recently introduced IEEE 802.11ac. In addition to the programs reviewed, there are also equally famous ones that were not included in this review, among which inSSIDer is an entirely paid software recently. In addition, a large number of programs running Android OS, Mac OS and Linux are available on the network. But that is another story.


