How to export to pdf from photoshop. Saving PDF Files in Adobe Photoshop CS5
Portable Document Format (PDF) is a universal file format that can represent both vector and point data. It has electric
throne document search and navigation features. PDF is the primary format for Adobe Illustrator and Adobe Acrobat.
Some PDF files contain a single image, while others contain multiple pages and images. When you open a PDF file in Photoshop, you can select specific pages or images to open and determine how it will be rasterized.
You can also import PDF data using the commands Place(Pestit) and Paste(Insert) and Drag-and-Drop technology. The page or image is placed on a separate layer as a vector object.
Please note that the following procedure is only used to open PDF files created in Photoshop. You should not specify options in a dialog box Import PDF(Import PDF) when opening PDF files in Photoshop.
Do the following:
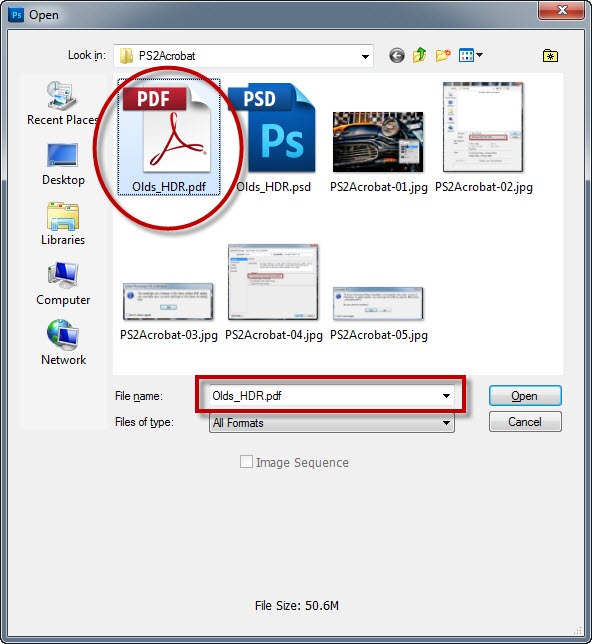
1. For Photoshop: select command File | Open(File | Open). Next in the dialog box Open(Open) select the file name and click the button Open(Open).
For Bridge: select PDF file and command File | Open With | Adobe Photoshop CS5(File | Open with | Adobe Photoshop CS5).
2. In the dialog box Import PDF(Import PDF) select Pages(Pages) or Images(Images), depending on what kind of PDF document you want to import.
3. Click the icons to select the pages or images you want to open. To select more than one page, hold down the click
Use large icons only to present them in the preview window. The large icon options control them in the preview window. A scroll bar appears for the three large icons.
4. To give the new document a name, enter a name in the text box. If you want to import more than one page or image, select them all at once and open.
5. When selecting a PDF document, you should set the options to enable from the menu Crop To(Limitation):
◆ Bounding Box(Limitation circuit). This option eliminates outer white margins and any document elements outside the area to which the tool is applied. Trim Box(Cutting box). Bounding Box(Constraint Outline) will not clip white margins that are part of the background created by the original application;
◆ Media Box(Mediabox). Crop to original page size;
◆ Crop Box(Box cropping). Crop the edge area of a PDF file;
◆ Bleed Box(Sharp cut box). Crop specific areas specified in the PDF file to accommodate the constraints inherent in presses such as shrinking, folding and trimming;
◆ Trim Box(Cutting box). Crop specific areas specified for the intended finished page size;
◆ Art Box(Artistic trimming). Crop specific areas specified in a PDF file to accommodate PDF data in other applications.
6. In section Image Size(Image size) enter values in the fields Width
(Width) and Height(Height):
◆ maintain page proportionality. Because they are scaled within the rectangle defined Width(Width) and Height(Here), then select Constrain Proportions(Limited proportion);
◆ accurately scaling the page, select Width(Width) and Height(Height).
Some distortion may occur when pages are scaled.
When more than one page is selected, text fields Width(Width) and Height(Height) show the maximum width and height of the selected pages. All pages are provided in their original size if the option is enabled Constrain Proportions(Limited proportion) and the values cannot be changed Width(Width) and Height(Height). Changing these values will scale all pages in proportion to how rasterized they are.
7. Define the following options for Image Size(Image Size):
◆ Resolution(Permission). Sets the permission for a new document;
◆ Mode(Mode). Sets the color mode of the new document;
◆ Bit Depth(Bit depth). Sets the bit depth for the new document.
The width and height plus resolution determine the final pixel size of the resulting document.
8. To respond to color profile warnings, select Suppress Warning(Suppress warning).
9. Press the button OK.
In Photoshop by command Save As(Save As) allows you to save indexed color, CMYK, Grayscale, Bitmap, Lab, and Duotone images in Photoshop PDF (Portable Document Format) format. Because a Photoshop PDF document can save data such as layers, alpha channels, color shots, and notes, you can open the document and edit the images in versions of Photoshop CS2 and later. Can also use Photoshop format
You can quickly save the file as a Photoshop PDF by selecting the file option Save As Photoshop PDF(Save as Photoshop PDF). Or you can use the command Production(Production) from the palette menu Actions(Actions).
For advanced users, the Photoshop PDF format offers options for managing the PDF/X document, which is essential when, for example, you send your document to a large commercial press. The PDF/X (Portable Document Format Exchange) format is a subset of Adobe PDF that does not preserve color, font, and trapping information, leading to printing problems.
You can also set security options to restrict access to the PDF document.
The 128-bit RC4 encoder (Acrobat 6 and later) has options for allowing users to view metadata and thumbnails for secure use of a PDF document using Adobe Bridge. You can save your PDF settings as a PDF template for creating Photoshop PDF files. Adobe PDF templates and settings are freely distributed across all Adobe Creative Suite programs, including Photoshop, InDesign, Illustrator, GoLive, and Acrobat.
Adobe Creative Suite users can find more information about common PDF customization options in the PDF Integration Guide on the Creative Suite CD.
Saving files in Photoshop PDF format
1. Select a team File | Save As(File | Save As), then select Photoshop PDF from the list of formats. You can select options Color(Color) if you want to enable a color profile or use a profile defined by the command Proof Setup(Profile setup). You can also include layers, notes, color shots, or alpha channels. Click the button Save(Shit).
2. In the dialog box Adobe PDF Select an Adobe PDF template that determines whether the Photoshop PDF file will be printed on a desktop printer, sent to a commercial printer, emailed, displayed online, etc. Selecting a template is the easiest way to set options for a Photoshop PDF file. Once the template is selected, click the button Save PDF(Save PDF) to save the Photoshop PDF file. If you want
If you want to add security options or fine-tune saving options for PDF, you must complete further fields in this window.
3. Select options from the menu Standard(Standard) and menu Compatibility(Compatibility) to determine PDF/X specifications and Acrobat version compatibility for a PDF document.
4. Select an option General(Basic) on the left side of the dialog box Save Adobe PDF(Save to Adobe PDF) to set general PDF file saving settings.
Users of Photoshop versions earlier than Photoshop CS2 can open a PDF (containing Photoshop data) as a PDF with antialiased layers. Select a team File | Open As(File | Open As) and then select Generic PDF(Created as PDF) from menu Files Of Type(File Type) (for Windows), or select the command File | Open(File | Open) and select Generic PDF(Created as PDF) from menu Format(Format) (for Mac OS).
5. Select an option Compression(Compress) on the left side of the dialog box Save Adobe PDF(Save Adobe PDF) to define compression specifications and sampling options for the PDF file.
6. Select an option Output(Exit) on the left side of the dialog box Save Adobe PDF(Save Adobe PDF) for color management and PDF/X options.
7. To add security to a PDF document, select Security(Security) on the left side of the dialog box Save Adobe PDF(Save Adobe PDF). Define password and permission options for your PDF document.
Parameter Encryption Level(Encryption level) depends on the command settings Compatibility(Compatibility) of your PDF document. Choose different settings Compatibility(Compatibility) to determine higher or lower Encryption Level(Encryption level).
8. Select a team Summary(Summary) on the left side of the dialog box Save Adobe PDF(Save Adobe PDF). You can view the options that you have overridden.
9. If you want to use the PDF settings again, click the button Save Preset(Save Template) and save these settings as a PDF template. Whenever you save a Photoshop PDF file in the menu list Adobe Preset PDF(Adobe PDF Template) A new template will appear in any Adobe Creative Suite product.
- Choose File > Save As... and choose Photoshop PDF from the Format menu. You can select the Color option if you want to use a built-in profile or a profile specified by the Proof Settings command. You can also include layers, annotations, spot channels, or alpha channels. Click the "Save" button.
- In the Save Adobe PDF dialog box, you should select a style that suits the task at hand: printing on a desktop printer or proofing device, in a print shop, email distribution, online posting, and so on.
Selecting a style is the easiest way to set options for a Photoshop PDF file. Once you've chosen a style, click the Save PDF button to create a Photoshop PDF file. If you need to add security settings or fine-tune your PDF saving options, follow the remaining steps in this procedure.
- (Optional) Select options from the Standard menu and the Compatibility menu to set compatibility with the PDF/X standard and with the version of Acrobat for this PDF document.
- (Optional) Select General on the left side of the Save Adobe PDF dialog box to set basic options for saving a PDF file.
Note. Users of Photoshop 7.0 and earlier can open Photoshop PDF documents as PDF with flattened layers. Choose File > Open As and then Basic PDF from the Files of Type menu (Windows) or File > Open and Basic PDF from the Format menu (Mac OS).
- (Optional) Select Compression on the left side of the Save Adobe PDF dialog box to set compression options and downsampling for the PDF file.
- (Optional) Select Output on the left side of the Save Adobe PDF dialog box to set color management and PDF/X compatibility options.
- (Optional) To define security settings for a PDF document, select Security on the left side of the Save Adobe PDF dialog box. Provide a password and set permissions for this PDF document.
Note. The encoding level depends on the Compatibility setting of the PDF document. Select a different Compatibility setting to specify a higher or lower encoding level.
- (Optional) Select Summary on the left side of the Save Adobe PDF dialog box. You can view the settings you have configured.
- (Optional) If you want to reuse the PDF save settings later, click the Save Style button to save the selected settings as a PDF style. The new style will appear in the Adobe PDF Style menu the next time you save a Photoshop PDF file in any application in the Adobe Creative Suite.
- Click the "Save PDF" button. Photoshop closes the Save Adobe PDF dialog box and creates the PDF document.
As part of the Creative Suite, Photoshop offers very good integration with other CS products, including one you might not expect - Adobe Acrobat. Photoshop can create native Acrobat PDF files directly from its own file using the function Save, But that is not all. Oh no, that's not all!
Acrobat's PDF file format offers several very useful features, not the least of which is cross-platform. Almost everyone on any computer can open and view a PDF, so when you start creating a PDF from Photoshop, you're starting to create a file with the same versatility as a JPG file.
But the PDF format offers more advanced features that can be integrated into your workflow. Specifically, I'm talking about document security, and back-and-forth editing capabilities. Yes, back and forth from Photoshop to PDF format, with full editing capabilities. Moreover, you can creatively mix and match security features with editing features.
Let's see... we'll start with this layered Photoshop file that we want to distribute as a PDF

At this point, we get a simple warning telling us that the changes we are about to make in the next dialog box may override the options selected in the previous (Save As) dialog.

Next we get a dialog box with options for saving the PDF file, which has several sections on several tabs. For now we will focus on only one of the main parameters: Preserve Photoshop Editing Capabilities(Keep editable in Photoshop):

When enabled, the PDF file will behave the same as a PSD file when opened again in Photoshop. Leave the checkbox and press the button Save PDF(save PDF). Another warning will appear that earlier versions of Photoshop will not be able to open this file as "Photoshop PDF". We press the button Yes, to continue.

The file will be saved. Now close the original file in Photoshop and open (File > Open) the created PDF.
The file will open, it's a PDF - but it contains a full set of layers, including layer masks as well as any text layers, shapes, paths, etc. All this is present and can be further edited at will in Photoshop!

So what does this mean? You have a PDF file, you can send it to someone and they can open and view it in Acrobat or Reader. Plus, you or anyone else will be able to open and edit the file just as if it were a native PSD file - all from one source document.
To do this, while saving the file, in the PDF options dialog box, go to the section Security(Safety). Check the box there Require a password to open the document(Require a password to open the document). You need to come up with a password (and don’t forget!!!) and enter it in the field Document Open Password.

This time when the button is pressed Save PDF, a confirmation window will appear and you will need to enter the password again:

Now, when you try to open a file, you will be prompted to enter a password before the program will allow you to open or view the file.
But wait - that's not all!
Using security features, you can restrict document editing with a password without requiring a password to open or view the file. In this case, we need to make some changes to the write security settings. Clear the checkbox for setting a password to open the document, but add another one to restrict printing, editing, and other tasks:

Below are the parameters Printing Allowed And Changes Allowed, which by default completely prohibit printing and modification of any kind - no copying of text, images or other content. You can set these parameters as you wish. For example, the image below only allows low-resolution printing and does not allow editing at all. However, anyone can view the document and no password is required to view it.

With these options, if we try to open this document in Photoshop, we will get the following dialog box

If we enter the password correctly, the file will open with the layers intact as before. If not, it won't open in Photoshop.
If we open the PDF file in Acrobat, we see that the document is protected - the editing tools are grayed out and completely unavailable - changes to this document cannot be made even in Acrobat.

These capabilities can be used in your work, both with clients and customers, and with colleagues in collaboration. Try it!
The original article in English is located
Mike Hoffman has been a photographer, artist, and educator for most of his life. Early in his career, he created technical illustrations and photographs for electronic equipment manufacturers, and also taught classes in computer training and 3D modeling. Michael is currently an Adobe Certified Professional in Photoshop and Acrobat and is proficient in Lightroom, Photoshop Elements, Illustrator and InDesign. He has contributed greatly to the work done by Operation Rescue Photo to restore photographs damaged by natural disasters. As an active member of the National Association of Photoshop Professionals, he continues his excellence in the art, design excellence, and education.


