How to check a Victoria hard drive without a system. How to check a hard drive for errors and bad sectors (bad blocks). How to work with the Victoria program in DOS and Windows
Victoria hdd is a program for extensive analysis of the hard drive of a computer, laptop, or external hard drive. This program is used by both beginners and professionals, as it has a very user-friendly interface with many tips, and at the same time, the program provides a large number of opportunities for setting up a hard drive and repairing it.
Features of the Victoria hdd program
- Works directly with Windows OS.
- View complete technical information of the hard drive.
- View SMART information.
- Scanning the surface of the hard drive and searching for bad sectors.
- Perform normal formatting.
- Recovering or reassigning damaged (Bad) blocks of the hard disk surface.
How to download and run the program
Victoria hdd 4.47 is completely free software.
You can download the program from the official website http://victoria4.ru/
Once you have downloaded the program, you can simply unpack it and immediately start working without installation.
For the program to work correctly, it must be run as Administrator.
After launching the program, we will see an interface where it is necessary, first of all, to select the hard drive with which we are going to work. To do this, simply select the disk we need with one click.
After selecting a disk, the hard drive's nameplate information will be displayed in the left window:

Hard drive SMART information
In order to view information about the status of the SMART hard drive, you need to select the hard drive you need and go to the SMART tab.
On the SMART tab, click the “Get SMART” button and wait while the program scans the hard drive information.
After the scanning is completed, we can see the general condition of the disk by the signal in the upper right part of the screen near the “Get SMART” button, in my case the condition of the hard disk is good, so the program displays the “GOOD” signal if the disk is in a critical state then in this place there will be an inscription “BAD”.
On the left side we see detailed SMART information.
To determine the status of the hard drive, you need to analyze the following points:
- Reallocated sector count – number of bad (BAD) sectors that were reassigned. If this number exceeds 10, then you should think about transferring information from this drive
- HAD Temperature – average operating temperature of the hard drive. This parameter should not exceed 40°C if the temperature is higher. Then you should think about cooling your hard drive.
- Seek error rate - the frequency of errors during the operation of the heads, this value should also be equal to zero; if the number is higher, then it is worth diagnosing the hard drive for the presence of overheating or vibrations.
Scanning your hard drive for bad sectors (BAD)
In order to scan the surface of the hard drive for bad (BAD) sectors, you need to go to the “Test” tab.
Consider the interface of this tab. The first thing you should pay attention to is the large gray field, in which the scanning process and the surface of the hard drive will be graphically displayed.
On the right we can see a field that will display the number of sectors with different response times.
Learn more about the field that displays the number of sectors with different response times.
The first 3 types of blocks are allowed on the surface of the hard drive; they display the number of sectors with an acceptable response time that will allow you to use the hard drive without problems.
Green sectors are also acceptable and may be present, but a large number of them will significantly reduce the writing and reading speed of the hard drive. Such sectors may be present in large numbers on old drives, or on hard drives that are in constant, uninterrupted use.
All other sectors (orange, red, Err) can cause the system to freeze or severely slow down the hard drive.
Scan options and what they mean:

Restore - this option is used to restore damaged sectors if they can be recovered, but this option is only available in the paid version of the program.
If you have decided on the scanning parameter, then select it and press the “Start” button. We are waiting for the scanning to complete; while the program is running, we can monitor the found and successfully corrected bad (BAD) sectors in the status field, which is located at the bottom of the program window.
Conclusion
The Victoria HDD program is a good tool for viewing information about the hard drive, or SMART status, you can view complete passport information and SMART status, which cannot be done in most similar programs, or you can, but the information will not be complete. If you don’t know much about restoring and minor repairs of hard drives, but want to diagnose and return the drive to good condition on your own, then this program is just for you. But if you need to carry out more accurate and high-quality work with a hard drive, then I recommend using the program, it is a more professional tool for working with hard drives and has more functions.
A hard drive is a complex physical device designed for recording and storing information. The surface of the disk is divided into tracks.
The vertical stack of these tracks forms a cylinder. The track is divided into smaller sections called sectors. Each sector is marked. Their number depends on the interface that is used to communicate with the disk.
The hard drive is vulnerable. The causes of failure may be a malfunction in the operation of the device software, failure of the controller, power failures, disruption of physical contact with the interface, sticking of the magnetic head, etc. The main defects of disks are sectors with damaged magnetic coating. Information cannot be stored in these areas.
Defective sectors are called bad sectors. Bad sectors located on the zero track are especially dangerous, because this is the boot area.
To determine the presence of bad sectors and the possibility of restoring them, Belarusian programmer Sergei Kazansky developed the Victoria utility. The latest release of the program was June 26, 2013. License type is Freeware, which makes it especially popular.
Purpose
The Victoria program allows you to perform low-level testing of a hard drive with a parallel connection interface - IDE (ATA - Advanced Technology Attachment) and SATA interfaces - a serial connection interface. The output contains detailed information about the physical state of the drive, its performance, and errors. This tool can be used by both service center professionals and ordinary users to evaluate the performance of the drive, the ability to correct errors, and analyze all the physical characteristics of the hard drive.
Video: Victoria HDD scan
Key Features
- comprehensive information about the technical characteristics of hard media;
- analytics of HDD self-monitoring parameters;
- testing of many technical parameters;
- the ability to change disk space due to bad clusters;
- constructing surface graphs;
- eliminating bad clusters from used ones - replacing them with backup ones;
- HDD performance analysis;
- determining the speed of access to clusters;
- clearing the disk of information without the possibility of recovery;
- protecting the device by setting a password;
- the ability to copy any sectors to a file;
- context help system;
- other useful features.
Installation and launch
There are:
- boot versions of the program. In this case, you need to create either a boot floppy disk or a boot disk. The tool for creating a floppy disk is the makedisk.bat file. To create a bootable CD, you need to unzip the program file and burn its ISO image to disk;
- non-bootable version. The program is unpacked directly onto your hard drive.
In the first case, after downloading from the devices, you can start working with the program.
In the second, to obtain a complete picture of the state of the hard drive, a number of conditions must be met:
- disable the controller channel of the disk being checked;
- shut down all running programs;
- run Victoriyu only on a warm disk.
Launch from the operating system is carried out by the application vcr446f.exe.

After launch, the user is presented with a window with a clear English-language interface.
HDD recovery using Victoria
The first tab is Standard, which provides information about the passport of the hard drive or drive that we want to test. (Selection is made in the upper right window of the section).

Photo: information about the hard drive passport
The second tab is Smart.

Photo: tab for checking disk self-test parameters
Here you can check such parameters of the HDD self-testing system as:

On the right side of the window, click the GetSMART button and get an assessment of the health of the hard drive as a whole (next to the GetSMART button) and by parameters.
The third tab is Tests. The main partition, which allows you to quickly detect and cure disk sectors.

The hard drive is divided into many clusters of the same size. The Victoria program, while running, accesses each cluster during testing.
The duration of the call is analyzed. The longer the wait time, the more likely there is a physical defect in that area.

There are many reasons for defects: In this section, testing launch modes are important, which can be selected in the lower right window.
- These are the modes:
- Ignore - allows you to run the test in information mode, without making adjustments;
- Erase - mode for cleaning the hard drive (used carefully and rarely);
- Remap - check with simultaneous replacement of damaged sectors with working ones. Can be used after checking in ignore mode if damaged clusters are found;
Restore - restoration. Used in the case when the remaining sectors are not reassigned after checking in remap mode.

To start the test, press the “START” button. The sectors being checked are graphically displayed in the left window and are indicated by color. In the windows on the right you can see the percentage of the tested device volume and the number of tested clusters.
Bad sectors on the HDD are hidden by replacing them from the reserve area of the hard drive. Reassigned so that they are no longer read. The utility allows you to restore only a hard drive that does not have any physical damage in its parts. If there is wear or an obvious breakdown, then software, of course, cannot be corrected.
Testing with the utility is considered low-level, but has high performance. So testing a 232 GB device takes about 60 minutes.

After the testing, error correction or recovery procedure, you need to restart the computer and recheck. The result should improve.
If, as a result of testing, there are too many bad clusters and they are located at the beginning of the hard drive, then such a disk is not recommended. Viktoria contains a function that is useful in this case, allowing you to halve the size of the hard drive at the expense of bad sectors.
After this procedure, the HDD can be used as a second disk or external storage. It is not suitable for installing an operating system.
Video: HDD diagnostics and repair
Legend
- During testing, you can see rectangles of different colors in the window.
- They clearly display a picture of the disk status:
- The sector marked in white is considered normal. The response from him comes within 5 ms;
- green. Response within 200 ms;
- orange. Response within 600 ms;
- red. Sectors that will no longer work;
- blue. "Deadly" sectors. Cannot be restored.

All these designations are in the test section, in the middle lower window. Next to them are numbers indicating the response time from the cluster to the program. The gray and white sectors are not damaged. Green is also a worker, but already strives for bad things.
Orange is a bad sector that can be restored either by low-level formatting or by S. Kazansky’s utility.
In order to be able to use the functions of restoring these sectors, you need to check the boxes opposite the designations in the check boxes.
To ensure proper operation of your computer, it is recommended to periodically test its component devices. The main device is the hard drive. Typically it houses the operating system. The user's comfort at the computer depends on the performance of the disk and its performance. Perform production tasks.
A high-quality, fast HDD testing program is necessary for both the technical support specialist and the average user. The functions of full-fledged and, importantly, fast low-level testing are performed by Sergei Kazansky’s Victoria program.
Most modern computers run the Windows operating system, so it is recommended to use version 4.46. It can be found on the manufacturer's website. The latest release of the program was June 2013. It is compatible with Windows 7, does not load the registry, and can be launched from any media. Easy to use.

Victoria serves as an assistant in various situations. For example, when buying a used drive to assess its technical condition, when the operating system is slowing down, to restore important information. In other matters, and to delete irrevocably classified information.
The program is a complete solution that combines the capabilities of several diagnostic utilities for the hard drive and useful functions. It is one of the most widely used programs for recovering bad HDD sectors.

 Hard drives, like any other computer components, can break, fail or become damaged. In such cases, whenever possible, hard drive recovery using special software is required. Thanks to their use, you can thoroughly check the disk and fix minor malfunctions.
Considering that most users use computers and laptops for simple everyday use, practice shows that this is enough to work effectively for a long time.
In this article we will talk about one of these programs, Victoria HDD, designed to check your hard drive. Let's figure out what this utility is, how to use it, and what you can achieve with it.

First of all, we can say that the Victoria program was created by a leading specialist from Belarus. It is absolutely free and is freely available on the Internet. Thanks to its wide functionality and simple design, Victoria is suitable for both novice users and professionals.
Victoria is suitable for all versions of Windows, including Windows XP/7/8/10 and supports x32 and x64 bit platforms.
Functional modes
This program has several operating modes:
- API (using Windows OS tools).
- Offline mode via ports.
As for the first, it is the main one and has a number of capabilities. Its main advantage is its simplicity and convenience, which makes it accessible even to inexperienced users.
If we talk about the offline mode, then it is largely intended for work by a specialist. With its help, you can get the most accurate readings and conduct a thorough diagnosis of both external and internal hard drives. In addition, it has a more extensive set of recovery tools.
Program functionality
According to the information provided by the official website, this hard drive testing program is capable of:
- Speed up your PC.
- Restore stable operation of the operating system and individual programs.
To achieve such significant results, the utility has a positive effect on the HDD and provides:
- Replacement of defective sectors of the hard drive with spare ones.
- Elimination of bad sectors.
- Repair of damaged areas.
Thus, using this software, you can restore the performance of the drive and extend its service life.
System recovery tools
Of course, you can use conventional recovery tools, and then the operating system itself will replace the damaged sectors with backup ones.

This is done by running a drive volume check, however, this type of replacement has its drawbacks:
- Works with the active volume exclusively in DOS mode.
- Does not provide the user with detailed information.
- Does not allow you to choose how to solve the problem yourself.
That is, standard tools do not have such wide functionality as third-party programs.
Without a doubt, Bill Gates created an excellent operating system. But think about how many standard programs you've replaced. For example, Internet Explorer, Notepad or Explorer. That is why checking and restoring the hard drive should be done using the Victoria program, and not built-in tools.
Working with the utility
Before starting to work with the Victoria program and presenting a guide on its use, I would like to clarify that the main language of the utility is English. However, on the Internet it can be found entirely in Russian; to do this, enter the corresponding phrase into the search.
Thanks to the support of the Russian language, it is incredibly convenient to use, which cannot be said about other similar utilities. Download only the newest version, since it is the one that has all the tools necessary for work and contains a minimum of errors, if any, of course.
Download and launch
Finding the program on the Internet is incredibly easy by asking the phrase “Download Victoria” in a search engine. You can also read its detailed description there. Next, select a reliable site, preferably one that has been previously verified, and download the utility from it to your PC.
The Victoria program does not require installation, since it will be in the form of an archive. Unzip it, go inside and you will see a single file “vcr447.exe”.

For your convenience, you can create a shortcut on your desktop.

Launch on a computer with the Windows 7, 8 and higher operating system installed exclusively as an administrator. To do this, right-click on the icon and select “Run as administrator.”


Before the program opens, several windows will appear on the screen:

Don't worry, it's a simple call to PC repair experts. This is a warning that there is no driver to work with the ports. Just click “OK” everywhere, and Victoria will launch.
Beginning of work
To open the graphical shell of the utility, you need to go to the “Standard” tab. All connected hard drives will be displayed on the right, select the one you want to check. Even if there is only one, click on it and all the data relating to it will be displayed on the left.


Next, go to “Smart” and click the “Get Smart” button. The table will display 242 parameters of your device. They are recorded from the first day of use of the drive, and the program reads them from the system.

The fifth point in the “Health” column deserves special attention:
- Green circles indicate disk sectors in excellent condition.
- Yellow color – indicators are not normal.
- Red circles indicate that the parameters are unacceptable.
We also need to say about the “Raw” column, where you can see the number of bad sectors of the hard drive.
Test tab
Now you should go to the “Test” tab. The principle by which the HDD test is carried out is to measure the duration of time from a request to receiving a response from sectors individually.


During the process of scanning the hard drive, the program evaluates the scanned sectors and graphically shows problem areas, indicating them with multi-colored rectangles.
Clusters are designated by a specific color, which depends on its state:
- Gray ones are perfectly readable sectors.
- Green ones take longer to respond, but are in good condition.
- Orange ones take a long time to read. It is these sectors that slow down the disk. They are working, but very soon they will become unusable. Their number should not exceed 50 pieces.
- Red – damaged sectors “bad blocks” that cannot be considered and cannot be restored. If you have such sectors, you should think about changing the hard drive.
- Blue with a cross – reading sectors causes a failure. The information contained on them cannot be . Such sectors need to be re-partitioned so that the HDD does not use them during operation. This is done by using the remap function, which we will talk about later.

Actions according to the modes will be applied to those sectors in front of which you check the boxes.
Operating modes
We can talk about four modes of operation that the Victoria program has:
- Ignore – normal hard drive diagnostics without affecting bad sectors.
- Remap – replacing bad sectors with backup ones.
- Restore – programmatic restoration of damaged sectors “bad blocks”.
- Erase – overwriting bad sectors. The function is most effective when there are software bad blocks on the hard drive, especially when there are a lot of them and maximum recovery speed is required. When using this function, all information is erased.


The last point deserves special attention - Erase. It should be tested only when the “Remap” and “Restore” modes do not bring results, but before that it is advisable to save all the information on the drive.
Reserve sectors
The operating system allocates reserve space on each hard drive. Often this is the slowest section of about 8% at the center of the hard drive.
If bad sectors appear, the system transfers the information available on them to the reserve area. This happens when the HDD is scanned for errors using standard Windows tools or by using third-party software.
Diagnostics
After you select a mode and check the boxes next to the rectangles, you can click “Start”. When using for the first time, it is not recommended to change the default settings. In this case, the usual operation will be carried out, without applying any actions to the damaged sectors.

If you exactly follow the steps in our step-by-step instructions, but nothing happens after starting the scan, then this may be due to the fact that you did not select the hard drive in the “Standard” tab. In this case, you need to go back and do this.
The diagnostic process can be observed visually. In earlier versions of the Victoria program, the sectors being checked were displayed in a grid.


However, this overloaded the processor when there was a large hard drive. That is why, already starting from version 4.47, it was decided to switch to visualization using a graph. It can be seen just a few minutes after the start of the diagnosis.


In both versions it can be disabled by unchecking the “Grid” checkbox.

The HDD testing process can take quite a long time, it all depends on the capacity of your drive. It is also not recommended to use a computer during the test, otherwise the results may not be accurate.
Buttons
After scanning starts, the “Start” button disappears, and “Stop” appears instead, by clicking on which you can stop the scan.


Also, for the convenience of users, there is a Pause button, with which you can pause the scanning process, and a “Continue” button to continue it from the same place where it was stopped.
Before checking your hard drive, be sure to disable all programs. If this is not done, the indicators may be inaccurate, and the number of orange sectors will increase significantly, since some of them will be used by running utilities.
Is it possible to save the drive with Victoria?
Using the Victoria program, you can replace about 8% of bad sectors, correct errors and unsatisfactory performance of sectors in a volume if this happened due to system failures. Of course, Victoria is unable to fix physical damage to the hard drive.


If you cure sectors that can be corrected and rewrite the remaining ones to reserve, then such treatment of the hard drive will significantly increase the duration of its operation. At the same time, it must act as an additional device, while the Windows operating system must be placed on a good drive.
As for analogues, it has them, for example the same HDD Regerenator, MHDD. The functionality of the first is quite limited, while the second program practically duplicates Victoria and works only under MS-DOS.
Update: Since Victoria runs under Windows, it may produce false results. To prevent this from happening, before starting the scan, you must close all open applications and pause your work on the PC. To get a more accurate result, you can use its analogue -.
Detailed video lesson
Professional help
If you are unable to resolve the problems yourself,
then most likely the problem lies at a more technical level.
This could be: a failure of the motherboard, power supply,
hard drive, video card, RAM, etc.
It is important to diagnose and repair the breakdown in time,
to prevent failure of other components.
Our specialist will help you with this.
Leave a request and receive
Free consultation and diagnostics from a specialist!
Bad sectors on the hard drive
What are bad sectors on a disk? First, let's briefly look at the organization of information storage on a hard drive.
A hard drive is actually made up of several magnetic disks. Magnetic reading heads move above the rotating disks. When recording, the heads magnetize certain areas of the disk, thereby recording zeros and ones - that is, information. Information is not written anywhere, but in strictly defined areas of the disk. The disk is divided into tracks, and they, in turn, into sectors. Information is recorded in these sectors.
In some cases, information from a sector on a disk cannot be read. This sector is called broken. The reason for the formation of bad sectors may be a sudden power outage during a hard disk write operation, a shock during operation, overheating, or physical wear and tear. Most often, bad sectors on a hard drive are formed as a result of the first two reasons.
Program for checking disk and recovering bad sectors Victoria
Victoria is a free program by Belarusian programmer Sergei Kazansky for restoring bad sectors and checking the hard drive. This program also has a Windows version.
But I strongly recommend using the DOS version for more reliable operation of the hard drive. Below you will find instructions for working with the DOS version of Victoria.
The Victoria program allows you to view the SMART table of your hard drive, scan the disk surface for bad and hard-to-read sectors, restore bad sectors, and perform all sectors on the hard drive (low-level formatting). So, let's get down to business!
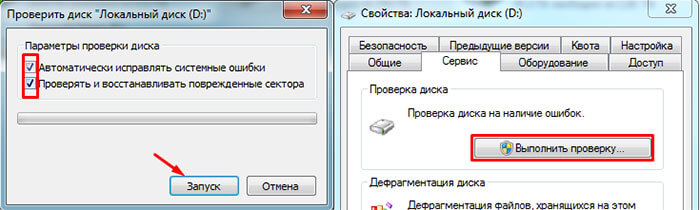
Checking the disk for bad sectors
Before you start checking and repairing bad sectors of your hard drive, you need to make preparations. It is necessary to properly configure the hard drive controller in the BIOS so that the program can work correctly with the hard drive. It is necessary to set the SATA controller mode in the BIOS to
IDE

.
 In AHCI mode, Victoria will not be able to recognize the hard drive and will not be able to work with it. Now you can boot into DOS using a bootable USB flash drive and launch Victoria. First of all, you need to select the IDE channel with which we will work, that is, to which the hard drive being tested is connected.
To do this, press the "P" (Latin) key.

In the menu that appears, select a channel and press Enter. If your drive is connected to a SATA port, then most likely you need to select Ext. PCI ATA/SATA. Service information of the hard drive (its model, capacity and other information) will appear on the screen. If this happens, then you did everything correctly and the program was able to connect to the disk.

Now the first thing you should do is look at the SMART table of the hard drive. In many cases, the information from it can clarify the situation even without scanning the surface. To view a SMART disk in Victoria 3.52 you need to press the key F9 .

In the table, we are primarily interested in two points: Reallocated sector count And Current pending sectors .
The first parameter shows the number of sectors transferred to the reserve zone (restored or remap), the second parameter shows the number of suspicious sectors, that is, which the hard drive could not read for one reason or another.
As you can see in the figure above, the number of recovered sectors on this disk is very large (767). This indicates that the disk most likely has some problems with the surface of the disk. In addition, SMART also shows the presence of suspicious sectors, which confirms the version of damage to the disk surface. Such a disk may be able to be recovered, but it should not be used in the future. Such a large number of bad sectors indicates that the disk is no longer reliable. It is better to replace such a disk with a new one and clone information from the defective disk to it. But first, in any case, you need to try to restore damaged sectors on your hard drive.
To return from SMART, press any key.
Recovering bad sectors of a hard drive
Now let's look at the question of how to recover bad sectors on a disk. Fixing bad sectors is actually not that difficult. To begin with, you can simply scan the disk for bad sectors, but we will immediately enable the recovery function.
In the first case, the sector cannot be read due to a mismatch between the information written in it and the checksum at the end of the sector. This problem can happen if the power is suddenly turned off during the recording process. That is, when the information in the sector has managed to be recorded, but the checksum remains old. Such bad sectors are not inherently defective. They just contain conflicting information that the hard drive cannot recognize. Such bad sectors are treated by erasing the information in them and writing new correct checksums. After this, the sector becomes readable and writable.
In the second case, there is physical damage to the sector (demagnetization, scratch, etc.). Such a defect may occur, for example, due to a shock or overheating of the hard drive during operation. In this case, the process of fixing bad sectors is more complicated. Each disk has a spare unused area. That is, any disk actually has a slightly larger capacity than is actually used. This area is used to redirect unreadable sectors to it.
A new physical address in the spare area for the defective sector is entered into the disk table. The logical address remains the same. That is, the sector seems to remain the same, but in reality it is located in a different place (remap).
 This approach, of course, reduces the read and write speed in the area of the disk with the transferred sector, since the magnetic heads have to move to the end of the disk (to the spare area) when accessing the redirected sector. But this approach is justified when the number of forwarded sectors is small and the data processing speed is reduced slightly. Restoring bad sectors using the Victoria 3.52 program Now let's put the theory into practice. To open the disk check menu, press the key F4. In the dialog box that appears, move the cursor to the item for selecting actions with unreadable sectors and with the cursor on the keyboard, scroll to the right or left, select the item
If a bad sector is detected, the program will try to erase it. If the sector is physically healthy, then this attempt will be successful. There will be no information left in the sector, but it will be possible to use it in the future. Don't worry too much about the information. If the sector is unreadable, then it will be practically impossible to extract it from there, so by erasing the sector, no additional information is lost. If the sector is unreadable due to a physical defect in the disk, then an attempt to erase the unreadable sector will fail and an error will be reported, as in the figure below.

Even if the process of erasing sectors ends with an error, I recommend not stopping the scan, since the disk may have bad sectors of both the first and second options. And if a bad sector can be restored by erasing, then it is better to do so than to transfer it to the reserve area (which is quite limited).
 If it was not possible to restore bad sectors by erasing, then you should try transferring unreadable sectors to the reserve area (remapping). Press the key Restoring bad sectors using the Victoria 3.52 program. This time use the arrows to select BB: Classic REMAP, as it shown on the picture. After that press Enter. The scanning process will begin again. But this time, when a bad sector is detected, the Victoria program will try to perform redirection and move the bad block to the backup area. On some drives, the spare area is very small, so if it runs out of space, the attempt will fail. In our case, everything went well (picture below).

Bad sectors on the hard drive have been successfully restored. Now you need to check the file system for errors (for example, through the ERD Commander utility chkdsk
or booting into Windows, if possible) or format the disk. After this, you can continue to use your hard drive without any problems.Purpose of the program
The Victoria program is designed for testing various drives: HDD, flash, RAID arrays, and also allows you to hide HDD surface defects, if such a possibility is present. The author of the program is Sergey Kazansky, it is distributed free of charge, you can download it http://hdd-911.com/
Brief description of the program
The program window is divided into several tabs: Standard, SMART, Test, Advanced and Setup. The API and PIO switches change the mode of operation of the program with the disk under test. PIO mode requires support from the motherboard chipset. Modern systems younger than approximately 2011 do not support this mode of program operation, so we will not describe it. Here is a brief description of the control elements in the tabs.
Standard. The window on the right shows a list of drives installed in the system. These are not only hard drives, but also USB flash drives, SD, CF and other memory card readers. They can also be tested. Selecting a device for testing is done by clicking on the desired item. Immediately on the left in the Drive ATA passport window, information about the selected device is displayed. Seek, Acoustic management & BAD"er runs the seek test, allows you to control AAM (if supported by the disk) and simulate on disk.
S.M.A.R.T. When you press the Get SMART button, the SMART is read. USB drives are not supported. The remaining buttons SMART ON, SMART OFF, Auto save attributes ON/OFF allow you to enable/disable SMART monitoring and save the read attributes.
Test. The main tab that we will work with in the future. The Start LBA/End LBA windows specify the beginning and end of the tested area. By default, the entire disk is tested. Pause – pauses the test, the value changes to Continue. Start – starts the selected test, changes the value to Stop – stops the test. Diamond with green arrows - moving forward or backward along the surface of the disk. Block size – the size of the block of sectors read at a time; you can leave it alone. Timeout – time after which, if there is no response from the drive, the program will move to the next sector. End of test – what to do at the end of the test: stop the disk, start the test over again, turn off the disk or turn off the computer. The color scale shows the number of blocks with the specified reading time. Switches Verify, Read, Write – test selection. Verify - check: the disk reads the sector, but does not transfer its contents to the computer. Read – reads a sector into the computer. Write – erases a sector - this test destroys user data. Switches Ignor, Remap, Restore, Erase – mode of working with bad blocks. Ignore - skip. Remap – attempt to perform the procedure of reassigning a sector from the reserve. Restore – attempts to read data and write it back (does not work on modern disks >80GB). Erase – an attempt to write to a damaged sector. It can correct it if an incorrect check sum (CRC) is written to the sector. > - test execution forward. ?|
Advanced. The main window shows the contents of the sector specified in the Sec field. The window below shows the contents of the partition table using the View part data button. The MBR ON/OFF buttons enable/disable the ability to recognize partitions in the operating system.
Example of working with the Victoria program For an example of testing a disk, let's take a faulty HDD WD2600BEVT, which has surface damage and bad attributes in SMART. We launch the program, select our disk and see the following: on the left we see the parameters of the selected disk.
Next, on the SMART tab, you can see the SMART of our disk. Here he is.

We see that the program interprets it as bad. Let's take a closer look.
Attribute 5 Reallocated sector count – number of reassigned sectors 1287 - the disk “crumbles”.
Attribute 197 Current pending sectors – the number of candidate sectors for reassignment; if the 5th attribute is full, it indicates that the disk is “crumbling”, the surface is quickly degrading.
This means that if you need data from a disk, you need to copy it immediately, and not try to repair such a disk. The actions that we will consider next can lead to the loss of information.

You can see errors like UNCR - these are bad, unreadable sectors - bad blocks.
You can uncheck the Grid checkbox, then a disk reading graph will be displayed. In places where there are bad spots, speed dips are visible, marked in red.

At the end of the test, you can try to hide the bad sectors by selecting the Remap mode. This can help if there are bads, but SMART does not yet have BAD status. It looks like this:

The result of the remap can be viewed by reading the smart disk. Here he is:

The value of the 5th attribute increased and became 1291. During normal operation, disks, in the absence of access to them, launch their own procedures for checking and reassigning sectors in the background, and the number of candidates for remap, numbering in the hundreds, indicates that the disk can no longer maintain condition condition and must be replaced. And the SMART status does not always adequately describe the condition of the disk - it can be severely damaged, and the SMART status is displayed as GOOD.
Victoria program(Victoria) is designed to check the computer’s hard drive for any problems using a large list of parameters. It includes functionality that provides the ability to search for various errors and contains software tools for checking the performance of the hard drive.
This test is not informative; for a more detailed analysis, you need to run a test to detect and restore bad sectors. Go to the “Test” item and click the “Start” button.

Performs hard drive testing. Upon completion of the work, displays a detailed report.

Sector status information
If errors were found, highlight them on the grid and click “Restore”. If restoration does not help, then click on the “Clear” button.
Victoria HDD will detect all malfunctions in hard drives and, by eliminating them, will increase the performance of your PC.
The Victoria hdd utility was created to solve problems and check various types of hard drives with the ability to use different parameters. The software has advanced functionality that allows you to solve various hard drive problems that arise under current circumstances.
Utility features
This utility can be downloaded from

Download the archive, unpack it and run the executive file vcr446f.exe
The utility interface opens.

This free software has a logical and simple interface, where there are various additional software modules for examining hard drives. Even an ordinary inexperienced user can understand the program, because all the points are written in clear language, and you can understand the basic and most important functions even at the first launch.
The Victoria hdd utility will help the user perform a thorough check of the hard drive; as a result, information about the status of the hard drive will be provided. In addition, you can perform self-diagnosis in the “S.M.A.R.T.” mode. which allows you to determine the service life of the disk.
Victoria hdd software has a function to check the surface of the hdd disk for possible damage and other problems. The utility can perform a full scan of the hard drive for defective sectors; after the analysis, information about the state of the media as a whole is provided. If Victoria hdd finds bad sectors, they will be reassigned so that you can use the drive in the future without losing data.
The Victoria disk utility can be used by both professional repairmen and ordinary users. Depending on dexterity and skills, the user can configure the Victoria hdd software to suit his needs, which will change the hard drive analysis algorithm.
What is included in the functionality of the Victoria utility:
The utility is able to give a detailed report on the operation of the hard drive and its technical characteristics;
Allows you to identify connected media via a sata/ide channel;
Has the ability to detect flaws on the surface of the hard drive;
Capable of eliminating hard drive shortcomings caused during operation, such as encryption of a bad sector and others;
Equipped with a practical and comfortable smart monitor that clearly displays important vital signs of the disc;
Has an integrated explorer for working with the file system;
Detailed help system for using and configuring the Victoria hdd utility;
The Victoria utility is absolutely free;
The Victoria hdd utility was created to conduct various tests of hard drives; it is more suitable for people with an above-average level of computer use. If you are running the Victoria hdd utility for the first time, it is better not to change the preset settings if you have no idea about their purpose.
In general, the Victoria utility is very useful and relevant for tracking hard drive problems and successfully eliminating most failures. This software has already been able to restore more than one practically “dead” hard drive, and if you are faced with a problem related to a hard drive, the Victoria hdd utility will be very useful.
Checking the hard drive
We open the program, and on the “Standard” tab we see the disk passport, which is listed on the right.

Go to the “Tests” tab. Select the “Ignore” check mode. In this mode, the program will make requests to sectors of the hard drive and if they are faulty or faulty, it will skip them.

Click the “Start” button. Scanning has started.

I stopped the utility (it takes a long time to check), but the results (not the entire disk) can already be assessed.
![]() Explanation:
Explanation:
We put the utility into recovery mode and click “Start”

Victoria hdd video:
Bad sectors on a hard drive What are bad sectors on a disk? First, let's briefly look at the organization of information storage on a hard drive.
Bad sectors on a hard drive What are bad sectors on a disk? First, let's briefly look at the organization of information storage on a hard drive.
A hard drive actually consists of...
Recovering deleted files is not a problem; there are dozens of utilities for this. But what if the drive is damaged, has an erroneous geometry description, or is locked with a controller-level password? Then the Victoria utility comes to the rescue. It is written in assembler, takes up a few kilobytes and works directly with the controller.
WARNINGAll information is provided for informational purposes only. Victoria uses low-level operations, the meaning of which is described in the manual. The editors and the author are not responsible for any possible harm.
From MS-DOS to Windows 10
Victoria was originally a disk utility for MS-DOS, written in assembly language. The ancient operating system was better suited than Windows due to the fact that in a single-tasking environment it is easier to provide exclusive access to the disk. With the advent of support for the porttalk.sys driver version 4.xx, Victoria has learned to work in the WinPE multitasking environment, as well as in Windows from XP to 10 of any bit size. It has become easier to launch it, the actions in the graphical interface have become clearer, and the operating mode itself has changed. But here's the problem: without understanding the new features of the program, some users began to lose data and entire disks instead of restoring them. Therefore, the latest official version 4.46b has developed “fool protection”.
By default, only non-destructive operations with drives are available. This is not just a read-only mode, as in other utilities that access the HDD/SSD using the Windows driver. Victoria also blocks the ability to change the HPA (and screw up the disk geometry) at the first start, accidentally launch low-level formatting, and “shoot yourself in the foot” in more sophisticated ways.
Universal Soldier
Victoria is the most universal utility. It addresses any type of drive (HDD, SSD, USB Flash) and any ATA-compatible interface. Its job is to transmit ATA commands to any device that supports them. Therefore, everything that has been said about Victoria’s work with disk drives is also true for solid-state drives, with the exception of what relates to their design features. It is clear that for an SSD it is pointless to watch the spindle spin-up time and try to control the head positioning speed - it has neither one nor the other. Nevertheless, it is quite possible to test and even restore an SSD using Victoria.
Victoria 4.47
This version was made in 2013 by a programmer from Moscow Oleg Shcherbakov. He patched the latest official Victoria 4.46b build. It's better to download. On this site Shcherbakov published it along with the source codes of the patches. Other resources can distribute anything under the guise of the new “Victoria”.
INFO
At the time of writing, the abandoned website of the Victoria program developer was infected. Therefore, instead of the URL www.hdd-911.ru specified in the documentation for the program, a link is provided to an alternative source for downloading the Victoria utility.Although Victoria is far from a new program, it also contained critical errors that required correction. One of them led to the fact that it was impossible to run Victoria on 64-bit versions of Windows. Another could cause problems when working with large disks. If the volume was higher than a terabyte, then Victoria 4.46b simply spent all the virtual memory on drawing and color marking the LBA blocks being checked. In version 4.47 Shcherbakov fixed all this.

PIO vs API
Victoria has two operating modes: PIO (port input/output) and API (application programming interface). In PIO mode, the drive controller is polled by the program through the porttalk.sys driver. If you select API, operating system tools will be used. Disk performance in PIO mode is reduced because DMA and high-level read and write optimizations are not supported. However, PIO mode allows you to use all the features of Victoria and send any ATA commands directly to the disk controller, bypassing the OS and standard drivers. It is through PIO that they most often work with disks in data recovery laboratories. Victoria supports both drives with the modern SATA interface and the old ones - PATA (aka IDE). Victoria can also work with external drives (features will be described below).
Having selected the PIO mode, at the beginning of work you need to scan the bus and identify the disk controllers using the PCI-Scan button. To the right of it, a window for selecting a disk port is displayed. Internal ones are usually detected without problems, but for external drives you will have to first find out their port. This can be done in the hardware properties or in any diagnostic program (for example, AIDA64). After this, you need to manually set the port in Victoria. While scanning, you can check the All dev (all devices) checkbox and use the exclusion method to find the desired disk in the list of found ones.

It is advisable to use the PIO mode specifically for low-level commands. A simple search for bad sectors and their reassignment to the spare area of the disk is much faster (but less reliable) in API mode.
The API mode restrictions are as follows: you cannot set or remove ATA passwords; work with the Host Protected Area and viewing registers are also disabled. If any of these functions are needed, you can switch to PIO mode. It happens that PIO mode is not available. This happens when using older versions of Victoria on 64-bit OSes. Another reason could be errors in working with the porttalk.sys driver or the choice of SATA AHCI mode. There is a guaranteed way out of the situation as follows.
- Recording bootloader
with WinPE x86 and place the Victoria program on it by simply copying it. - Connect the desired drive to the SATA/PATA port, if you have not already done so.
- Disable all other HDDs or SSDs (optional).
- Go to CMOS setup, switch the SATA controller mode from AHCI to compatible (compatible, native or IDE).
- Download WinPE. If necessary, we install drivers, including porttalk.
- We launch Victoria in PIO mode, initialize the desired HDD or SSD and execute the necessary command.
Settings can be set via the GUI or in the vcr40.ini file. The same file will help to remove the blocking of work with the primary port. By default, it is enabled in order to protect the system disk from accidental modification. To be able to select Primary in the list of ports, you need to do two things:
- Disable the “only non-destructive functions” option and close the program.
- In the section of the vcr40.ini file, add the line Enable PM=1, save the changes and restart the program.
Porttalk
The latest versions of Victoria can automatically install the porttalk driver, but it is completely useless on 64-bit systems. The fact is that for the sake of greater security, they removed a couple of functions that are necessary for porttalk and Victoria to work. Therefore, the porttalk driver (and, accordingly, PIO mode) only works on 32-bit versions of Windows, which have the Ke386SetIoAccessMap and Ke386IoSetAccessProcess functions.
External drives
External drives are regular laptop (2.5″) or desktop (3.5″) models in containers with USB and FireWire interfaces. They are equipped with various controllers with the general name “SATA bridge”. Many of these bridges do not broadcast low-level commands. Therefore, Victoria can immediately work with some external drives in PIO mode in the same way as with internal drives, while with others you will have to suffer at first. In the simplest case, it will be enough to remove the disk itself from the case (do not open the HDA!) and connect it to the port directly.
Rare beast: SATA hard drive without SATA port
Western Digital and, possibly, other manufacturers produced some external hard drives with a soldered SATA - USB bridge. Therefore, they do not have a regular SATA connector. However, they can still be connected directly to the port by soldering a SATA cable to the pins on the drive board. To understand whether your disk belongs to such a series, you will have to google the model number and look for datasheets.
Passwords
One of the most popular low-level commands in PIO mode is working with passwords. According to the specifications, access to the disk can be limited using a password. It is set by the user from the BIOS or using external utilities. There is also a master password preset by the manufacturer. The drive can only be locked using a user password. If you have forgotten it, you can remove the lock using the master password.
Depending on the specified security level, the result of entering the master password will be different. At a high level, the master password acts the same as the user password. It just unlocks the drive and that's it. If the maximum security level is set (max), then entering a master password instead of a user password will unlock the disk only after all data on it is completely erased (secure erase).
Working with ATA passwords is also complicated by the fact that according to the standard they always consist of 32 bytes (no matter how long you specify it). Extra characters are ignored, and missing ones are added automatically. The problem is that different programs add them in different ways. Standard security utilities on some laptops are especially guilty of this. Instead of traditional zeros (or at least spaces), they use non-printable characters. The code 00h cannot be entered from the keyboard at all (even through (ALT)+code). There is only one way out: do not enter the password in the program window, but read it from the file. Any characters can be written to a file using a hex editor.
Often the user cannot unlock the drive even when he enters the correct password. If you change a laptop or lose the standard utility, any other one (for example, HDDL) will add up to 32 bytes to the password with its own characters.
There is also a preliminary modification of the password. On many laptops it is actually encrypted before it is sent to the controller. Usually these are the simplest logical operations, but this doesn’t make it any easier. The user thinks that this is a password he knows, while in reality the controller accepts a completely different one. If you have tried all the options for the proposed user and standard master passwords, but have not achieved any results, then there is only one way out - take the drive to the laboratory, where they will work with it in technological mode.
How to get back a lost terabyte
Sometimes the ability to work Victoria in PIO mode with HPA (Host Protected Area) - a service memory area in which the disk geometry is recorded - is very helpful. It determines the storage capacity by specifying it as the number of LBA blocks.
There was an interesting case in my practice. I received a standard complaint: “the computer does not turn on” (read, the OS does not load). The owner complained that he had been suffering for about a month. First, he visited all the service centers, then invited various Enikey people - to no avail. I came, looked and also thought deeply. All components are in good condition. The disk is detected in the BIOS, but booting from it does not work. I launched Linux from a flash drive. The hard drive is visible, but logical partitioning utilities show a strange picture: 64 MB of total volume and one partition with an unknown file system.
And then I realized that the HPA had simply failed on the hard drive. As a result, a terabyte disk began to be defined as a 64-megabyte stub. I switched the SATA port mode from AHCI to compatible in CMOS setup, took a USB flash drive with WinPE and launched Victoria in PIO mode. Next, I sent the NHPA command (restore factory volume).
Usually in such cases it is possible to instantly restore the passport value of LBA blocks, but this time the miracle did not happen. Therefore, I found a service utility for hard drives of this series and sent a similar HPA recovery command from it. A terabyte of data returned from oblivion on the next reboot.
Why did Victoria fail? I assume because this disk had some specific features unknown to me or the universal program.
Bad sectors
Most often, Victoria is used to find and fix bad sectors. If everything is fine with the HPA of the disk and there is no password protection, but no utilities can read files from it in a reasonable time, then it’s time to check the surfaces. Victoria can do this in any mode (PIO/API) using sector-by-sector reading (read), writing (write) and writing with verification (verify).

When restoring data, you can use read-only, but its options also vary. The simplest of them is sequential: from the first block to the last. The starting and ending LBA values can be specified manually, which is convenient for many reasons. Firstly, this makes it possible to check disks of any size, simply by performing the test in fragments of up to one terabyte. Secondly, you can re-check the suspicious area and exclude external factors. Victoria analyzes the time it takes to access the sector. Typically, for new disks it does not exceed 5 ms for 80% of sectors. Sectors with a polling time of less than 50 ms are also considered normal. Those for which it is measured in hundreds of milliseconds are candidates for bad sectors.

If the sector was counted after a few seconds, then this is a clear bad block. The disk controller must independently identify such disks during idle time and replace them in the address table with good sectors from the reserve area. However, in practice this does not always happen. Victoria can ask the hard drive to perform such an operation (Remap) for those sectors that have not responded to requests for too long. Formally, part of the information is lost during this procedure, but in reality it was already lost at the moment when the sector became faulty.
In the paid version of Victoria, the Restore function was available - an attempt to read data from a bad sector at any cost and then rewrite it to a good sector. However, the program has not been officially supported since 2008, so it is unlikely that you will be able to purchase its full version. Free Victoria has helped out more than once by restoring HPA, resetting passwords, and eliminating bad sectors that caused other data recovery programs to freeze.

How free Victoria saved a secret job
I'll share one more story with you. Laboratory at a research institute, our time. The analytical instrument is controlled from the computer that came with it. The computer comes pre-installed with very specific software that the developers no longer support. There is no distribution kit either on the disk or on the website. There is only an installed program, and it has stopped working. The laboratory carried out research under a multi-year government contract. Without the miracle device, the employees found themselves tied hand and foot. We struggled and found out that the problem was with the disk. From ancient times it became covered with troubles, and normal work became impossible. An attempt to make a disk clone by skipping bad sectors was unsuccessful - the cloning program froze. We ran the disk through the Victoria test with the Remap function. We have pre-selected the necessary settings. By the evening of the same day, we successfully removed the disk image, and then restored everything from it to a new hard drive. The device came to life, the contract was completed on time.
Additional features of Victoria
Victoria analyzes the drive's condition in detail and can eliminate almost any failure in its operation. Actually, this is what distinguishes Victoria from the mass of other utilities. While most programs simply show SMART attributes, they can forcefully run entire sets of self-diagnosis tests.

Victoria has four methods and three types of surface testing (twelve modes in total). In each, it automatically counts the total number of defective blocks and writes their addresses to the log. Like a disk editor, Victoria can show the contents of sectors and allows you to change them. In PIO mode, Victoria displays information about logical partitions on the media even if it is not detected at all in the BIOS. No utility with API access is capable of this. Additionally, Victoria can control the level of acoustic noise of the disk (AAM), adjusting the speed of movement of its heads during search, launch low-level formatting, change the HDD capacity and run benchmarks. It can even be used to check the physical interface (the status of cables and ports). At home, it will save an HDD or SSD in many difficult situations, except for severe mechanical damage that requires opening the HDA. The laboratory will cope with them too, using Victoria as one of the proven utilities.

Conclusion
There is much more that could be written about Victoria, but for details I will still have to refer you to the Russian-language documentation. And, since the program versions differ in all sorts of subtleties, I recommend reading the manuals for versions 3.5.2, 4.46b and 4.47.


