Gmail mail - login. Mail gmail com: registration, login, how to send a letter Login to gmail email
In this article we will discuss in detail the registration of email on the gmail.com service. Registering mail on gmail.com is completely free, this service is provided by the google.com portal and is available to all users on the Internet. Gmail.com email is famous for its reliability, lack of spam, and the presence of additional Google services, including the Google AdSense contextual advertising service. Below we will analyze in detail, step by step, the process of registering an account on gmail.com.

Now you are a full-fledged user of gmail.com email, as well as other services from Google.
Additional services from Google
For registered users, google.com, along with email, provides the opportunity to use additional services directly from their account. To do this, log in to your gmail.com email using your username and password, and click on the square in the upper right corner. 
A window will appear in front of you, in which you will see all the additional services that you can use. 
List of additional services from Google.com
- Google +
- translator
- calendar
- YouTube
- cards
- search
- blogger
- documents and others
You can view a complete list of all possible services by clicking on the “Other Google services” button. In this case, on a separate page you will see all the products and services available to users. 
Internet services
- search
- browser toolbar
- Google Chrome browser
- bookmarks
Services for mobile devices
Here are special products for use on a mobile phone. Search for mobile phones, as well as a map service for mobile devices.
Google Services for Business
Google.com has a number of services that are designed specifically for those people who do business on the Internet. These are services such as:
- AdWords— using this service you can order contextual advertising, which will be placed both on Google search and on partner websites on the Internet.
- My business— using this service you can place information about your company on maps, Google Plus and Google search completely free of charge.
- AdMob— designed for making money on your applications, if you are their developer.
- Google Apps for Work— these are documents, disk, email and other services. designed specifically for companies.
- AdSense is a contextual advertising service that allows website owners to make money on the Internet.
Google multimedia services
- YouTube is a world-famous service for downloading and watching videos. Here you can both download and watch videos online.
- Image search— this service is designed to search for images on the Internet.
- Video search— using this service you can find any video on the Internet.
- Books— designed to search for books.
- News is a news feed from which you can find out all the latest events.
- Picasa— the service is designed for publishing and editing your own photos.
Cards
Currently there are 3 services available in this section:
- Cards- here to study and create your own routes.
- Panoramio— here you can view and add your own photos from all over the world.
- Planet Earth— the service is designed to explore the world without leaving home.
For home and office
- Gmail.com— reliable email with proven anti-spam protection.
- Documents - Here you can create and share your documents with other users.
- Presentations— allows you to create, edit and show your own presentations.
- Drawings— now all Internet users can create diagrams and draw flowcharts.
- Calendar— here you can plan your time and share events. and also create events and reminders about them to your email.
- Google Cloud Print— with this service you can print anywhere and from any device.
- Disk— here you can store files and also give access to them to other people.
- Table— creating and editing tables. Spreadsheets can be shared with other users on the Internet.
- Forms— designed for creating and conducting surveys on the Internet.
- Websites— a service for creating your own websites.
- Translator— allows you to translate texts and websites on the Internet into various languages of the world.
- Google Keep- if you have ideas, you can write them down and store them here.
Social media
- Google Plus is a well-known social network from Google.com. Upload your photos, publish events and posts, and share them with your friends.
- Groups- here you can create mailing lists and various discussion groups.
- Blogger- a free service for creating your own blog on the Internet. Any user can get their own blog in two clicks completely free of charge.
- Hangouts— interactive communication without borders. You can communicate on the Internet completely free of charge.
Login to gmail.com email
Login to email is available only to registered users. If you have not yet acquired your own email, then do so using the instructions contained above in this article.
For registered users, logging into gmail.com is quite simple:

Now you can log into gmail.com at any time of the day, check and send emails. If you check the box next to the “Remain logged in” item, your login and password will be recognized automatically, you will not need to indicate them every time you log in to your email.
Gmail.com is an example of an email service. Therefore, I created my personal, main mailbox on Gmail.com, although by that time I had about five e-mail addresses from other mail services.
I love the ease of use, reliability, and capacity of my Gmail.com inbox. By registering a mailbox on Gmail, you get the opportunity, with the same login and password, to access other Google services: the most popular video hosting YouTube, calendar, Google documents and many other useful services.
Registering with Gmail.com
To register for Gmail in Russian, go to the official website https://mail.google.com.
The Google Account login window will appear.
In order to log in, you need to enter the mobile phone number or email address specified during registration. But since you are not registered yet, click the More options link 
From the options provided, select Create an account.
A page will open with a form that you must fill out. 
We fill out the form.
- What is your name. Here I advise you to indicate your real First and Last Name. Because other Google services, including those on your smartphone, will be associated with this account. I think this will be your main inbox for a long time! If you need a temporary mailbox, then you can follow my tutorial in a few minutes.
- Create a username. This will be the name of your mailbox and login to your account. You will have to work hard to find a clear and memorable name. After all, names like olga, nina, ivan have been taken for a long time. Substitute names, and the system will tell you whether this name is occupied or free. To create a name, you can use letters of the Latin alphabet, numbers and dots.
- Create a password. The password must have at least eight characters. For security reasons, it is not recommended to use passwords from other sites.
- Confirm the password. To make sure you entered the password correctly, enter the password again. If the system displays that the passwords do not match, check whether the keyboard layout is set correctly. There must be Latin letters, not Russian.
- Date of Birth. Select from the drop-down list.
- Floor. Selected from the list.
- Mobile phone number - necessary for more reliable account protection. If important documents are stored in your mailbox, you can allow login to your account only after receiving an SMS with a password on your mobile phone. Also, if you forget your password, you can request an SMS with a code to change your password.
- A spare email address is necessary for more reliable account protection. For example, if suspicious activities are noticed in your account, the gmail administration will be able to send an alert to this address.
- Make Google my home page. If you check this box, the Google search engine will always appear when you open the browser. But many users make their favorite site their home page. Then, you don’t need to check the box here, otherwise your page will be replaced with a Google page.
- A country. Select the country in which you currently live from the list.
After filling out the form, click Next. 
The Privacy Policy and Terms of Use page opens. Read (scroll down the page) and click the “I Accept” button. 
The "Verify your account" window will open. Enter your mobile phone number and click the "Continue" button. 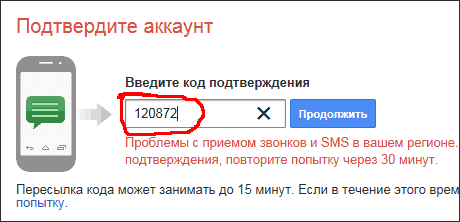
A window will appear to enter the Confirmation Code, which will be sent to you via SMS. If the code does not arrive within 15 minutes, try again. I managed to complete the registration the third time. After entering the code, click the Continue button. 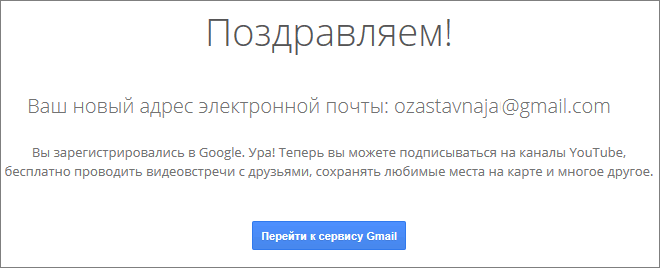
You will be congratulated on your successful registration and asked to log into your Gmail account. Click the "Go to Gmail service" button and start getting acquainted with your new mailbox. 
You will see buttons by clicking on which you can select the theme (appearance) of your mail account, change (add) the main photo of your profile, import addresses and mail from another mail account. By the way, your new mailbox will already contain a letter from Google describing the capabilities of your Google account. And by clicking the “How to use Gmail” button, you will learn all the features of working with this email service.
Video: how to register with Gmail - create a profile on Google
The video clearly shows:
- How to register with Gmail and gain access to all Google services;
- how to create folders,
- how to sort emails into folders,
- how to prepare a signature for letters,
- how to add files to letters,
- how to switch to other Google services?
Login to gmail.com
If you have already registered, then to log into Gmail, click the link mail.google.com
In the window that opens (Fig. 1), enter the Email or mobile phone number associated with your account and click Next. By the way, you can enter not the entire email address, but only the login - without @gmail.com
A password entry field will appear. Enter your password, click "Next" and your mailbox will open in front of you.
Sign in to other Google services
By registering with your email, you can use this username and password to log into any Google service. 
While in your Gmail account, in the upper right corner, click the square (shown by the red arrow). A window with many buttons will open (see Figure 5). By clicking the desired button, you will be taken to the most popular Google services: Calendar, YouTube, Search, Maps.
And by clicking the link More, you will see buttons to other Google services, for example, Docs.
Hi all. Today I’ll tell you what Gmail.com mail login is. If authorization on Google mail is unsuccessful, it would be a good idea to try to recover your password. To get started, go to the website – accounts.google.com (do this preferably from the device from which you last successfully logged into your account). Login pages offer their users the opportunity to change the language, choose the one that is most comfortable for you and get started!
Then you need to find the link: “Can’t access your own account?”, and, following it, enter exactly the email address that caused problems with authorization. Here you will need to confirm that you are not a robot by entering a verification code.
Very often the solution to the problem is a simple password recovery. How to do this, read the next article.
The resulting page offers a list of various options for restoring access. If you have another email address in the settings, or a phone number, the recovery procedure is greatly simplified.
Check if cookies are enabled for this site
Cookies are files that help a web browser remember client settings on a specific resource, while saving its configuration and collecting statistics. Now virtually all sites require these files. For this reason, to check their availability for Google Mail, you need to open your browser settings and enable them. We invite you to consider the process of enabling them in three popular browsers, such as: IE, Firefox, Google Chrome.
- Enabling cookies in Internet Explorer. First you need to go to the “Control Panel” and find “Internet Options” there. Click on the “Privacy” tab, then click on “Advanced”. In the resulting window, you will need to check the “Override auto-processing of cookies” checkbox and set the “Accept” markers on both primary and third-party files.

- Enabling Cookies in Mozilla Firefox. First of all, open your browser and go to settings. There you will find the “Privacy” tab. Find the block with history, where you will need to click on the last item from the drop-down list “will apply settings for saving history.” On top of that, check the “Accept cookies from sites” checkbox. Close the settings window by clicking the “OK” button.
- Enable cookies in Google Chrome. Open the browser, then go to “Settings” (in the upper right corner there is an icon with three stripes; after clicking on it, a window appears in which you can find those same settings).
At the bottom of this window there is a subsection “Additional settings”, go into them and click on “Personal data”, and then “Content settings”. In the resulting window, check the box under “Allow saving local data.” Finally, confirm the configuration by clicking on the “OK” button.
Once you've finished clearing your Cookies, you can also clear your browser history and cache. As a rule, the browsing history becomes so large that performance is significantly reduced, and certain functions stop working altogether. We invite you to take a closer look at deleting history in popular browsers.
Clearing your browsing history in IE.
First you need to go to “Service”, and then hold down the “Alt” button. As a result of this, a menu will appear; in the list of suggested items, select “Delete browsing history.” In the resulting window you will need to mark those items that you need to delete. All that remains is to confirm your actions by clicking on the appropriate button. Made!
Clearing your browsing history in Mozilla Firefox.
With this browser it will be somewhat simpler: you just need to hold down the key combination “Ctrl+Shift+Delete”, in the resulting window, select the items that you need to delete. It is important to systematically clear your browser cache and history. By the way, upon completion of the deletion procedure, you will need to log into your profiles on the sites again.
Clearing your browsing history in Google Chrome.
The deletion process is generally the same as with other browsers, but there is one caveat: upon completion of this procedure on one of the devices, the history is deleted on absolutely all devices from which the Chrome account was logged in. So, open the web browser menu, go to the “Tools” tab. On the resulting page, select Clear Browsing Data. In the window that appears, select the items that need to be deleted.
Along with this, it would be a good idea to look at what extensions are installed in the browser. If you find unfamiliar and unnecessary extensions, it is better to remove them, as they (to some extent) reduce the performance of the browser.
By following our advice, you can easily solve the problem with authorization on any website.
Gmail.com mail login to mail
If you were not registered in Gmail, you can fix this on the website - mail.google.com. On the right side, click on the “Create account” button.
You can create your own profile in this system in 3 steps.
The first stage involves filling out a questionnaire.
- Write your first and last name. An email account is usually created for a long period of time. Moreover, it can be used to activate mobile devices running the Android operating system. If you need an additional email address, it is better to use the services of mail.ru.
- Choose a login name. This stage is not the easiest, since choosing a name takes a lot of time from users. For example, names such as artem, andrey, etc. are already in the database. It’s good that the system is fully automated, so you only need to enter your option, and it will tell you whether you can use it or not.
- . Its length must not be less than eight characters. Try to make it different from those you have installed on other portals.
- Confirm the password. The site needs to make sure that you actually remember the password you set. Important: the password must include Latin characters. Errors often occur due to incorrect keyboard layout, so be careful.
- Please enter your date of birth.
- Select gender.
- You can write your phone number to protect your account. If an important confidential message history will be stored on it, then you can set up two-step authorization by entering an SMS message. Along with this, if you forget your password, you can easily recover it using your mobile phone.
- The reliability of the protection system will increase significantly if. Suppose your main mailbox is hacked and commits their nefarious deeds, and corresponding notifications are sent to your secondary email address.
- You can check the box next to “Make Google my home page” if you want this search engine to be displayed on the main page when you open your browser.
- After this, you need to pass a verification that distinguishes spam robots from real users. This is an absolutely simple task, and it is completed quickly.
- “Country” item: select your place of residence.
- Check the box to indicate your agreement with the rules for using this system.
- If in the future you intend to actively use Google+, then it would be a good idea to check the box “I want to see what they recommend...”. Thanks to this, you can watch what your friends recommend to you.
This is all that is needed for the survey. Click on the “Next” button and proceed to the next registration stage.
At the second stage, you can choose an avatar if you wish.
That's all for me!
Google Mail, better known as Gmail, is an effective tool for working with emails. Mail from Google is extremely popular among users around the world, and this is largely due to the company’s services, such as YouTube, Android, Google Drive and others. In this article we will talk about the main issues related to.
Mail is a necessary tool for every computer or smartphone user, which, if not needed for conducting electronic correspondence, then at least for. In the process of using Gmail, users may have questions at various stages, the main ones of which will be discussed below.
How to sign up for Gmail?
You will need to fill out your personal information (fields cannot be left blank).

Is it possible not to provide a mobile phone number when registering?
If you are registering, you have probably already noticed that one of the columns is "Mobile phone". If some time ago it was possible to refuse to indicate this item, now the mobile phone number is required to be filled out in the column.
The fact is that this is an excellent way to protect against bot registration, as well as the use of multiple email accounts by users. This practice has already been successfully used by many social services, and continues to be implemented by many resources.
How to log into Gmail?
You can sign in to Gmail from the Google home page. If you go to the site, you can find a button in the upper right corner "To come in", after clicking which the authorization page will open. It’s probably pointless to tell the further progress of logging into mail.

What to do if you can’t log into your mail?
In 99% of cases, the inability to log into Google mail occurs due to incorrect username and password. Double-check the correctness of the entered data, make sure that you have the desired keyboard layout enabled, the Caps Lock key is deactivated, and there are no accidentally inserted spaces.
A forgotten password can be recovered on the authorization page by clicking the button "Help is needed?".

Is it possible to log into mail without knowing your login?
Unlike many email services, Google has added the ability to recover your email address if you simply forgot it. To do this, on the login page you will need to click on the button "Find Account".

Next, you will need to provide a mobile phone number or a backup email address that is linked to your lost account. After this, a message with your email address will be sent to the specified source.

Why do we need two-step verification?
Google Mail is regularly improved, gaining new features. Google recently implemented a two-step authentication feature, which can significantly secure your account, reducing the risk of page hacking to almost zero (and given that various services can be linked to one email, the value of the account increases several times).
The essence of two-step authentication is that when logging into Gmail, you first enter the password for your mailbox, after which a message (or call) with a code that must be entered in a special window is sent to the linked phone number.
How to enable two-step authentication?
- Go to page to enable two-step verification. Scroll down the page and click the button "Tune".

- Sign in to Google by entering your credentials.

- An agreement to enable authentication will appear on the screen, at the end of which you will need to select the button "I accept".

- Next, you will again need to provide your Google mail password.

- If necessary, change the phone number to which the code will be sent, and then select the method in which you want to receive the codes (this can be an SMS message or a phone call).

- An SMS confirmation with a code will be sent to your number, which must be entered on the Google website in the specified column.

- Complete the authentication activation by clicking the button "Turn on".

How to log into mail if your phone is not at hand?
Let’s immediately imagine a situation where you don’t have a phone nearby, which means you won’t be able to receive an SMS or call with a code. In this case, by continuing to set up authentication or by going to the function page and logging into your account, we find the block "Backup codes" and select the button "Create".

Google will generate several backup codes. You can choose one or several at once. These codes must be written down in a safe place and saved so that they do not fall into the hands of criminals and are only available to you. If necessary, codes can be sent for printing in the same window.

How do I disable two-step verification?
If the method of double confirmation of logging into your account is not for you, you can always disable this function.

Where to contact if login problems have not been resolved?
More than likely, your question related to logging into Gmail may not have been included in the article. In this case, you can ask your questions directly in the comments (the article can be supplemented if necessary), look at the Help page, which contains answers to the most popular user questions, or write to Google support if your question is very complex.
Today, email is an integral part of any communication. It is very convenient to use, because you can instantly send a file of almost any format to your interlocutor or receive an incoming one. It is very important to create an email address and that it is easy to use and reliable. Therefore, this article will help you to know about gmail.com mail.
Using this mailbox couldn't be easier. In order to log into the server, you must register your own Google account. In this article we will describe how to log into your mailbox. In addition, we will tell you how to set it up and edit it in the future, as well as how to secure your gmail mail.
If you have not yet created your own account on the Google server, proceed to register it. Then come back to this page to be aware of how to properly log in and set up your gmail email address.
Reasons for experiencing difficulties when logging into mail
After creating your own account, the server will automatically authorize you. That is, you will immediately log into your saved gmail mailbox. However, to use it successfully, you will be forced to log in and out of your own mailbox each time in order to secure your correspondence. It is especially important to log in and out of the “mail” if you did not log into it from your computer (from your work computer, for example).
Since there are people who are faced with the problem of logging into their Google mailbox, we were interested in what exactly this is connected with. We tried a variety of computer equipment and also worked with completely different software. But we didn’t have any difficulties: we logged into mail from any device in the standard way. Based on this experience, we came to the conclusion that perhaps some steps were not being reproduced correctly.
Sometimes incoming users do not separate gmail.com and gmail.ru emails. The first is from Google, the second is from a completely different server. Therefore, you need to make sure that you are trying to enter exactly the saved mailbox from Google. In addition, sometimes the mailbox interface changes, which also causes some difficulties when trying to log in. But in fact, you need to abstract from the appearance of the service, since everything happens in a standard way, despite the updated interface.
Gmail mailbox: how to log in and out?
If you want to use mail and log into your gmail mailbox, do the following:


If you need to sign out of gmail, look at the top right corner of the page. You will see your own photo there. Click on it and click “Log out” in the menu that appears.

Google Email Settings
Today there are very convenient functions in mail (interface, way of working), which you will definitely want to change at your discretion. For example, you have the opportunity to create a permanent signature, change the appearance of labels, or choose a different theme for the appearance of your mail.
In order to change gmail settings, you need to do the following: pay attention to the upper right corner of the page. There you will see a gear icon. Click on it and click “Settings”. This is where you have the opportunity to transform and change the category you want.


Attaching contacts
Mail from Google server contains a very convenient function. It makes it possible to create, save and access the necessary contacts in an address book specially created for this purpose. This feature gives you the opportunity not to clutter your head with all the email addresses of your interlocutors. In addition, there is an opportunity to come in and add additional information to the contact. For example, mobile number, date of birth, residential address.
If you decide to add a contact:


To log in and change contact information:
- On the left settings menu line, click “My Contacts”.
- Select the contact you want to make changes to.
- After this, you have the opportunity to create any changes to the contact information.

It is also worth noting that in the case when you send a letter to an email address unknown to the system, the gmail.com server can automatically put the corresponding address in your contacts. By selecting “Contacts” from the menu, you can easily add changes to the information about this contact.
Transfer email and contacts
Maybe you have a ready list of contacts in another email box? But does mechanically importing every single pin take too long? Then this setting is for you. Mail from Google server includes a function that allows you to transfer your contact list from almost any other mailbox. In addition, it gives you the ability to import all your correspondence.
It is convenient to transfer letters and contacts from Yandex and Mail.ru services. But this can also be done from other emails. For this:
- Click the gear icon located at the top right corner of the gmail page. You need to go in and click “Settings”.
- Select the "Accounts" category. Check mail from other accounts (using POP3). By following the instructions that appear on the setup screen, you can easily transfer contacts or emails.

gmail email security
If you think that you are an ordinary person, a simple user, and no one will want to enter your email, no one will encroach, then you are very mistaken. Today there are a huge number of attackers hacking mail for personal gain. Undoubtedly, if your mail is used exclusively for everyday correspondence with friends, then there is nothing to worry about. But in the case when the mailbox is linked to other important accounts, especially financial ones (for example, WebMoney), you must secure your own mailbox and funds so that no one can enter it. Many servers make it possible to link important personal pages with a mobile phone number. However, most of them continue to sync with the email address.
If you value outgoing information that is synchronized with your email, and want to prevent gmail from being hacked, you must configure your gmail.com mailbox correctly. Enter “Settings” (top right corner after clicking the gear):
- First make sure "Use http only" is selected in the General panel. If there is no outgoing checkbox, then you need to check it. This is necessary to ensure that the data comes out in encrypted form. If the checkbox is not checked, and you use mail in a public place with free access to a Wi-Fi network, there is a risk that attackers will intercept information in unencrypted form and be able to log into your email;
- those who use email clients will be forced to change their connection type settings from simple to secure (TLS). In the connection settings panel, you need to click on the secure connection type, and also change the mail receiving port (POP) from 110 to 995, the sending port (SMTP) from 25 to 465. Typically, the ports change independently after clicking on the TLS connection;
- for those who do not use email programs, it is worth disabling this function: go to the “Forwarding and POP/IMAP” panel to check the “Disable POP” and “Disable IMAP” checkbox;
- Double authentication must be enabled. Its presence serves as the difference between mail from Google and mailboxes from other servers. After establishing dual authorization, to enter your mailbox, you will need to enter a password sent as an SMS message to your mobile phone number. This greatly enhances the security of your email.
How do I enable two-step email verification?
For this:
- you need to go to the “Accounts and Import” panel, click “Change password recovery settings”.
- On the outgoing page, enter your personal mobile number. In addition, there is the opportunity to specify another email, through which you can recover a forgotten password (linking another email is also not entirely safe, so I recommend not linking it);
- click on “Other Google account settings”;
- On the page that appears, in the “Security” branch, click “Change” two-step authentication. In the new window, select the “Proceed with setup” option;
- In the initial field, please indicate your current mobile number personally. It will receive SMS messages from Google with confirmation codes. If the phone number is already synchronized with the account, skip this field, since the number will already be there;
- Select the Trusted Computer option. It allows you to enter a verification code from a selected computer only once every 30 days.
Thus, you have enabled two-step verification!
Application passwords
Following the establishment of two-step authorization, any applications that used the username and password of your Google page will stop working. An error message will appear: “Invalid username or password.” For them to work as before, you need to generate and change application passwords. To do this and ensure that passwords are saved, do the following (after two-step authentication):
- click “Create passwords” or click on the link: https://accounts.google.com/IssuedAuthSubTokens ;
- on the page, enter the password name you like;
- Click “Create a password.” The creation wizard will give you a password. It must be saved by you, since it will no longer be possible to find it. It is issued only once. Naturally, it can later be changed to something invented personally. His name has no meaning. It will work with any application;
- then enter this password into applications, replacing it with the password name of your Google page.
Enjoy!


