Home media service how to use. Setting up a DLNA server for a Philips TV. We watch movies from the computer on the TV. What types of devices support DLNA
A free application that allows you to open folders with movies, music or pictures to play it all on your TV screen, audio player, PDA or tablet.
To become familiar with the program's functions, you will need a little understanding of the UPnP abbreviation. This is a set of protocols that allow you to connect several devices and then exchange data between them.
Now imagine the situation: you have long wanted to watch some movie, but it’s still not on the TV program. Thanks to the media server, you can turn on the movie on your computer/laptop, and the image will be on the TV screen. In addition to transmitting video, you can stream music (for example, to a player), online radio and TV.
It is worth noting that the Home Media Server is quite simple to set up. All you need to do is open the program, add folders in the settings from which the broadcast will be carried out, select a device (all detected devices are automatically connected) and turn on the desired movie, song, picture.
You can download the home media server for Windows 7, XP or 8.
Possibilities:
- broadcasting media content to TVs, players, tablets;
- playing online TV and radio on devices;
- opening a file on several devices at once;
- a parental control function that gives you permission to view only the files you select on a specific device;
- transmission of subtitles for video;
- limiting the broadcast time on the selected device.
Advantages:
- Russian interface language;
- Home media server is distributed free of charge;
- large list of supported devices.
Things to work on:
- outdated interface design;
- Some devices do not sync well with the program.
If you have a lot of electronics in your home that support the UPnP protocol, then this application will make your life more comfortable. The only negative is the outdated interface design, but it does not at all affect the quality performance of the program’s functions.
In this article we will look at how to install your DLNA server on Windows using the Home Media Server (HMS) program as an example.
Nowadays, it is increasingly necessary to have a DLNA server on your home network, since most modern TVs do not support data transfer protocols such as SMB or NFS, but only work via DLNA.
What is DLNA?
DLNA (Digital Living Network Alliance) is a set of standards that allow compatible devices to transmit and receive various media content (images, music, videos) over a home network, as well as display it in real time. That is, a technology for connecting home computers, mobile phones, laptops and consumer electronics into a single digital network. Devices that support the DLNA specification can be configured and networked automatically at the user's request. (Source - Wikipedia)
Installing DLNA Home Media Server (HMS)
Installing HMS is very simple, but we will still explain in detail how it happens.
First you need to download the installer. At the time of writing, the official website was not working. And it didn’t work a month before, so below I will provide a link to download the latest version of HMS from our server:
(47.2 MB)
Let's get started with the installation.
Launch the installer:
Here we are asked to select the directory into which the installation files will be unpacked. Select a directory and press the button Execute". After unpacking, the installation will start automatically.
Attention: Unpacked files are not automatically deleted after installing the program, I advise you to delete them manually after installation is complete
After unpacking, the installation of the program automatically starts:

There are not very many settings here. In this window, select the directory in which the Home Media Server (HMS) program will be installed and “Program Group” - the name of the folder in the Start menu.
After selecting the installation folder and folder name in the “Start” menu, all that remains is to check the box “create a shortcut to run the program on the desktop”, if necessary, and click the “ Install«.
At the end of the installation, which takes less than a minute ( depends on your equipment), we are offered to immediately launch the Home Media Server (HMS) program.

This completes the installation of the program.
Initial setup of DLNA Home Media Server (HMS)
So, we have a freshly installed DLNA server, let's launch it and see what it first offers us to configure, and also make a couple of useful settings. Let's get started.
After launching the program for the first time, we see the initial settings window.

In this window we are asked to select the device to which the media content will be broadcast. There are many templates in the list.

If you haven’t found your device or a device similar to yours, then you can leave the standard DLNA Device, as practice has shown, this does not affect anything much. After choosing, move on.

And then a choice of folders from which we will take media content appears before our eyes. You can select folders with your media content now, or you can add them later. We'll look at how to do this below. After selecting the folders, click the " Ready«.

After the initial settings, we are asked to make a backup copy of the settings, image cache, database, and set up an automatic backup schedule. Let’s not dwell on this in detail now and move on. To do this, press the button “ Close«.
After this, the main program window appears in front of us. Let's move on to several “important” settings at once.

On the left are the types of settings, on the right are specific settings.

Let's go straight to additional settings and configure the DLNA server to autoload and turn on the PC.
To do this, select points 2 and 3.

Now let's go to the " Server"and write down the name of our DLNA server. How will we see it online?
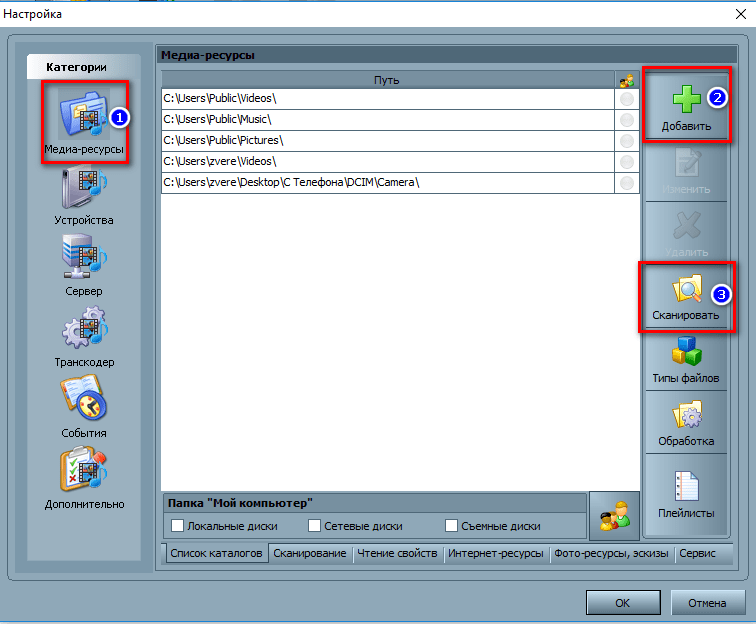
After changing the name, you need to add folders with media content (if you did not do this in the “initial setup” or decided to add more folders. Everything is simple here. Click the “ button Add"(2) and select the folder you want to add. After this it is necessary " Scan"(3) so that files from the folder/folders get to the server.

If you did everything correctly, then your files should appear on the right side (as highlighted in yellow in the screenshot).
If you have your files there, then we have just a little bit left. Launch and use. Everything is very simple here - press the button " Launch«.
If you have Windows Firewall enabled, the system will ask you whether to allow it access to the network. Select which ones to allow access to and click “ Allow access«.

Conclusion
We have installed the Home Media Server (HMS) program, or, to put it simply, we have configured a DLNA server on the Windows operating system.
All that remains is to launch the playback device (TV, media set-top box, mobile phone, etc.) and check whether our device is on the network and whether it contains the files we need.
We hope this article helped you. If something doesn’t work out for you or you have questions, write a comment and we’ll try to help.
In this article, I want to once again talk about how to create on a computer (laptop, netbook) DLNA server. This will allow you to watch movies and photos on your TV, as well as listen to music that is on your computer.
You just need to connect the TV to your computer via a network cable, or simply to one network, start a DLNA server on your computer and start watching a movie or photo.
But, as it turned out, there are many problems with the Smart Share application. Either it does not start, then it produces various errors, or it closes on its own. You can read about this in the comments that visitors left on the article, the link to which is above.
There is a very good and absolutely free program “Home media server (UPnP, DLNA, HTTP)”, which is an excellent analogue of Smart Share from LG, or for example AllShare from Samsung.
“Home Media Server (UPnP, DLNA, HTTP)” is a universal program with which you can launch a DLNA server and connect to it from almost any TV that supports DLNA technology (and if your TV has Wi-Fi or a network connector, then it most likely supports this technology). In principle, a DLNA client can be not only a TV, but for example a game console.
This instruction is suitable for TVs from different manufacturers: LG, Samsung, Toshiba, Sony, etc. Compared to branded applications such as Smart Share, “Home Media Server (UPnP, DLNA, HTTP)” has a large number of settings.
We will not delve into all the nuances, but will only consider how to open shared access to the necessary folders or drives. How to create a server and how to start watching a movie using DLNA technology on your TV.
Connecting a TV to use DLNA technology
Before we start setting up the program, we need to connect the TV to a computer or laptop. If you already have everything connected, for example through a router, then you can move on to the next step.
We need to connect the laptop and TV to the network. If you have a router installed at home, then just connect your computer to this router, via cable or via Wi-Fi, it doesn’t matter. And you need to connect the TV to the same router. You can connect your TV the same way, or via Wi-Fi (see connection instructions ) .
Our task is to ensure that the TV and computer (in my case laptop), were connected to the same router. I have a TV connected to my router via Wi-Fi LG 32LN575U and laptop Asus K56CM. This instruction will be based on their example.
What to do if you don't have a router?
In this case, you can connect the computer to the TV via a network cable directly. Just take the required length of network cable (it can be crimped at almost any computer store), and connect the TV to the computer.
It looks something like this:
Connecting this way should work fine. But my TV refused to see the server created on the laptop. But, in the “Home Media Server (UPnP, DLNA, HTTP)” program, the TV was displayed and I could start viewing photos from the laptop itself, and the photo appeared on the TV.
She also has an idea on how to connect them without a cable and without a router. But I’m not sure what will work and this method is only suitable for TVs that have the ability to connect to Wi-Fi.
You can try to create a computer-to-computer connection on a laptop, which I wrote about in the article ““. Then, connect the TV to the created access point and try to access files on the computer.
I think we have sorted out the connection. Let's move on to setting up the server.
Setting up the “Home Media Server (UPnP, DLNA, HTTP)” program
First, we need to download and install the program itself. I recommend downloading from the official website: https://www.homemediaserver.ru/index.htm. There is always a new version and it is safer.
Save the archive to your computer. To install, simply run the setup.exe file, which is located in the archive. I will not describe the entire installation process, it is simple. Follow the instructions.
After installation, launch the program with a shortcut on the desktop.
Let's go straight to the program settings. We won't do anything special there. We will simply indicate local drives, flash drives, external hard drives, or folders whose contents we want to see on the TV. For example, you can open only a few folders with movies, photos and music.
A settings window will open. In the first category, Media resources, we need to indicate which drives or folders we want to see on the TV. By default, standard folders with photos, videos and music are open there.
The program is trying to sort everything. And in order not to get confused in all these folders on the TV, I advise you to open shared access to local drives. By default, if I'm not mistaken, access to them is already open. Check if the checkbox next to Local disks.
If installed, this means that you can open any file on your TV that is stored on these local drives (drives C, D, E, etc.).
You can also specify individual folders, or, for example, an external hard drive. To do this, click on the button on the right Add, and select the desired folder, flash drive, or hard drive in Explorer.
We can see which folders and drives we have opened access to. We can delete selected folders. These are the basic settings, if you look, there are a lot of settings there, I won’t go through them all. To save, click on the button Ok, and agree to scan media resources.
We wait while the program scans the folders and disk. Next, you can start the DLNA server itself. To do this, simply click on the “ Launch“.
We see a message stating that the server is running.
Now, just turn on the TV. If everything is connected correctly, it should appear in the “Home Media Server (UPnP, DLNA, HTTP)” program. To do this, go to the tab Playback devices (DMR), and on the right, click the button Update.
If our TV appears, then everything is fine. You can try to view photos directly from the program.
If the TV does not appear in the program, and the server we created is also not visible on the TV, then first of all, check the connection. Is the TV connected to the network and is the laptop connected.
Then, completely disable antiviruses and firewalls. They can block access to the server.
To do this, in the main program window (above), select one of the tabs: movies, music, or photos.
In the left window, media content will appear that is located in those folders and drives to which we have opened access. Right-click on a photo, for example, and select “Play on“, then select our TV.
The photo should immediately appear on the TV screen.
In the same way, you can start playing video and music. This means that we can start playback on the TV screen from the “Home Media Server (UPnP, DLNA, HTTP)” program.
But this is not always convenient. It is much better to go through the TV and open the necessary files. To do this, leave the server running. You can hide the “Home Media Server (UPnP, DLNA, HTTP)” program. Click on the red cross (close the program), and it will hide in the notification panel.
At the same time, the server will work and you will be able to access your computer from the TV.
We start viewing files via DLNA from the TV
This means the server is running on the computer, files are open for viewing.
Now, on the TV, we need to go into the program that is responsible for working with DLNA technology. For example, in LG, this is Smart Share. On other TVs, this application may be called differently.
For example, to launch Smart Share in LG, go to Smart TV (blue button on the remote control) and select Smart Share. If your TV does not have Smart TV, but does have DLNA, the process may be different.
Open the folder My computer, and we see our local drives there, and other folders to which we have opened access.
Afterword
“Home Media Server (UPnP, DLNA, HTTP)” is actually a very cool program, with a lot of settings. We only considered opening file sharing and starting the server. When I started watching a movie through the Smart Share program, the laptop went into sleep mode and playback was interrupted. “Home Media Server (UPnP, DLNA, HTTP)” has a lock that prevents the computer from going to sleep when it is being used as a server.
I hope everything worked out for you and you are now watching your favorite movies on the big screen TV using DLNA technology.
If something doesn’t work out, write in the comments, we’ll try to figure it out.
Previously, most users used the built-in shell in Windows OS to manage their media library: Windows Media Center. In Windows 8, it could be installed additionally, and the 10th version of Windows completely lost the ability to centrally manage multimedia content, not to mention the reduction of DVD playback in the “eight”.
Currently, many Windows users store their library of media files on the hard drives of their personal computer, and the vast majority of them would like to be able to manage their multimedia content and seamlessly play it on all devices on their home network, regardless of the audio and video formats of the collection. It has gained particular popularity because it provides rich multimedia functionality and Internet access. Modern smart TVs play most files from USB drives or from the Internet, but let's talk about media players, which will become the main program for playing your media content on a regular computer.
VLC: Media playback out of the box
VLC is a free media player with rich features for playing video and music files without installing additional codec packs. This player also plays movies on physical media: DVDs and Blu-ray discs without protection. The media player is also capable of decoding HD audio formats or transmitting them as a bitstream to . It also supports playback; just point it to a playlist with a list of channels.
As the main media player for video playback, I use an alternative option - Media Player Classic Home Cinema (MPC-HC), which has the widest customization options and rich functionality. To use this media player smoothly, you need to understand filters, codecs and file formats, not to mention numerous settings. For those interested, I can recommend an article for the correct one in the K-Lite Mega Codec Pack.
Kodi is the best media center

This media center is the best free software shell for implementing a multifunctional home entertainment center. The current version 15 of Kodi Isengard supports work not only on a desktop PC, but also on a Raspberry Pi mini-computer (versions 1 and 2) and devices with Android OS. Kodi “eats” all file formats (except those used by Australopithecus), but its main advantage is the ability to combine different sources of media content into one. Read more about the capabilities and configuration of Kodi in. Thanks to various add-ons that can be installed directly from the shell (they are stored in repositories), you can even organize your audio collection and film library by obtaining file metadata from the Internet.
As an alternative to Kodi, I can recommend a similar PC-based media center solution designed for users with large multimedia collections. The main advantage of the Plex media server over Kodi is its support for transcoding when using the client application on the playback device. By installing the media center on your computer, you can customize your media library: find movie descriptions, posters, ratings and other data. Just like Kodi, Plex can organize TV series by season and episode and organize any music collection. It is worth noting that the Plex media center is a continuation (the old name of Kodi) and has similar functionality. The Plex media center competently implements transcoding from one format to another, so the program will be a good media server and alternative. A great option for playing your media library on smart TVs, and also supports Apple TV. The saddest part of all this is that the advanced functionality is only available if you purchase a license, but its free features and benefits are enough to compete with Kodi.
PowerDVD and WinDVD: Best Players to Play Blu-ray on PC

Unlike the Kodi media center and VLC player, which are distributed free of charge, the player costs 4,300 rubles (PowerDVD 15 Pro version), and its analog WinDVD Pro 11 from Corel costs 6,400 rubles. These media players have licenses to play protected Blu-ray movies. Many people use the AnyDVD application, which removes protection, but this software is illegal.
I really regret the end of support from ArcSoft in June 2014 - this media player was an excellent competitor to PowerDVD and WinDVD. I personally hardly use these players (I play them), but I have PowerDVD on my HTPC, and clients often ask for these solutions for use in multimedia centers. In my opinion, such prices are not justified, since apart from functions to improve picture and sound quality, you will not find anything, and the need to use them is quite debatable. WinDVD and PowerDVD can be praised for their excellent interface with support for the Russian language and menu layout with a large number of image and sound settings.
Devices for creating a home media center
Various set-top boxes run on Android OS and are an excellent alternative to the standard functionality of smart TVs. More details about this are written in the article of the same name. As part of this material, I will recommend equally interesting devices for a home media center.
Amazon Fire TV Stick– this set-top box runs on Android OS and easily connects to any TV via the HDMI socket, communicating with it via Wi-Fi. This gadget can be purchased with a pre-installed Kodi player at a price of 3,000 rubles. The device has access to the Amazon and Netflix app stores. The Fire TV Stick is a miniature version of its big sister, the Fire TV. Small dimensions and the ability to connect an HDMI module directly to the TV allow you to take the gadget with you. There are no complaints about the quality of streaming. The only disappointing thing is the limited set of interfaces: there is no separate audio output, sound can only be transmitted via HDMI. By the way, there is no support for HD audio.
Mini PC for enthusiasts

I envy today's schoolchildren who can delve into affordable gadgets of this kind. is a universal mini-computer that can be used for various purposes when organizing a home network, up to . There's also a version of the Raspberry Pi 2 XBMC Media Center Kit that comes with the Kodi-based OSMC media system for playing content from USB drives. Considering that the gadget is based on Linux, Raspberry Pi 2 can also be used as a home server. Plus, the mini-computer supports DTS-HD-MA playback.
Home NAS
Potential buyers, without knowing it themselves, rarely encounter or pay attention to the possibility of using network attached storage (Network Attached Storage) in everyday life, as they consider its installation in an apartment or house unnecessary and unreasonable. Yes, you can save money by ordering from the side, but if you are interested in a ready-made solution from manufacturers, I recommend reading this material to the end to learn about the possibilities of using a NAS on a home network to optimize the process of playing a collection of media files with a high level of data storage security.
NAS: convert video files on the fly

For example, the Synology DS214Play model is capable of converting videos during playback, which allows you to comfortably view your media library on Smart TVs and iOS devices. It is worth noting that network storage does not have official support for the DTS format, but it is possible to install it separately: just download the file “FFmpegWithDTS-evansport-1.0-0005.spk” from the Internet and manually install it using the Synology Package Center.
The main feature of this model is the ability to transcode video on the fly, but in practice the real work is usually limited to watching videos in the browser and on iOS devices. Synology DS214Play supports the installation of two hard drives and supports the installation of a variety of software; it is also possible to use external drives with USB 3.0 and eSATA interfaces. Among the shortcomings, it is worth noting the noisy operation of the fan and the lack of HDMI.
Home server on the shelf of your media center

The Qnap HS-251 is a network storage and playback device for your media library. This NAS comes with an HDMI port for connecting to your TV, and for dessert, it comes pre-installed with Kodi media center. It does not create noise, since the case is not equipped with a fan and two hard drives are placed inside. The device is quite expensive, the price without hard drives is 45,000 rubles. The disadvantage of a home server follows from the advantage - we pay for silence with quite strong heating of both the device body and hard drives. Before I was able to use the device, I thought that my Cisco IPTV set-top box was getting very hot 😉
UHD content: H.265 codec and 4K resolution
Those who have already purchased may not only be disappointed by the lack of UHD content. All devices mentioned in the article cannot handle video material in 4K resolution. The problem lies in the need to use the next generation codec - which is used for 4K video playback, which can provide better compression compared to H.264 with the same image quality. This also applies to older Smart TV models that lack support for the appropriate hardware, that is, the processing power to play H.265. This drawback can be solved by organizing video streaming in 4K, but these services have not yet become widespread. The first UHD Blu-ray player has already appeared on the market - it was Panasonic for 200,000 rubles, and 4K TVs support H.265 starting from the 2014 generation.
Before we start talking about setting up the Home Media Server program, I would like to explain that this program will help solve the issue “How to watch movies, listen to music from a PC on a TV with DLNA technology”. These include Samsung's AllShare technology. Download program "Home media server" you can follow this link.
Supported HMS operating systems:
- Windows 95, 98, ME, 2000, XP, 2003, Vista, 7;
- UNIX-like systems using Wine;
- MAC OS using WineBottler, CrossOver Mac.
Adding directories of media resources to the Home Media Server program
- button "Settings"- chapter "Media resources"- page "Directory List" — "Add"
- from Windows Explorer, drag (and release) the required directories with the mouse into the main form of the program (can be used with standard file search in Windows).
To access the server through a browser, you must enable the mode Web, set a permanent server port in the section Settings - Server - "Port" field(value from 1024 to 65535). Accessing the server from a browser:
http://server IP address: specified server port.
The server IP address can be found in the section Settings - Server - List of allowed network connections - Search.
Launching the Home Media Server program
Pay close attention to all messages that may appear from firewall programs when you first start the server.
Click the button "Launch" in the button bar of the main program window. If the server starts successfully, the button "Launch" will become inaccessible, but the buttons will become available "Stop" And "Restart", the message log will contain lines
"Start the server".
What to do in case of errors when starting a home server
- check the list of available network connections in the program settings (section Server - List of allowed network connections - Search). If the list of allowed network connections is not empty, then compare it with the list of available network connections using the button "Search".
- check the settings of the firewall program you are using, the Home Media Server (UPnP) program must allow network activity, for more stringent rules, UDP port 1900 must be open for incoming and outgoing packets, the server port specified in the program settings must be accessible for incoming connections.
You can generate a list of allowed network connections from the list of available network connections by marking the network connection to be included in the list in the first column. If for the media server in the program settings (section "Server" - field "Port") a constant port number is specified, then the availability of the media server can be checked from the browser at http://server IP address: specified server port. If yes, the media server welcome page will open. If in the section Program settings - Device , Web mode is enabled, the top level of the media resource database will open.
Automatic start of home media server
- Enabling automatic server startup when the program starts: Settings button - section "Advanced" - "Server autostart when program starts".
- Autostart the program when the user logs into Windows: Settings button - section "Advanced" - "Autostart the program when starting a Windows session."
- Installing the server as a Windows service: Settings button - "Advanced" section - "Install the Windows Home Media Server (UPnP) service."
Options for connecting media devices to the server
You can familiarize yourself with the options for crimping network cables. To avoid misunderstandings, a media device also includes a television.
- Computer - Media Device. A crossover cable must be used for the connection.
- Computer - Switch - Media Device
- Computer – Router (router) – Media device. Straight cables must be used to connect devices.
- Computer - Wi-Fi router - Media device. You can find out more about the wireless connection method in the article .
The operation and settings of the media server do not depend on the connection option. When using a router, enable the mode for automatically assigning IP addresses to devices; for details about setting up the router (router), read the article. When using connection options 1 and 2, IP addresses are assigned manually, the addresses must differ in the last part of the IP address, the subnet mask is 255.255.255.0, the default gateway is the IP address of the computer, if necessary, you can specify the address of the computer. Example: computer address is 192.168.1.4, media device address is 192.168.1.5.
Finding a server in a media device
The search for a server with shared folders is performed according to the user manual of the media device. If you have any questions, please refer back to the above-mentioned articles on Allshare and Smart TV.
If the server is not found, but all connections are made correctly, then in the program settings (Server section) check that the list of allowed client devices is empty or the device’s IP address is in the list of allowed ones. When using a firewall program, check the rules for accessing the module's network hms.exe(if the server runs as a Windows service, then for the hmssvc.exe module), if possible, switch the network protection program to learning mode, restart the “Home Media Server (UPnP)” program. If other media servers are used, it is better to turn them off at the setup stage.
If the server is found, but there is no way to open it in a media device
Settings in the Home Media Server (UPnP) program that may help resolve this issue include: Device section: mode “DLNA 1.0”, “DLNA 1.5”, “Authorization Service”, “Russian names of main folders”, in the Server section set a permanent server port (from 1024 to 65535).
Navigating through files on a media device (TV, media player)
If the device supports the Russian language, then in the program settings (Device section) you can enable the “Russian names of the main folders” mode, this affects the names of the main folders of the media resource database. If the Russian language is not supported by the media device, select the Translit mode for encoding Russian names; the “Russian names of the main folders” mode is turned on/off at the user’s discretion (if disabled, the names of the main folders of media resources will be in English).
Folder names can be changed in the main form of the program by right-clicking the mouse - selecting the "Change name" item.
Unnecessary folders of media resources can be deleted in the main form of the program by right-clicking the “Delete Folder” item, or the “Exclude empty folders when transferring information to UPnP devices” mode can be enabled in the Device section.
Slow navigation through the media resource database may be due to the operating characteristics of the media device, the inclusion of the “Exclude empty folders when transferring information to UPnP devices” mode, the presence of slow removable media in the system, frequent changes in media resource directories and the enabled “Automatic” mode. scanning directories when they change while the server is running.” The “Exclude empty folders when transferring information to UPnP devices” mode can be turned off, the “Removable media” folder can be deleted in all sections of media resources (Movies, Music, Photos).
Navigation through directories of media resources in the structure of their storage on disk can be done through the folder “Watch Folders” (Russian language is turned off), “Catalogues of media resources” (Russian language is turned on).
If some media resources are not visible on the media device, but are present in the main form of the program, then this may be due to the mime type transmitted by the server for this media resource. The Mime type can be changed in the program settings - Settings button - "Media resources" section - "File types" - selecting a file extension - Change button.
Watching movies from the server
The server can transfer films to a media device in their original form or through transcoding (converting a film into a format supported by the media device). The movie is automatically transcoded if the file extension is not included in the list of supported ones or if a transcoding profile is selected for the movie. Configuring movie file extensions supported by the media device: button "Settings"- chapter "Device" — "Native file support" — "Movies". The list of file extensions is generated according to the media device user manual or information on the media device manufacturer’s website. If the film is played in its original form, then selecting the audio track and subtitles included in the film file is possible only if the media device supports this choice. When you select a movie through the Transcoding folder, you can select an audio track, internal and external subtitles, audio delay, and a transcoding profile to convert the movie.
Transcoding profile is a script (macro) that generates parameters for calling a transcoding program or performs transcoding using DirectShow. Editing transcoding profiles: button "Settings"- chapter - button "Profiles".
The transcoding profile used can be selected:
- for all films: Settings button - section "Transcoder" - "Transcoded file parameters" - Movies - "Transcoding profile"
- for movie files of a certain type (extension) - Settings button - “Media resources” - “File types” button - selecting a file extension - Edit button - “Transcoding profile”
- for a specific film: in the list of films of the main form of the program, using the right mouse button - “Transcoding profile” or through the navigation of a media device, if the film is selected through the Transcoding folder in the Settings folder, generated by the server for each film.
When playing movies, media devices usually stretch the video to fill the entire screen, so to maintain the proportions of the movie frame, the server generates parameters for adding color to the original frame size to the frame size specified in the settings. Setting the transcoded frame size and the color of the addition is set in the program settings - Settings button - section "Transcoder" - page "Codecs, frame" - "Frame size". Color addition is not supported by all transcoding programs, so if you select a transcoding profile different from the main ones, it may not be available.
Reasons for errors when playing movies from a home media server:
- select the original movie file in which the format, video or audio encoding is not supported by the media device, a possible solution to the problem is to select the movie through the Transcoding folder
- a movie is selected through the Transcoding folder, in which video or audio encoding is not supported by the transcoder program; a possible solution to the problem is to select a different transcoding profile for the movie; Problems with the audio track can also be solved by setting the number of channels in the program settings (section Transcoder - “Codecs, Frame” page) to 2
- Media device or server is unavailable: Reboot the media device or server.
Reasons for stopping/slowing down content playback:
- stopping viewing may occur due to insufficient disk space used to store temporary files; exceeding the file size supported by the device; exceeding the maximum size of the transcoded file specified in the program settings (section Transcoder - “Transcoded file parameters” - Maximum size).
- The transcoding speed of the film is not sufficient for viewing, you can check this in the main form of the program: perform test transcoding using RMB in the list of films - The transcoding speed (fps parameter) must be greater than the frame rate of the film. If the “Show transcoding panel” mode is enabled in the program settings (Transcoder section), then the transcoding speed can be viewed in it after selecting a movie on the media device. You can also turn on the transcoding speed indicator (section Transcoder - “Subtitles, speed indicator”), if the transcoding speed is less than the value specified in the program settings, the current transcoding speed will be displayed on the film frame in the place specified by the user.
Solutions to the above problems:
- select a transcoding profile with a smaller frame size and video quality for viewing
- if the encoding of a video track is supported by a media device, but the movie file format is not supported, then you can select a transcoding profile that converts the movie file format and leaves the video track unchanged (transcoding profiles “Movies - TsMuxer” - m2ts file generation, “Movies - WMF" - generation of wmv files). For the “Movies - TsMuxer” transcoding profile, you must additionally download the TsMuxer transcoder program from the home page (in the Transcoding profile settings)
- stop watching a movie on a media device to create a transcoded movie file large enough for viewing
- specify a disk for storing temporary transcoding files that is different from the one used by the system to store the paging file
- optimize the system as a whole - check disk fragmentation, the list of startup programs, etc.
Settings of the Home Media Server program using the example of my TV model SONY Bravia KDL-46XBR9
Install, launch the Home Media Server program on your PC, go to Settings by clicking on the corresponding button.

On the right is the “Add” button for disks/directories with media content. In this case, you can choose which of these files will be scanned when the program starts. Scanning is necessary if you have changed the contents of this directory and changes have occurred there. A green circle indicates that these file types are being scanned.
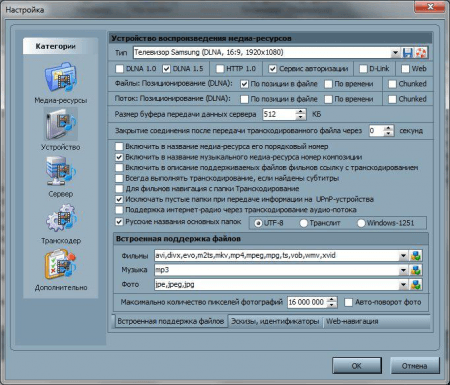
Now you should pay attention to the File Types button on the right panel. Some TV models cannot play PAL video files; you must add NTSC for the content to be recognized. (for example, MPEG-PS_PAL_NTSC for *avi).

For the *mkv container, select Transcoding Profile - Core AVC. In DLNA, enter the line MPEG-PS_PAL or MPEG-PS_NTSC depending on your TV.
Now let’s look at the left panel “Categories” - “Device”. Here you will need to select your TV type and resolution. DLNA1 and DLNA1.5 are the old and new versions, you will learn about the supported DLNA version of your TV from the manual or on the official website. You can also configure Web access to the server here. Let's move on to the next category of the left panel of the “Server” settings section.

Add your TV to the client devices (look in the menu, TV network settings for static IP). When you click on the lifebuoy icon, the program will automatically detect the name of your computer and add it to the Server - Name line. To identify devices on the network connected by DLNA technology, use the “Search” button. Make sure your TV is turned on and connected to a wired or wireless network. After scanning the network, the program will add the found network clients (PC and TV). Click on TV and go to client settings.

By clicking on the Settings button, you will be taken to the individual device settings. Set the settings we talked about above.

When you click the “File Types” button, you will be taken to the file registration settings, where you can make the necessary changes.

Return to the main settings window and go from the left panel to the “Transcoder” category.

Set the settings according to the image and go to the bottom tab “Codecs, Frame”.

I draw your attention to the parameter section “Sound - Original audio track if compression is the same”. Unchecking this box will help avoid losing the Russian track when playing a video. Remember that before transcoding, each file can be viewed and changed if necessary.
The next tab we'll look at is Subtitles.

In this window, you will configure the subtitle display style to your taste and other parameters necessary for their correct display. Let's look at the last category in the left panel, "Advanced".

Place a tick in the checkbox “Installing the Windows Home Media Server (UPnP) service”. Thus, the program will automatically load when you turn on the computer as a service, I wrote about this in the section Automatic server startup.


