Stationary antenna for TV. Necessary equipment for viewing. Disadvantages of a home antenna
Digital terrestrial television broadcasting
Terrestrial is television broadcasting, in which a TV signal is transmitted by a transmitting television station into the surrounding space using electromagnetic waves, and anyone can pick up this signal using a television receiving antenna. Broadcasting is carried out on meter (MV/VHF) and decimeter (UHF/UHF) waves. In connection with Russia's transition to a digital broadcasting format, terrestrial television is becoming a convenient and free way to deliver a high-quality television signal. The DVB-T2 standard has been adopted as the main format for digital terrestrial TV in Russia.
Antenna classification
Television antennas are conventionally divided according to installation location, type of signal amplification, and range of received frequencies.
- Depending on the installation location - indoor and outdoor.
Indoor antennas are installed indoors. Important: reception with an indoor antenna is possible only where the TV signal level is high enough - such places are called areas of reliable reception. In reality, there are not so many such zones. There are not very many chances to get a high-quality “picture” using an indoor antenna in the village, at the dacha and other places remote from the repeater. Of course, you want to make do with a nice, elegant design, and not climb on roofs and balconies, but there is no way to bypass the laws of physics.
Attention: the statement that an indoor antenna will receive signals well in any room is completely wrong! Each case should be considered separately and a suitable antenna should be selected.
Outdoor antennas have significantly better parameters and can be used in most places, including country houses and cottages. Installing an outdoor antenna requires significant effort and some experience, but the resulting effect will more than pay for your efforts. Outdoor antennas can almost always provide better reception!
- By type of signal amplification - passive and active.
Passive antennas receive and amplify the signal due to their design (geometry). They are not connected to the electrical network and do not have active amplification elements: transistors, microcircuits or other electronic components. Thus, a passive antenna does not introduce its own interference and noise (which is inevitably produced by various electronic components) into the received signal. At the same time, in some situations its own capabilities are not enough for high-quality reception.
Active antennas amplify the received signal not only due to their design features, but also with the help of an electronic amplifier with which they are equipped. The amplifier can be mounted inside the antenna housing or separately from it. Power is supplied from a household electrical outlet using an adapter (power supply). It should be remembered that the amplifier is a source of its own noise. In some cases, interference and distortion may occur in the received TV signal, for example:
- when using an active antenna in an area of already reliable television reception,
- if you choose the wrong amplifier with very high gain (this is the case when everything is good in moderation!),
- when using low-quality amplifiers from unknown companies and manufacturers.
- By received frequencies - channel, band and all-wave.
Channel antennas are designed to receive only individual frequency channels and are used in special conditions - for the average TV viewer they are practically never needed.
Band antennas are used where it is necessary to receive only HF, or only UHF. In particular, only the UHF range is used for broadcasting digital terrestrial television in Russia. If an antenna is purchased only to receive digital TV, then an antenna that operates only in the UHF range is sufficient.
All-wave antennas are capable of simultaneously receiving signals from both ranges: VHF and UHF. Most often, TV viewers need just such antennas, because various TV channels in Russia are broadcast both in the MW range and in the UHF range.
Antenna Specifications
The antenna, like any electronic device, has a number of parameters and technical characteristics. Some of them are described in the product passport, some - only in technical specifications. It is unlikely that the average buyer needs all these numbers. Probably the only technical characteristic that the consumer should pay attention to is the antenna gain or gain. Measured in decibels (dB). The higher the value, the better the antenna’s ability to amplify the TV signal. But as mentioned above, high gain will not always lead to a better image. The gain must match the antenna installation location! Sometimes unscrupulous manufacturers or sellers indicate sky-high gain factors on the packaging and in the product data sheet that have nothing to do with reality. If the antenna shows numbers above 40–45 dB, you should treat this product very carefully. And if you see 80, 90, 120 dB, you are almost certainly being misled. Do not buy!
Assembly, installation and configuration
Purchasing an antenna is not all that is needed to receive high-quality television signals. The antenna must be correctly assembled, correctly installed, connected and configured. The assembly is usually described in detail in the product data sheet or on the packaging. Read the instructions carefully before starting assembly, or better yet, before purchasing! Pay attention to the recommended antenna installation location, how to connect to the TV and achieve the best reception quality. If in the instructions you see clumsy machine translation, errors and inaccuracies, low-quality and incomprehensible illustrations, do not purchase such an antenna!
The installed antenna must be connected to the TV. This is done using a coaxial cable, which many antennas come with. But if the antenna is purchased without a cable (often an outdoor antenna), or the cable is not long enough, you should take the issue of purchasing it very seriously! For television antennas, it is necessary to use a cable with a characteristic impedance of 75 Ohms. This number is indicated on the product itself. The quality of a cable depends on the quality of the materials used and the quality of production. The denser the cable braid and the thicker the central core, the better the cable and, usually, the more expensive it is. Don't go for cheap, because a bad cable can negate all the benefits of a good antenna!
Setting up the antenna most often comes down to its correct orientation towards the television center. The technique is simple - slowly rotate the antenna in a horizontal plane, while simultaneously observing the quality of the received image. When setting up an outdoor antenna, use the help of a second person.
For indoor antennas, when switching TV channels, situations may arise when you need to change the gain or adjust the position of the VHF or UHF parts of the antenna. This is normal and is a kind of payment for placing the antenna indoors. The configuration of the antenna should be written in detail in its passport.
Often the buyer finds it difficult to choose a suitable television antenna. Here, first of all, it is necessary to determine for what purposes the antenna is purchased and under what conditions it will operate. Choosing an antenna based on its appearance can lead to dissatisfaction with a poor-quality image on the TV screen.
— If we are talking about receiving a small number of channels, then you can limit yourself to choosing an indoor antenna in the budget segment. But you should be clearly aware that an indoor antenna will often not provide high-quality reception of all channels - this is a compromise option if other options are not suitable at all. Among indoor antennas, it is better to choose directional ones.
— Point the antenna towards the television center or repeater.
- If the windows of the room where the TV is installed face the television center, a window antenna may be suitable for you - it is mounted on the glass, and due to this, although it is indoor, in some cases it can compete with outdoor antennas.
Remember! At a short distance from the TV tower, the built-in amplifier will be overloaded with a powerful signal, which can lead to a sharp deterioration in the reception of all channels.
— If you plan to connect several television receivers to the antenna, you should choose an outdoor antenna with the best parameters.
Remember! Your TV and receiver must support the DVB-T2 standard.
SITUATION 1
Apartment on the top floor of a high-rise building a short distance from the TV station (3–5 km). The television center is visible from the location where the antenna is supposed to be installed. The best option here is an outdoor all-wave antenna without a built-in amplifier. An acceptable level of image quality will be achieved when using almost any indoor antenna. If you choose an indoor antenna with a built-in amplifier, then there must be a gain adjustment to avoid overload with a powerful signal. When receiving a signal in the DVB-T2 digital format, the image quality should be excellent even with an indoor antenna.
SITUATION 2
Similar to the previous situation, but the apartment windows face the opposite side of the television center. The best option is an external all-wave antenna without an amplifier, installed on the roof and aimed at the television center. If for some reason this is not possible, you can use a directional indoor antenna. But receiving all channels in good quality is usually impossible. Again, if the signal is received in the DVB-T2 digital format, the image quality should be excellent.
SITUATION 3
Outskirts of the city, high-rise building, apartment on the ground floor. The distance to the television center is 10–30 km. The most suitable option is an external active all-wave antenna installed on the roof. In this case, you will need to additionally purchase a coaxial cable, since usually a small amount of cable (6–8 meters) is included with the antenna. It is necessary to choose a high-quality cable with minimal losses, having a dense braid of wires and aluminum foil as a screen. The most commonly used cable is RG6 or SAT-50. Old Soviet RK75 cables have significant attenuation in the UHF range and are practically unsuitable for modern use. The use of indoor antennas in this case is possible only in the case of low requirements for the quality of the received signal. High-quality digital TV signal reception is possible by using a directional indoor antenna.
SITUATION 4
A cottage or country house at a considerable (more than 50 km) distance from the television center. For high-quality reception of all channels, it is necessary to use a professional complex of several band antennas with signal amplification and filtering systems. If it is acceptable that a high-quality image will not be available on all channels, then you can use an external all-wave antenna with an amplifier. Indoor antennas are absolutely useless in this case.
In order for the TV antenna to function properly and not cause difficulties when working in a country house or apartment, you need to choose the right indoor (indoor) or outdoor digital device. There are several criteria when buying a TV antenna - signal reception strength, gain, activity. Familiarize yourself with well-known device manufacturers and the secrets of choosing an antenna.
Types of antennas for TV
In Russia, the signal level of television waves varies, so home antennas are highly sensitive, which ensures reception in almost any conditions. There are parabolic, indoor and outdoor antennas, which are divided into several more categories. To receive a television wave without interference, you need an individual selection of type and power.
Satellite antennas for TV
Parabolic television antennas are popular. They are distinguished by stable operation, high quality signal reception and an increased number of channels. Equipment of this type consists of a receiver, a receiver for decoding. The antenna receives waves from the satellite, so the clarity of the image depends on the location of the unit and the TV.

Direct focus
In this type, the converter feed “looks” below the horizon, which protects the signal receiver from negative atmospheric influences:
- Model name: MULTI Toroidal;
- price: 1100 rub.;
- characteristics: diameter – 100 cm, reception from 16 satellites;
- pros: ease of adding channels;
- Cons: Reception quality varies.
In a small house or country house, a 60-centimeter satellite dish will be useful, which costs a little more than the first one:
- Model name: Triax TD-064;
- price: 1300 rub.;
- characteristics: 60 cm;
- advantages: resistance to precipitation, corrosion;
- cons: the cost of satellite television channels is high.
For those who don’t want to bother with a complex design, a ready-made satellite television set is suitable:
- model name: NTV+;
- price: 7050 rub.;
- characteristics: interactive set-top box, movie library;
- pros: decoding;
- Cons: There may be interference.

Offset
The advantage of using offset antennas is a larger viewing angle and improved image quality:
- model name: Supral;
- price: 1400 rub.;
- characteristics: 80 cm;
- pros: anti-corrosion coating, wall bracket;
- cons: none.
The following subtype has a slightly larger diameter and is suitable for receiving any waves:
- model name: Universal;
- price: 1200 rub.;
- characteristics: 90 cm, aluminum alloy;
- pros: compatible with different TV sockets;
- cons: no fastening.
The third option for an offset antenna will be a satellite television kit at an affordable price:
- Model name: D-Color DCA-101;
- price: 253 rub.;
- characteristics: dimensions 30*20 cm;
- pros: compactness, power supply of the amplifier from the set-top box, low noise;
- cons: none.

Outdoor TV antennas
If the buyer lives far from TV signal transmitters, then external elements will help strengthen the reception. Outdoor options receive TV waves up to 60 km from the transmitter. To make the correct selection, you need to know the distance to the nearest tower and find out the need for wave amplification. To achieve a high-quality picture, it is recommended to install the unit at the highest possible point above the house.

Active
The active antenna for TV is equipped with a special power amplifying device. This helps improve the clarity of the TV picture when the TV tower is located far away:
- Model name: Funke ABM 3553;
- price: 2300 rub.;
- characteristics: 75 Ohm, size 1.38 m;
- pros: works in difficult reception conditions, made of anodized aluminum;
- cons: large size, no cable and power supply.
A more affordable antenna is the following, which differs in design features:
- Model name: Cadena AV;
- price: 1550 rub.;
- characteristics: receiving DVB-T/DVB-T 2;
- pros: there is a bracket;
- cons: power supply via adapter.
Another popular affordable budget option would be the following long-range unit:
- Model name: Rexant ABM 3529;
- price: 2064 rub.;
- characteristics: 68 cm;
- pros: there is protection against corrosion and ultraviolet radiation;

Passive
If there are no obstacles, passive TV devices can be used, which are cheap and do not require amplification technology:
- Model name: GELLAN FULLBAND-15;
- price: 1264 RUR;
- characteristics: up to 2700 MHz, 50 Ohm, parameters – 240*240*40 mm, operating conditions – wall;
- pros: vertical polarization;
- cons: improves the signal at a distance of up to 10 km.
The second popular brand is the Dutch Funke, which is expensive, but justifies it with the following parameters:
- model name: Funke BM 4527;
- price: 1413 rub.;
- characteristics: 75 Ohm, 685 mm;
- pros: anodized aluminum;
- cons: no cable and power supply.
The third most popular among TV buyers is the Locus antenna, which is affordable and available at discounts:
- model name: antenna Locus L 021.12;
- price: 1300 rub.;
- characteristics: range 55 km, 1.31 kg, 1.4x2 m;
- pros: ease of assembly;
- cons: no wire.

Rod
A traditional TV antenna has a rod system consisting of metal semi-vibrators:
- Model name: Jablotron AN-05 GSM;
- price: 1428 RUR;
- characteristics: frequency 900-1800 MHz, cable length – 3 m;
- pros: magnetic base;
- Cons: There may be interference.
The product of another manufacturer that produces dipole devices for TVs is considered more expensive and of higher quality:
- Model name: ETS-LINDGREN;
- price: 3144 rub.;
- characteristics: 80 MHz-2 GHz, parameters – 210x170x9 cm;
- pros: individual calibration, high gain;
- cons: weight 4.5 kg.
The most expensive device in the selection is considered to be manufactured by the manufacturer according to military standards:
- model name: Narda RA-01;
- price: 5000 rub.;
- characteristics: 9 kHz-30 MHz, weight – 1.5 kg, dimensions – 150x135x120 mm;
- pros: individual antenna;
- cons: too expensive.

Framework
This subtype is represented by one or several turns of wires connected into one frame, in the plane of which the maximum intensity of the decimeter frequency range is located:
- model name: Garmin 220;
- price: 1490 rub.;
- characteristics: compact;
- pros: accepts any programs;
- cons: delivery required.
A simple device is the following, which is a magnetic generating type frame winding:
- Model name: EMCO 7603;
- price: 1000 rub.;
- characteristics: 20 Hz-50 kHz, 16 turns, diameter – 12, height – 8 cm;
- pros: individual calibration, linear polarization, weight – 0.5 kg
- cons: not found.
A loop antenna for a TV manufactured by A.H.Systems is more affordable and easy to operate:
- model name: A.H.SYSTEMS SAS;
- price: 700 rub.;
- characteristics: 1 kHz-30 MHz, 50 Ohm;
- pros: weight 1 kg, increased structural strength, network adapter and preamplifier included;
- cons: battery operation principle.

Indoor TV antennas
If the signal from the television center is of high quality, an internal collecting device is suitable, which is more convenient in installation than an external one. Such options are cheap, fit into any TV socket, and are transportable. The downside is the difficulty of adjusting the image. There are analogue, all-wave, broadband and narrowband varieties.

Digital
This subtype is used to obtain a digital image. With its help you can achieve high-quality images:
- model name: Funke Margon Home 2.0;
- price: 1450 rub.;
- characteristics: 170-240 MHz;
- pros: 3.5 m cord for indoors;
- cons: not equipped with an outdoor cable.
The following TV antenna is more affordable; it can be ordered by mail at a special offer:
- model name: BBK DA 19;
- price: 843 rub.;
- characteristics: obtaining HDTV standards for terrestrial TV;
- pros: little noise;
- cons: not found.

All-wave
From the name it follows that the devices accept all types of frequencies (decimeter, meter), they are called universal:
- model name: Polish antenna Delta K331A.02;
- price: 1092 rub.;
- characteristics: dimensions 280*680*120 mm;
- pros: acceptance of any TV programs;
- Cons: minor interference.
The domestic manufacturer is considered popular; the products are distinguished by favorable prices and free delivery for orders over 3,000 rubles:
- Model name: SPI 918;
- price: 399 RUR;
- characteristics: 75 Ohm;
- pros: compact size;
- cons: none.

Broadband
The fan or broadband subtype is installed in summer cottages located far from the transmitter:
- model name: Remo Bas 5340 TV JET ANT-USB Horizon;
- price: 580 rub.;
- characteristics: log periodic antenna;
- pros: powered by USB or receiver;
- cons: works only in the stable receiving zone.
The ceiling-mounted option can significantly enhance reception on any television waves:
- Model name: AO-700/2700-4;
- price: 599 rub.;
- characteristics: weight 300 g, dimensions 185*100 mm;
- pros: domed;
- cons: no wire.

Narrowband
This term refers to highly targeted options for televisions that pick up a specific frequency, which reduces interference:
- model name: Romsat AV-2845;
- price: 600 rub.;
- characteristics: cable length 14 m, telescopic, material – aluminum;
- advantages: not afraid of “wintering” at the dacha;
- cons: size 1035 mm.
A cheaper device is considered to be a simple design of a domestic brand, made of plastic, capturing smaller channels:
- Model name: Vector-PL-1 K;
- price: 450 rub. on sale;
- characteristics: 5-128 V, 75 Ohm;
- pros: wire 3 m;
- cons: plastic, short distance from the tower.

With amplifier
Indoor antennas with an amplifier for a TV will help you watch programs with a clear picture and a bright image:
- model name: Delta Satellite in dvb-t2 DS 1000 format;
- price: 1800 rub.;
- characteristics: sun resistance, installation on a mast;
- pros: built-in weak signal amplifier, picks up signals up to 80 km;
- cons: not found.
The following construction for a TV that accepts digital and analogue television encodings will cost half as much:
- model name: Selenga 101 A;
- price: 843 rub.;
- characteristics: cable length 1.2 m;
- pros: compactness, weight 300 g;
- cons: plastic body.

How to choose an antenna for your TV
The choice depends on where the structure is installed. Outdoor ones with an amplifier are suitable for a remote installation location, narrowband ones for city apartments, active indoor ones, and frame ones for cars. In villages and dachas it is better to install parabolic dishes. The choice depends on the criteria of distance, price range, and amplification factor.

For auto
For high-quality reception of TV, radio, and navigator, a combined GPS or GSM car unit is required. Parabolic will accept all programs, but will be expensive. In-cabin active all-wave structures are equipped with an amplifier, external ones are passive and require an extension cord. Among the disadvantages of the latter, instability to corrosion is noted.

For the dacha
To watch TV in the country, it is better to buy an active structure and install it as high as possible. The kit should include an amplifier and an adapter; you will need to purchase a coaxial wire for charging. The external type must stand on the roof. If the TV tower is nearby, an indoor unit will do. To listen to the radio, purchase broadband.

Home
In a city apartment or country house, it is easier to install an indoor unit on a TV if the repeater is no more than 30 km away. Otherwise, you will have to install an external one (active or passive) or a digital one with a tuner. It is better to choose a room type (meter signals) or frame type (decimeter signals): it is mobile, weighs less, and is easy to connect.

For digital television
Parabolic collective antennas provide stable reception of weak messages and high-quality TV images. They are distinguished by an expanded package of channels and increased stability. When installing, it is necessary to take into account the location of the unit relative to the broadcast source. You should choose a plate based on costs and capabilities.

Video
This is a small device that has the ability to receive a signal for transmission to the TV screen. There are three main types:
- indoor (indoor);
- external;
- satellite.
What factors and features should be considered when purchasing an indoor antenna?
And now we will conduct a small analysis that will help you make the right choice when purchasing and installing indoor digital television.
The typification of these devices is divided into two more branches. That is, they are divided according to the type of waves that the TV antenna is capable of receiving, and according to the strength of the TV signal reception. Based on this information, we will highlight the main pros and cons when choosing indoor antennas.
Types of antennas
As we mentioned above, based on the type of wave reception, television receivers are divided into three types:

Note. All three types of television antennas also differ in appearance: meter antennas are a kind of “antennae” for receiving a television signal, while decimeter antennas look like a ring or frame. All-wave have elements of both of the above receivers.
Active and inactive
And there are also two types of television antennas, which differ only in the strength of signal reception:
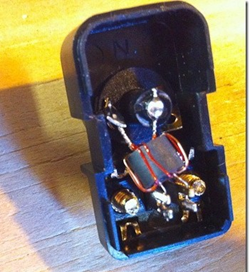
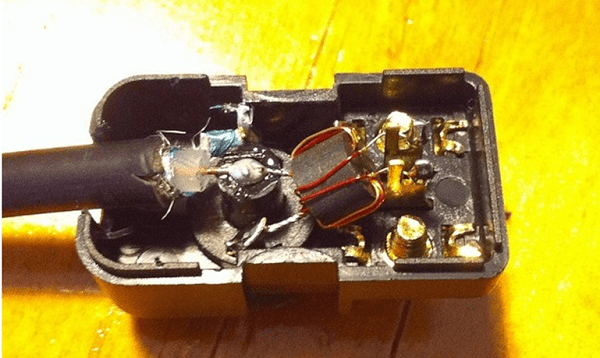
- Active - having a good signal level, they are well suited for densely populated areas. Useful in cases where the wave source (repeater) is remote and if the installation site does not have the ability to receive a “direct” television signal by receiving reflected waves. Active devices have an amplifier (special board), in some cases requiring connection to the mains via its own power supply or power supply from the receiver.
- Inactive - useful if you are close to the repeater. If the wave signal is quite strong, there is no point in installing an amplified version of the TV receiver, in order to avoid “over-amplification” of the reception of TV channels, which has the same negative effect on the image quality as the lack of a TV broadcast signal.
Analyze and select an indoor antenna
Taking into account the information listed above, we can summarize that the main criterion for purchasing an internal antenna is the location of the repeater relative to the installation location of the receiver. That is, buying a meter antenna will be useful if you need to install TV channels at your dacha or vacation spot far from densely built-up cities, where there will be no interference and distortion (reflected TV signal). We also don’t forget to take into account the distance to the broadcasting tower (you can look at the coverage map on the Internet) and, based on the coverage data, we decide whether we need an amplifier.
Note. If your choice fell on a meter internal antenna, it is worth noting that it is undesirable to use a divider (split the signal to 2 or more TVs), but it is better to use an active type of device (amplified).
Buying a decimeter antenna will pay for itself if you need a larger list and variety of channels or digital (DVB-T2) television. In large cities, it is best to choose a television receiver with an amplifier, since the signal there is often “reflected”. And don’t forget about the length of the cable that connects the antenna to the TV: the longer the cable, the worse the quality will be. An all-wave receiver is useful if you need television channels in the meter and decimeter range (for example, if you have two favorite channels with different waves).
Note. If the receiver is located at a distance of 20 km or more, it is better to use external terrestrial antennas.
IMPORTANT. The state of the Russian Federation will stop sponsoring analogue TV broadcasting by approximately 2018!
The benefit of the economic aspect when choosing an indoor antenna is that running analog TV will cost a bit less than connecting digital (DVB-T2) television, not to mention installing a separate signal amplification element (active antenna).
Subsequently, we emphasized in what conditions and under what circumstances it is right to choose the right receiver to achieve the best TV quality. Having dealt with this, you can safely purchase the internal TV antenna we need and enjoy watching TV shows.
Despite the huge number of television antennas presented on the consumer market, which can be easily purchased at any electronics store, interest in how to make an antenna for a TV with your own hands does not disappear. This interest can be explained by a reluctance to spend money on buying an antenna, being away from retail outlets (if you are in the outback or at the dacha) or the failure of the purchased one.
Antennas for a television receiver can be divided into several types.
- All-wave antenna– the design is easy to manufacture; it can be made from simple available materials. It picks up a digital signal quite well outside the city, where there is not much interference. When located near a broadcast tower, it can receive analog television.
- Log-periodic band antenna also easy to make. It has perfect consistency with the feeder across all ranges, without changing its parameters. Since this design has average technical parameters, it can be used in the country, or as an indoor antenna in the city.
- UHF antenna. A simplified modification of the Z-antenna is often used; it works well, regardless of the signal reception conditions.
All-wave antenna
All-wave TV signal catchers are also called frequency independent (FIN). Their designs can be different.
Of two petals
The figure shows an all-wave antenna made from two metal plates triangular in shape and two wooden slats on which copper wire is stretched in the shape of a fan.
Copper wire can be taken of any diameter, it does not play a special role. The ends of the wire are attached at a distance of 20 to 30 mm from each other. The plates with the other ends of the wire soldered together should be located at a distance of 10 mm from each other.
The metal plate can be replaced with a square piece of fiberglass, which has copper foil on one side.
Since the design of the homemade antenna is square in shape, its height will be equal to its width, and the angle between the panels will be 90 degrees. Zero potential point marked in yellow in the figure. There is no need to solder the cable braid in this place - tying it tightly will be enough.
A television signal receiver assembled in this way in the form of two lobes is capable of receiving both all decimeter channels and meter ones. Moreover, it picks up signals well in all directions. But if you install the CNA in an area of poor signal reception from a TV tower, it will only work normally with amplifier. Others can also be used.
Butterfly shaped
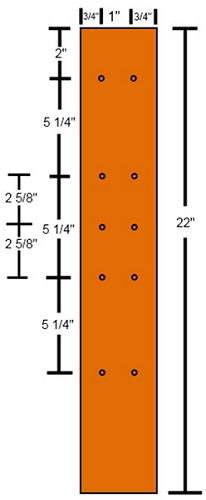
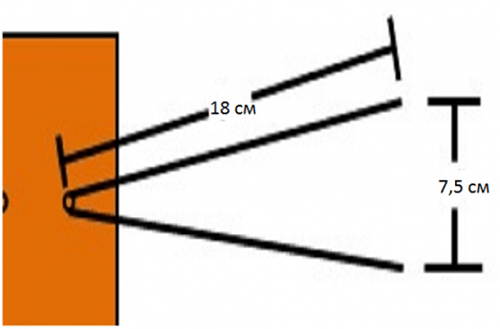
You can make a television antenna in the shape of a butterfly with your own hands. To make this fairly powerful antenna yourself, you need to prepare a board or plywood with dimensions of 550 x 70 x 5 mm, a wire with a copper core with a cross-section of 4 mm, and, accordingly, a PK75 cable.
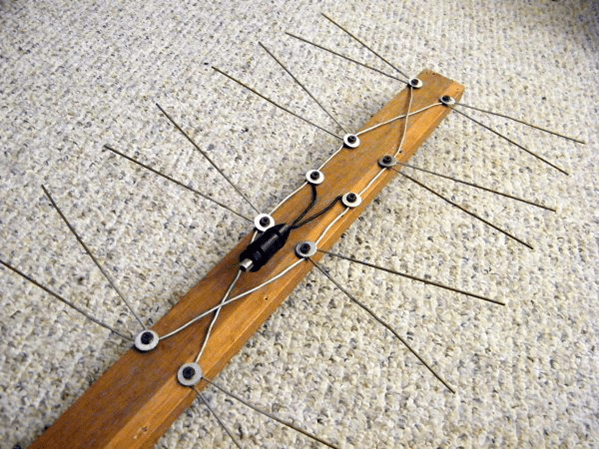
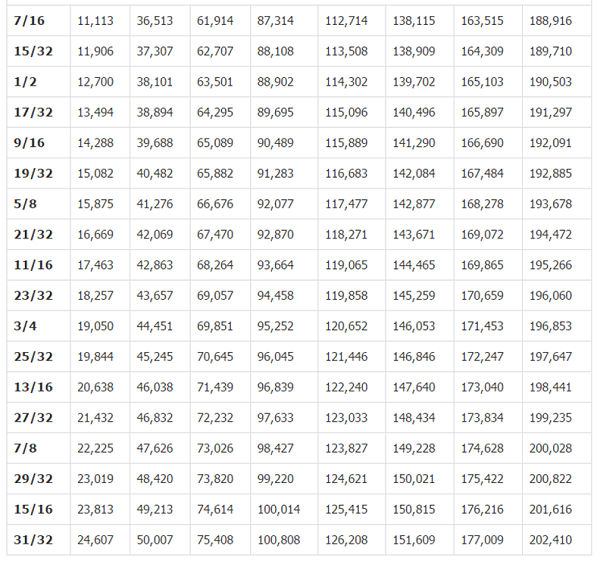
- Mark the holes on the plywood and drill them. Dimensions in the picture are in inches. Below the figure is a table for converting inches to mm.

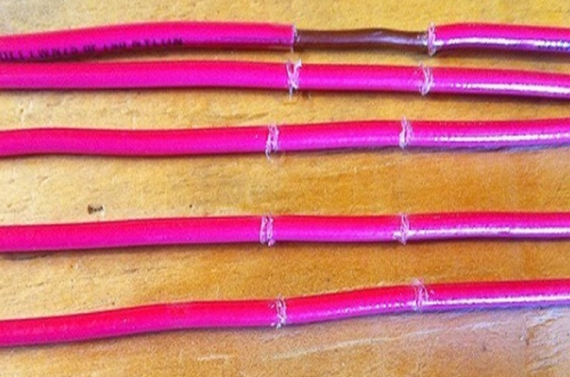
- From copper wire you need to cut 8 pieces of the same length, 37.5 cm each.
- In the center of each wire, clear sections of insulation (2 cm each), as in the figure.
- After this, you should cut off 2 more pieces of wire, already 22 centimeters each, divide them into 3 equal parts and remove the insulation at the separation points.
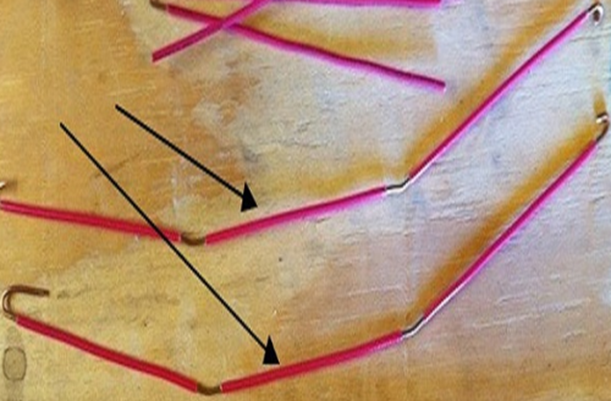
- Give the segments V-shape. You should be careful to maintain a distance of 7.5 cm between the ends of the wire. This is the optimal distance to receive a clear signal.
- Connect all the elements according to the figure below.
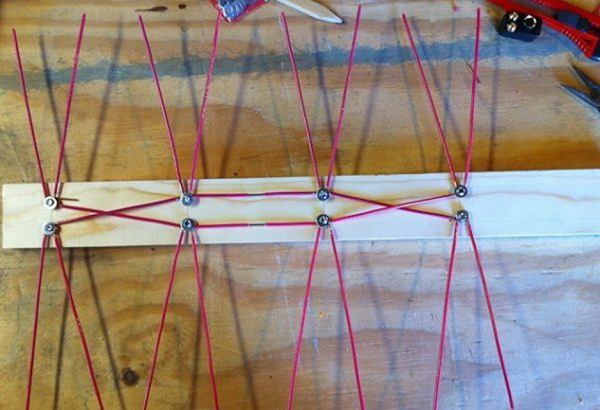
- Next, you need to purchase a socket to connect the plug to it.
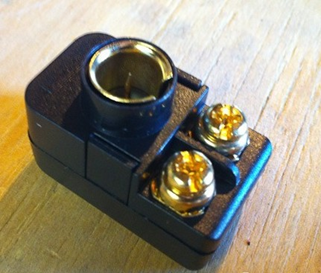
- The cable must be soldered to the coil contacts, as in the figure.
- Make 2 more pieces of wire of the required length to connect the antennae to the socket.

- Screw the socket onto the board and connect all the elements.

That's all - you have made an antenna for your TV with your own hands.
From beer cans
To make such an original ChNA you will need 2 cans (0.5 l or 0.75) of beer or other drink. But before you make a television antenna, you need to consider some material requirements. Namely, it is recommended to purchase a high-quality television cable with a resistance of 75 ohms per meter. Which is correct? Make sure that the central core is strong and that the braid is double and continuous.
Don’t forget, the longer the cable, the stronger the signal attenuation will be, which is especially important for receiving meter waves, in contrast to UHF, for which the length of the wire also matters, but not so much.
It will also be necessary to prepare the usual wooden trempel, a couple of self-tapping screws, electrical tape or tape and, if possible, a soldering iron with tin.
An antenna made from beer cans can receive both the UHF and meter wavelengths.
To illustrate the entire process, you can watch the video.
Log-periodic antenna
A log-periodic antenna (LPA) can be used to receive radio waves in both the meter and decimeter ranges.
To make such a signal receiver, you can use an aluminum tube with a diameter of 10 mm and metal rods (studs) as a stand, which can be purchased at a store that sells fasteners. Ideally, instead of threaded rods, it is better to use smooth tubes or rods. A plastic U-shaped box is used as a base.
UHF antenna
When the soldering is completed, the manufacture of the device can be considered complete and you can begin testing your creation.
Homemade decimeter signal catchers can have different shapes and designs, from the simplest to manufacture to more complex devices.
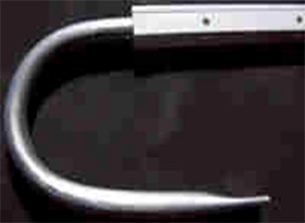
Ring-shaped The simplest design for receiving UHF can be made in a short time with your own hands from scrap materials

. All you need is a coaxial cable and a piece of plywood of the appropriate size.
- Now all this needs to be assembled:
- prepare a piece of coaxial cable (RK75) 530 mm long (a ring will be made from it);
- also cut another piece of cable 175 mm long - this will be a loop;
- secure it all to a plywood sheet and point the completed TV signal receiver towards the TV tower.
If your TV receiver uses such an antenna, try making a more complex device.
Figure 8
You can make your own home UHF antenna from wire in the shape of the number 8. To make such a receiver, you can use copper or aluminum wire with a diameter of 3 to 5 mm, as well as PK75 cable. During the manufacturing process you will also need glue gun
Manufacturing progress.
- Using wire cutters, you need to cut 2 pieces of wire 56 cm each.
- At the ends of each segment, make a loop, which should take 1 cm.
- Bend the wire squares and connect the loops. Solder the cable to the squares as shown in the picture. The central core is soldered to one square, and the braid to the other. The distance between the elements should be 2 cm. The entire structure can be secured in the lid of a 20 liter water bottle, filled with glue.

Such a UHF receiver can be placed anywhere, and it does not require an amplifier. Perhaps an amplifier may be needed if the device is outdoors and the cable length is significant. In this case, to compensate for signal losses, its installation will be required.
From a metal-plastic pipe
You can make a television antenna with your own hands from an ordinary metal-plastic pipe. This will result in a device for receiving UHF with a possible range from 480 MHz to 1000 MHz. This “model” uses a pipe with a diameter of 16 mm and a cable of 5.5 m. The ring will require 55 cm of pipe, and the stand will require 14 cm, which is equal to a quarter of the wavelength. This serves to better match the outer braiding of the cable and reduces high frequency currents.

The cable exit in this design is made through a hole in the pipe. The cable braid should be attached with a clamp to the stripped part of the pipe. The central core of the cable is attached to the ring (you can use a screw with a washer and a nut). This homemade product works well as an indoor antenna in apartments with reinforced concrete walls that do not transmit television waves well. Thanks to the extended cable, you can take it out onto the balcony or place it on the windowsill - the reception quality will only improve.
In the form of a frame
Another UHF antenna design is assembled in the form of a frame. It will be made from aluminum plates(stripes).

Thus, home-made antennas will help you save money on purchasing them, and in some cases get out of the situation where you have a TV, but the standard antenna is out of order, or it doesn’t exist at all. Moreover, the quality of reception of homemade products is no worse than their factory counterparts. If you do not want to make the device yourself, then the information in the store will be useful to you.
Buying a good antenna for your dacha is not always advisable. Especially if she is visited from time to time. The point is not so much the cost, but the fact that after a while it may not be there. Therefore, many people prefer to make an antenna for their dacha themselves. Costs are minimal, quality is good. And the most important point is that a TV antenna can be made with your own hands in half an hour or an hour and then, if necessary, can be easily repeated...
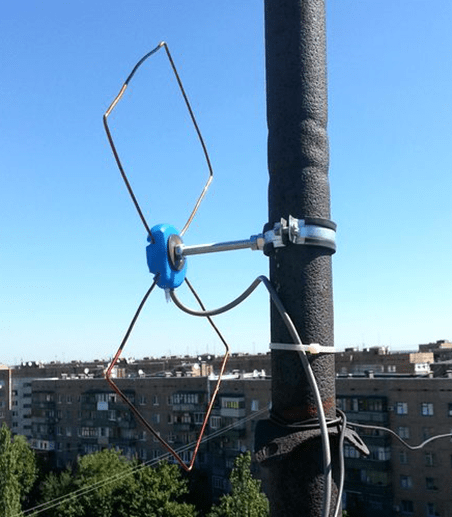
Digital television in the DVB-T2 format is transmitted in the UHF range, and there is either a digital signal or it is not. If the signal is received, the picture is of good quality. Due to this. Any decimeter antenna is suitable for receiving digital television. Many radio amateurs are familiar with the TV antenna, which is called “zigzag” or “figure eight”. This DIY TV antenna can be assembled literally in a matter of minutes.
To reduce the amount of interference, a reflector is placed behind the antenna. The distance between the antenna and the reflector is selected experimentally - according to the “purity” of the picture  You can attach foil to the glass and get a good signal...
  Copper tube or wire is the best option; it bends well and is easy to bend.
It is very simple to make; the material is any conductive metal: tube, rod, wire, strip, corner. Despite its simplicity, she accepts it well. It looks like two squares (rhombuses) connected to each other. In the original, there is a reflector behind the square for more reliable signal reception. But it is more needed for analog signals. To receive digital television, you can do without it or install it later if the reception is too weak.
Materials
Copper or aluminum wire with a diameter of 2-5 mm is optimal for this homemade TV antenna. In this case, everything can be done in literally an hour. You can also use a tube, a corner, a strip of copper or aluminum, but you will need some kind of device to bend the frames to the desired shape. The wire can be bent with a hammer, securing it in a vice.

You will also need a coaxial antenna cable of the required length, a plug suitable for the connector on your TV, and some kind of mount for the antenna itself. The cable can be taken with a resistance of 75 Ohms and 50 Ohms (the second option is worse). If you are making a TV antenna with your own hands for installation outdoors, pay attention to the quality of the insulation.
The mounting depends on where you are going to hang your homemade antenna for digital television. On the upper floors, you can try to use it as a home decoration and hang it on curtains. Then you need large pins. At the dacha or if you take a homemade TV antenna to the roof, you will need to attach it to a pole. For this case, look for suitable fasteners. To work, you will also need a soldering iron, sandpaper and/or a file, a needle file.
Do you need a calculation?
To receive a digital signal, there is no need to count the wavelength. It is simply advisable to make the antenna more broadband in order to receive as many signals as possible. To do this, some changes were made to the original design (pictured above) (further in the text).
If you wish, you can make a calculation. To do this, you need to find out what wavelength the signal is broadcast on, divide by 4 and get the required side of the square. To obtain the required distance between the two parts of the antenna, make the outer sides of the diamonds slightly longer and the inner ones shorter.

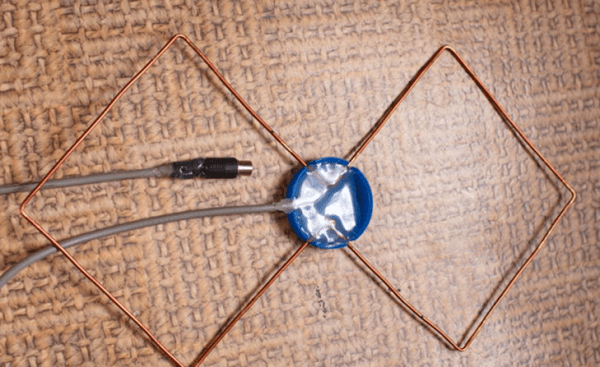
Drawing of a figure-of-eight antenna for receiving digital TV
- The length of the “inner” side of the rectangle (B2) is 13 cm,
- “external” (B1) - 14 cm.
Due to the difference in lengths, a distance is formed between the squares (they should not be connected). The two extreme sections are made 1 cm longer so that you can fold the loop to which the coaxial antenna cable is soldered.
Making a frame
If you count all the lengths, you get 112 cm. Cut off the wire or whatever material you have, take pliers and a ruler, and start bending. The angles should be 90° or so. You can make a little mistake with the lengths of the sides - this is not fatal. It turns out like this:
- The first section is 13 cm + 1 cm per loop. The loop can be bent immediately.
- Two sections of 14 cm each.
- Two 13 cm each, but with a turn in the opposite direction - this is the point of inflection onto the second square.
- Again two 14 cm each.
- The last one is 13 cm + 1 cm per loop.
The antenna frame itself is ready. If everything was done correctly, there will be a distance of 1.5-2 cm between the two halves in the middle. There may be small discrepancies. Next, we clean the loops and the bend point to bare metal (treat it with fine-grain sandpaper), and tin it. Connect the two loops and crimp them with pliers to hold them tightly.

Cable preparation
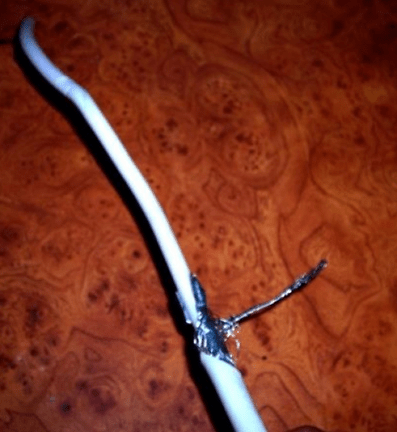
We take the antenna cable and carefully clean it. How to do this is shown in the step-by-step photo. The cable must be stripped on both sides. One edge will be attached to the antenna. Here we strip it so that the wire sticks out 2 cm. If it turns out more, the excess (later) can be cut off. Twist the screen (foil) and braid into a bundle. It turned out to be two conductors. One is the central monocore of the cable, the second is twisted from many braided wires. Both are needed and need to be tinned.

We solder the plug to the second edge. A length of 1 cm or so is sufficient here. Also form two conductors and tin them.
Wipe the plug in the places where we will solder with alcohol or solvent, and clean it with emery (you can use a file). Place the plastic part of the plug on the cable, now you can start soldering. We solder a monocore to the central output of the plug, and a multicore twist to the side output. The last thing is to crimp the grip around the insulation.

Then you can simply screw on the plastic tip and fill it with glue or non-conductive sealant (this is important). While the glue/sealant has not hardened, quickly assemble the plug (screw on the plastic part) and remove the excess compound. So the plug will be almost eternal.
DIY DVB-T2 TV antenna: assembly
Now all that remains is to connect the cable and the frame. Since we were not tied to a specific channel, we will solder the cable to the middle point. This will increase the broadband of the antenna - more channels will be received. Therefore, we solder the second cut end of the cable to the two sides in the middle (those that were stripped and tinned). Another difference from the “original version” is that the cable does not need to be routed around the frame and soldered at the bottom. This will also expand the reception range.
The assembled antenna can be checked. If the reception is normal, you can finish the assembly - fill the solder joints with sealant. If the reception is poor, try first to find a place where the fishing is better. If there are no positive changes, you can try replacing the cable. To simplify the experiment, you can use regular telephone noodles. It costs a penny. Solder the plug and frame to it. Try it with her. If it catches better, it’s a bad cable. In principle, you can work on “noodles”, but not for long - they will quickly become unusable. It is better, of course, to install a normal antenna cable.

To protect the junction of the cable and the antenna frame from atmospheric influences, the soldering points can be wrapped with ordinary electrical tape. But this method is unreliable. If you remember, you can put on several heat-shrinkable tubes before soldering to insulate them. But the most reliable way is to fill everything with glue or sealant (they should not conduct current). As a “case” you can use lids for 5-6 liter water cylinders, ordinary plastic lids for jars, etc. We make indentations in the right places - so that the frame “sits” in them, do not forget about the cable outlet. Fill it with a sealing compound and wait until it sets. That's it, your DIY TV antenna for receiving digital television is ready.
Homemade double and triple square antenna
This is a narrowband antenna, which is used if you need to receive a weak signal. It can even help if a weaker signal is “clogged” by a stronger one. The only drawback is that you need precise orientation to the source. The same design can be made to receive digital television.
 You can also make five frames - for a more confident reception
  It is not advisable to paint or varnish - reception deteriorates. This is only possible in close proximity to the transmitter
The advantages of this design are that reception will be reliable even at a considerable distance from the repeater. You just need to specifically find out the broadcast frequency and maintain the dimensions of the frames and matching device.
Construction and materials
It is made from tubes or wire:
- 1-5 TV channel MV range - tubes (copper, brass, aluminum) with a diameter of 10-20 mm;
- 6-12 TV channel MV range - tubes (copper, brass, aluminum) 8-15 mm;
- UHF range - copper or brass wire with a diameter of 3-6 mm.
The double square antenna consists of two frames connected by two arrows - upper and lower. The smaller frame is a vibrator, the larger one is a reflector. An antenna consisting of three frames gives a higher gain. The third, smallest square is called the director.

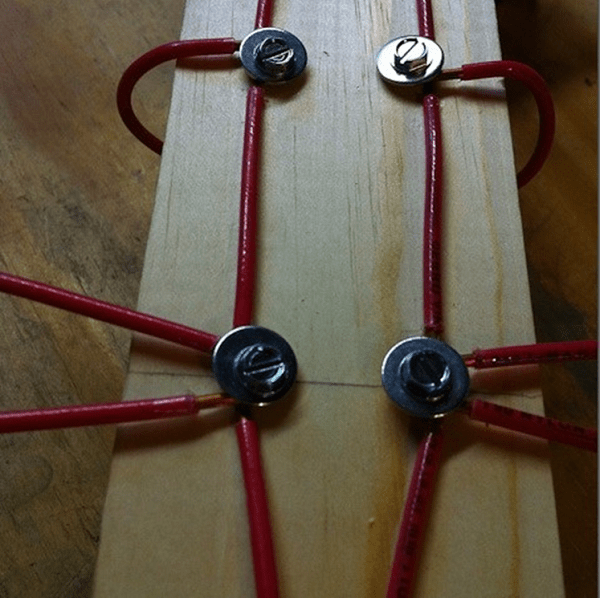
The upper boom connects the middle of the frames and can be made of metal. The lower one is made of insulating material (textolite, gettinax, wooden plank). The frames must be installed so that their centers (the points of intersection of the diagonals) are on the same straight line. And this straight line should be directed towards the transmitter.
The active frame - the vibrator - has an open circuit. Its ends are screwed to a textolite plate measuring 30*60 mm. If the frames are made from a tube, the edges are flattened, holes are made in them and the lower arrow is attached through them.
The mast for this antenna must be wooden. At least the upper part of it. Moreover, the wooden part should start at a distance of at least 1.5 meters from the level of the antenna frames.
Dimensions
All dimensions for making this TV antenna with your own hands are given in the tables. The first table is for the meter range, the second is for the decimeter range.

In three-frame antennas, the distance between the ends of the vibrator (middle) frame is larger - 50 mm. Other sizes are given in the tables.

Connecting an active frame (vibrator) via a short-circuited cable
Since the frame is a symmetrical device, and it must be connected to an asymmetrical coaxial antenna cable, a matching device is required. In this case, a balancing short-circuited loop is usually used. It is made from pieces of antenna cable. The right segment is called the “loop”, the left one is called the “feeder”. A cable is attached to the junction of the feeder and the cable, which goes to the TV. The length of the segments is selected based on the wavelength of the received signal (see table).

A short piece of wire (loop) is cut at one end by removing the aluminum screen and twisting the braid into a tight bundle. Its central conductor can be cut down to insulation, since it does not matter. The feeder is also cut. Here, too, the aluminum screen is removed and the braid is twisted into a bundle, but the central conductor remains.
Further assembly proceeds like this:
- The braid of the cable and the central conductor of the feeder are soldered to the left end of the active frame (vibrator).
- The feeder braid is soldered to the right end of the vibrator.
- The lower end of the cable (braid) is connected to the feeder braid using a rigid metal jumper (you can use wire, just make sure there is good contact with the braid). In addition to the electrical connection, it also sets the distance between sections of the matching device. Instead of a metal jumper, you can twist the braid of the lower part of the cable into a bundle (remove the insulation in this area, remove the screen, roll it into a bundle). To ensure good contact, solder the bundles together with low-melting solder.
- The cable pieces must be parallel. The distance between them is about 50 mm (some deviations are possible). To fix the distance, clamps made of dielectric material are used. You can also attach a matching device to a textolite plate, for example.
- The cable going to the TV is soldered to the bottom of the feeder. Braid is connected to braid, center conductor to center conductor. To reduce the number of connections, the feeder and cable to the TV can be made single. Only in the place where the feeder should end must the insulation be removed so that the jumper can be installed.
This matching device allows you to get rid of noise, blurred contours, and a second blurry image. It is especially useful at a great distance from the transmitter, when the signal is clogged with interference.
Another variation of the triple square
In order not to connect a short-circuited loop, the triple square antenna vibrator is made elongated. In this case, you can connect the cable directly to the frame as shown in the figure. Only the height at which the antenna wire is soldered is determined in each case individually. After the antenna is assembled, “testing” is carried out. The cable is connected to the TV, the central conductor and braid are moved up/down, achieving a better image. In the position where the picture will be clearest, the antenna cable branches are soldered, and the soldering points are insulated. The position can be any - from the bottom jumper to the transition point to the frame.

Sometimes one antenna does not give the desired effect. The signal turns out to be a weak image - black and white. In this case, the standard solution is to install a television signal amplifier.
The simplest antenna for a summer residence is made from metal cans
To make this television antenna, in addition to the cable, you will only need two aluminum or tin cans and a piece of wooden plank or plastic pipe. Cans must be metal. You can take aluminum beer beers, or you can take tin ones. The main condition is that the walls are smooth (not ribbed).

The jars are washed and dried. The end of the coaxial wire is cut - by twisting the braided strands and clearing the central core of insulation, two conductors are obtained. They are attached to banks. If you know how, you can solder it. No - take two small self-tapping screws with flat heads (you can use “fleas” for drywall), twist a loop at the ends of the conductors, thread a self-tapping screw with a washer installed on it through it, and screw it to the can. Just before this you need to clean the metal of the can by removing the deposits using fine-grain sandpaper.

The cans are secured to the bar. The distance between them is selected individually - according to the best picture. You shouldn’t hope for a miracle - there will be one or two channels in normal quality, or maybe not... It depends on the position of the repeater, the “cleanliness” of the corridor, how correctly the antenna is oriented... But as a way out in an emergency, this is an excellent option.
A simple Wi-Fi antenna made from a metal can
An antenna for receiving a Wi-Fi signal can also be made from improvised means - from a tin can. This DIY TV antenna can be assembled in half an hour. This is if you do everything slowly. The jar should be made of metal, with smooth walls. Tall and narrow canning jars work great. If you will be installing a homemade antenna on the street, find a jar with a plastic lid (as in the photo). The cable is an antenna, coaxial, with a resistance of 75 Ohms.

In addition to the can and cable, you will also need:
- radio frequency connector RF-N;
- a piece of copper or brass wire with a diameter of 2 mm and a length of 40 mm;
- cable with a socket suitable for a Wi-Fi card or adapter.
Wi-Fi transmitters operate at a frequency of 2.4 GHz with a wavelength of 124 mm. So, it is advisable to choose a jar such that its height is at least 3/4 of the wavelength. For this case, it is better that it be more than 93 mm. The diameter of the can should be as close as possible to half the wavelength - 62 mm for a given channel. There may be some deviations, but the closer to the ideal, the better.
Dimensions and assembly
When assembling, a hole is made in the jar. It must be placed strictly at the desired point. Then the signal will be amplified several times. It depends on the diameter of the selected jar. All parameters are shown in the table. You measure the exact diameter of your can, find the right stitch, and have all the right dimensions.

| D - diameter | Lower limit of attenuation | Upper limit of attenuation | Lg | 1/4 Lg | 3/4 Lg |
|---|---|---|---|---|---|
| 73 mm | 2407.236 | 3144.522 | 752.281 | 188.070 | 564.211 |
| 74 mm | 2374.706 | 3102.028 | 534.688 | 133.672 | 401.016 |
| 75 mm | 2343.043 | 3060.668 | 440.231 | 110.057 | 330.173 |
| 76 mm | 2312.214 | 3020.396 | 384.708 | 96.177 | 288.531 |
| 77 mm | 2282.185 | 2981.170 | 347.276 | 86.819 | 260.457 |
| 78 mm | 2252.926 | 2942.950 | 319.958 | 79.989 | 239.968 |
| 79 mm | 2224.408 | 2905.697 | 298.955 | 74.738 | 224.216 |
| 80 mm | 2196.603 | 2869.376 | 282.204 | 070.551 | 211.653 |
| 81 mm | 2169.485 | 2833.952 | 268.471 | 67.117 | 201.353 |
| 82 mm | 2143.027 | 2799.391 | 256.972 | 64.243 | 192.729 |
| 83 mm | 2117.208 | 2765.664 | 247.178 | 61.794 | 185.383 |
| 84 mm | 2092.003 | 2732.739 | 238.719 | 59.679 | 179.039 |
| 85 mm | 2067.391 | 2700.589 | 231.329 | 57.832 | 173.497 |
| 86 mm | 2043.352 | 2669.187 | 224.810 | 56.202 | 168.607 |
| 87 mm | 2019.865 | 2638.507 | 219.010 | 54.752 | 164.258 |
| 88 mm | 1996.912 | 2608.524 | 213.813 | 53.453 | 160.360 |
| 89 mm | 1974.475 | 2579.214 | 209.126 | 52.281 | 156.845 |
| 90 mm | 1952.536 | 2550.556 | 204.876 | 51.219 | 153.657 |
| 91 mm | 1931.080 | 2522.528 | 201.002 | 50.250 | 150.751 |
| 92 mm | 1910.090 | 2495.110 | 197.456 | 49.364 | 148.092 |
| 93 mm | 1889.551 | 2468.280 | 194.196 | 48.549 | 145.647 |
| 94 mm | 1869.449 | 2442.022 | 191.188 | 47.797 | 143.391 |
| 95 mm | 1849.771 | 2416.317 | 188.405 | 47.101 | 141.304 |
| 96 mm | 1830.502 | 2391.147 | 185.821 | 46.455 | 139.365 |
| 97 mm | 1811.631 | 2366.496 | 183.415 | 45.853 | 137.561 |
| 98 mm | 1793.145 | 2342.348 | 181.169 | 45.292 | 135.877 |
| 99 mm | 1775.033 | 2318.688 | 179.068 | 44.767 | 134.301 |
The procedure is as follows:

You can do without an RF connector, but with it everything is much simpler - it’s easier to position the emitter vertically upward, connect the cable going to the router or Wi-Fi card.


