We are expanding the functionality of ZyXel Keenetic. Internet centers Zyxel Keenetic Omni II and Keenetic Lite III
We remind you that attempts to repeat the author’s actions may lead to loss of warranty on the equipment and even to its failure. The material is provided for informational purposes only. If you are going to reproduce the steps described below, we strongly advise you to carefully read the article to the end at least once. The editors of 3DNews do not bear any responsibility for any possible consequences.
⇡ Introduction
In the comments to one of the first articles about alternative firmware, readers asked if there was something similar for ZyXel routers. Either the official ZyXel firmware is terribly good, or enthusiasts are not so active, but today there is no more or less decent alternative to proprietary firmware. Well, you, of course, can download the source codes of the firmware, change it, reassemble it and upload it to the router. But this is somehow too much for the average user. All the more interesting is the very young project of our compatriots with the simple name zyxel-keenetic-packages, which originated in the depths of the Zyxmon forum. In this case, the idea is much simpler and more elegant. No reflashing of the router is required, and all additional applications are launched from a removable storage device - a flash drive or an external hard drive. Moreover, when the drive is disconnected, the device continues to work as if nothing had happened, but, of course, without any “goodies”. Well, in this article we will look at installing and configuring the updated Transmission torrent client, DLNA server and access to the local network from the Internet via OpenVPN.
⇡ Preparation
First, we need to format the drive in ext 2/3 or NTFS. It’s better, of course, in ext 2/3, although some experts claim that everything works fine with NTFS. There are quite a lot of programs that can format partitions into the file system we need: Partition Magic, Paragon and Acronis products, and, after all, the free GParted Live. If you suddenly need to urgently read data in Windows from such a drive, you can use either the Ext2Read file manager or install the Ext2Fsd driver. Also, in the router’s web interface, you need to enable access to the drive over the network in “USB applications” → “Network drive”.
We also need the PuTTY SSH client and the installer itself. Let's unpack the archive to any convenient place. Now let's go to our drive over the network: Win+R, \\KEENETIC, Enter. In the disk_a1 folder you will need to create a system directory, and in it another directory - bin. This is where you need to copy the ext_init.sh file from the archive. Thus, the full path to it will look like \\KEENETIC\disk_a1\system\bin\ext_init.sh. At the same time, it’s useful to create a data folder in the root where all the files will be stored. Now you need to disconnect the drive from the router and connect it again. After a couple of minutes, the following entry should appear in the logs (“System” → “Log”):
dropbear Running in background
Launch PuTTY, enter root@ip_address of the router in the Host Name field, and in Windows → Translation select UTF-8 encoding and click Open. Enter the password - zyxel (it is not shown when typing) and press Enter. We complete the installation and immediately update the system with the commands:
Finish_install.sh
opkg update
opkg upgrade


⇡Transmission setting
New applications are installed using the opkg install package_name command. At the moment, the number of ported applications is not so large - you can see a list of them. In principle, the project wiki describes well the main nuances of their installation. However, an untrained user is unlikely to understand certain points regarding their configuration. So let's look at some examples for clarity. First, let's look at installing and configuring a newer version of the Transmission torrent client than the one that is preinstalled in the router firmware - 2.3 instead of 1.93. Install the nano client and text editor with the command:
Opkg install nano
opkg install transmission-daemon transmission-web
Traditional advice - instead of manually typing the commands, just copy them from here and right-click in the PuTTTY window. By default, all new downloads will be recorded in the transmission folder, that is, the same as by default happens with the torrent client built into the router. Let’s first stop it by going to the “USB applications” → “Torrents” section in the router’s web interface, unchecking “Enable BitTorrent client” and clicking “Apply”. Let's edit the Transmission settings with the command:
Nano /media/DISK_A1/system/var/transmission/settings.json
Here it is enough to change a few lines as desired:
"peer-port": 52400
"rpc-authentication-required": true
"rpc-password": "password"
"rpc-port": 9091
"rpc-username": "username"
To enable authorization to access the Transmission web interface, you must change the value of the rpc-authentication-required parameter from false to true. Then, instead of username and password, you will need to specify your login and password, respectively. In peer-port and rpc-port, you must specify the port numbers that are used to connect to other clients and access the client’s web interface, respectively. Other parameters do not need to be changed. Save the file and exit - F2, Y, Enter. To autostart Transmission when you turn on the router, you need to rename one of the scripts:
Mv /media/DISK_A1/system/etc/init.d/ K90transmissiond /media/DISK_A1/system/etc/init.d/S90transmissiond
It also needs to be adjusted a little:
Nano /media/DISK_A1/system/etc/init.d/S90transmissiond
At the very beginning there are two variables TRN_PORT and TRN_RPC_PORT. If you changed peer-port and rpc-port in settings.json, then their values need to be substituted into these variables accordingly. You will also need to “uncomment” (remove the # at the beginning of the line) six more commands of the form iptables -A (or D) INPUT -p tcp --dport $TRN_PORT (TRN_RPC_PORT) -j ACCEPT. Don't forget to save the file and run Transmission. Just keep in mind that now its control panel will be in English.
/media/DISK_A1/system/etc/init.d/S90transmissiond start
![]()
⇡ Setting up a DLNA media server
A more useful service is minidlna. With its help, the router gains support for the DLNA protocol, so you can watch multimedia files, for example, on a TV or set-top box. It is much easier to install and configure than Transmission.
Opkg install minidlna
nano /media/DISK_A1/system/etc/minidlna.conf
In the configuration file, you will need to change the media_dir parameters, in which you need to specify the folders where multimedia files are stored. You can additionally set a file type filter - only audio (A), video (V) or images. Remember that the root folder of a removable drive is available as /media/DISK_A1. Here is an example of the settings.
Media_dir=/media/DISK_A1/transmission/
media_dir=/media/DISK_A1/data/downloads
media_dir=A, /media/DISK_A1/data/Music_and_AudioBooks
media_dir=V, /media/DISK_A1/data/Films_and_Movies
media_dir=P, /media/DISK_A1/data/Photos
All that remains is to launch the minidlna server.
/media/DISK_A1/system/etc/init.d/S50minidlna start
SettingsOpenVPN
Download the OpenVPN distribution kit from the official website by selecting Windows Installer in the section. When installing, check all components. Like last time, we will use authorization using a static key, that is, only one VPN connection will be available to us. The key must first be generated - from the main menu in the OpenVPN → Utilities section, run Generate a static OpenVPN key. The finished key is located in the file C:\Program Files\OpenVPN\config\key.txt. Rename it to static.key and copy it to the drive in the \disk_a1\system\var folder. Now install OpenVPN on the router with the command:
Opkg install openvpn
Let's create a configuration file:
Nano /media/DISK_A1/system/etc/openvpn/openvpn.conf
And insert the following lines into it:
Port 1194
proto udp
dev tune
secret /media/DISK_A1/system/var/static.key
ifconfig 10.8.0.1 10.8.0.2
keepalive 10 120
comp-lzo
persist-key
persist-tun
Save the file (F2,Y, Enter). Then let’s tweak the launch script a little:
Nano /media/DISK_A1/system/etc/init.d/K11openvpn
In it you need to add iptables rules at the end of the start sections
Iptables -A INPUT -p udp --dport 1194 -j ACCEPT
Iptables -D INPUT -p udp --dport 1194 -j ACCEPT

We save this script, rename it to run automatically and run it immediately.
Mv /media/DISK_A1/system/etc/init.d/K11openvpn /media/DISK_A1/system/etc/init.d/S11openvpn
/media/DISK_A1/system/etc/init.d/S11openvpn start
Now let's create a group of rules for the firewall:
Nano /media/DISK_A1/system/etc/firewall.d/fw.sh
You need to copy the following lines into this file:
#!/bin/sh
iptables -I FORWARD 1 --source 10.8.0.0/24 -j ACCEPT
iptables -I FORWARD -i br0 -o tun0 -j ACCEPT
iptables -I FORWARD -i tun0 -o br0 -j ACCEPT
iptables -t nat -A POSTROUTING -o br0 -j MASQUERADE
After saving, we make the file launchable and immediately execute it:
Chmod +x /media/DISK_A1/system/etc/firewall.d/fw.sh
/media/DISK_A1/system/etc/firewall.d/fw.sh
Naturally, we need to register a DDNS name on our router. More details about registration using DynDNS as an example are written in the section “Setting up DDNS”. Through the router’s web interface, go to the “Internet” → “Domain name” section, turn on the “Use dynamic DNS” checkbox, fill in the appropriate fields and click “Apply”. By the way, after enabling DDNS, you will also have access to the Transmission web interface (http://ddns_router_name:rpc-port), and if you check the “Allow remote access” box and specify the “TCP port of the web configurator”, then the web interface router. In the same way, you can open access to files on the drive via FTP - check the box “Allow access from the Internet” in the “USB applications” → “FTP server” section.

On the client (for example, on an office computer or laptop), you also need to install OpenVPN, and at the same time copy our static.key key, which we generated earlier, to the folder C:\Program Files\OpenVPN\easy-rsa\keys\ (well, or wherever it is convenient for you, only in the client settings you will need to change the path to it). Now in the C:\Program Files\OpenVPN\config\ folder you need to create a new text file, insert the following lines into it and rename it, for example, to router.ovpn. Please note that in the path to the secret.key file you need to use double slashes (\\), and not single ones (\).
Remote ddns_router_name
dev tune
ifconfig 10.8.0.2 10.8.0.1
secret "C:\\Program Files\\OpenVPN\\easy-rsa\\keys\\static.key"
comp-lzo
keepalive 10120
ping-timer-rem
persist-tun
persist-key
route 192.168.1.0 255.255.255.0
Double clicking on the ovpn file will open a tunnel to the router. You can launch OpenVPN GUI from the main menu - an icon will appear in the notification area, double-clicking on it will also open the tunnel. The color of the icon will change from red to green. Another double click on the icon will show a window with a log. To disconnect from the VPN, click the Disconnect button. After connecting, your home network will be available to you and you can, for example, set up a remote desktop (see section “Setting up TightVNC”). It is also necessary to ensure that the addressing on the remote machine, on the home network and inside the VPN tunnel is different. In our example, we used the 10.8.0.0 subnet for the tunnel, and 192.168.1.0 for the home network. If necessary, adjust the addresses in all scripts and configuration files in this section.

Conclusion
At the moment, these are, perhaps, all the applications that make sense to talk about. Of course, there are other packages in the repository, but it’s unlikely that a home user would want to install his web server on a router, install Drupal on it or, for example, bother with other DDNS services or mount another drive over the network. However, if you want to, the setup is not that difficult. After all, you weren’t banned from Google or Yandex. For a young project, such a small number of packages is normal. In addition, their list is gradually growing, however, as the author of zyxel-keenetic-packages himself admits, he doesn’t have much time. So enthusiasts who are ready to collect new packages and develop the project are clearly not a bad idea. Finally, we once again recommend that you familiarize yourself with the wiki and forum, links to which were given at the beginning of the article. Let me take my leave and traditionally wish you successful experiments.
P.S.: ZyXel, by the way, promises to soon release a completely new official firmware, which, according to rumors, will contain a lot of tasty things.
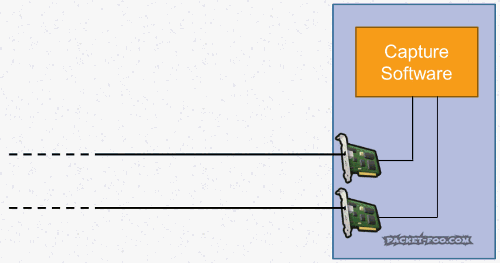
In order to view captured packets, you must select the menu item Capture\Display captured data or press the F10 key, or click the corresponding button on the toolbar. This will open the package viewing window:
Each line in this window corresponds to one captured packet, the packets are arranged in the order in which they were captured (that is, in the order in which they were transmitted over the network). To switch to viewing mode for the contents of a package, you must select the package and press Enter, or double-click on the package. This will split the window into 3 parts:

The top window still displays all packages. The middle window contains detailed information about the selected package. Bottom – the contents of the selected package in hexadecimal.
Top window displays the following information for each package:
Frame- Sequence number of the package. Starts from 1.
Time– Packet capture time. This parameter has different meanings depending on the Display\options option:
Absolute (system) time
Packet capture duration
Time between the end of the capture of the previous packet and the beginning of the capture of the current one
Src MAC Addr- MAC - source address. Can be displayed either as a 6-byte MAC address value or as the name of the Network monitor Address Table (see point 5)
Dst MAC Addr- MAC – recipient address. Can be displayed either as a 6-byte MAC address value or as the name of the Network monitor Address Table (see point 5)
Protocol The upper-level protocol that was the source of the packet.
Description Brief description of the contents of the protocol
Src Other Addr Source address at the network layer (usually an IP address or IPX address). The type is specified in the Type Other Addr parameter.
Dst Other Addr Destination address at the network layer (usually an IP address or IPX address). The type is specified in the Type Other Addr parameter.
Type Other Addr Network address type (type of network layer protocol used for transmission). Determines the value type of the two previous fields.
Middle window is basic and contains detailed information about the package. Consists of several sections. The top section - Frame - contains general information about the packet (not contained in the body of the packet), such as time, packet number and size. The number of remaining sections will depend on the number of protocol headers different levels, which were used when forming the package, that is, from the purpose of the package and the software component - the source of the package. Each section corresponds to its own protocol, the order of the sections corresponds to the order of the headers in the packet body, that is, the order in which the packet is processed. This in turn corresponds to the order of the layers in the 7-layer OSI model.
Bottom window displays the contents of the packet body in hexadecimal and ASCII characters. When a section is selected in the middle window, the part of the packet corresponding to the selected section is selected in the lower window.
Address table Network monitor
To simplify reading information about captured packets and creating filters (see paragraph 6), each computer address on the network can be associated with a symbolic name, which will be displayed in the corresponding fields when viewing packets instead of the MAC address or network-level computer address. Information about these symbolic names and the addresses that map to them is stored in Network Monitor's address table. You can view and edit the address table by selecting the Display\Addresses menu item. The address table looks like this:

The main fields of the address table are the symbolic name, its associated address, and the address type. Please note that the address can be either physical or network, so for each symbolic name two addresses of different types can be specified.
The address table is generated automatically during the packet capture process. In this case, NETBIOS names of computers are used as symbolic names.
There are default address table entries (marked with *). They define names for special physical layer addresses. For example, for Ethernet broadcast packets whose destination address consists of binary ones (FFFFFFFFFFFF), the name BROADCAST is used.
In order to add an address to the table, you need to click the Add.. button, after which a dialog box will appear:

Installing packet capture filters ( Capture filter)
When solving specific problems of analyzing network traffic, it is usually necessary to capture not all packets transmitted over the network (their number can be very large!), but only certain ones, that is, packets that satisfy certain conditions. For this purpose, capture filters are installed (Capture filter - not to be confused with viewing filters - Display filter!). To view or change the capture filter, select the Capture\Filter menu. A window will appear showing the current filter:

Filtering of captured packets is possible based on the following criteria:
Protocol type. To define this criterion, you must double-click on the line SAP/ETYPE = ... A dialog box will appear that allows you to allow or disable the capture of packets of a specific protocol. By default, all protocols are enabled for capture (Enabled protocols):

Computer address. To define this criterion, you must double-click on the Address Pairs line. A dialog box will appear that allows you to define pairs of addresses between which packets will be captured when transmitted. In addition, you can determine the direction of transmission of captured packets (Direction) - two-way or only in the direction from one address to another. The name *ANY matches any address of any type. By default, this criterion is configured to capture all packets in all directions (ANY<->ANY).

Pattern matches of a packet field. Allows you to capture packets whose contents match the pattern. The pattern is binary data (Hex) or a character string (ASCII) and a byte offset from the start of frame. A packet will be captured if its contents at the specified offset match the specified sequence of binary or character data. By default, no pattern is specified, meaning all packages match the pattern.

All three criteria described above are combined using the logical “AND” circuit. This means that a packet will be captured if it meets all three criteria. For the Pattern matches criterion, several conditions can be specified, combined into a logical expression. For example, the following filter is designed to capture packets that contain the specified data at offset 0x30 or the specified data at offset 0x50 and do not contain the specified data at offset 0x4.

6.3. Work order
1. At the command line, run the ipconfig /all command. View and record the name, MAC address (physical address), and IP address of your computer.
2. Select the interface for packet capture in the Capture/Networks menu.
3. Create a filter designed to capture packets transmitted between your computer and all other computers on the network in both directions. When choosing the address of your computer from the address table, you must specify the LOCAL name corresponding to the physical address of your computer. Save the filter in a file whose name matches your username with index 1 (for example 281san1.cf).

4. Using the created filter, capture a small number of packets (100-200). In this case, after starting packet capture, you need to initiate the network activity of your computer - for example, launch an Internet browser, a browser to view the network environment, access a network drive.
5. Go to the mode of viewing captured packets.
6. From the total number of packages (except for the first and last package), select several packages that have different structures (at least 3). In the middle viewing window, open the Frame and Ethernet sections and view the contents of the fields.

7. Write down and arrange in table form the following information about the packages:
§ Source MAC address
§ Destination MAC address
§ Upper level protocol type (Ethernet Type)
§ Total Frame Lengths
§ Size of the Ethernet packet data field (Number of data bytes remaining)
§ Protocol nesting order. For example, for the Ethernet,IP,TCP,NBT packet considered above
9. Create a filter to capture packets that do not contain IP packets. To do this, in the Capture filter window, select the SAP/ETYPE line and click the Edit button.

Disable IP packet capture and click OK.

10. Capture packets (capture at least 3 packets), repeat step 7.
6.4. Control questions
1. Is it possible to capture a packet using Network Monitor if neither the source MAC address nor the destination MAC address is the MAC address of the computer from which it is being captured? Explain.
2. What is a MAC address?
3. What is a network address?
4. Provide a brief description of the algorithm for transmitting packets over an Ethernet network.
5. What fields does the Ethernet frame header consist of?
6. What size is the Ethernet frame header?
7. After the capture is completed, the Network statistic – frames and Captured statistic – frames indicators have the same values. What conclusion can be drawn?
8. What is packet encapsulation at different levels?
Laboratory work 7. Composition of the TCP/IP protocol stack. Study of ARP, IP, ICMP protocols.
7.1. Introduction
The TCP/IP protocol stack is currently the most popular means of organizing composite networks. The global Internet network is organized on the basis of this protocol stack. Therefore, it is by the example of this stack that it is advisable to study network-level tools. This lab provides a brief description of the TCP/IP stack, the purpose and functions of the IP Internetworking Protocol, the ARP Address Resolution Protocol, and the Internet ICMP Control Message Protocol.
7.2. General characteristics of the TCP/IP protocol stack
There are 4 layers defined in the TCP/IP stack. Each of these levels bears some load on solving the main task - organizing a reliable and
productive operation of a composite network, parts of which are built on the basis of different network technologies.
The second generation of Zyxel Keenetic Internet centers appeared on the market two years ago and began with three models of the upper and middle levels. Later they were joined by five more devices, and now there are more than a dozen modifications in the series. Moreover, the latest newcomers are no longer adding to, but replacing previously released devices.
From the point of view of the hardware platform, Zyxel Keenetic Omni II and Keenetic Lite III are no different from their predecessors. They are also based on the MediaTek MT7620N SoC, equipped with 8 MB of flash memory and 64 MB of RAM, 100 Mbps wired ports and a single-band 802.11b/g/n access point at 300 Mbps. The Omni II model has a USB 2.0 port, which the Lite III lacks, but the latter has a hardware mode switch. Among the external differences, you can notice a changed design of the case and packaging, which, of course, is not a reason for an update.
These devices are one step above the simplest version of Keenetic Start. The Keenetic 4G III is no different in terms of hardware, which allows you to use the USB port only for modems. So the information in this material can safely be attributed to him. Summarizing the characteristics, we can say that the Lite III is the basic model for those who do not need a USB port, and the Omni II will be of interest to those who plan to use not only modems, but also drives. Note that the presence of a USB port still significantly expands the range of tasks the router can solve.
The release of new products coincided with a major update of the firmware, the operating system of which received a new kernel, which significantly affected the entire firmware and required significant effort for implementation. At the time of writing, the new kernel was also used in beta versions for the Viva and Extra models. It is planned that all current generation devices will receive similar updates.
Contents of delivery
In the generation of models under review, the manufacturer slightly changed the design of the outer covers of cardboard boxes and used a bright orange color on the ends. The rest has changed little - a large photograph of the device on the front side, detailed technical specifications, delivery kit, as well as a description of the capabilities and use cases on the back side. Moreover, all texts are completely localized.

Photos of smartphones and logos of mobile application stores attract attention. Apparently the company decided to follow the example of other manufacturers and released a specialized utility for configuring routers. It is difficult to say how much this function is really in demand in practice; much will depend on the quality and capabilities of the program. But given the widespread use of mobile devices, it may well prove useful. We will definitely get to know her in the appropriate section.

The delivery package for routers in this segment has not changed for a long time, and these models are no exception - a router, an external compact switching power supply (9 V 0.6 A for Lite III and 12 V 1 A for Omni II), a network patch cord, a fairly voluminous user manual, warranty card and a small flyer describing some of the company's products.
Appearance
The devices received the same housings, which, however, differ from previous generations. In particular, non-removable antennas are now located on the side ends, so the router can no longer be placed on its side.

The dimensions of the cases have decreased slightly and are 140x103x30 mm excluding cables and antennas. Black plastic is used again. At the same time, the bottom was left glossy, the sides were made matte, and on the top cover we see a familiar pattern with waves and a predominance of gloss.

At the bottom of the devices there are two rubber feet and two holes for wall mounting with the connectors facing down. There are ventilation grilles at the side ends. The Keenetic Lite III model has a hidden reset button on the left. The Omni II adds a USB 2.0 port and a multifunction button. On the top panel of the routers there is a large and convenient button for connecting clients using WPS technology and disabling the access point. Let us remind you that the functions of the buttons can be changed in the settings.

At the back there are five network ports and a power supply input with a button. Keneetic Lite III additionally has a hardware operating mode switch - main, adapter, amplifier, access point. There are no antennas here now, so there can be no difficulties with connecting cables or accessing the switch.

Non-removable antennas are installed on the side ends. Their rotating mechanism seems more reliable than previous implementations. The length of the antennas is more than fifteen centimeters, and the shape and design of the outer casing has also changed slightly and become more interesting. This, of course, does not affect the speed, but it’s still nice.

Router operation indicators are located on the front end. They have a green glow, are quite informative and do not irritate with frequent blinking. But when mounted on a wall, they may not be visible.
With the exception of the continued use of gloss, there are no comments on the design of the new products.
Hardware configuration
In terms of hardware configuration, the models do not differ from their predecessors. They are based on the popular MediaTek MT7620N platform, are equipped with 8 MB of flash memory, 64 MB of RAM, have a radio unit built into the processor with support for 802.11b/n/g networks in the 2.4 GHz band with a maximum connection speed of 300 Mbit/s and a network switch on five wired Fast Ethernet 100 Mbps ports. It is worth noting that processor revision 0206 is used here.
The Omni II model has a USB 2.0 port and an additional button, while the Lite III is distinguished by the use of a hardware operating mode switch. Please note that the operating mode of this device cannot be changed via the web interface. At the same time, the model saves four independent sets of settings (one for each mode) and can quickly switch between them.
Features and capabilities of the firmware
The current Keenetic series products have unified firmware NDMS2, which we have already described several times in our publications. Differences may include different hardware configurations, such as the presence of USB ports or dual-band radio, or the availability of certain packages. So most of the further information can be applied to other solutions in the series.
When turned on for the first time, the devices automatically offer the user assistance in setting up Internet access and other basic settings. This uses a built-in database of providers, which greatly simplifies the process. It is also possible to launch the assistant from the web interface. After completing the wizard, the router independently checks the functionality of the network connection and the availability of firmware updates, and after the user’s permission, it can install them.
The design of the device’s web interface can be considered quite convenient, although of course the abundance of options can be a little confusing if you’re not used to it. It is also worth noting that it looks good on low-resolution screens, which is becoming increasingly rare today. There are no comments on the responsiveness of the interface, as well as on the translation. In this case, it is worth considering Russian as the main language, and English as an additional one. Let us remind you once again that the firmware for this series is created by domestic developers.

Compared to many other routers on the market, the products in question have several distinct software differences. In particular, in addition to supporting IPoE, PPPoE, PPTP and L2TP connections, you can use Wi-Fi client mode, USB modems (in routers with a USB port), 802.1x and a CABiNET authorizer to connect to the Internet.

Simultaneous configuration of various connection options is supported, including using several wired ports, to implement the redundancy function. Its effective use is facilitated by the Ping Check module, which allows you to monitor the performance of communication channels. We also note the possibility of forcibly turning off the power to the USB port in manual or automatic mode, which increases the reliability of work with USB modems. The compatibility list contains many modern models, including those designed for fourth generation networks.

If the address issued by the provider is not permanent, you can use dynamic DNS clients, including the domestic DNS master. Access to local network services is provided by configuring address translation rules and UPnP support. An additional level of protection for users, especially their mobile devices, can be achieved thanks to the support of SkyDNS and Yandex.DNS services. Note that they can now use the assignment of individual profiles to clients to use DNS servers from the provider.

In the “Home Network” group you can change the local address of the router and also configure a DHCP server. In this case, you can create several network segments, dividing them by IP address ranges. This feature is used, in particular, to maintain a guest wireless network. Here you can also configure a DHCP relay and disable NAT.
To work with IPTV, the IGMP protocol, port allocation for set-top boxes, VLAN technology are supported, and there is also a built-in udpxy server.

The wireless access point settings are standard. There is a choice of network name, protection mode, channel number and width, country, standard and signal strength. Please note that the device’s factory settings include the individual network name and password indicated on the sticker. We didn’t forget about the MAC address filter, WPS and the implementation of a guest wireless network. Note the lack of scheduling and support for authentication via the RADIUS server.

In addition to the services mentioned above for filtering DNS requests, routers have a programmable filter for incoming packets, the tables of which are programmed for each interface (including local ones) individually.
Additional packages of interest include VPN server (PPTP), ALG for some popular protocols, IPv6, packet capture module, support for NTFS and HFS+ file systems, user identification for network file access, transmission file download system, DLNA server, support for certain USB models -modems. Many of them are relevant only for models with a USB port, but, in particular, the Lite III also has a VPN server. Note that the VPN clients present in the firmware can also be used to connect to remote networks, and not just to the Internet.

The devices have advanced monitoring and diagnostic tools, which allows technical support to more effectively solve possible problems. In addition to the extended status page, where you can find information about connections, current traffic, as well as processor and RAM load, you can view the routing table, a list of local network clients, their active connections, data about wireless devices (including connection speeds), USB drives and VPN clients.

The system event log is stored on the device or can be sent to an external syslog server. There are no special functions for searching in it or setting filters. There is no sending information by email. The advantages include high detail of events.

The system parameters include setting the time, resetting the configuration, rebooting, updating the firmware and installing components. It also provides for selecting the operating mode of the device (except for Lite III), setting the operation of the buttons on the case, working with system files (configuration, log and firmware), programming users and indicating their rights to services.
Note that now the operating modes use separate individual sets of settings, and on the Lite III they can be changed with a hardware switch.

In some cases, when contacting technical support, the ability to create an extended report on the operation of the device and the network packet capture module may be useful.
The USB port in the Keenetic line is used to connect drives, modems and printers. In the first case, you can use devices with multiple partitions, and the list of compatible file systems includes all the popular options today, including FAT32, NTFS, EXT2, EXT3 and HFS+. In addition to access via SMB and FTP protocols (including via the Internet), drives can be used for offline downloading of files and broadcasting multimedia content to DLNA receivers.
At the time of writing, the official list of printer compatibility included almost five hundred models. Depending on the model, printing over a Windows network or using a network port may be supported. With the exception of printing, MFP capabilities are not supported.
The manufacturer also pays great attention to working with modems for cellular networks - the compatibility list includes about forty 4G models and more than eighty 2G GSM/3G UMTS, not counting options for 3G CDMA networks. Moreover, work with modern devices is carried out in the most productive modes, which allows you to achieve high speeds.
As mentioned above, the manufacturer introduced a special Keenetic NetFriend utility for mobile devices based on Android and iOS for the initial configuration of routers.


It has built-in interactive instructions, uses a QR code on the case to connect to the router’s wireless network, has a location function for filtering the built-in list of providers by locality, and the ability to manually configure parameters. It’s a pity that the current version does not support setting up IPTV, changing Wi-Fi settings, and does not have monitoring and diagnostic functions. On the other hand, IPTV in many cases will work out of the box, and the wireless network is already configured in protected mode. So, even in its current form, the program can be useful for novice users.
Performance
The routers under consideration differ only in the capabilities associated with the presence of a USB port. So formally it would have been possible not to test the performance in routing and wireless access tasks of both models, but we still did it, although we did not expect big differences. Testing was carried out on our standard bench using synthetic benchmarks.


If you follow our publications, you may remember that when testing its predecessor, we had no comments in terms of routing speed. The new products, despite the above-mentioned reasons for updating the firmware and all modules, performed even a little better in full-duplex tests. So the models under consideration can be safely recommended for operating at speeds up to 100 Mbit/s inclusive with any type of Internet connection.
The efficiency of working with the provider’s local network has also been preserved, as can be seen from the next pair of graphs.


As we wrote earlier, these mid-level models received in the current firmware the implementation of a VPN server operating using the PPTP protocol. This allows you to organize a secure remote connection to your home network and some other useful scenarios. To test performance in this mode, we used a connection to the router from a computer located in the external segment of the network with a standard Windows client. The graphs show indicators averaged over three scenarios (reception, transmission and simultaneous reception and transmission, all in eight streams).


When working without encryption, you can get from 75 to 100 Mbit/s in this task. Using MPPE128 reduces the speed to 30-40 Mbit/s. As we can see, the implementation of this service in devices of the considered level makes complete sense.
The wireless access point built into the routers operates with a maximum connection speed of 300 Mbit/s. However, performance in this scenario will likely be limited by wired ports that are only rated at 100 Mbps. The routers were configured for maximum performance with a 40 MHz channel and WPA2-PSK encryption. The testing used the TP-Link TL-WDN4800 adapter (802.11n, 2.4 and 5 GHz, up to 450 Mbit/s) and two options for placing a computer with it - four meters of line of sight and four meters through one non-permanent wall. The previously used point at eight meters through two non-permanent walls was dropped from the list due to the presence of strong interference from a large number of neighboring devices in the 2.4 GHz range.


And in this group of tests we see the expected results - about 90 Mbit/s for the maximum reception or transmission speed, and also about one and a half times more for full-duplex modes. Note that the second placement option may show better results due to the client’s greater distance from the center of the house and neighboring networks.
The last test applies only to the Omni II model, since it has a USB 2.0 port that supports storage. The speed of reading and writing to a connected disk with file systems NTFS, FAT32, EXT3 and HFS+ of a large file using the SMB and FTP protocols was tested.

In this test, like the previous one, the limiter is the device's 100 Mbit/s wired port. So the maximum performance is about 10 MB/s. It’s difficult to call this option a full-fledged network drive, but it’s certainly suitable for backing up small amounts of data, watching HD video on a TV, and creating an FTP server. We also note that in this test the new product performed faster than its predecessor.
conclusions
The updated models of Zyxel Keenetic Omni II and Keenetic Lite III Internet centers, like their predecessors, left a very pleasant impression. The devices are based on the MediaTek platform, which is well suited for the mass segment, and have optimal technical characteristics - 100 Mbit/s wired network ports and a 300 Mbit/s wireless access point. The Omni II model is distinguished by the presence of a USB port, which allows you to implement many additional scenarios, and the Lite III is interesting with a hardware mode switch. Let us also remind you about the presence in the line of the Keenetic 4G III solution, which is similar in characteristics to these devices.
As for the built-in software, you can see that the manufacturer pays even more attention to it than to the hardware platform. Regular updates for the entire line allow not only to improve compatibility with the services of domestic providers and expand the range of functions and capabilities, but also to increase productivity. For some categories of users, the disadvantage here may be the closed nature of the firmware and the inability to add their own software modules. At the same time, the devices discussed in this article cannot be installed with a previous generation program that retains this feature.
There are no comments regarding the speed of operation of the considered models. They can be used without any compromise with all tariff plans and connection options on channels up to 100 Mbit/s inclusive. Testing has shown that wired ports are often a limitation in this case. However, do not forget that gigabit devices are usually noticeably more expensive.
Moving the antennas to the side ends made it possible to relieve the back panel. Another plus is the reprogrammable buttons on the case and the ability to mount the routers on the wall. The traditional disadvantage is the use of gloss.
The largest number of dumps are now recorded using SPAN ports. Now that we know a lot about SPAN (from the previous article), it's time to learn about TAP devices - when and how they should be used to write a dump and what they even are.
TAR is an abbreviation for “ T est A access P ort". ( In Russian, such a device is called “ traffic coupler" However, for convenience, I prefer to use both options - both the English abbreviation TAR and the Russian version - approx. transl.) The purpose of TAP is to give you access to traffic that passes through a specific communication channel.
When capturing traffic, correctly using TAP is a direct path to obtaining the most accurate and reliable dump. Pay attention to the word “correct”! Yes, that's exactly what I mean - even with TAP you can get incorrect results if you use it incorrectly. Naturally, we will consider these points, but for now let’s look in a little more detail at what this device is and how it is used.
You won't be wrong if you think of a coupler as a small box that fits into a cable break and provides access to the data that passes through it. Surely you have heard the term “man in the middle” (aka “Man in the middle”) - this is exactly what TAP does, and at the physical level (Layer 1). “Installing in a gap” means exactly the physical process - you pull out a cable from a port, say, a switch, insert it into the TAP, and use a second additional cable (don’t forget to take it with you!) to connect the TAP to the end node of the network.
By the way, the second additional cable must be a “reversal”, but lately this has become less and less a necessary requirement, because there are few network devices left that cannot take care of this on their own (Auto MDI-X function). Therefore, the direct cable will also work fine in most cases.
Working with TAP/splitters
Let's look at how to use TAP in the most general case. Right from the start, if you start choosing which tap you need, you will find that there are many different types for different network infrastructures. The very first choice you need to make is optics or copper. Optical couplers often called “ splitters“. TAP functionality can be quite rich and complex, so choosing a specific model can take a lot of time and effort, especially if you do not have enough experience and knowledge of what exactly to look for. But don't worry—I'm going to help with that in the current article. So first, let's look at what all TAPs have in common, regardless of type.
Disconnect/connect network
The tap must be installed in the gap of the physical link (unless we are talking about “virtual TAPs”, which some vendors develop for use in virtual environments, but this is more of a marketing name, to a greater or lesser extent). Installing in a gap means that you will have to endure at least one cycle of link interruption. In order to turn off TAR after capture, you will have to go through a second similar cycle. By the way, the second link break is one of the reasons why I constantly have to buy new couplers for myself: from time to time my clients prefer to just buy my TAP and leave it installed, without removing it at all after the end of the analysis. Thus, avoiding the need to break the link again (and at the same time gaining the opportunity for constant monitoring).
Advice: if you are on a team of network engineers designing data center, add TAP at the design stage and install initially– very often this is the only way to have a tap on a backbone link, because with a 100% guarantee no one will allow you to install it later, breaking such an important and busy link through which a lot of data constantly flows. The cost of TAP in this case will be orders of magnitude less than the cost of high-end switches and routers, and at the same time it will be very useful when troubleshooting is necessary. And if you choose a reliable, well-established brand, you won’t have to worry about an additional point of failure in the system - taps of this order have a redundant power supply, as well as protection in case of emergency power outage (automatic bypass mode). Nothing speaks volumes about the professionalism of a network engineering team to me more than when I see several professional taps on site already installed at the most critical points throughout the network.
Truth in packages
Using TAP is the only way to get a real picture of what is happening in the link. TAR excludes possibility of packet loss or manipulation in case an attacker has access to your network. Remember: a SPAN port can “hide” packets due to compromise or simply due to overload. Whereas absolutely impossible manipulate a passive full duplex splitter and almost impossible all other types of taps. Of course, it is worth noting that there are also “sophisticated” controlled taps with a web or CLI interface, and everything that is controlled can be manipulated. But – if you choose the right TAP type, no one will be able to hide their malicious packets from you. Therefore, the most skilled attackers try to either imitate normal, unsuspicious traffic, or hide in a huge number of packets so that it is more difficult to notice them in this mass.
Behavior during power outages
Taps that require power to operate (almost all “copper” taps, as well as more functional optical taps with link aggregation) usually have a protection mechanism at Layer 1 (physical layer) in case of power failure. This is something like a relay that closes when the power goes out and connects the link, bypassing the TAP (bypass mode is activated). You can even hear this kind of operation - a click - when you turn the TAP on/off using power.
 |
| Rice. 2 – Behavior during power failure |
The tap's response time to a power loss event typically takes less than a second. But still, this is a rather unpleasant fact, because it can cause the interruption of current sessions, as well as the start of some network convergence procedure. Still, at a minimum, this will ensure that the network returns to its original state without personnel intervention. Also keep in mind that without power, the TAP will no longer perform its primary function - and you will no longer see traffic on its monitor port. In this case, restoring power to the TAP will again cause a flap/resynchronization of the link.
Advice: if you need to reapply power to the copper tap, do so while service window at least 5 minutes long, because the production link may be “extinguished” for too long for some connections to survive.
The output (monitor) port is for transmission only!
The output links of the coupler are designed to be transmit-only, that is, they will not accept any packets as input. Therefore, the capture device (or indeed any other device that hangs on the monitor port) cannot transmit packets to the network, affecting other connections.
 |
| Rice. 3 – Dropping a packet on the monitor port |
Occasionally there is someone who wants TAP to have on board the function of injecting packets into the network. Most often this applies to the case when you have an IDS hanging on the monitor port, and you want to send RST packets from it as a response to suspicious connections. But this is not the best implementation option; in such a situation, it is better to install inline-IPS on the network.
Advice: Still, check whether your tap is receiving packets on the monitor port. Some vendors offer TAPs (or that's what they just call them) that do not discard incoming packets. This can be either as a separate function, or quietly, without informing you. In my opinion, this is either useless (IDS) or simply harmful (“Man on the side” / “Man in the middle” using constructed packages).
Full Duplex Taps
You may have already noticed that in Figure 1 the TAP is connected in a slightly different way than the SPAN port. You do not have one aggregated link, but two separate ones. Let's look again:
As you can see, packets in the direction PC -> switch are transmitted to one monitor port, and counter packets are transmitted to another. Such a coupler is called full duplex– each direction of communication is redirected to its own dedicated monitor port. Of course, this means on the capture device you will need two ports to get a complete dump. This has its advantages, but increases the price. (It’s worth noting that many switches can do the same with SPAN - redirect multidirectional traffic to different ports - approx. transl.)
Bandwidth at full duplex
Recording traffic for reception and transmission on two ports means that you will not experience link overload: if, for example, a gigabit link has a speed of 1 Gbit/s for reception and the same for transmission, and a total of 2 Gbit/s, TAP transmits via 1 Gbps through each port. Therefore, we can only get drops on the capture device itself.
Splitters
Splitters are optical couplers. They can operate without power at all, simply using optical elements like translucent mirrors in their design. And if you're worried about introducing an additional point of failure into your system, a splitter is the best solution.
Translucent mirrors reflect part of the signal from the optical cable towards the capture device, while the rest passes further to the recipient. This type of splitter does not require any electrical parts at all. Modern splitters can operate on links of different speeds - you do not need to buy a separate splitter for 1 Gbit/s capture and a separate one for 10 Gbit/s.
If you look at the splitter, you can see the characteristic "Split Ratio", that is, the ratio or separation factor. This is the percentage of the light signal that is reflected by the mirror. Typical parameter values – 70/30 And 50/50 , which means, respectively, 70% will go to the main link and 30% to the monitor port, or, for the second example, 50% to each of the ports. A word of warning: I've seen engineers who prefer to use 90/10 splitters for fear that too much signal will go to the monitor port and it will damage the main channel. And this can actually theoretically happen for long-distance channels. The 90/10 approach will eliminate such a development, but at the same time, the remaining 10% is almost always insufficient for the capture device and it cannot establish a connection. Personally, I prefer 70/30 splitters and so far I haven't had a single problem with them.
The next characteristic that you need to keep in mind is the type of optical connector of the splitter. There are quite a few types of them; the connectors on the splitter and on the capture card do not always match. The most common type now is the LC type, it is gradually replacing the older and bulkier SC type connectors.
Correct installation of a splitter can sometimes also be a problem - if you installed it, the main link went up and continued to work normally - this does not mean that you are already receiving a copy of the traffic on the monitor port. Because it is quite possible for the splitter to be installed incorrectly - so that the light will fall on the mirror from the back side and, accordingly, be reflected in the wrong direction. If this happens, disconnect the main link cable and swap RX/TX on both sides. Well, this also means that it is better to schedule these operations within a service window of at least 15 minutes duration. After all, unlike a copper TAP, which takes a minute to install, you may have to reconnect and check. And again, let's not forget about the classic warning - never look directly to the optical link to check the presence of a signal - the laser power is high enough to damage your eyesight!
Interestingly, the optical splitter, unlike the copper coupler, has three ports, not four. This is because it uses one physical port for both monitor channels:
 |
| Fig.6 – Diagram of copper and optical TAP ports |
You can use one regular optical cable for both monitor ports, just at the other end (capture device side) both connectors are connected to the card inputs, while the card outputs remain unused.
Packet out-of-order problem
If you are using a full duplex tap, the capture device must have 2 free network ports on one network card or two network cards. Then you will receive each of the monitor streams in a separate port, and after that there is a need to rebuild one of the two streams. This task is more difficult than it seems at first glance. Many people assume that two ordinary network cards will be enough, and there shouldn’t be any difficulties. But in reality, everything turns out somewhat differently. The problem is that two network cards in one PC do not always transmit captured packets to the capture software instantly:
 |
| Fig. 7 – Out of order of packets in NIC |
As you can see, network packets from the top card are transferred to the capture process faster than from the bottom one. This happens very often - after all, regular network cards that are used for basic network functionality are not initially designed to maintain micro- or nanosecond gaps between packets. The network stack will simply somehow sort them and transfer them directly to the capture/analysis software. The result can be annoying:
| Fig. 8 – Out of order packets in Wireshark |
Take a closer look: packet No. 2 is SYN, which arrived in the dump after SYN-ACK. Packet No. 3 contains “HTTP 200 OK”, which arrived before the handshake ended and before the GET request was sent. There is a negative time gap between some packets, which is a sure sign that the order of the packets in the dump is out of order.
For such a situation, there is an effective solution - use the command line utility reordercap.exe, which comes with Wireshark and is located in the installation folder:
Reordercap "Out of Order Sample.pcapng" "Out of Order Sample Reordered.pcapng" 12 frames, 3 out of order
The result will look like this:
If you want to immediately avoid all these troubles with the wrong order of packets, there is only one way: a professional FPGA multiport capture card that reassembles the stream on board before sending it further down the stack. This is exactly the path I use when capturing from a full duplex coupler. I have several capture devices, including a couple of old Network General S6040 19″ rackmount form factor, which can accommodate up to 4 full duplex capture cards. I'm going to look at these cards in more detail in one of my next posts.
TAP with stream aggregation
TAPs with aggregation are connected to the main link in the same way as full-duplex ones:
But, unlike full duplex couplers, they only have one monitor output port. That is, it is somewhat similar to a SPAN port - such a coupler will merge two streams into one before sending it to the capture card. The good aspects of this approach are the following: only one card is needed for capture and there is no need to think about the out-of-order packets - the TAP itself will take care of this.
But there are also problems with this approach. Of course, this is a problem of overloading the monitor output port. In general, again about the same 1Gbit/s for reception, the same amount for upload... You understand. To avoid this problem, you can use a TAP with an output port that has a higher speed than the sum of the input ports. In particular, there are TAPs that connect to a PC via USB3. At the input, they are connected in the same way as everyone else, and the output stream is transmitted via a USB3 cable (with a maximum transfer rate of 6 Gbit/s, which is quite enough for monitoring a full-duplex Gigabit link with a full load).
TAP with aggregation is technically much more complex than their full-duplex counterparts, which is why they are much more expensive and start from about 1000 euros. The simplest full-duplex TAPs can be found for a couple of hundred euros.
About cheap TAR
I'm pretty sure some of you are shaking your head when you see the approximate prices of taps, thinking - why is it so expensive? Well... It depends on what you want to get out of TAPs and where to use them. It is possible to find or build a coupler yourself for a few dollars, or buy an option with aggregation for a couple of hundred. The reason for such a low price is that in this case it can only be copper TAP and only limited to 100 Mbit/s. Also, such TAPs lack most of the functions. In my experience:
- they do not have a bypass mechanism in the event of a power failure, which limits their use (certainly should not be done in a data center);
- they allow packets to be injected into the network.
Since installing a TAP is adding a point of failure to the operational network, you need to be sure that there are protection mechanisms in place, such as a redundant power supply or bypass mode (or both).
Dec 19, 2011 By Henry Van Styn
in HOW-TOs
Packet capture is one of the most powerful ways to analyze network processes. You can learn a lot about what's happening on a network by intercepting and examining raw data flowing across network connections. Modern traffic analysis utilities allow you to capture, interpret and describe data streams in a human-readable style.
tcpdump is an essential traffic listening, or sniffing, tool, it provides many analysis capabilities and can even export interpreted packet fields to other programs.
If you think utilities like tcpdump are losing their value with the advent of graphical tools like Wireshark, think again. Wireshark is a great application, but it is not a universal tool for absolutely all situations. As a universal lightweight solution for various applications (such as the Unix tools cat, less and hexdump), tcpdump looks much cooler. And its most impressive feature is its ease of use. As a behavioral style, it follows an approximation of the "one line command" concept to obtain quick, one-step responses. In addition, it can be used within an ssh session without the need for graphics. By supporting command line syntax conventions (such as outputting a data stream to standard output that can be redirected), tcpdump can be used in all types of pipelines to build interesting and useful utilities.
In this article, I will look at some basic principles of using tcpdump and the basics of its syntax.
Basics
Before you become a master at using tcpdump, there are some fundamental concepts you should understand. Firstly, packet capture is a passive process; it does not change the traffic in any way and does not broadcast anything to the network from itself. Secondly, you can only capture packets that your system receives. If any two hosts exchange packets directly and that traffic bypasses your computer, you won't see anything, regardless of the monitoring tool. Third, you can only capture packets that are destined for your system unless the network interface is put in promiscuous mode.
Since it assumes that you are interested in more than just the packages for your system, tcpdump will put the first interface on the system (unless another is explicitly specified) into promiscuous mode automatically. This operation requires superuser privileges.
Anatomy of tcpdump commands
The tcpdump command consists of two parts: options and a filter expression (Figure 1).

Figure 1. Example tcpdump Command
The filter expression determines which packets to capture, and the options - which of them to show in the output; the options also determine the behavior of the utility.
Options
Tcpdump options follow standard command line conventions, so the option format is flag-value. Some flags have no parameter value because they are switches themselves. For example, -i is followed by the interface name, and -n disables name resolution through DNS.
The man page describes a lot of options, but there are a few that you can't do without:
I interface: the interface on which tcpdump will listen for traffic;
V, -vv, -vvv: output verbosity;
Q: quiet mode;
E: print link layer frame headers (Ethernet);
N: resolve domain names of hosts;
T: do not print timestamps;
N: do not resolve domain names of hosts;
S0 (or -s 0): maximum capture, entire packets are captured; in recent versions of tcpdump this is the default behavior.
None of the options are required. User-defined values only change the program's default behavior, which is to capture on the first interface and print packet information on a single line.
Filter Expressions
Filter expressions are Boolean criteria (yes/no) to evaluate whether a packet matches a pattern. All packets that do not meet the specified conditions are ignored.
The packet filter syntax is powerful and transparent. At the beginning it contains keywords called "primitives", which are different qualifiers for packets, these can be protocol, address, port or direction. They can be connected to each other in chains using operators and/or, grouped and combined by inheritance rules, sorted using negation.
Thanks to self-explanatory criteria names, filter expressions typically appear to be self-explanatory, making them fairly easy to construct and understand. The full syntax is described in the pcap-filter man page, and some examples are provided here:
ARP is a simple protocol, it is used to resolve IP addresses to MAC addresses of network cards. As you can see above, tcpdump describes these packets in a rather primitive manner. DNS packages, on the other hand, will be described slightly differently:
| IP 10.0.0.2.50435 > 10.0.0.1.53: 19+ A? linuxjournal.com. (34) IP 10.0.0.1.53 > 10.0.0.2.50435: 19 1/0/0 A 76.74.252.198 (50) |
This may not seem clear enough at first, but as you learn how the different layers of protocols work, it will make more sense. DNS is a much more complex protocol than ARP, but it also operates at a higher level. This means that the underlying protocol packets also appear in the output. Unlike ARP, which is not routed between different physical network segments, DNS is an Internet-wide protocol. The IP layer is used to route these packets; UDP is used for transport. This makes DNS a layer 5 protocol (IP is layer 3, UDP is layer 4).
UDP/IP layer information containing the source address and port is displayed on the left side of the line, and specific DNS information is displayed on the right. Although the syntax is quite condensed, it is sufficient to define the basic elements of DNS. The first packet is an address request for linuxjournal.com, the second packet is a response giving the address 76.74.252.198. This is a typical sequence for simple DNS queries.
See the "OUTPUT FORMAT" section of the tcpdump man page for a complete description of all protocol-dependent output formats. Some protocol packets are better visible in the output than others, but important information is usually easy to find.
Capture output to file
In addition to the usual mode with output to the console (standard output), tcpdump also supports a mode for writing output to a file. The mode is activated by the -w option, which specifies the path to the file.
When writing to a file, tcpdump uses a different format than when outputting to the screen. This is the so-called raw output; it does not perform primary analysis of the packet. These files can then be used in third-party programs such as Wireshark, because the format of the entries in the file follows the universal "pcap" format (such a file can be supplied to tcpdump input using the -r option). This feature allows us to capture packets on one machine and analyze them on another. For example, you have Wireshark on your laptop. You do not need to connect it to the network being analyzed in order to scan a previously captured file.
Analysis of TCP-based protocols
tcpdump is a packet analyzer, so it works well with packet-based protocols such as IP, UDP, DHCP, DNS, and ICMP. If there is a "stream", or a sequence of packets to establish a connection, tcpdump will not be able to directly analyze these streams and connection scenarios. Protocols such as HTTP, SMTP, and IMAP are much more like interactive applications from a networking perspective than "packet" protocols.
TCP handles all the low-level details required for communication sessions within session protocols transparently to the user. This is where flow-oriented data is encapsulated into packets (segments) that can then be sent over the network. All such details are hidden below the application layer. Therefore, additional steps are required to capture connection-oriented protocol packets. Since each TCP segment is a piece of application-level data, information about it cannot be used directly. For this to make sense, you need to completely reconstruct the TCP session (flow) from a sequence of individual packets. tcpdump does not have this feature. To analyze session protocols, you can use what I call the "string trick."
String trick
Usually, when capturing traffic, I mean the purpose of analyzing the causes of some errors. The data does not have to be perfect to view in order to understand the reasons for any incidents. In such cases, speed of understanding is more important than anything else. The next trick is one of my favorite tcpdump techniques. This works because:
TCP segments are usually in chronological order;
- text-based application protocols generate packets with a text load;
- the data surrounding the text load (for example, package headers) is not text;
- UNIX utilities can save text from application binary output;
- if you run tcpdump with the -w - option, it will generate raw information to standard output.
Putting everything together, we get a tool for capturing HTTP session data.
Additionally, you should be aware that the output may contain some garbage. The excess can be cut off using the strings utility option, which limits the length of the string output (see man strings).
This trick works quite well for any text based protocols.
HTTP and SMTP Analysis
The string trick from the previous section can help to capture HTTP session data, despite the lack of a built-in stream analyzer. The resulting data can be “analyzed” and then in many different ways.
For example, you might want to check the availability of all sites that have “davepc” in their name in real time. The following command, running on the firewall, will help (assuming the internal interface is eth1):
These are just two simple examples to illustrate the possibilities. You can go so far as to, for example, write a Perl script to analyze the received strings in more depth.
So the real power of tcpdump comes when you want to quickly get answers to some questions without much effort. This is especially important when debugging network applications.
Debugging routing and VPN connections
tcpdump can be a great help when debugging things like VPN connections. All you need is to understand on which hosts which packets appear and on which they do not.
Let's take a standard scheme for connecting two networks via a VPN connection. Networks 10.0.50.0/24 and 192.168.5.0/24 (Figure 2).

Figure 2. Example VPN Topology
If this works correctly, hosts on different networks should ping each other. If pings don't respond (in this case, let's assume they don't come from D to host A), we can use tcpdump to find out where things are being lost.
If the request packets go to host C (the remote gateway) but not to D, this indicates that the VPN connection itself is working, but there are routing problems. If host D receives requests but does not send responses, this may indicate that ICMP is blocked. If replies are sent but do not reach C, the default gateway may be configured incorrectly on D.


