Connecting an amplifier to speakers in a car. Simple tips for connecting an amplifier to speakers. The most interesting videos on Youtube
Shvetsov Alexey Vladimirovich 62000
Don't like it when car speakers start wheezing at high power? Doesn't your radio have enough power to listen to your favorite music? The answer is simple: “You need a car amplifier.
In this article we will look at the question: “How to connect an amplifier to speakers?”
One of the reasons to install a car amplifier is a subwoofer. It requires at least a 2 channel amplifier. In this case, the channels are combined in bridge mode, i.e. the right and left channels work together to drive one load - the subwoofer speaker.
The second reason is that I don’t like the wheezing of speakers at high power. Then, depending on the number of speakers, 2 or 4 channel amplifiers are used.

Using a five-channel amplifier will help you implement two options at the same time, although we will consider connecting a four-channel amplifier to speakers and a subwoofer.
Tip 1
Attention! Do not connect speakers and a subwoofer to a two-channel amplifier at the same time. Surely your amplifier protection will work, but the amplifier may burn out.
INSTALLATION OF THE AMPLIFIER is carried out in any convenient place - usually in the trunk or under the seat. The sound system is located in standard places, and the subwoofer is in the trunk.
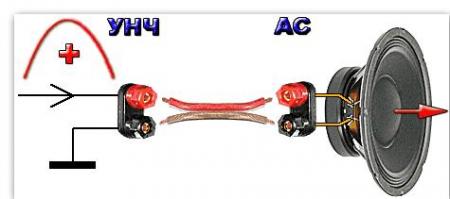
The speakers are connected to the amplifier using specialized speaker wires. The cores of an acoustic cable are usually of different colors, or one of them has an inscription.

Tip 2
Use a cable with a cross-section of at least 2.5 square meters. mm. Don't skimp on the price of the cable - a cheap Chinese speaker cable will most likely serve as a source of interference.
 |
alarmobninsk.ru | RUR 2,990 | |
 |
alarmobninsk.ru | 730 R |
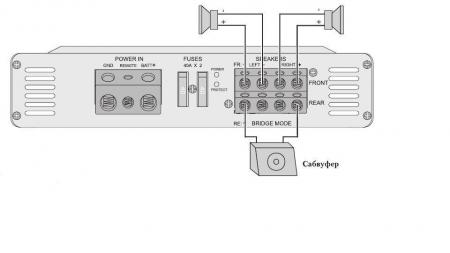
CONNECTING A 2 CHANNEL AMPLIFIER
A 2 channel amplifier is used for the following connection options:
- connecting two speakers
- subwoofer connection
Connecting the amplifier to the installed broadband speakers is carried out subject to certain requirements. To the amplifier, the speaker cable is connected to the Left and Right terminals of the speaker output of the system.
Tip 3
When connecting, be sure to observe polarity: the red wire (or marked) of the cable should be connected to the terminal marked “+” (usually red), and the black (unmarked) wire to the “-” terminal. On the acoustics side, the connection is made to the left (Left) and right (Right) speakers with mandatory polarity.

How to connect a subwoofer to a two-channel amplifier? Its connection is made as follows: the negative terminal of the subwoofer is connected to the “-” of the left channel, and the positive terminal to the “+” of the right channel. This is called “bridged” mode and the powers of each channel are added together.
CONNECTING A 4 CHANNEL AMPLIFIER
The 4 channel amplifier is used for the following connection options:
- 4 columns
- 2 speakers and subwoofer
- 2 subwoofers
If you have a 4-channel amplifier used to connect four speakers (front and rear), then they should be connected to the “front left and right” terminals (Front Left and Front Right and “rear left and right” (Rear Left and Rear Right).
If you want to connect a passive subwoofer along with the speakers, then it must be connected in the same way as described above to the terminals of the rear left and right speakers). Regular front speakers are connected to the Front Left and Front Right terminals.
When using a 4-channel amplifier, it is possible to connect two subwoofers. In this case, one subwoofer is connected to the Front terminals, and the second Rear (rear) in the same way.
 |
alarmobninsk.ru | RUB 12,740 | |
 |
alarmobninsk.ru | RUB 11,940 | |
 |
In this short article, we tried to present in the most accessible way possible the basic information about various types of professional speaker systems, methods of connecting them and calculating the power of the amplifier based on the power of the speaker.
Based on the connection method, acoustics are divided into transformer and low-impedance.
Transformer acoustics
Transformer acoustics is intended for objects where very good sound quality is not required, since the quality is lower than low-impedance. The main feature of this type of acoustics is the ability to connect acoustics on one line, one after another. This creates a parallel connection, allowing you to make fairly long lines with a large number of speakers.
Advantages of transformer acoustics:- the ability to make long chains of speakers by connecting a large number of speakers on one line
- ease of connection and saving on cables due to this switching option
- costs less than its low-impedance analogues
- The drop in signal power on the transformer line is significantly less
- quality is worse than low-impedance
- transformer speaker line is always a mono signal
How to identify a transformer column
Example of a column description:
Ceiling speaker system with transformer. Power: 5-10 (100V); frequency range: 78Hz-19kHz; weight: 0.9 kg.
Sign:
The description of transformer acoustics always indicates its operating voltage. Transformer speakers can operate at different voltages, but the most common is 100 Volts. Therefore, a chain of columns is often called " hundred-volt line".
How to identify a transformer amplifier
An example of an amplifier description:
Bittner Audio XV200
Power amplifier: 2 x 100 W / 100 V; class AB; ground fault detection; sequential inclusion; 15 kg; 2U.
Sign:
The description of the amplifier for transformer acoustics again indicates the operating voltage

Power calculation rule for transformer acoustics
Total total speaker power should be less amplifier power.
Example of amplifier power calculation:
To connect 20 CS6/T speakers, the power of each of which is 10 watts, an amplifier of at least 20 pcs * 10 watts = 200 watts is required. Thus, the Bittner Audio XV200 amplifier is suitable for these purposes.
Audio cables for transformer acoustics
Transformer speakers are connected with a standard speaker cable, for example, such as:
- Tasker C275
- Tasker С102-1.50
- Tasker С102-2.50
- Tasker C192
Low impedance acoustics
Low impedance acoustics is divided into two main categories: active and passive speakers.
Advantages of low-impedance acoustics:
- higher sound quality
- more options for colors, types, shapes. For example, all options for household acoustics are low-impedance.
Disadvantages of low-impedance acoustics:
- you can't actually make long transmission lines
- You cannot connect a large number of speakers in one line
Active speakers:
Active speakers do not require an additional amplifier, since it is already built into the speakers themselves. Perhaps the main disadvantage of active acoustics is the need to supply not only an audio signal, but also electricity to the speaker. In most cases, an active speaker has several input options, thereby allowing you to connect signals of various formats.
An example of an active column description:
Active speaker system; 2x6" speakers + 1" neodymium tweeter with titanium diaphragm; class "D" amplifier power: 200 + 30W; frequency range: 65Hz-20kHz; dimensions: 53.2x25x26cm; weight: 9.5 kg
Sign:
The description usually indicates the type of built-in amplifier. In this description you can see that this speaker has a built-in class “D” amplifier with a power of 200 + 30 watts. The first number represents the power for mid and low frequencies, and the second number represents the power for reproducing high frequencies.
Passive speakers:
Passive speakers, unlike active ones, do not have a built-in amplifier. They have different internal resistance options, the most common of which are 4 and 8 ohms. It is the characteristic of the internal resistance of the speaker that plays the main role in choosing a suitable amplifier.
The vast majority of amplifiers for connecting such acoustics are stereo/two-channel, i.e. you can connect 2 speakers or two pairs of speakers to the amplifier.
Example of a description of a passive speaker:
Passive speaker system; 10" speaker + 1.4" driver; power: 500 W; resistance: 8 ohms; frequency range: 52Hz-18kHz; Max. sound pressure 125 dB; weight: 16.3 kg.
Sign:
The description always indicates the internal resistance of the speaker. This description shows that this speaker has an internal resistance of 8 ohms and a power of 500 watts.
I always want to take music with me. The car is no exception. However, I want to not only take it, but also in a way that makes it pleasant to listen to. Standard acoustic systems installed in cars, in most cases, do not produce what is required. In order to boost your car acoustically, an additional system is installed, which includes an amplifier and an expanded circuit of multi-frequency speakers.
Types of car amplifiers
- Two-channel amplifier. This device is designed to provide sound to two speakers (front or rear) and a subwoofer. It is very rare that channels are divided into four speakers.
- The amplifier is a four-channel type. Can provide sound from four speakers or two speakers and a subwoofer.
Important! When connecting two speakers per channel and a subwoofer on another channel, it is very difficult to achieve clear sound.

- Five-channel amplifier. You can connect four speakers and a subwoofer to it. Each element connects to its own channel. The disadvantage of such a device is that most of the amplifier's power goes to the subwoofer, as a result of which the sound will be uneven. Low frequencies will go off scale if there is a lack of high frequencies.
- A monoblock is a device designed to amplify sound going only to a subwoofer.
Factors Affecting Amplifier Installation
– the device should not interfere with the driver and passengers, should not spoil the interior and should not take up much functional space;
– the amplifier must be screwed to the car body, and not to moving parts;
– the device must be well cooled, i.e. it should be located in a large space, and not in a small box;
– wiring should be simple. The wiring of the speaker system must be in a separate harness from the main wires of the car.
Interesting! If you connect all the wires into one harness (main and music), then when the car is started, noise will be heard in the speakers.
Amplifier installation locations

- Under one of the front seats. Pros: close to the power source, radio; does not occupy functional space. Cons: overheats, inconvenient to install speaker wires.
- Under the back seat. Pros: does not take up useful space, does not overheat. Cons: as a rule, there is little space, and, consequently, low power of the device; far from the radio and power supply.
- Under the trunk lid. Pros: a lot of space for placement (you can install any device of any power), excellent ventilation, does not take up useful space, does not interfere. Cons: if the trunk shelf is very thin or flimsy, then the amplifier can create extraneous sounds, loosen the shelf, and the connectors in it can also become loose; If the amplifier is designed to power not only a subwoofer, but also speakers, then it is very inconvenient to do the wiring.
- Place it on one side of the trunk. Pros: convenient installation, does not take up much functional space, convenient connection, you can install several amplifiers, good cooling of the device. Cons: far from all devices.
- On the trunk lid. They don’t take up space, good ventilation, easy connection, beautiful. Cons: possible loosening of the device and the trunk lid itself, possible short circuits of wires in places of kinks, far from all devices.
- On the back of the rear seats. Pros: plenty of space for installation, good cooling, convenient installation, ability to route wiring in detail on different sides of the machine, powerful mount, does not take up functional space. Cons: wires may break if the backrests are folded frequently, far from the sources.
- On the wall of the subwoofer. Pros: close to acoustics, does not take up extra space, installation and dismantling is simple, powerful cooling. Cons: strong vibration of the sound source can damage the amplifier.
Selecting wires to connect the amplifier
Now let's look at how to connect an amplifier in a car. Nowadays there are entire kits for connecting acoustics on sale. However, the quality of the wires in the kits is rather questionable. The best option is to purchase special speaker wires.
Important! Household wires are not suitable for connecting the speaker system.
For the rear and front speakers, a PVA cable with a cross-section of 2x2.5 mm is suitable, for high-frequency (tweeters) a wire with a cross-section of 2x1.5 mm is suitable, for a subwoofer 2x4 mm.
Important! Rule: the longer the conductor, the thicker it should be.
The amplifier is powered from the battery using wires of type KG-25 or 35.
Amplifier connectors

+12V connector – it is supplied with power from the battery. A fuse must be installed between the battery and the amplifier.
REM – control connector, designed to create a connection with the radio. The equipment through this wire will turn on and off along with the radio.
GBD – mass connector. The wire should be as short and thick as possible.
Line connectors – designed to connect speakers and a subwoofer. The subwoofer can be connected as a bridge into two linear connectors: the minus of the subwoofer is connected to the minus of one connector, and the plus of the subwoofer is connected to the plus of the second connector. We connect the remaining “+” and “-” in the connectors (you must read the instructions, since this operation is not required for all devices).
RCA (tulips) – for connecting the head unit.
Do-it-yourself installation of an amplifier in a car
And now about how to install the amplifier in the car.
- We fasten the amplifier with self-tapping screws or bolts in the selected location.
- The next step is to connect the amplifier to the radio. If the device is four-channel, then two interconnect wires are required, if it is two-channel, then one wire is needed.
- After this, the amplifier is connected to a power source. The mass can be found on the machine body.
- We connect the control wire.
- It is recommended to install a capacitor between the battery amplifier. It will prevent battery discharge and equipment failure.
- Then we connect all the speakers and the subwoofer to the device. When connecting, observe the polarity, and also ensure that the wires are securely fastened, as vibrations cause them to move away and contact is lost.
Setting up the amplifier
Traditionally, several settings are used.
The sensitivity on the amplifier is designated as Level, possibly Gain.
LowFrequency (LPF) – low pass filter. This adjustment allows you to cut off as much of the subwoofer's low frequencies as possible.
HighFrequency (HPF) – cuts off the low end of high frequencies. Designed to adjust high and mid frequency speakers.
Crossover or x-over is a switch between high-pass and low-pass filters.
Setting option:
- Turn the sensitivity to minimum.
- On the radio, set the volume to maximum or almost maximum. Until distortion begins to appear in the sound. Now we begin to rotate the sensitivity control on the amplifier until significant sound distortion is heard. Turn it to a slightly lower level and leave it.
- Reduce the volume on the radio.
This kind of simple theoretical knowledge will help you choose a good amplifier and correctly place it in the cabin.
Video on how to connect an amplifier to a car
Every lover of high-quality sound in a car is well aware that the power of the standard radio is not enough to achieve truly clear and powerful sound. Even if you choose an expensive branded radio, powerful front and rear speakers, and a subwoofer, you certainly cannot do without an additional power amplifier.
Differences between installing an amplifier in a car and at home
At home, we connect acoustics of any power to the sound source and practically do not think about the arrangement of wires and the placement of the amplifier itself. In the case of a car, everything is completely different. When installing an amplifying device in a car, it is important to take care of laying the wire so that it does not break or short out. This applies to both power cables and speaker cables.
The placement of the amplifier itself must be accessible enough to control and configure it. The usual options are mounting in the trunk, on the rear parcel shelf or under the driver's seat. By the way, do not forget that in no case should you try to immediately get high-quality sound from a newly purchased amplifier and acoustics. To work properly, these devices need time to reach alignment.
This connection method is also suitable for a combined installation, when the amplifier is used only for rear and front speakers and is connected via four channels to the car radio. By the way, amplifiers attached to the subwoofer housing (active subwoofer speakers) are considered to be very unreliable, since constant vibrations burn out the main board, and replacing it is equivalent to buying a new amplifier. Therefore, the classic version of separate connection is preferable.
You should also pay attention to the power of the amplifier. The optimal option is 50-80 watts for speakers and about 200 watts for a subwoofer. If you see an amplifier labeled, for example, 5000 watts, then you can rest assured that this is nothing more than a marketing ploy. Most likely, the power of such an amplifier will not exceed 60 watts.
How to properly connect a car amplifier in a car
After choosing a place to install the amplifier, you need to select the power cables to power it. In order to choose the right cable, you need to perform a simple calculation to determine the wire cross-section.
To do this, the current consumed by the amplifier is calculated using the formula I=P/U. Where P is the total power of the amplifier, U is the voltage of the vehicle’s on-board network. For example, you have a 4-channel amplifier of 50 W each. 4×50=200 W. To this figure you must add 30% for losses and a power reserve of 60 W. In total we get 260 W. The voltage of the on-board network is 12 V. The current strength in the amplifier power circuit is I = 260/12 = 21.7 A. Using table 1, we select the cross-section of the copper wire according to the current.
Table 1
| Wire cross-section, mm2 | Current, A. For wires and cables with copper conductors |
| 0,5 | 7 |
| 0,75 | 11 |
| 1 | 15 |
| 1,5 | 23 |
| 2,5 | 30 |
| 4 | 41 |
| 6 | 50 |
| 10 | 80 |
| 16 | 100 |
| 25 | 140 |
| 35 | 170 |
We select the closest value of 23 A, according to which the cross-section of the wire to power the amplifier must be at least 1.5 mm2. The wire must be stranded copper and in high-quality insulation.
The amplifier's power is connected directly to the battery through a special fuse, the rating of which must correspond to the design current. The battery is located under the hood, and the amplifier is usually in the trunk, so the wires will need 5-6 meters. The wire should be laid in a flexible corrugated pipe to prevent a short to ground. The wire must be passed through the wall of the engine compartment through a special adapter, which prevents chafing of the wire insulation as a result of inevitable vibration. We connect the laid power cable to the positive terminal of the battery through the fuse and to the corresponding + terminal of the amplifier. The negative terminal of the amplifier is “grounded” using a cable of the same cross-section.
The next step will be to lay the signal cable from the radio to the amplifier. When choosing an interconnect cable, we advise you not to save money and purchase high-quality wire, and quality is never cheap. When purchasing an interconnect cable, make sure that it has a built-in amplifier control wire. When laying the interconnect, you should pay attention that this cable should NEVER be laid next to the power cable, as this can cause extraneous noise and interference, which is incompatible with the high-quality sound for which all this work was undertaken.
The final step is to lay the speaker wires from the amplifier to the speakers. Difficulties may arise when laying wires to speakers located in the car doors. Sometimes manufacturers do not leave reserve terminals in door adapters, and in this case it is necessary to drill additional holes for acoustic cable channels and place additional rubber couplings in the door posts.
What should I do if I hear extraneous noise through my speakers?
If you hear background noise, wheezing or crackling through the speakers, this is a signal that the acoustics are connected incorrectly. Most likely, the audio cable is of poor quality, the contacts are not securely fastened, or there is a short to ground. The interconnect signal cable should be selected with a sufficiently large cross-section. In this case, you need to pay attention to its insulation.
Now on the car audio equipment market there is a wide selection of wires with an additional noise-reducing screen made of various materials. This cable will save you from unnecessary background. By the way, the cable should be laid away from other wires. If the main bundle of electrical wiring, including the power cable of the amplifier, is laid on the left side of the cabin, then it would be optimal to run the signal wire either on the right side of the cabin or in the center. This will reduce the risk of “catch” interference from the power supply.
The signal cable is RCA type on the radio side and a stripped wire to the amplifier. When connecting, it is important that the audio input and output devices are not active, otherwise there is a risk of burning the output board of the radio or short-circuiting the amplifier.
In car audio stores you can find wires with a noise-reducing screen.
Carefully check that the wire is securely fastened to the amplifier terminals, as loose contact will lead to unnecessary noise. There is also a possibility of the cable insulation overheating and melting.
Connecting the amplifier to the battery via a relay
You should also pay attention to the fact that the amplifier must be connected directly to the battery. Options through the cigarette lighter or ignition switch are fraught with malfunctions or even failure of the amplifier. In this case, another nuance arises.
Many amplifiers are constantly in operation, and in order not to drain the battery, there is a terminal for connecting the power button in the amplifier power connection unit. The wire from this terminal is connected to a special cable on the radio. As a rule, this is a blue wire marked “Remote”.
In the original, the amplifier power connection diagram is as follows: the positive cable passes through the fuse and capacitor to the positive terminal of the amplifying device, the mass of the capacitor and amplifier is connected to the car body. Very often you can find an option without using a capacitor, but it is only applicable when connecting low-power amplifiers. Otherwise, a high-power amplifier without a capacitor will begin to “choke” and constantly turn off, thereby draining the battery.
Amplifier classes
When choosing a car amplifier, you should also pay attention to the classes of amplifiers. This parameter indicates how much electricity the device will consume, how much it will heat up, and how much extra noise will appear in the sound after amplification.
There are four classes of amplifiers:
- class A - excellent noise reduction, but high energy consumption and high heat generation;
- class B - consumes little energy, practically does not heat up, but has a lot of sound distortion;
- class AB - something between the first and second, low power consumption, thermal stability and quite little distortion in sound, this class is most often found in cars;
- class D is a “digital” version of sound amplification, has almost no distortion, does not heat up and consumes little energy.
Having connected all the components, we move on to setting up the sound. We turn the volume of the radio up to about 70%, and set the volume of the amplifier to zero. Next, with the sound turned on, we begin to increase the volume of the amplifier until wheezing appears in the speakers. Next, we slightly reduce the sound on the amplifier, turn on the filters and move on to adjusting the sound quality.
Never turn the amplifier's volume control to maximum; this will cause the power supply to overheat, resulting in sound distortion and burnout of the power supply. Next, we adjust the equalizer on the radio according to our preferences, achieving clear readability of the “middle” without losing the quality of the upper and lower frequencies.
Here you should rely only on your own hearing. It is worth noting that different musical compositions have different recording quality, so on the same setting, the sound of two different tracks can differ significantly from each other. That is why it is important to catch the “golden mean”. The sound adjustment itself should be carried out using the example of a composition of sufficiently high quality without dips in the mid frequencies and cutting off the “bass”.
Well, and the last thing is improving the sound. Sealing and gluing of all “rattling” parts of the car body and interior. They are the ones who can ruin all the pleasant sensations from listening to music in your “iron horse”. If the subwoofer is located under the rear shelf in the trunk, then it should be reinforced with a layer of plywood or chipboard. Plastic panels and linings can be glued with a layer of sound insulation or, in order to save money, thick double tape will do. A license plate can also add unpleasant noise.
By the way, most often, while outside the car, the owner hears a rattling sound every time the subwoofer hits. This vibrates the license plate and creates that unpleasant noise. To avoid such trouble, under the state plate. numbers, you can put a layer of foam rubber or rubber. After which the number is firmly pulled through with bolts and you can forget about the rattling of the number.
- News
- Workshop
Prices announced for the sports version of the Volkswagen Polo sedan
A car equipped with a 1.4-liter 125-horsepower engine will be offered at a price starting from 819,900 rubles for the version with a 6-speed manual transmission. In addition to the 6-speed manual, a version equipped with a 7-speed DSG robot will also be available to customers. For such a Volkswagen Polo GT they will ask from 889,900 rubles. As Auto Mail.Ru has already said, from a regular sedan...
The Prosecutor General's Office began checking car lawyers
According to the Prosecutor General's Office, in Russia there has been a sharp increase in the number of trials conducted by “unscrupulous auto lawyers” who work “not to protect the rights of citizens, but to extract excess profits.” According to Vedomosti, the department sent information about this to law enforcement agencies, the Central Bank and the Russian Union of Auto Insurers. The Prosecutor General's Office explains that intermediaries take advantage of the lack of due diligence...
Tesla crossover owners complained about the build quality
According to motorists, problems arise with opening doors and power windows. The Wall Street Journal reported this in its article. The cost of the Tesla Model X is about $138,000, but according to the first owners, the quality of the crossover leaves much to be desired. For example, several owners had their upward opening...
Traffic jams in Moscow will be warned a week in advance
The center’s specialists took this measure because of work in the center of Moscow under the “My Street” program, reports the Official Portal of the Mayor and the Government of the capital. The data center is already analyzing traffic flows in the Central Administrative District. At the moment, there are difficulties on the roads in the center, including on Tverskaya Street, Boulevard and Garden Rings and Novy Arbat. The press service of the department...
Volkswagen Touareg review reaches Russia
As stated in the official statement of Rosstandart, the reason for the recall was the possibility of loosening of the locking ring on the support bracket of the pedal mechanism. Previously, Volkswagen announced the recall of 391 thousand Tuaregs worldwide for the same reason. As Rosstandart explains, as part of the recall campaign in Russia, all cars will have...
You can pay for parking in Moscow with a Troika card
Troika plastic cards, used to pay for public transport, will receive a useful feature for motorists this summer. With their help, you can pay for parking in the paid parking zone. For this purpose, parking meters are equipped with a special module for communication with the Moscow Metro transport transaction processing center. The system will be able to check whether there are enough funds on the balance...
Mercedes will release a mini-Gelendevagen: new details
The new model, designed to become an alternative to the elegant Mercedes-Benz GLA, will receive a brutal appearance in the style of the “Gelendevagen” - Mercedes-Benz G-Class. The German publication Auto Bild managed to find out new details about this model. So, if you believe insider information, the Mercedes-Benz GLB will have an angular design. On the other hand, complete...
The regions of Russia with the oldest cars are named
At the same time, the youngest vehicle fleet is in the Republic of Tatarstan (average age is 9.3 years), and the oldest is in the Kamchatka Territory (20.9 years). The analytical agency Autostat provides such data in its study. As it turned out, besides Tatarstan, only in two Russian regions the average age of passenger cars is less...
Limousine for the President: more details revealed
The Federal Patent Service website continues to be the only open source of information about the “car for the president.” First, NAMI patented industrial models of two cars - a limousine and a crossover, which are part of the “Cortege” project. Then our people registered an industrial design called “Car Dashboard” (most likely...
GMC SUV turned into a sports car
Hennessey Performance has always been famous for its ability to generously add additional horses to a “pumped up” car, but this time the Americans were clearly being modest. The GMC Yukon Denali could turn into a real monster, fortunately, the 6.2-liter “eight” allows this to be done, but Hennessey’s engine engineers limited themselves to a rather modest “bonus”, increasing the engine power...
WHAT do you need to know to take out a car loan?, how long to take out a car loan.
What do you need to know to take out a car loan? Buying a car, especially with credit funds, is far from the cheapest pleasure. In addition to the principal amount of the loan, which reaches several hundred thousand rubles, you also have to pay interest to the bank, and considerable interest at that. To the list...
Central figures Local traffic cops show no reaction to the new Golf. According to observations, they much prefer the flashy Honda (apparently rare in Ukraine). In addition, the traditional proportions of Volkswagen hide the updated body platform so well that it is difficult for the average person...
The most expensive cars in the world
Of course, any person has at least once wondered what the most expensive car in the world is. And even without receiving an answer, I could only imagine what the most expensive car in the world was. Perhaps some people think it is powerful,...
What cars are stolen most often?
Unfortunately, the number of stolen cars in Russia does not decrease over time, only the brands of stolen cars change. It is difficult to accurately determine the list of the most stolen cars, since each insurance company or statistical bureau has its own information. Accurate data from the traffic police about what...
Which sedan to choose: Almera, Polo Sedan or Solaris
In their myths, the ancient Greeks talked about a creature with the head of a lion, the body of a goat and a snake instead of a tail. “The Winged Chimera was born as a tiny creature. At the same time, she sparkled with the beauty of Argus and horrified with the ugliness of Satyr. It was the monster of monsters." The word...
A car enthusiast is a person who spends a lot of time driving his car. After all, in order to ensure the necessary comfort in the car, as well as traffic safety, you need to put a lot of effort into caring for the car. If you want to please your friend...
The structure and design of the car rack
No matter how expensive and modern the car is, the convenience and comfort of movement primarily depends on the performance of the suspension on it. This is especially acute on domestic roads. It's no secret that the most important part of the suspension responsible for comfort is the shock absorber. ...
HOW to choose a car, Buying and selling.
How to choose a car Today the market offers buyers a huge selection of cars, which simply makes their eyes wide open. Therefore, before buying a car, there are many important points to consider. As a result, having decided what exactly you want, you can choose a car that will...
- Discussion
- In contact with
In this short article we will look at the main features of connecting broadcast amplifiers and loudspeakers. We will not describe “Why”, we will not give formulas for calculating connections, we will simply describe “How”.
Broadcasting equipment is fundamentally different from the equipment that we are used to using at home or from professional concert or club systems. The main feature of broadcast systems is the use of a matching transformer in the amplifier, which outputs a signal with a level of 100V into the line (in some cases it can be 30V, 240V, but we will consider these cases separately). This voltage allows (unlike home or professional amplifiers) to carry out long broadcast lines up to hundreds of meters (possibly up to about 1 km, but subject to the selection of a suitable cable). Loudspeakers that are used in conjunction with broadcast amplifiers must also contain a step-down transformer and have a corresponding input voltage of 100V (30 or 240V in some cases, respectively). It is important to remember that the total power of the connected broadcast speakers should not exceed the power of the amplifier (unlike professional speaker systems and amplifiers, where the opposite rule is recommended). Unlike professional equipment, where connecting several speaker systems to one amplifier can cause certain difficulties (series-parallel connection circuit), broadcast technology saves us from such difficulties. In the diagram below, you can see the general principle of connecting broadcast speakers to ROXTON / / / / / amplifiers and the / / / series line. This connection diagram is quite relevant for equipment from other manufacturers.
The general connection diagram for a 100V broadcast amplifier looks something like this:
Connecting 100V broadcast speakers to the output of a 70V amplifier.
Most 100V broadcast amplifiers, in addition to the main 100V output in the speaker line, also have a 70V output. When connecting speakers to this output, their power is halved, but the maximum number of connected speakers can also be doubled. For example, to a 30 W amplifier you can connect no more than 3 speakers with a power of 10 W per 100 V output. At the 70V output of the amplifier it is possible to connect 6 10W loudspeakers.

Connecting broadcast speakers to multi-zone amplifiers.
Multi-zone amplifiers ROXTON series / / / / / , series / / as well as combined public address systems SX-240/480 allow you to connect several loops of speaker systems to organize multi-zone broadcasting at a facility. Connection is made using separate cables to numbered pairs of terminals. These amplifiers also have a common output of 100V, 70V and 4 Ohms, which are used when there is no need to divide the enterprise territory into separate broadcast zones. In this case, the corresponding common output of the amplifier is used.
Is it possible to connect broadcast amplifiers from one manufacturer to loudspeakers from another manufacturer?
Of course you can. But it is important to take into account that the output voltage of the amplifier and the input voltage of the speakers match. The most common equipment in this market segment is 100V equipment (both amplifiers and loudspeakers), but 30V, 120V and 240V systems can be used .
If you connect 30V speakers to a 100V amplifier, nothing good will happen and we categorically do not advise doing this (although it should be noted that there have been cases of similar use of technology, but they require extreme care and we will not talk about such experiments, so as not to introduce temptation to do so). You can safely connect 100V speakers to an amplifier with an output voltage of 30V, but the loss of power (actually volume) will be completely unacceptable. A combination of 100V amplifiers and 120V speakers is acceptable, there will be some loss of power. 120V amplifiers and 100V speakers will, in principle, work, but we strongly do not recommend using such a circuit.
Connecting broadcast speakers.
Here we will focus only on 100V speaker connection diagrams. You can see which amplifier outputs you need to use to connect broadcast acoustics in the diagrams above. As a rule, this is the “0” terminal (in some cases designated as “COM”) and the “100V” terminal.
In the picture below we see a loudspeaker nameplate (for example). In addition to indicating the model, input voltage and rated power, there are three more inscriptions indicating the colors and purpose of the wires coming from the speaker.
- BLUE: COM (i.e. the blue wire is common, it is always connected to the amplifier terminal “0” or “COM”)
- RED: 20 W (i.e. the red wire is used to connect a speaker with a power of 20 W, this wire is connected to the 100V amplifier terminal)
- YELLOW: 10 W (i.e. the yellow wire is used to connect a speaker with a power of 10 W, this wire is connected to the 100V amplifier terminal)
Connecting a 20 W speaker.

Connecting a 10 W speaker.
In some cases, instead of wires, terminal blocks labeled in the same way are used (for example, COM; 10 W; 5 W; 2.5 W), in this case the connection is even simpler, we connect 0 (COM) on the amplifier with 0 (COM) on the speaker, and connect the 100V terminal of the amplifier to the selected power to which you need to connect the speaker.
The circuit is very simple, when only two wires come out of the loudspeaker (or there is one block with two terminals), and a signed switch is installed on the loudspeaker body, which allows you to simply set the regulator to the desired position, to the desired power.
How to connect a loudspeaker if the power values are not indicated, but only the resistances of the loudspeaker taps are indicated.
Indeed, in some types of speaker systems the possible power connected to a specific outlet is not indicated. If everything is clear with the “common” tap (“COM” or “0”), then other taps, as in the picture below, can be indicated by different resistances.
In example 1 (horn loudspeaker Inter-M HS-20, 20/10W) we see a common tap “COM” - black wire (BLACK), as well as several resistances - 8 Ohms (RED), 500 Ohms (WHITE) and 1 kOhm (GREEN). The 8 Ohm tap (RED) is intended only for connection to low-impedance amplifier outputs and is rarely used in broadcast technology. If you see the designation of a 4 or 8 Ohm speaker tap, then you can immediately forget about it; the use of this tap is possible only if the power amplifier itself is not broadcast and has only low-impedance outputs. (the same can be said, by the way, about the outputs of broadcast amplifiers 100V 4-8-16 Ohm, these outputs are used in the opposite situation, when for one reason or another it is necessary to connect household, professional or any other speaker systems with an input impedance to the broadcast amplifier 4-8 Ohm). There are two taps left - 500 Ohm (WHITE) and 1 kOhm (GREEN). The rule in this case is simple: the lower the resistance to which you connect, the more power the speaker produces. In this example, we considered the HS-20 loudspeaker with a power of 20 and 10 W. When connected to 500 Ohms, the speaker will “play” at 20 W, when connected to 1 kOhm it will output 10 W. There are formulas for calculating the ratio of resistance and power that we will not give in this article. You can just remember: the lower the resistance to which you connect the loudspeaker (ignore 8 ohms at all!), the more power it will operate.
In example 2, we showed the designations for the CS-810 loudspeaker with a power of 10 and 5 W. To connect a speaker system at full power (10 W), we connect the “COM” and 1 kOhm terminals; to connect a speaker at half power (5 W), we use the “COM” and 2 kOhm terminals.
Identical loudspeakers in one broadcast line can be connected to different powers. For example, some of the acoustics can be turned on at full power, some at half and some at a third. It is also possible to connect different types of speaker systems (including different manufacturers) to one broadcast line. To calculate the load on a given broadcast line, you simply need to add up all the values of the connected power at each speaker in the line.
How many speakers can be connected to the broadcast amplifier?
The rule is simple. The total power of the speaker systems should not exceed the power of the amplifier. It is advisable to even leave some reserve. Therefore, when selecting a broadcast amplifier, it is necessary to take into account the possibility of expanding the system. If you bought 12 speakers with a power of 10 W each and an amplifier with a power of 120 W, then there is no reserve left for connecting additional acoustics (unless you reconnect all the speakers at part of the power).
We also note an important point: some multi-zone amplifiers do not allow, for example, connecting to a separate zone a power that exceeds the approximate power of the amplifier itself, divided by the number of zones. For example, the JPA-1120A amplifier with a selector for 5 broadcast zones does not allow connecting more than 25 W to each broadcast zone. In this case, despite the fact that the total power of the loudspeakers may be significantly lower than the power of the amplifier itself, if you need to connect a load of 50 W to a separate broadcast zone (for example), you must either buy an amplifier that allows you to turn on such a load on a separate broadcast zone or in various ways (sometimes costly, sometimes inconvenient) to solve this problem.
All ROXTON amplifiers that are presented on our website allow you to supply at least all the connected power to a separate broadcast zone, so the above nuance has nothing to do with them.
Is it possible to use the 100V output of the amplifier and the 8 Ohm output at the same time?
No. It is forbidden.
Which cable to use to connect broadcast speakers and amplifiers.
Special speaker cable (used in professional audio) should not be used. As a rule, radio broadcast systems are laid with ordinary electrical wire with a cross-section of 0.75 mm and higher (ShVVP-2*0.75, any PVA, etc.). The longer the broadcast line is, the larger the cross-section of the cable should be used.
You can use this formula to calculate the cable cross-section:
Minimum cross-section = 0.08 * (line length) * (total speaker power in the line) / 10,000
For 100V systems, the limit is a distance of about 1 km, while the cost of cable for laying the network over such distances can significantly increase the cost of the system itself. When building fire warning systems, it is advisable to use special fire-resistant cables, the brand of which will be advised to you by the specialists of our company.


